OpenWRT + Asus WL 520GU + Iptables. Separate LAN, DMZ and Internet
Hello!
Recently there was a need to hide some service in the DMZ. This service is spinning in W2K3, and I didn’t want the Windows OS machine to look at the Internet and the local network in any way unprotected (the “Windows” firewalls just go through the forest).
Remembering the successful experience with Asus WL 520GU and DD-WRT, I decided to go along the beaten track, but chose OpenWRT as the firmware for the router.
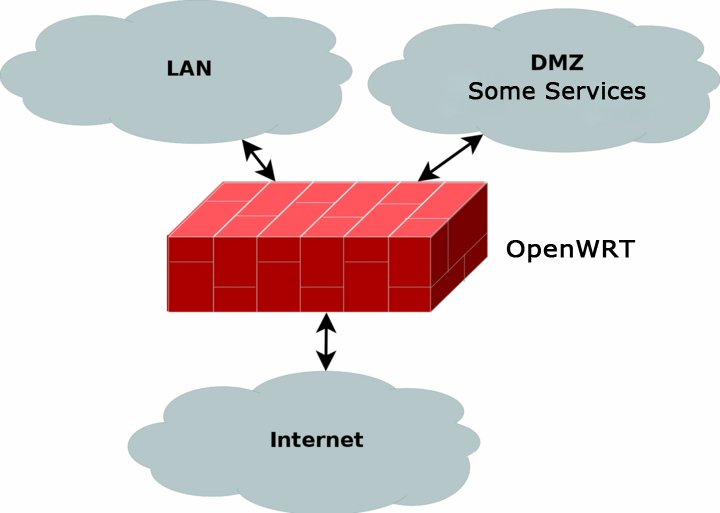
The ligament operation scheme can be seen in the figure.
So, let's get down to business from words.
Some misunderstanding of the term DMZ was noted in the comments.
In this connection, I will give a quote from Wikipedia . (For opponents of such citation, I can note that this material is almost identical to what is written in the bookA complete guide to Cisco )
DMZ (demilitarized zone, DMZ) is a technology for securing the information perimeter, in which servers responding to requests from an external network are located in a special network segment (which is called DMZ) and are limited in access to the main network segments with using a firewall (firewall), in order to minimize damage, when hacking one of the public services located in the DMZ.
For the model I have chosen, firmware backfire.brcm47xx is required 1.
We will perform a hardware reset, the so-called 30/30/30.
When the power of the router is on, press the reset button, hold for 30 seconds, without releasing the button, turn off the power and hold for another 30 seconds, without releasing the button, turn on the power and hold the reset button again for 30 seconds.
Hint: the default ip of the router is 192.168.1.1. If you “ping” it before a hardware reset 30/30/30 then ttl will be 64, after resetting ttl becomes equal to 100.
Now we send the firmware to the router using the following command.
After the message flicker, wait 5 minutes and turn the router off / on with power.
The next step is to set the root password and disable unnecessary services, for this we go to the web interface of the router
192.168.1.1
I disabled luci_dhcp_migrate and dnsmasq (I have DHCP and DNS on the network))


In Asus WL 520GU there are 5 ports, a WAN port and 4 LAN ports. The WAN will look at the provider, LAN1-3 to the local network, and I will allocate LAN4 to a separate VLAN and forward to the DMZ.
1. / etc / config / network, interface settings are set in this file. 2. Comment out all the lines in / etc / config / firewall except 3. Configure Iptables, for this, add the file to /etc/firewall.user. We reboot the router and check that the settings work. I’ll finish the sim, the tasks are completed, the traffic runs as I need. In conclusion, it is worth noting that this solution is very budgetary and can hardly be considered with large volumes of traffic. When testing with iperf, the following results were obtained: iperf server is running in dmz, client in LAN = ~ 36Mb / s iperf server is running in dmz, client in Internet = ~ 26Mb / s
This is quite enough for me, the provider gives us 4Mb / s, and traffic from the local network to the DMZ is not very large.
Thank you for your attention =)
Recently there was a need to hide some service in the DMZ. This service is spinning in W2K3, and I didn’t want the Windows OS machine to look at the Internet and the local network in any way unprotected (the “Windows” firewalls just go through the forest).
Remembering the successful experience with Asus WL 520GU and DD-WRT, I decided to go along the beaten track, but chose OpenWRT as the firmware for the router.
The ligament operation scheme can be seen in the figure.
So, let's get down to business from words.
Some misunderstanding of the term DMZ was noted in the comments.
In this connection, I will give a quote from Wikipedia . (For opponents of such citation, I can note that this material is almost identical to what is written in the bookA complete guide to Cisco )
DMZ (demilitarized zone, DMZ) is a technology for securing the information perimeter, in which servers responding to requests from an external network are located in a special network segment (which is called DMZ) and are limited in access to the main network segments with using a firewall (firewall), in order to minimize damage, when hacking one of the public services located in the DMZ.
Flashing the router.
For the model I have chosen, firmware backfire.brcm47xx is required 1.
We will perform a hardware reset, the so-called 30/30/30.
When the power of the router is on, press the reset button, hold for 30 seconds, without releasing the button, turn off the power and hold for another 30 seconds, without releasing the button, turn on the power and hold the reset button again for 30 seconds.
Hint: the default ip of the router is 192.168.1.1. If you “ping” it before a hardware reset 30/30/30 then ttl will be 64, after resetting ttl becomes equal to 100.
Now we send the firmware to the router using the following command.
atftp --trace --option "timeout 1" --option "mode octet" --put --local-file openwrt-brcm47xx-squashfs.trx 192.168.1.1After the message flicker, wait 5 minutes and turn the router off / on with power.
The next step is to set the root password and disable unnecessary services, for this we go to the web interface of the router
192.168.1.1
I disabled luci_dhcp_migrate and dnsmasq (I have DHCP and DNS on the network))
We’ll finish this with the web interface, further configuration will proceed already from the console.
In Asus WL 520GU there are 5 ports, a WAN port and 4 LAN ports. The WAN will look at the provider, LAN1-3 to the local network, and I will allocate LAN4 to a separate VLAN and forward to the DMZ.
Connect to the router
#ssh root@192.168.0.30

root@192.168.0.30's password:


BusyBox v1.15.3 (2010-11-12 00:01:06 PST) built-in shell (ash)

Enter 'help' for a list of built-in commands.


_______ ________ __

 | |.-----.-----.-----.| | | |.----.| |_

 | - || _ | -__| || | | || _|| _|

 |_______|| __|_____|__|__||________||__| |____|

 |__| W I R E L E S S F R E E D O M

 Backfire (10.03.1-rc4, r24045) --------------------

 * 1/3 shot Kahlua In a shot glass, layer Kahlua

 * 1/3 shot Bailey's on the bottom, then Bailey's,

 * 1/3 shot Vodka then Vodka.

 ---------------------------------------------------

root@OpenWrt:~#
We need to change several configuration files.
1. / etc / config / network, interface settings are set in this file. 2. Comment out all the lines in / etc / config / firewall except 3. Configure Iptables, for this, add the file to /etc/firewall.user. We reboot the router and check that the settings work. I’ll finish the sim, the tasks are completed, the traffic runs as I need. In conclusion, it is worth noting that this solution is very budgetary and can hardly be considered with large volumes of traffic. When testing with iperf, the following results were obtained: iperf server is running in dmz, client in LAN = ~ 36Mb / s iperf server is running in dmz, client in Internet = ~ 26Mb / s
root@OpenWrt:~# cat /etc/config/network

#### VLAN configuration

config switch eth0

 option enable 1


config switch_vlan eth0_0

 option device "eth0"

 option vlan 0

 option ports "1 2 3 5*" #default vlan, это порты LAN1-3, смотрят в локалку

 #если кому-то интересно что означает 5*, обратитесь к доке на сайте,

 #так как адекватно перевести я не смог

 #http://wiki.openwrt.org/doc/uci/network/switch


config switch_vlan eth0_1

 option device "eth0"

 option vlan 1

 option ports "0 5" #Это WAN порт


config switch_vlan eth0_2

 option device "eth0"

 option vlan 2

 option ports "4 5"  #добавленный нами vlan2, DMZ


#### Loopback configuration

config interface loopback

 option ifname "lo"

 option proto static

 option ipaddr 127.0.0.1

 option netmask 255.0.0.0


#### LAN configuration

config interface lan

 option type bridge

 option ifname "eth0.0"

 option proto static

 option ipaddr 192.168.0.30

 option netmask 255.255.255.0


#### DMZ configuration

config interface dmz

 option ifname "eth0.2"

 option proto static

 option ipaddr 192.168.100.1

 option netmask 255.255.255.0


#### WAN configuration

config interface wan

 option ifname "eth0.1"

 option proto static

 option ipaddr 1.2.3.4

 option netmask 255.255.255.0

 option gateway 1.2.3.1
config include
option path /etc/firewall.user#!/bin/sh
ext_if="eth0.1"
ext_ip="1.2.3.4"
int_if="br-lan"
int_ip="192.168.0.30"
LAN="192.168.0.0/24"
dmz_if="eth0.2"
dmz_ip="192.168.100.1"
dmz_server="192.168.100.2"
lo_if="lo"
lo_ip="127.0.0.1"
IPTABLES="/usr/sbin/iptables"
$IPTABLES -P INPUT DROP
$IPTABLES -P OUTPUT DROP
$IPTABLES -P FORWARD DROP
$IPTABLES -N bad_tcp_packets
$IPTABLES -N icmp_packets
#chain icmp_packets (разрешены только echo reply[request)
$IPTABLES -A icmp_packets -p icmp -s 0/0 --icmp-type 8 -j ACCEPT
$IPTABLES -A icmp_packets -p icmp -s 0/0 --icmp-type 0 -j ACCEPT
#chain bad_tcp_packets (любому кто читал мануал по iptables известно что выполняется в этих #строках)
$IPTABLES -A bad_tcp_packets -p tcp --tcp-flags SYN,ACK SYN,ACK -m state --state NEW -j REJECT --reject-with tcp-reset
$IPTABLES -A bad_tcp_packets -p tcp ! --syn -m state --state NEW -j DROP
#chain PREROUTING (меняем destination address в пакетах пришедших на внешний IP)
$IPTABLES -t nat -A PREROUTING -p tcp -d $ext_ip -m multiport --dport 8001,31187,20113,20118 -j \
DNAT --to-destination $dmz_server
$IPTABLES -t nat -A PREROUTING -p tcp -d $ext_ip -m multiport --dport 80 -j DNAT \
--to-destination $dmz_server:8001
$IPTABLES -t nat -A PREROUTING -p udp -d $ext_ip -m multiport --dport 20113,20118 -j \
DNAT --to-destination $dmz_server
$IPTABLES -t nat -A PREROUTING -p icmp -d $ext_ip -j DNAT --to-destination $dmz_server
#FORWARD
$IPTABLES -A FORWARD -p tcp -j bad_tcp_packets
$IPTABLES -A FORWARD -p tcp -i $ext_if -o $dmz_if -s 0/0 -d $dmz_server -m multiport --dport 80,8001,31187,20113,20118 -j \ ACCEPT
$IPTABLES -A FORWARD -p udp -i $ext_if -o $dmz_if -s 0/0 -d $dmz_server -m multiport --dport 20113,20118 -j ACCEPT
$IPTABLES -A FORWARD -p tcp -i $int_if -o $dmz_if -s $LAN -d $dmz_server -m multiport --dport 31187,3389 -j ACCEPT
$IPTABLES -A FORWARD -p icmp -i $int_if -o $dmz_if -s $LAN -d $dmz_server -j icmp_packets
$IPTABLES -A FORWARD -p icmp -i $ext_if -o $dmz_if -s 0/0 -d $dmz_server -j icmp_packets
$IPTABLES -A FORWARD -p ALL -i $dmz_if -o $int_if -m state --state ESTABLISHED,RELATED -j ACCEPT
$IPTABLES -A FORWARD -p ALL -i $dmz_if -o $ext_if -m state --state ESTABLISHED,RELATED -j ACCEPT
$IPTABLES -A FORWARD -p icmp -i $dmz_if -o $ext_if -j icmp_packets
#INPUT
$IPTABLES -A INPUT -p tcp -j bad_tcp_packets
$IPTABLES -A INPUT -p icmp -j icmp_packets
$IPTABLES -A INPUT -p tcp -i $int_if -s $LAN -m multiport --dport 22,80 -j ACCEPT
$IPTABLES -A INPUT -p ALL -i $dmz_if -s $dmz_server -j ACCEPT
#OUTPUT
$IPTABLES -A OUTPUT -p tcp -j bad_tcp_packets
$IPTABLES -A OUTPUT -p icmp -o $ext_if -d 0/0 -j icmp_packets
$IPTABLES -A OUTPUT -p ALL -s $lo_ip -j ACCEPT
$IPTABLES -A OUTPUT -p ALL -s $int_ip -d $LAN -j ACCEPT
$IPTABLES -A OUTPUT -p icmp -o $dmz_if -d $dmz_server -j icmp_packets
#POSTROUTING
$IPTABLES -t nat -A POSTROUTING -o $ext_if -j SNAT --to-source $ext_ip
root@OpenWrt:~# rebootThis is quite enough for me, the provider gives us 4Mb / s, and traffic from the local network to the DMZ is not very large.
Thank you for your attention =)