We draw fluorescent acrylic on a hard surface.
 Once here a topic flew over drawing with acrylics on fabric .
 I’ve been trying to kick myself for a long time to describe my own experience in this matter. I hope the information will be useful for those who want to draw, but do not know where to start. Under the cut is a description of the process of painting a normal room door with fluorescent acrylic paints.
[carefully, there are pictures]
Introduction
I am not an artist, and I painted with paints the last time kalyaki-malyaki at school in the class of fine arts. Therefore, I made some mistakes, which I will discuss. On the other hand, I did it, which means it’s not so difficult (with an acceptable quality error).
So, the initial data:
1. Patient: Wooden door, 800x2000mm, uneven surface - hardboard, painted with white paint
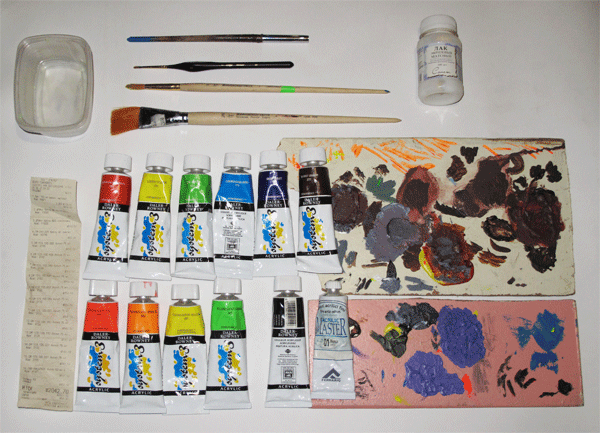
2. Tools: Pencil, eraser, acrylic (ordinary and fluorescent) paints, colorless varnish, three brushes, roller, a couple of plaques, flasks
3. Free space
4. Free time
5. Free desire.
Task: to paint the door, while trying to have fun.
Bit of theory
Acrylic paints are water-dispersed paints based on polyacrylates (mainly polymers of methyl, ethyl and butyl acrylates), as well as their copolymers. Dry very quickly - this is their advantage over other paints. It can be applied both in a very liquid, diluted state (diluted with water) and in a pasty state, thickened with special thickeners used by artists, while acrylic does not form cracks, unlike oil paints. The paint lays down in an even film, glistens a little, does not require fixing with fasteners and varnishes, has the ability to form a film that can be washed off after drying only with special solvents.
Acrylic paints and varnishes can be used on any non-greasy basis such as glass, wood, metal, canvas, canvas and the like. Fresh acrylic paint is easily removed from objects with water, but when dried requires special solvents. Drying of acrylic paints occurs as a result of the evaporation of water, while the paint forms a chemically stable elastic film. Unlike oil paints, dried acrylic is characterized by greater strength and elasticity (water acrylic is less brittle); the paint does not crumble, its layer does not form cracks, the surface does not peel off. Over time, acrylic paint does not wrinkle, it is not susceptible to normal temperature extremes and changes in humidity conditions.
[Based on materials from wikipedia.org and flur.ru ]
Fluorescent acrylic paints additionally contain a fluorescent pigment (phosphor), which, under the influence of UV lamp radiation, starts to glow in a certain color. The color depends on the pigment, and in addition, normal can be mixed with fluorescent acrylic, thus obtaining any color with a slight loss of brightness. Fluorescent acrylic is sold (as, however, also ordinary) in the following form:
- diluted in water (tubes, cans);
- in the form of an aerosol (cylinders);
- in the form of a powder (banks with pigment).
There are many ways to apply acrylic paints on a hard surface, but the main ones are still brushes, a roller and an airbrush.
Brushes are the least demanding option in terms of money and skills.
Rolleryou can process large surfaces, but small parts / contours will still have to be done with brushes.
Airbrush allows you to make gradients and other interesting features, but it requires certain skills and money costs.
I chose brushes as a “pen test”.
Procedure
In general, the procedure should look like this:
1. Development of a sketch
2. Preparation of the surface
3. Drawing with a pencil
4. Purchasing
5. Application of paints
6. Varnishing
It is believed that the surface may not be primed before (item 2) and not varnish after (item 6) application of paints. In my experience, it’s better to do it, I’ll explain a little later. In general, I had all this catavasia lasted two years - i'm a lazy bastard. I skipped point 2 altogether, and my pattern was constantly changing right up to the application of varnish. In principle, some processes can go in parallel. You can completely draw in your free time with a pencil, and
Let's move on to practice
1. Development of the sketch
You must decide - what you will draw, it is advisable to sketch at least general objects with a pencil on paper. It is necessary to start somewhere, supplement with new details can (and should) be after. In my case, it was a banality in the form of the sun and moon, schematically drawn on sheet A4. If you wish, I think you can draw patterns on your computer, so that you can then print them on a natural scale and circle them with a pencil.
2. Surface preparation
The ideal case is a peeled, smooth, sanded and primed surface. I was too lazy to clean off the paint, sand and primer. The result - after two years, the paint does not hold well. Where there is physical contact (the sliding door sometimes touches the wall), the paint is a little showered. Therefore, I recommend overstepping in terms of surface preparation: sanded and primed. In any case, wash the surface from dirt and degrease it is necessary. But what if there is already a pencil drawing? I did this: I washed it in small parts and immediately applied the drawing back, but more accurately and this time with thin lines.
3. Drawing a pencil
This stage was for me the most interesting and the longest. Something was constantly lacking, but I wanted to redo what was painted. As a result, a certain final sketch was ready, but in the process of applying paints it turned out that it was far from final. It is worth saying here: do not be afraid, even if you applied the paint, you can draw a new contour with a pencil on top and paint it again. Fortunately, acrylic dries quickly. You should also think about the colors (I just marked the area with letters like: W-yellow, W-green, etc.) that will cover your sketch. This is necessary in order to understand what paints to buy and how to mix them. As an option: take a picture and paint on your computer.
4. Purchasing
On the advice of my comrades, I went to the 3-Color store for shopping. The comrades advised English acrylic and synthetic brushes "black river". After asking the lady behind the counter about some of the details of acrylic painting, I bought 12 tubes of acrylic, 3 brushes and 3 cans of varnish.
Ammunition for coloring looked like this:
Details (note that it was bought about three years ago):
1) Acrylic paint: 7 tubes of 75 ml + 1 tube of 60 ml.

Red (cadmium red), yellow (lemon yellow), green (leaf green), blue (coeruleeum), brown (burnt umber), purple (deep violet), dark gray (payne's gray), white. All paint except the white company Daler-Rowney, white - Ferrario Color SRL. Dark gray paint was bought because there was no black, but it also fit perfectly. It is also worth saying that the blue paint left me the most - because it is background. So, when buying, figure out the number of colors depending on the area of the flowers.
All paints, with the exception of white, cost 142 rubles each. White (60ml) - 117.5 rub.
2) Fluorescent acrylic paint: 4 tubes of 75 ml.
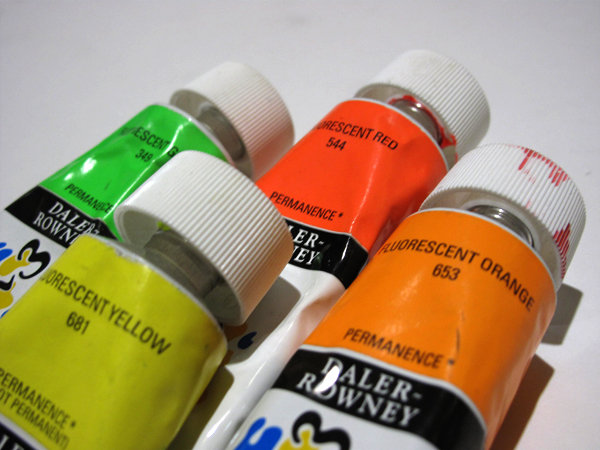
Green, red, yellow, orange. The same Daler-Rowney. The choice was small, so I took those that were. In the case of fluorescent paints, it turned yellow most of all - I had to apply many layers so that the door texture would not shine through. Yellow paint is quite transparent (this applies to regular) .
Each tube cost 159.5 rubles.
Total paint was spent approximately 1750r.
3) Synthetic brushes: 3 pcs.
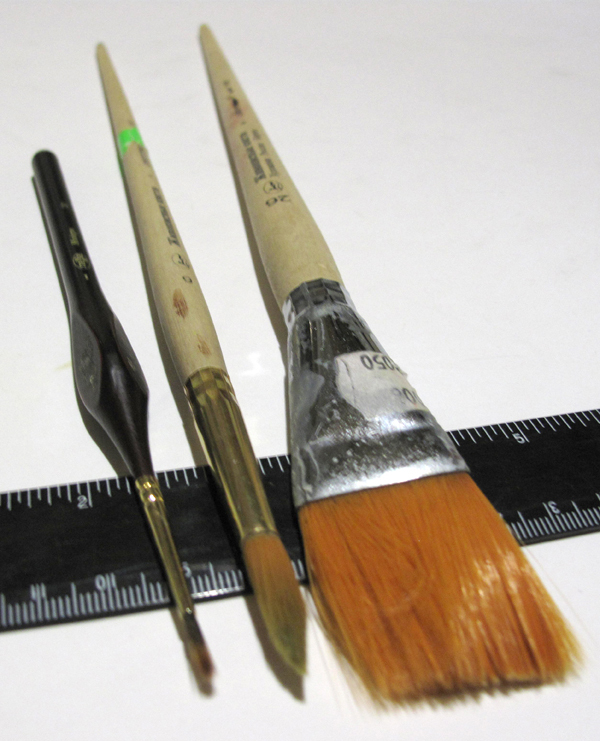
There was no “Black River", but I immediately decided that three things were needed: for large plain surfaces, for medium-sized objects and for drawing contours. Big brush: No. 26 is flat. Middle: No. 6 round (conical). Small: No. 1 round (cylindrical). All brushes are synthetic. The numbers, as I understand it, correspond to the dimensions in millimeters. The first two brushes are made by the Kirov company "Painting Brushes", the small one is the Gamma of the Modern series.
The brush took about 120r + 40r + 30r = 190r.
4) Colorless varnish: 3 cans of 100 ml each. The

varnish is acrylic matte colorless. Production: Plant of artistic paints "Neva Palette." The saleswoman in the store said that 100ml goes to about 1sq.m. - and it turned out in practice.
The varnish was about 70r, total 70 * 3 = 210r
I don’t know in honor of what, but the check shows a 5% discount, and I left 2042.70 rubles in the store.

5. Application of paints
If you are going to paint the door (as in my case) - I highly recommend removing it and putting it on the floor. If the consistency is unsuccessful (if diluted liquid), the paint tends to flow down.
First you need to “fill in” the background (if any), excluding objects with a different color. There is no need to be afraid to hurt other objects when you paint these objects later - their color will completely block the background paint. The main background I had was the sky - blue. After applying the first coat, I began to doubt the successful outcome of this event - the paint lay uneven, in some places it was lighter, in some places it was darker, the surface structure was very visible. But I did not despair, but applied a few more layers (in total they turned out about 7-8) - and voila! A relatively even blue color came out.
Then I painted all the objects in decreasing order of the area they occupy. After that, I applied some elements with fluorine paint over the usual one. And in the end he circled all the contours with plain and fluor paint.
Looking at what happened, I noticed empty pieces in the background that I did not like. I decided to add a couple more objects on top of the finished picture. The sequence of actions was the same: pencil, background, contours.
A few words about possible problems and how to avoid them:
1) The paint from the tubes had to be diluted with water, it was very thick. I did this: I cut off several beer cans with scissors to make “cups” (small plastic containers were also used, but this turned out to be less convenient). In bottles, mix with a stick of paint to the desired proportions. Stir it liquid - you will have to apply many layers, thickly - you will get a "relief" of the paint and it will not go evenly. I usually added a little water, stirred and tried to draw, if it was not enough, I added more.
2) Take a couple of tablets (I took a couple of pieces of hardboard) for mixing colors - this will be a palette.
3) It is better to paint in the following order: background (large area), medium-sized objects, small objects, in conclusion - contours. It is best to apply fluorescent contours in the last turn - in ordinary light they remain almost invisible.
4) Often you have to paint over the same elements several times to get a monotonous color. Do not worry if everything looks crooked at once.
5) Be sure to wash the brush at least every hour, and even more so after switching from one color to another. If you do not wash the brush on time, acrylic may decide to settle on it.
6)Do not be afraid to "get drunk". Acrylic paints are washed off with water if done immediately. Therefore, it is better to keep a wet rag ready, with which all the jambs are quickly fixed. In addition, you can easily apply a new color on top of the old.
7) After coloring all the elements of the figure, it is necessary to draw the contours between them. Take a small brush and draw in black. This process must be approached carefully so that your circuit does not "move" beyond the actual circuit of the object. But do not bother much, as practice shows - one crookedly drawn element looks bad, and if the whole picture is like that, then this is
8)Elements made in fluorescent paint, under the light of a UV lamp, were not clear enough. The solution was found simple: apply on top of the black contours, also a “fluoric” contour of a different (from the object) color.
9) Some elements can be applied with fluorescent paint over the usual one of the same color. The result is a kind of “easter egg”: in normal light, the object will look simple, but in the UV various details will be visible.
6. Varnishing
I varnished the door using a roller - in my opinion, the best option. You will need two things: a roller and a roller basin, but you can do this with a large brush. The number of layers of varnish depends on the varnish itself, the roller / brush and the quality of its application. In my case, I applied 3-4 layers. The roller, like brushes, must also be remembered to wash.
7. Additional work
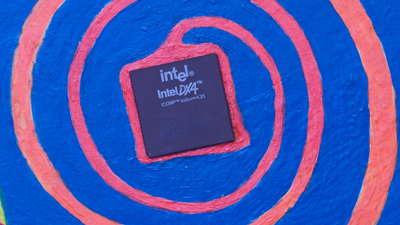
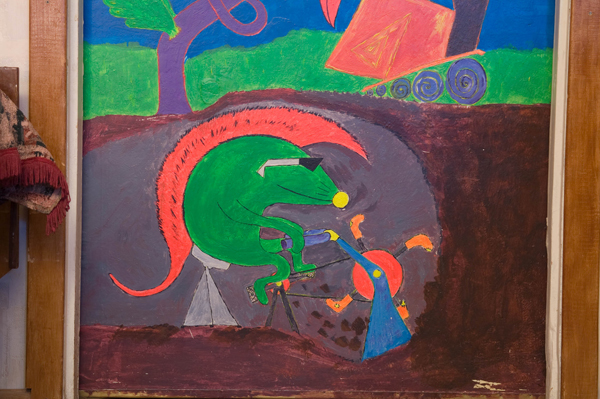
Having hung the door, I proceeded to the final stage, namely, glued the Intel 80486 DX4 stone into the tail of the chameleon. The surface under it had to be hollowed out with a chisel, glued with “Moment”.
I cannot but mention that two wonderful girls helped me: Nocha helped to paint, and Malaya took photos of the door. Thanks you!
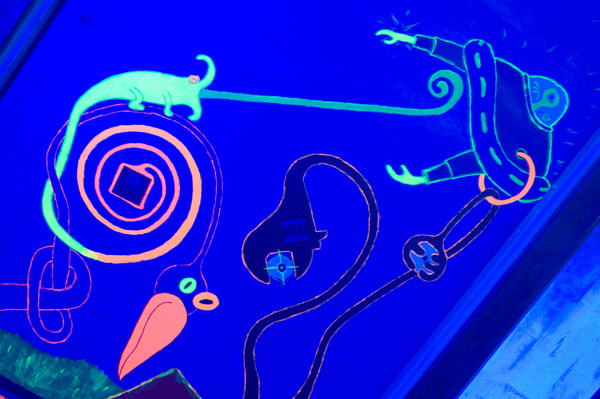
Photo
This is how my door looks in ordinary light:

And this is how it is in the light of a UV lamp:

Animals in UV:
Krotoyozh:
Krotoyozh in UV:
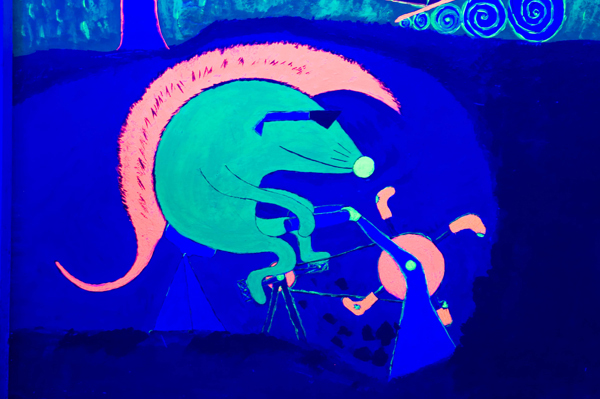
Tail of a chameleon with four on board:

Conclusion
You can almost always find enough literature on a particular issue (and, I hope, my article will also help someone). Do not be afraid to take on something little-known and, at first glance, complicated. If you want, you should definitely try.
And let the guru say that it turned out crookedly, and let the shortcomings be full. But when you look at something created from nothing with your own hands, very pleasant thoughts and feelings appear. I guarantee it!