New life of Intel 5150 AGX WiFi adapter (and others like it)
While the whole country was relaxing, celebrating the “Day of National Unity”, skillful hands and living brains of individual citizens gave us joy and fun. Especially lucky were the owners of officially imported laptops based on the Intel Centrino 2 platform with integrated Intel 5150AGX WiMax / WiFi adapter (nee 5150ANX), which was brutally castrated by the manufacturer at the EEPROM level. As a result, the victim forgot how to sing beautifully in all of his 300Mbps and only unconvincingly lowed the note G (54Mbps). As an impatient reader can guess, the crazy hands and living brains mentioned above successfully coped with this small misunderstanding, returning to a hypothetical eunuch his lost dignity.
So, you have a laptop in the 5150AGX card in conjunction with an irrepressible thirst for risk, and we have instructions:
Remember, all of the following is done by you at your own peril and risk. Even if you are extremely attentive and accurate. The result can be not only an 11n card, but also its hard-to-recover corpse.
1. Download RW Everything , unzip, install.
2. If you need a backup of your EEPROM, also download DumpIWL . If not, read from paragraph (3). If yes: unzip the entire contents of the archive into a folder, start it (it may not work under x64, details in the forum, link at the very end). Click on “Read EEPROM”, close, and download the file.
3. Open the device manager, find your map there, open the "Properties"

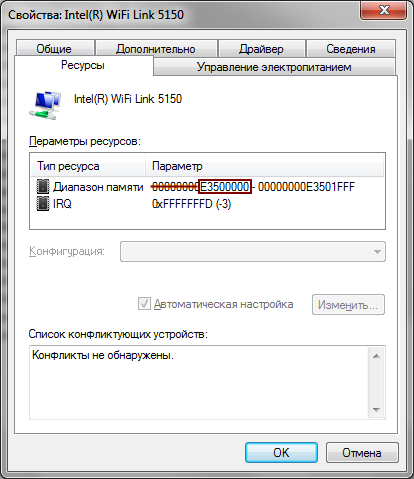
4. Go to the "Resources" tab. Record 8 digits marked in the screenshot. This is an offset , it will come in handy.
5. Run RW Everything, in the window that opens, in the drop-down list, find Intel Network Controller and select it.
We look carefully at Subsytem IDat the bottom right of the window. They can be of the following form:
1201 - Full, 11n enabled, OEM
1206 - Full, 11n disabled, OEM
1301 - Half, 11n enabled, OEM
1306 - Half, 11n disabled, OEM
1211 - Full, 11n enabled, HP / Lenovo / IBM
1216 - Full, 11n disabled, HP / Lenovo / IBM
1311 - Half, 11n enabled, HP / Lenovo / IBM
1316 - Half, 11n disabled, HP / Lenovo / IBM
After completing the following steps, the ID will change from view XXX6 to XXX1, with XXX will remain unchanged. If you have one at the end, then there’s no point in reading further.
If your number is in the first half of the list, you can breathe a little more freely. If in the second - your risks have increased. Notebooks of some manufacturers contain whitelist valid devices, changing ID (or other parameters) can lead to trouble.
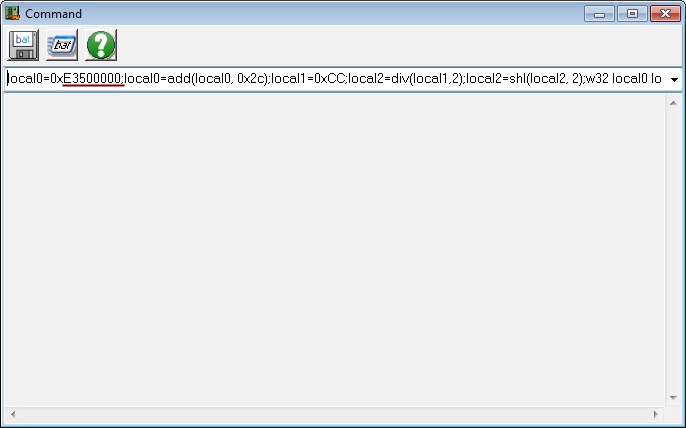
6. In the RW Everything menu, select Access-> Command (or click on the corresponding button on the toolbar). In the window that appears, there will be one input field, you need to copy the following text (in one line): Eight stars (********) must be replaced with the offset written earlier (in my case, in the screenshots, this is E3500000). We get something like: 7. We check ourselves again, it is very important not to make mistakes at this stage
. Have you checked? Press Enter, wait 10-30 seconds (the text of the executed command will appear), then just a minute just in case, close RW Everything and carefully shut down the system (DO NOT: turn off WiFI with a hardware switch, cut down the computer by holding the power button, etc. , all these are additional risk factors).
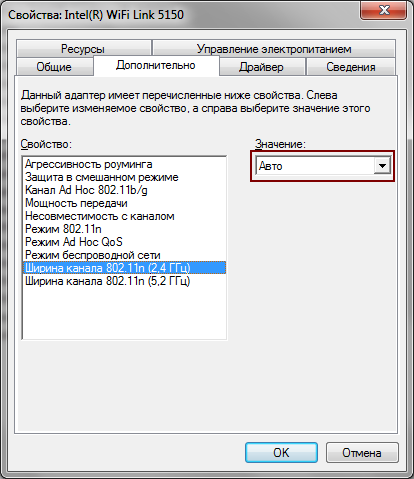
8. After rebooting and entering the system, Windows will find a new device (the ID has changed) and will install drivers on it. Most likely this process will fail (which is normal). Everything, you can connect to an access point and enjoy life. To make it completely joyful, you can increase the channel width from 20 to 40Mhz (device manager, adapter, tab "advanced").
9. An item for those who do not like the new device name with # 2 at the end, i.e. aesthetes like me. The plan is as follows (briefly, as homework):
9.1 Add the devmgr_show_nonpresent_devices system variable with a value of 1
9.2 Go to the device manager, select "View> Show hidden devices" in the menu and remove both adapters (old translucent and new with # 2 at the end) .
9.3 After rebooting, the device will be found, the drivers are installed, # 2 at the end will not be
1. Rejoice. Everything here is simpler and more elegant, as always (it is understood that svn is already there, and there is something to collect)
2. Go to
3. Run “
9. Reboot and check
Prepared from discussion materials on iXBT ( Intel 5150 AGX - is 802.11n possible ).
Many thanks to ittrium , advan , thinkfar , ShultZ , thanks to which our small local happiness became possible.
So, you have a laptop in the 5150AGX card in conjunction with an irrepressible thirst for risk, and we have instructions:
Remember, all of the following is done by you at your own peril and risk. Even if you are extremely attentive and accurate. The result can be not only an 11n card, but also its hard-to-recover corpse.
Windows
1. Download RW Everything , unzip, install.
2. If you need a backup of your EEPROM, also download DumpIWL . If not, read from paragraph (3). If yes: unzip the entire contents of the archive into a folder, start it (it may not work under x64, details in the forum, link at the very end). Click on “Read EEPROM”, close, and download the file.
3. Open the device manager, find your map there, open the "Properties"
4. Go to the "Resources" tab. Record 8 digits marked in the screenshot. This is an offset , it will come in handy.
5. Run RW Everything, in the window that opens, in the drop-down list, find Intel Network Controller and select it.
We look carefully at Subsytem IDat the bottom right of the window. They can be of the following form:
1201 - Full, 11n enabled, OEM
1206 - Full, 11n disabled, OEM
1301 - Half, 11n enabled, OEM
1306 - Half, 11n disabled, OEM
1211 - Full, 11n enabled, HP / Lenovo / IBM
1216 - Full, 11n disabled, HP / Lenovo / IBM
1311 - Half, 11n enabled, HP / Lenovo / IBM
1316 - Half, 11n disabled, HP / Lenovo / IBM
After completing the following steps, the ID will change from view XXX6 to XXX1, with XXX will remain unchanged. If you have one at the end, then there’s no point in reading further.
If your number is in the first half of the list, you can breathe a little more freely. If in the second - your risks have increased. Notebooks of some manufacturers contain whitelist valid devices, changing ID (or other parameters) can lead to trouble.
6. In the RW Everything menu, select Access-> Command (or click on the corresponding button on the toolbar). In the window that appears, there will be one input field, you need to copy the following text (in one line): Eight stars (********) must be replaced with the offset written earlier (in my case, in the screenshots, this is E3500000). We get something like: 7. We check ourselves again, it is very important not to make mistakes at this stage
local0=0x********;local0=add(local0, 0x2c);local1=0xCC;local2=div(local1,2);local2=shl(local2, 2);w32 local0 local2;delay 10;local3=(r32 local0);local3=shr(local3, 15);local1=add(local3, 0x08);LOOP{14,local2=div(local1, 2);local2=shl(local2, 2);local2=or(local2, 0x0F6F0002);w32 local0 local2;delay 50;local1=add(local1, 2)};local1=add(local3, 0x42);LOOP{12,local2=div(local1, 2);local2=shl(local2, 2);local2=or(local2, 0x0FE10002);w32 local0 local2;delay 50;local1=add(local1, 2)};local1=add(local3, 0x5c);LOOP{11,local2=div(local1, 2);local2=shl(local2, 2);local2=or(local2, 0x0F310002);w32 local0 local2;delay 50;local1=add(local1, 2)};local1=add(local3, 0x74);LOOP{6,local2=div(local1, 2);local2=shl(local2, 2);local2=or(local2, 0x0FA10002);w32 local0 local2;delay 50;local1=add(local1, 2)};local1=add(local3, 0x82);LOOP{7,local2=div(local1, 2);local2=shl(local2, 2);local2=or(local2, 0x0F6F0002);w32 local0 local2;delay 50;local1=add(local1, 2)};local1=add(local3, 0x92);LOOP{11,local2=div(local1, 2);local2=shl(local2, 2);local2=or(local2, 0x0FE10002);w32 local0 local2;delay 50;local1=add(local1, 2)};local1=add(local3, 0x02);local2=div(local1, 2);local2=shl(local2, 2);local2=or(local2, 0x6F4D0002);w32 local0 local2;delay 50;local1=add(local3, 0x04);local2=div(local1, 2);local2=shl(local2, 2);local2=or(local2, 0x00570002);w32 local0 local2;delay 50;local1=0x8A;local2=div(local1,2);local2=shl(local2, 2);local2=or(local2, 0x00f00002);w32 local0 local2;delay 50;local1=0x8C;local2=div(local1,2);local2=shl(local2, 2);w32 local0 local2;delay 10;local3=(r32 local0);local3=shr(local3,16);local3=and(local3, 0xFE9F);local3=or(local3, 0x0010);local3=shl(local3,16);local2=or(local3,local2);local2=or(local2,0x02);w32 local0 local2;delay 50;local1=0x14;local2=div(local1,2);local2=shl(local2, 2);w32 local0 local2;delay 10;local3=(r32 local0);local3=shr(local3,16);local3=and(local3, 0xFFFF0);local3=or(local3, 0x0001);local3=shl(local3,16);local2=or(local3,local2);local2=or(local2,0x02);w32 local0 local2;delay 50;
. Have you checked? Press Enter, wait 10-30 seconds (the text of the executed command will appear), then just a minute just in case, close RW Everything and carefully shut down the system (DO NOT: turn off WiFI with a hardware switch, cut down the computer by holding the power button, etc. , all these are additional risk factors).
8. After rebooting and entering the system, Windows will find a new device (the ID has changed) and will install drivers on it. Most likely this process will fail (which is normal). Everything, you can connect to an access point and enjoy life. To make it completely joyful, you can increase the channel width from 20 to 40Mhz (device manager, adapter, tab "advanced").
9. An item for those who do not like the new device name with # 2 at the end, i.e. aesthetes like me. The plan is as follows (briefly, as homework):
9.1 Add the devmgr_show_nonpresent_devices system variable with a value of 1
9.2 Go to the device manager, select "View> Show hidden devices" in the menu and remove both adapters (old translucent and new with # 2 at the end) .
9.3 After rebooting, the device will be found, the drivers are installed, # 2 at the end will not be
Linux
1. Rejoice. Everything here is simpler and more elegant, as always (it is understood that svn is already there, and there is something to collect)
2. Go to
/usr/local/src(or where you used to collect there), create the “iwleeprom” directory 3. Run “
svn checkout iwleeprom.googlecode.com/svn/trunk iwleeprom”, as a result, we will see:
4. Enter the created directory and execute " ", we will see:
5. Become a superuser ("su" or "sudo -i" to choose) and run " ", it should turn out:
6. Run " ", we will get an EEPROM dump (backup just in case).
7. Think about whether you are willing to take a chance? Run " ", the tool itself will do everything
8. Nail (if any) the file "A iwleeprom/iwleeprom.c
A iwleeprom/iwleeprom.8
A iwleeprom/Makefile
Checked out revision 11.makegcc -Wall -o iwleeprom iwleeprom.c
gzip -c iwleeprom.8 > iwleeprom.8.gz
./iwleeprom --helpEEPROM reader/writer for intel wifi cards
Usage: ./iwleeprom [-d device] [-r filename] [-w filename] [-p]
-d device device in format 0000:00:00.0 (domain:bus:dev.func)
-r filename dump eeprom to binary file
-w filename write eeprom from binary file
-b save dump in big-endian byteorder (default: little-endian)
-p patch device eeprom to enable 802.11n
./iwleeprom -r eeprom.bak./iwleeprom -p/etc/modprobe.d/intel-5300-iwlagn-disable11n.conf", which does not allow 11n to work on Intel adapters in the latest kernel versions (something there the developers broke and disconnected N from harm's way, in practice everything works, but temporary brakes are possible) 9. Reboot and check
Prepared from discussion materials on iXBT ( Intel 5150 AGX - is 802.11n possible ).
Many thanks to ittrium , advan , thinkfar , ShultZ , thanks to which our small local happiness became possible.