Building GTK + Applications Using the Glade Environment
This post is dedicated to creating applications using the cross-platform GTK + library. It focuses mainly on beginners? therefore, some things may seem to many to be very simple and banal, but I tried to describe everything as detailed as possible so that it would be clear to everyone.
A considerable advantage of this library is that it is free for commercial use. There is not much documentation and really high-quality articles on working with GTK + on the Internet. In many examples, the program interface is written in “pens”, which is sometimes very inconvenient. I myself came across this and quite often spent more time on correctly placing widgets (objects) on the form, in containers, and not focusing on solving the task.
I will demonstrate how you can very quickly create an interface for GTK + using the Glade visual GUI application and integrate it into your program. Glade is neither a compiler nor a debugger. It only allows you to describe the interface and present it in GladeXML XML format files.
The basic interface for the GTK + library is C. But I will use C ++ in this example. Accordingly, small features will appear, which I will tell you about. Linux distribution I am using Ubuntu 10.04.
The task will be this: write a small application consisting of a canvas, a side menu (the choice of what to draw on the canvas), the main menu and the status bar. At the same time, the side menu and the canvas should remain constant in size when resizing the entire application window. But the container in which the canvas is located can change its size depending on the increase / decrease in the size of the main window. And if necessary, scrollbars should appear.
The plan will be as follows:
It is assumed that you already have the GTK + dev package installed, if not, you can do this through the console:
You can install Glade through the Ubuntu Update Center or again using the console:
After installation, run through Applications - Programming - Glade Interface Designer
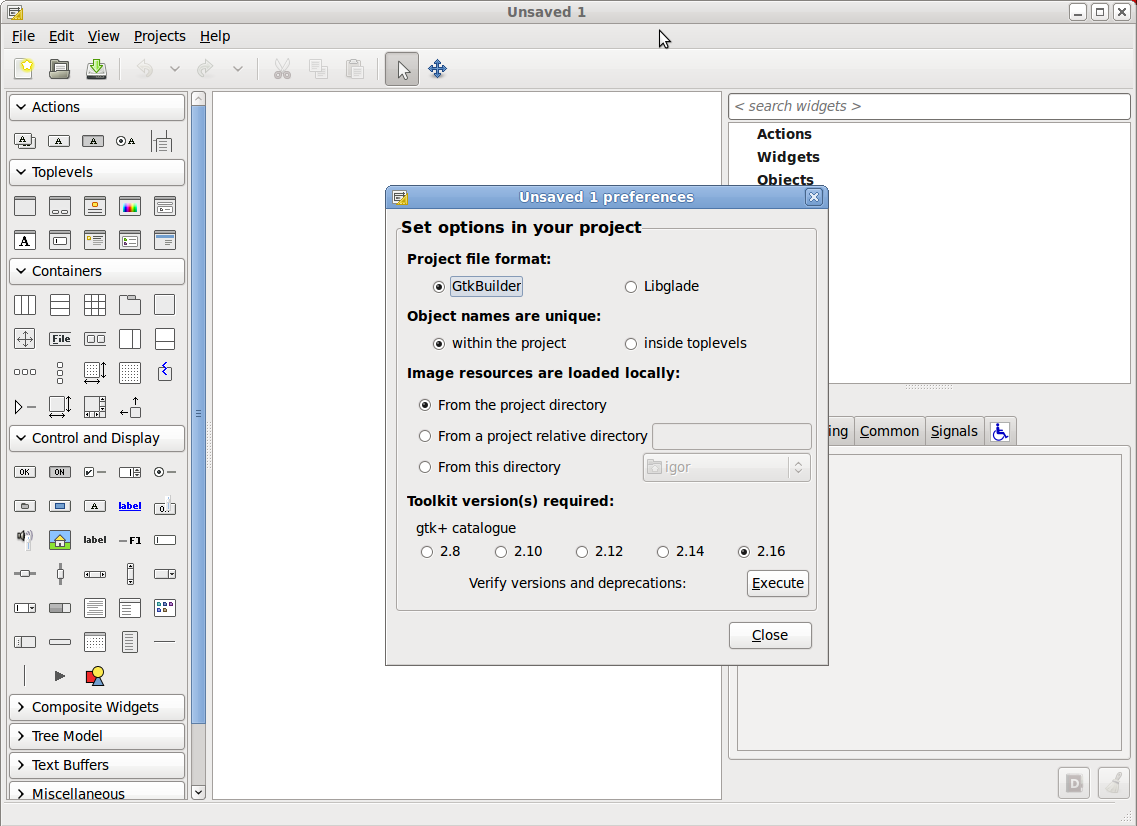
Set all the parameters as shown in the figure. We select the Toolkit Version 2.16.
On the left you can see a window with a set of different widgets. Those who worked with Windows Forms, or in an environment, Delphi developers will quickly figure it out. There are two menus on the right: one shows the widget hierarchy, and the second window shows the widget properties window.
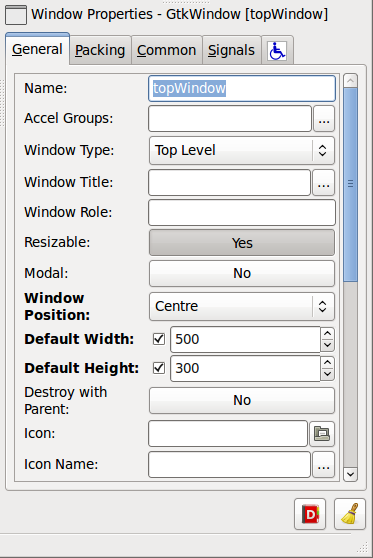
Creating a graphical interface for your GTK + application starts with setting the main form - the main window of the program. We find the Window widget in the TopLevels section of the left menu.
On the right in the Properties window, set the properties of this widget:
Name: topWindow
Windows position: Center
Default Width: 500
Default Height: 320
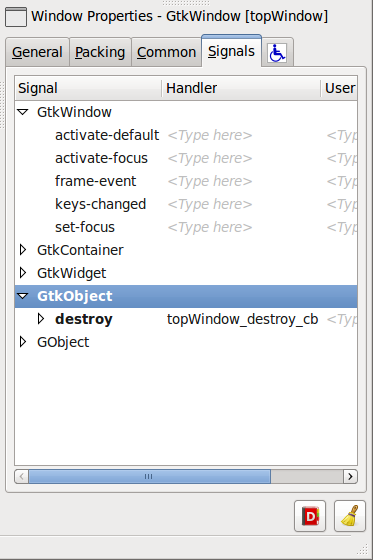
Go to the Signals tab and look for GtkObject destroy, in the Handler column we write topWindow_destroy_cb or select from the list . This will be the name of the procedure that will process the destroy signal - closing the main form.
Further, we plan that in our application there should be a main menu, the main functional part (this is the canvas and the menu for choosing what to draw) and the status bar. Take the Vertical Box widget container in the left menu in the Containers section and put it in our main form. In the dialog that appears, select Number of Items: 3. This means that 3 widgets can be placed in the container we create.
We have 3 so-called cells or compartments in the vbox1 container. In the second (center) compartment, put Frame (the Containers section of the widget menu). We look at the widget tree on the right. Inside the created widget frame1 there will be two widgets: alignment1 and label1 - they can be deleted. We will deviate a little on this and turn to theory.
Understanding how widget size is managed in GTK + is very important for creating the right and efficient graphical interfaces. This process is often called the approval process, which consists of two components (2 stages): the requested size and the allocated size.
The request phase is a recursive question: "How much space do you need?" The main window sets it to child windows, child windows sets it to their child windows, and so until all widgets in this entire hierarchy respond.
There are 2 important points:
Now that the main window knows how much space is ideally needed, a decision is made about how much space will actually be available. If a reasonable value has come to the request, it is the default one. But if the window size is set manually (for example, using gtk_window_setdefault_size) or otherwise, the window discards the requested size and sets another.
At the second stage (allocation of the size), a command occurs from the parent to the child widget: "Here you have some space, do everything to fit in it." If the widget has more than one child widget, then the task of this step is to properly divide the free space between the child widgets.
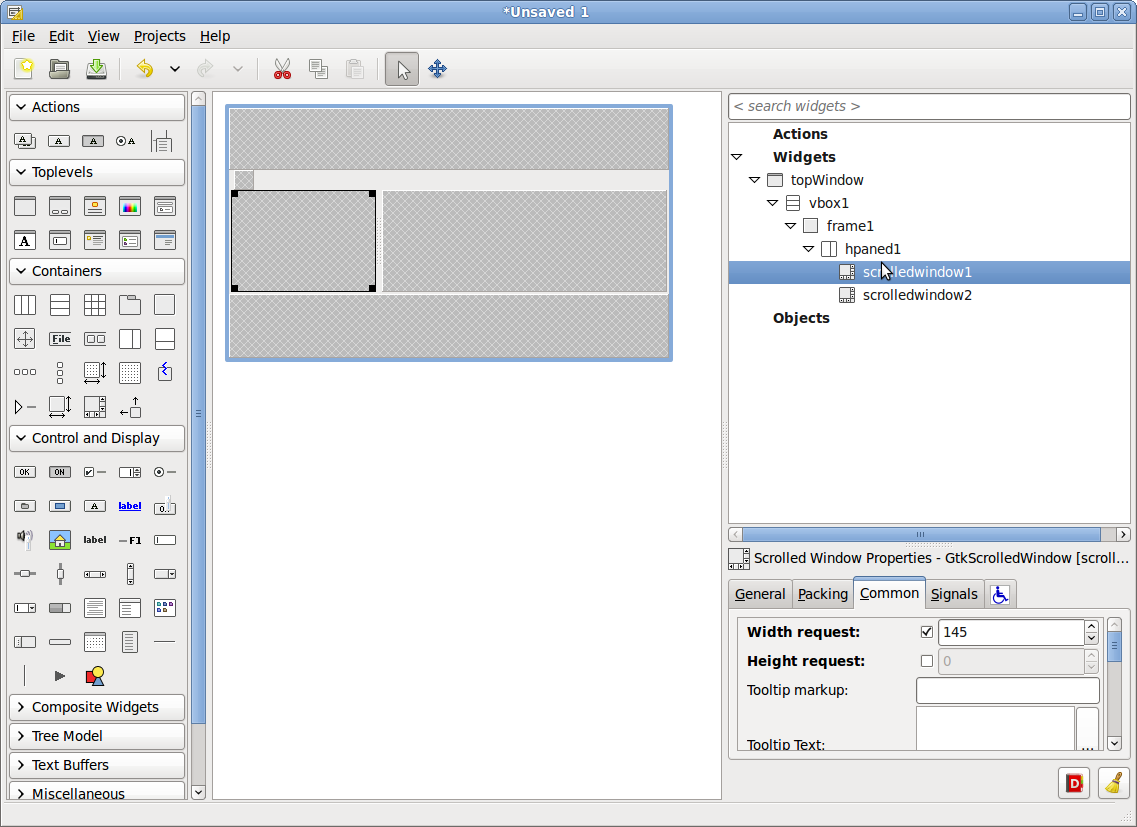
Now we pass to the main part of our application. Go to the widget menu and select Horizontal Panes in the Containers section and put it on frame1. We need our left side to be a fixed size, the right side not. Again, go to the widget menu and look for the Scrolled Window there. And first we put one, and then the second Scrolled Window in the left and right compartment hpand1 (Horizontal Panes). In the left Scrolled Window, called scrolledwindow1, set the property (in the Common tab) Width reguest to 145 - this will mean the requested size (for the matching process). You should also check that in the Packing tab the Resize property of scrolledwindow1 is No , and that of scrolledwindow2 Yes .
From the Containers section, we first put the first ViewPort widget, and then the second one on both of our scrolledwindow1 and scrolledwindow2, respectively.
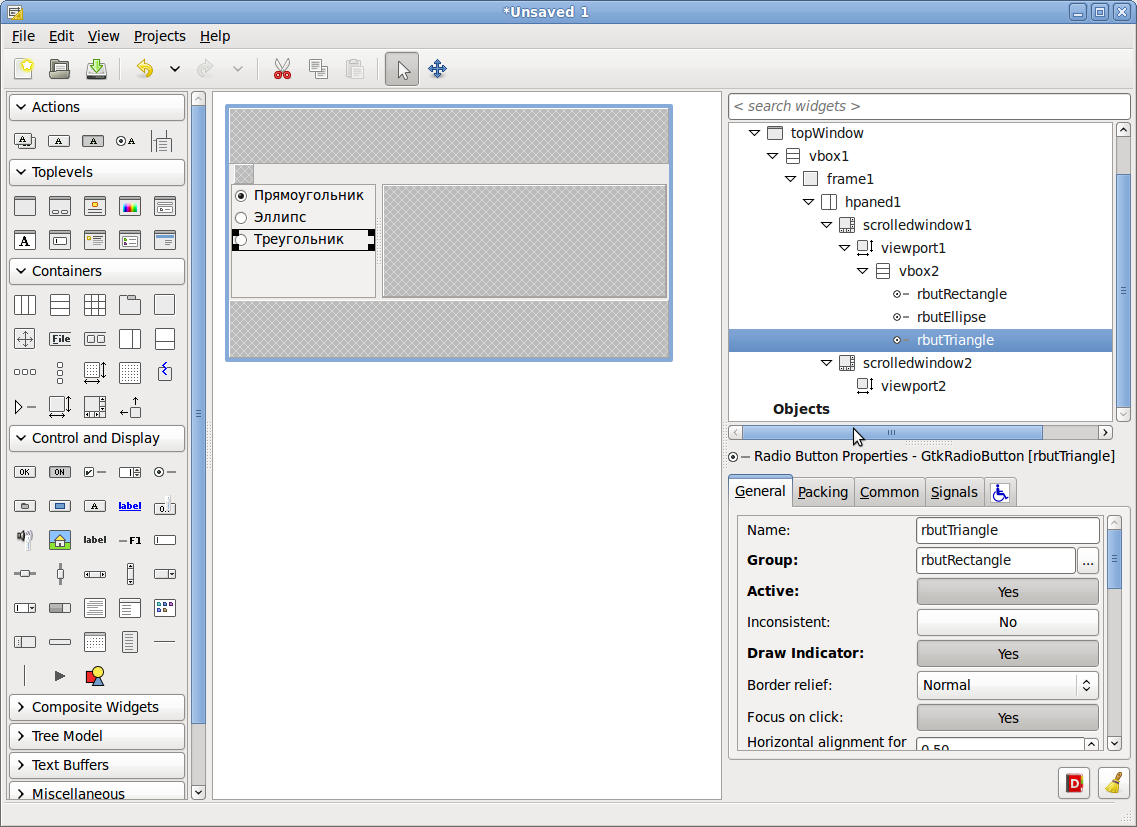
Let's take our side menu. Add to the ViewPort1 Vertical Box with 3 compartments. And in each compartment add Radio Button. For each Radio Button, set the Expand No property so that they do not stretch as the size of the parent widget increases. Also in the Common tab, you can specify Width and Height request then they will be the size of what we specify, and not by default. But in any case, they will vary in size. Change their properties in the General:
Name tab, respectively, to rbutRectangle , rbutEllipse , rbutTriangle
Label, respectively, to Rectangle ,Ellipse , Triangle
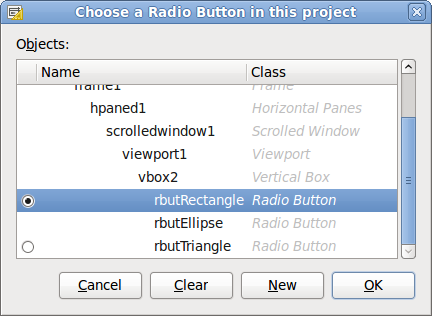
and for rbutEllipse and rbutTriangle we specify in the Group property rbutRectangle using a special dialog.
It should look like this:
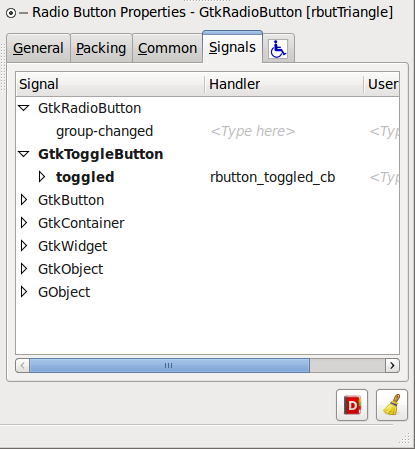
Now you need to register events for each Radio Button. In the Signals tab without any difference for the event GroupChanged, either toggled (I will do for him) prescribe handler rbutton_toggled_cb :
We now turn to the right hand side of our window. Add a Vertical Box with two compartments to ViewPort2. In the top we put the usual Label, and in the bottom Drawing Area - this will be the canvas. For Label1, in the label property, write 300 x 200 Canvas . We turn to the Packing tab and set the Expand to No .
Now our canvas.
Name: drawingarea
Expend: No
Width request: 300
Height request: 200
Event: check the Exposure checkbox
In Signals we look for expose-event and write or select from the list:
drawingarea_expose_event_cb

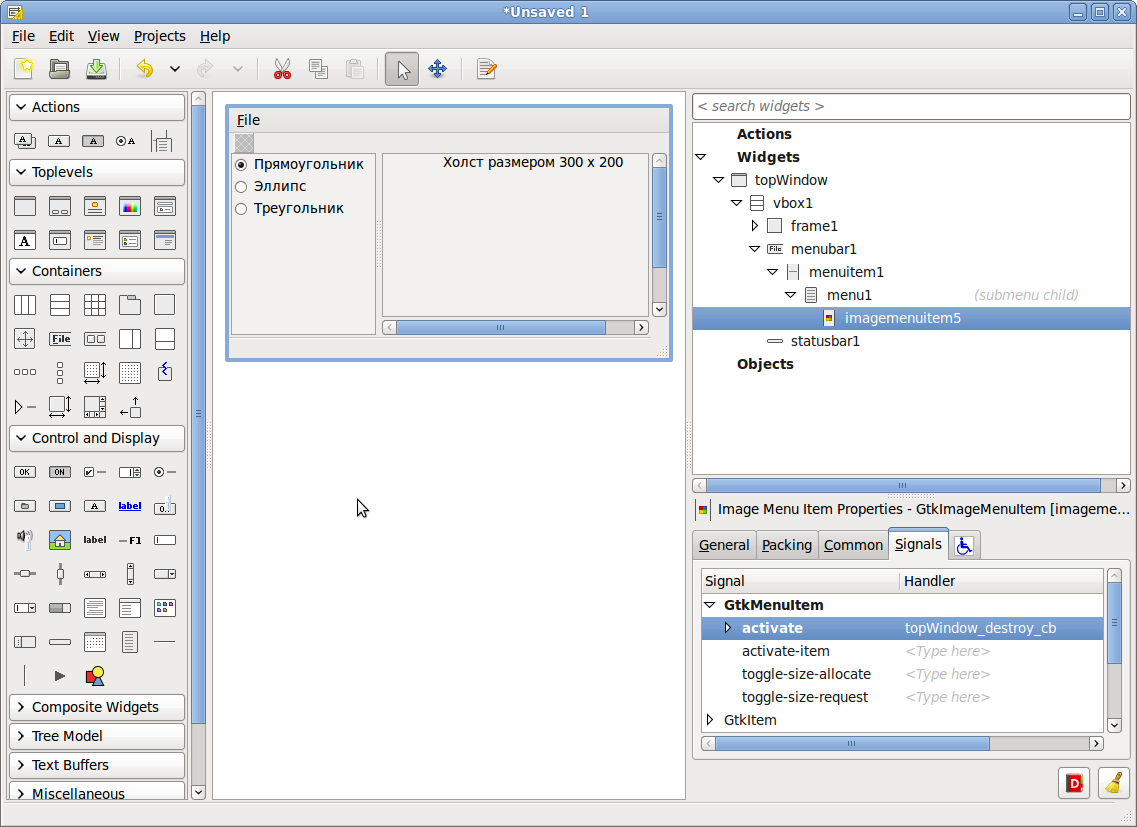
Now we need to add the status bar (to the lowest compartment) and the main menu (in topmost compartment). We put the Menu Bar (the Containers section of the widget menu) in the very top, In the very bottom compartment of the Status Bar (the Control and Display section of the widget menu), a dialog will appear about adding it, select Number of Items: 1.

In menubar1 for our example, we will leave only one menu item - exit the program. Accordingly, you can remove: menuitem2, menuitem3, menuitem4. Then open menuitem1, go to menu1 and delete everything except imagemenuitem5. This is the Quit item. You can click on it and look at the property in the General tab of the property window, the Stock Item property, in which gtk-quit is registered . There you can "play around." You can generally select Custom label and image and set everything yourself. It is not so important. For imagemenuitem5 in the Signals tab, set the activate signal (clicking on the menu item) for the signal exactly the same as for closing the form: topWindow_destroy_cb .
This is how our interface should look like in the end. We save our project with the name mainForm. The file will be called mainForm.glade
Create Example1.cpp file in the same folder where you saved mainForm.glade. First, I will give the whole code in its entirety, and then I will explain some important points.
First we declare those objects. with whom we will work. Then we begin to register signal handlers. Because we write in C ++, using extern “C” we declare topWindow_destroy_cb, drawingarea_expose_event_cb, rbutton_toggled_cb as external functions and indicate that they must be linked according to the binding order in C. GtkBuilder contains links to all objects from the description in Glade. The gtk_builder_get_object function gets a reference to the object with the corresponding name from GtkBuilder (in this case, builder). The gtk_builder_connect_signals function is used to connect the handler functions in the code with the corresponding corresponding signal handlers in us GladeXML. This happens automatically. It is important that the names in Glade and in the code match. The application compiles normally, just the signals will not be processed,
Also, because we write in C ++ very often we have to use explicit type conversion. for instance
if we wrote in C, we could do without the explicit ghost of GTK_RADIO_BUTTON.
In order to compile your program, you need to use either an automatic build system (for example CMake), or register a makefile yourself. I will not dwell on this in detail. And just give an example of a description of makefile. At the end of the post, the two most recent links concern the creation of a make file.
Compilation takes place with the command:
We start ...

... and then
we resize the window. As we can see, the side menu and the canvas did not stretch and remained in the same dimensions, but the container in which the canvas resized. And with all the free space that appeared with an increase in the size of the form went to him. This is all because we set scrolledwindow1 Width reguest = 145 and resize Yes . Here is an example of scrollbars appearing as the main window has become smaller
. Now I’ll go into Glade3 and change label1 property Expand to Yes. The project does not need to be recompiled. Simply save the mainForm file. And here is the result:
Why is that? We have a fixed size canvas. And all the space that is obtained when the main window is enlarged is given to the label1 widget. You can "play around" with all this business. For example, setting Expand back to No and specifying the exact Height value, for example 70. And then again there will be a fixed size, but not by default, but the one you specify.
This ends this post. If this topic is interesting, I have a desire to write more posts in this direction.
A bit of theory is taken from the Glade3 tutorial - Size negotiation .
I advise you to read: Packing Widgets , The Cairo graphics tutorial , Makefiles by example , GNU `make '
A considerable advantage of this library is that it is free for commercial use. There is not much documentation and really high-quality articles on working with GTK + on the Internet. In many examples, the program interface is written in “pens”, which is sometimes very inconvenient. I myself came across this and quite often spent more time on correctly placing widgets (objects) on the form, in containers, and not focusing on solving the task.
I will demonstrate how you can very quickly create an interface for GTK + using the Glade visual GUI application and integrate it into your program. Glade is neither a compiler nor a debugger. It only allows you to describe the interface and present it in GladeXML XML format files.
The basic interface for the GTK + library is C. But I will use C ++ in this example. Accordingly, small features will appear, which I will tell you about. Linux distribution I am using Ubuntu 10.04.
The task will be this: write a small application consisting of a canvas, a side menu (the choice of what to draw on the canvas), the main menu and the status bar. At the same time, the side menu and the canvas should remain constant in size when resizing the entire application window. But the container in which the canvas is located can change its size depending on the increase / decrease in the size of the main window. And if necessary, scrollbars should appear.
The plan will be as follows:
- Install and launch Glade3
- We will create a graphical interface for our application in Glade3 by placing the main widgets (objects) in the main window and containers, defining events (Singnals, signals) for widgets and their handler (Handler), i.e. procedure in the code of our program, which will be called when this signal occurs
- write the program code: integrate the XML file with a graphical interface, write the handlers and some functionality for demonstration
- test our application a little
Install and launch Glade3
It is assumed that you already have the GTK + dev package installed, if not, you can do this through the console:
sudo aptitude install libgtk2.0-devYou can install Glade through the Ubuntu Update Center or again using the console:
sudo apt-get install glade-gnomeAfter installation, run through Applications - Programming - Glade Interface Designer
Set all the parameters as shown in the figure. We select the Toolkit Version 2.16.
On the left you can see a window with a set of different widgets. Those who worked with Windows Forms, or in an environment, Delphi developers will quickly figure it out. There are two menus on the right: one shows the widget hierarchy, and the second window shows the widget properties window.
GUI creation
Creating a graphical interface for your GTK + application starts with setting the main form - the main window of the program. We find the Window widget in the TopLevels section of the left menu.
On the right in the Properties window, set the properties of this widget:
Name: topWindow
Windows position: Center
Default Width: 500
Default Height: 320
Go to the Signals tab and look for GtkObject destroy, in the Handler column we write topWindow_destroy_cb or select from the list . This will be the name of the procedure that will process the destroy signal - closing the main form.
Further, we plan that in our application there should be a main menu, the main functional part (this is the canvas and the menu for choosing what to draw) and the status bar. Take the Vertical Box widget container in the left menu in the Containers section and put it in our main form. In the dialog that appears, select Number of Items: 3. This means that 3 widgets can be placed in the container we create.
We have 3 so-called cells or compartments in the vbox1 container. In the second (center) compartment, put Frame (the Containers section of the widget menu). We look at the widget tree on the right. Inside the created widget frame1 there will be two widgets: alignment1 and label1 - they can be deleted. We will deviate a little on this and turn to theory.
Understanding how widget size is managed in GTK + is very important for creating the right and efficient graphical interfaces. This process is often called the approval process, which consists of two components (2 stages): the requested size and the allocated size.
The request phase is a recursive question: "How much space do you need?" The main window sets it to child windows, child windows sets it to their child windows, and so until all widgets in this entire hierarchy respond.
There are 2 important points:
- Child widgets do not know anything about parent widget sizes
- The size of parent widgets depends on the size of child widgets
Now that the main window knows how much space is ideally needed, a decision is made about how much space will actually be available. If a reasonable value has come to the request, it is the default one. But if the window size is set manually (for example, using gtk_window_setdefault_size) or otherwise, the window discards the requested size and sets another.
At the second stage (allocation of the size), a command occurs from the parent to the child widget: "Here you have some space, do everything to fit in it." If the widget has more than one child widget, then the task of this step is to properly divide the free space between the child widgets.
Now we pass to the main part of our application. Go to the widget menu and select Horizontal Panes in the Containers section and put it on frame1. We need our left side to be a fixed size, the right side not. Again, go to the widget menu and look for the Scrolled Window there. And first we put one, and then the second Scrolled Window in the left and right compartment hpand1 (Horizontal Panes). In the left Scrolled Window, called scrolledwindow1, set the property (in the Common tab) Width reguest to 145 - this will mean the requested size (for the matching process). You should also check that in the Packing tab the Resize property of scrolledwindow1 is No , and that of scrolledwindow2 Yes .
From the Containers section, we first put the first ViewPort widget, and then the second one on both of our scrolledwindow1 and scrolledwindow2, respectively.
Let's take our side menu. Add to the ViewPort1 Vertical Box with 3 compartments. And in each compartment add Radio Button. For each Radio Button, set the Expand No property so that they do not stretch as the size of the parent widget increases. Also in the Common tab, you can specify Width and Height request then they will be the size of what we specify, and not by default. But in any case, they will vary in size. Change their properties in the General:
Name tab, respectively, to rbutRectangle , rbutEllipse , rbutTriangle
Label, respectively, to Rectangle ,Ellipse , Triangle
and for rbutEllipse and rbutTriangle we specify in the Group property rbutRectangle using a special dialog.
It should look like this:
Now you need to register events for each Radio Button. In the Signals tab without any difference for the event GroupChanged, either toggled (I will do for him) prescribe handler rbutton_toggled_cb :
We now turn to the right hand side of our window. Add a Vertical Box with two compartments to ViewPort2. In the top we put the usual Label, and in the bottom Drawing Area - this will be the canvas. For Label1, in the label property, write 300 x 200 Canvas . We turn to the Packing tab and set the Expand to No .
Now our canvas.
Name: drawingarea
Expend: No
Width request: 300
Height request: 200
Event: check the Exposure checkbox
In Signals we look for expose-event and write or select from the list:
drawingarea_expose_event_cb
Now we need to add the status bar (to the lowest compartment) and the main menu (in topmost compartment). We put the Menu Bar (the Containers section of the widget menu) in the very top, In the very bottom compartment of the Status Bar (the Control and Display section of the widget menu), a dialog will appear about adding it, select Number of Items: 1.
In menubar1 for our example, we will leave only one menu item - exit the program. Accordingly, you can remove: menuitem2, menuitem3, menuitem4. Then open menuitem1, go to menu1 and delete everything except imagemenuitem5. This is the Quit item. You can click on it and look at the property in the General tab of the property window, the Stock Item property, in which gtk-quit is registered . There you can "play around." You can generally select Custom label and image and set everything yourself. It is not so important. For imagemenuitem5 in the Signals tab, set the activate signal (clicking on the menu item) for the signal exactly the same as for closing the form: topWindow_destroy_cb .
This is how our interface should look like in the end. We save our project with the name mainForm. The file will be called mainForm.glade
Code of our program
Create Example1.cpp file in the same folder where you saved mainForm.glade. First, I will give the whole code in its entirety, and then I will explain some important points.
/* Example1.cpp */
#include
#include
#define UI_FILE "mainForm.glade"
// описание виджетов
GtkBuilder *builder;
GtkWidget *topWindow;
GtkRadioButton *rbutRectangle, *rbutEllipse, *rbutTriangle;
GtkDrawingArea *drawingarea;
// описание обработчиков сигналов
extern "C" void topWindow_destroy_cb (GtkObject *object, gpointer user_data);
extern "C" gboolean drawingarea_expose_event_cb(GtkWidget *widget, GdkEventExpose *event, gpointer data);
extern "C" void rbutton_toggled_cb (GtkObject *object);
int main( int argc, char **argv )
{
    GError *error = NULL;
    // инициализация GTK+
    gtk_init( &argc, &argv );
   // создание нового GtkBuilder объекта
    builder = gtk_builder_new();
    // загрузка пользовательского интерфеса из файла, который мы создали в Glade
    if( ! gtk_builder_add_from_file( builder, UI_FILE, &error ) )
    {
        g_warning( "%s", error->message );
        g_free( error );
        return( 1 );
    }
   // связывание наших виджетов с описаннимем виджетов в GladeXML
   topWindow = GTK_WIDGET(gtk_builder_get_object(builder, "topWindow"));
   rbutRectangle = GTK_RADIO_BUTTON(gtk_builder_get_object(builder, "rbutRectangle"));
   rbutEllipse = GTK_RADIO_BUTTON(gtk_builder_get_object(builder, "rbutEllipse"));
   rbutTriangle = GTK_RADIO_BUTTON(gtk_builder_get_object(builder, "rbutTriangle"));
   drawingarea = GTK_DRAWING_AREA(gtk_builder_get_object(builder, "drawingarea"));
   // связываем сигналы с объектами графического интерфейса
   gtk_builder_connect_signals (builder, NULL);
   // освобождение памяти
   g_object_unref( G_OBJECT( builder ) );
   // Показываем форму и виджеты на ней
   gtk_widget_show( topWindow );
   // запуск главного цикла приложения
   gtk_main();
   return( 0 );
}
// закрытие приложения
void topWindow_destroy_cb (GtkObject *object, gpointer user_data)
{
 // завершаем главный цикл приложения
 gtk_main_quit();
}
// перерисовка холста
gboolean drawingarea_expose_event_cb(GtkWidget *widget, GdkEventExpose *event, gpointer data)
{
  cairo_t *cr;
  cr = gdk_cairo_create (widget->window);
  cairo_set_line_width (cr, 7);
  cairo_set_source_rgb (cr, 0, 0, 0);
   // переключатель установлен на прямоугольник
   if (gtk_toggle_button_get_active (GTK_TOGGLE_BUTTON(rbutRectangle)))
   {
    // рисуем прямоугольник
    cairo_rectangle (cr, 20, 20, 200, 100);
    cairo_stroke_preserve(cr);
    cairo_set_source_rgb(cr, 0, 0.8, 0);
   }
   // переключатель установлен на эллипс
   if (gtk_toggle_button_get_active (GTK_TOGGLE_BUTTON(rbutEllipse)))
   {
    // рисуем эллипс
    cairo_arc(cr, 150, 100, 90, 0, 2 * 3.14);
    cairo_stroke_preserve(cr);
    cairo_set_source_rgb(cr, 0.8, 0, 0);
   }
   // переключатель установлен на треугольник
   if (gtk_toggle_button_get_active (GTK_TOGGLE_BUTTON(rbutTriangle)))
   {
    // рисуем треугольник
    cairo_set_line_cap(cr, CAIRO_LINE_CAP_ROUND);
    cairo_move_to (cr, 40, 40);
    cairo_line_to (cr, 200, 40);
    cairo_line_to (cr, 120, 160);
    cairo_line_to (cr, 40, 40);
    cairo_set_line_join(cr, CAIRO_LINE_JOIN_ROUND);
    cairo_stroke_preserve(cr);
    cairo_set_source_rgb(cr, 0.8, 0, 0.8);
   }
  cairo_fill(cr);
  cairo_destroy(cr);
  return FALSE;
}
void rbutton_toggled_cb (GtkObject *object)
{
 // перерисовка drawingarea
 gtk_widget_queue_draw (GTK_WIDGET(drawingarea));
}
First we declare those objects. with whom we will work. Then we begin to register signal handlers. Because we write in C ++, using extern “C” we declare topWindow_destroy_cb, drawingarea_expose_event_cb, rbutton_toggled_cb as external functions and indicate that they must be linked according to the binding order in C. GtkBuilder contains links to all objects from the description in Glade. The gtk_builder_get_object function gets a reference to the object with the corresponding name from GtkBuilder (in this case, builder). The gtk_builder_connect_signals function is used to connect the handler functions in the code with the corresponding corresponding signal handlers in us GladeXML. This happens automatically. It is important that the names in Glade and in the code match. The application compiles normally, just the signals will not be processed,
Also, because we write in C ++ very often we have to use explicit type conversion. for instance
rbutRectangle = GTK_RADIO_BUTTON(gtk_builder_get_object(builder, "rbutRectangle"));
if we wrote in C, we could do without the explicit ghost of GTK_RADIO_BUTTON.
In order to compile your program, you need to use either an automatic build system (for example CMake), or register a makefile yourself. I will not dwell on this in detail. And just give an example of a description of makefile. At the end of the post, the two most recent links concern the creation of a make file.
CC=g++
LDLIBS=`pkg-config --libs gtk+-2.0 gmodule-2.0`
CFLAGS=-Wall -g `pkg-config --cflags gtk+-2.0 gmodule-2.0`
Example1: Example1.o
	$(CC) $(LDLIBS) Example1.o -o Example1
Example1.o: Example1.cpp
	$(CC) $(CFLAGS) -c Example1.cpp
clean:
	rm -f Example1
	rm -f *.o
Compilation takes place with the command:
makeA little testing of our program
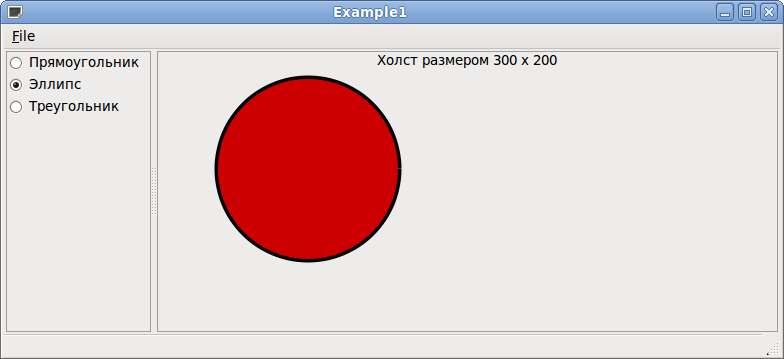
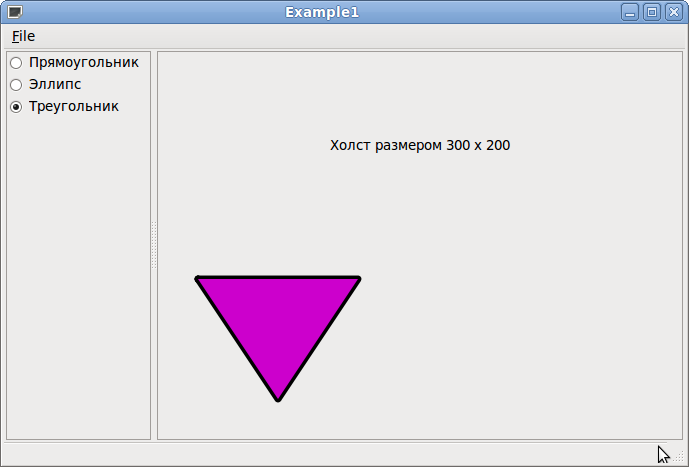
We start ...
... and then
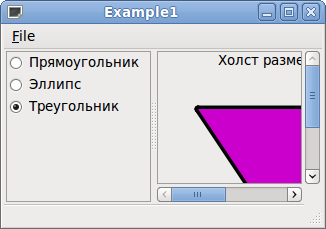
we resize the window. As we can see, the side menu and the canvas did not stretch and remained in the same dimensions, but the container in which the canvas resized. And with all the free space that appeared with an increase in the size of the form went to him. This is all because we set scrolledwindow1 Width reguest = 145 and resize Yes . Here is an example of scrollbars appearing as the main window has become smaller
. Now I’ll go into Glade3 and change label1 property Expand to Yes. The project does not need to be recompiled. Simply save the mainForm file. And here is the result:
Why is that? We have a fixed size canvas. And all the space that is obtained when the main window is enlarged is given to the label1 widget. You can "play around" with all this business. For example, setting Expand back to No and specifying the exact Height value, for example 70. And then again there will be a fixed size, but not by default, but the one you specify.
This ends this post. If this topic is interesting, I have a desire to write more posts in this direction.
A bit of theory is taken from the Glade3 tutorial - Size negotiation .
I advise you to read: Packing Widgets , The Cairo graphics tutorial , Makefiles by example , GNU `make '