Getting Started with Drupal: A Complete Practical Guide (Part 1)
- Transfer
Hello!
I bring to court the translation of the wonderful article Getting Started with Drupal: A Comprehensive Hands-On Guide . This material is an indispensable guide for novice Drupal developers, as it covers not only the installation and basic principles, but also two of the “three pillars” of Drupal site building - Views and CCK. The best part is that the whole article is devoted to the practical creation of a useful site (message board). Indeed, at the time of Drupal 4.7, when I was just starting to get to know him, one could only dream of such detailed and intelligible manuals.
Let me briefly announce the Drupal workers who worked on translation and localization: Ch , graker (initiator of the translation), iHappy(localization of screenshots), kyky (your humble servant), mak-vardugin , P.Selfin , trubinovskaya , vgoodvin .
Drupal is a popular open source content management system. Due to its powerful functionality, developing complex websites on Drupal is much easier than writing them from scratch. Not surprisingly, thanks to the large community of users and the huge number of modules, we hear about Drupal more and more.
In this guide, we will in practice discover Drupal and create a site with a new type of content and pages for its output.
Ready? Immerse yourself in an exceptionally powerful content management system!
After reading this manual, you:
We will develop a site on Drupal with a bulletin board for vacancies, where visitors can add jobs and projects. Our goal is precisely so that you immediately begin to create sites, and not just read how to do it.
First, let's briefly consider what advantages (and disadvantages) Drupal has so that you can decide whether this CMS suits you .
Open source. Yes, Drupal is distributed with open source code, which means that all the advantages of open source software are available to you .
Configuration flexibility. The main advantage of Drupal lies in its flexible architecture. You can use it to build sites of any type: from social media sites that allow users to post their own content and vote for it, forums and sites with vacancies, to galleries or publications of portfolio designers. Drupal will do the job well (of course, for this you will have to work a little).
A large and competent community of developers.Around Drupal there is a large, vibrant and open community of users and developers. This means that you have access to excellent modules, timely bug fixes and kernel updates, as well as an inexhaustible stream of documentation and manuals on the network.
Modules A huge number of modules have been developed for Drupal that extend its original functionality (we'll talk about what a module is a bit later).
Ease for developers.As a web developer, you will not feel the restrictions when working with Drupal. After all, Drupal was developed taking into account the needs of developers. The mistake of some basic CMS is the excessive emphasis on the user interface, which often leads to a lack of attention to the needs of those who, in fact, will develop and promote the system in the future. But this is not the case with Drupal.
Built-in caching system. Drupal has a built-in caching system that can reduce server load and reduce page generation time . Caching avoids complex database queries, which improves server performance.
Decent built-in search engine.Unlike other CMS, Drupal has a very good search engine, implemented at the kernel level. Of course, she cannot compete with search services such as Google Search , or Yahoo! Search BOSS , but nevertheless quite suitable for work.
A long learning process. Yes, it is a fact that learning Drupal is a little more difficult than learning other CMS. I would not recommend Drupal if you want to make the first site after a week of dating. It will take you more than one month to truly understand Drupal, and the same amount to create the first full site. However, it should be noted that you can create a small site in less than a day (this is what we will do in this guide).
Difficulty for non-developers.Since the needs of developers are at the forefront, those who are not very familiar with information technology will need some time to get used to Drupal. This means that it will be difficult for specialists who are only superficially knowledgeable in web development to create (or even administer) sites on Drupal.
Sophisticated interface. The site administration interface in Drupal is somewhat difficult to understand; overall he is not as user friendly as he could be. (However, this will change soon).
Wherever Drupal discusses, there is always an irresistible desire to compare it with another leading open web platform; this is usually WordPress .
And wherever you assume that WordPress is not a full-featured CMS, but just a blogging platform, you will always have a heated discussion. I myself use both CMS, but sometimes WordPress features are simply not enough .
In other words, if you are making a serious resource with registration, authentication, a set of permissions and roles, for example, an online store, a forum or a site with video and audio materials that users add, it makes sense to use a more serious CMS than WordPress.
I would not recommend that you use Drupal if the client only needs a blog or a simple website with a portfolio of several pages and basic content: such websites are faster and easier to do on WordPress. Drupal is clearly redundant for this.
Another important argument against using Drupal is an interface that is not easy for inexperienced users to understand. This is a good argument for WordPress.
To inspire you, I’ll list a few sites on Drupal.
Mozilla
Mozilla, the company responsible for Firefox , uses Drupal in almost all of its web projects. The official Mozilla and Spread Firefox websites are made on Drupal.
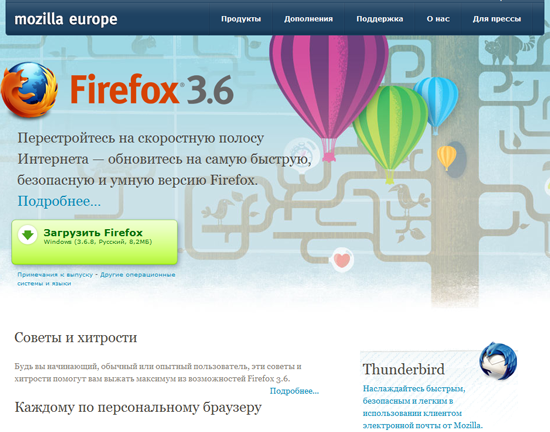
Spread Firefox

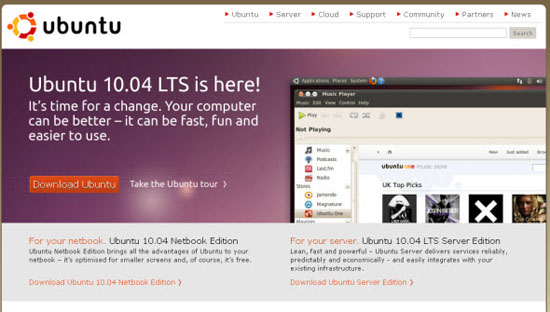
Ubuntu
The official site of Ubuntu , a popular Linux distribution , the operating system that runs on many servers, is also made on Drupal. Pay attention to the size of this site and the number of content types and features; you will soon understand why Drupal was chosen for Ubuntu.
Need more examples? Then look at these wonderful Drupal sites .
As part of this guide, we will use the latest stable release of Drupal 6 ; download it from here .
Here we will install Drupal on our computer, but if you want to install it on a real server, the process will be similar.
To install Drupal on a local machine, you need a server platform such as XAMPP or WAMP . Do not be alarmed if you have never heard of them - it is very easy to use them.
If you do not already have a local web server, install XAMPP right now .
Below is a link to a simple authorship by Jacob Gübe (founder and editor-in-chief of Six Revisions), according to which you very quickly install and configure XAMPP (the manual is written for WordPress, so follow only the first part, steps 1–26, keeping in mind that you are installing not WordPress, but Drupal):
Later in this guide, we assume that you are using XAMPP, so if you choose a different server package, you may need to slightly modify the installation process.
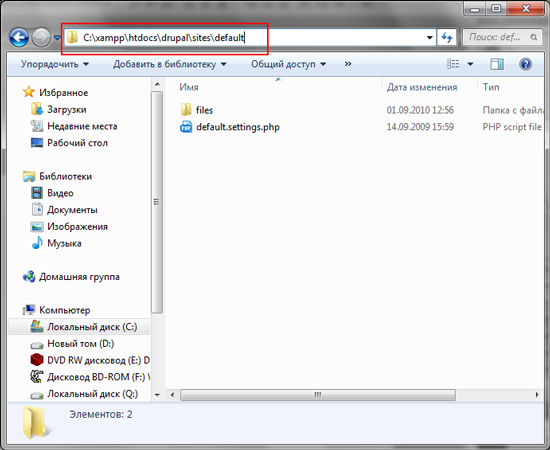
Copy the Drupal files to the XAMPP directory Copy the Drupal
package you downloaded earlier to the xampp \ htdocs directory. Unzip the files and rename the folder to “drupal” for easy navigation.
Now go to the xampp \ htdocs \ drupal \ sites \ default folder.
Make a copy of the default.settings.php file and rename it to settings.php.
Make sure that you did not delete default.settings.php , otherwise the installation of Drupal will fail with an error; This is one of the most common mistakes made by new developers on Drupal.

Drupal uses MySQL to store data . So we need to pre-configure the MySQL database. To do this, we will use phpMyAdmin , a web interface for convenient administration of MySQL databases (it is already included in the XAMPP distribution kit).
Go to the phpMyAdmin page in the browser at:
localhost / phpmyadmin

In this example, I named the database db_drupal . You can give the superuser ( root ) all privileges to work with the db_drupal database , so that he can read, write and modify data in the database. However, using a root account on a production site is not a good practice.. It is best to create a separate user for this database and give it only the necessary privileges. Now we will do so.
In our example, I will create a new MySQL account and name it drupal_user . For work sites, however, it’s nice to use a non-obvious, random username to reduce the chance of hacking during a brute force attack.
And surely do not use a root account , as most hackers will try it first. The root user in MySQL has super privileges and has access not only to your drupal_db database, but also to other databases. (By the way, a good option is to delete the root user altogether and not use it anywhere. You can create a pseudo-root user, but more about that some other time).
To create a new MySQL user, go to the phpMyAdmin main page and then click on the “Privileges” tab.
Now click "Add a new user" and fill in the input fields with the necessary data.

While you are working on the local machine (that is, Drupal is installed on your computer and runs on XAMPP), you can select all available privileges, but on the production server it is highly recommended to install only those that are really needed by drupal_user.
For our example, I chose only those privileges that I want to grant drupal_user to the user.
This concludes our work with MySQL and phpMyAdmin.
In order for the installation process to match the illustrations in this guide, you must install the Russian version of Drupal. To do this, download its translation. Translations of Drupal and its modules into Russian are available on the Drupaler.ru website . To download the translation of Drupal itself, go to this page , fill out the form as shown in the figure, and click Export.

Then unzip the downloaded archive into the same directory where Drupal was unpacked a little earlier.
Translations of additional Drupal modules are also available at Drupaler.ru. Since we will need the CCK and Views modules later in the tutorial, download their translations right now from the CCK Translation and Views Translation pages .
So, enter the following URL in the address bar of our browser:
localhost / drupal
If you did not forget to rename the unpacked directory with Drupal to “drupal”, everything should work. If you forgot, replace “drupal” in the URL with the name of the folder that you specified when unpacking Drupal files in htdocs.
As soon as you go to the URL above, you will immediately see the Drupal installation menu. You can select your preferred Drupal interface language on the first page. Please note that this option can be changed later from the admin panel. We will continue the installation in Russian, so let's choose “Install Drupal in Russian”.
On the next screen, Drupal will check if your server (in our case, the local machine) is able to work with Drupal. If your server does not have enough applications for Drupal, an error message will be displayed.
Next you will see the database configuration screen . Here you need to provide the information that you used when creating the drupal_db table and the drupal_user user.
In the same place, on the database settings screen, click on “ Advanced Settings ” and you will see an option called “ Table Prefix ”, which allows you to assign a given string to the name of all MySQL Drupal tables (eg blackjack_drupal_table). I recommend that you set a random prefix that is understandable only to you; this caution will help reduce the risk of attacking a database with SQL injection.
If all the previous steps were performed correctly, Drupal will begin installing the necessary modules, after which you will be redirected to the site configuration page .
The configuration options are intuitive, so I will let you enter all the necessary information yourself.

One of the options that may be unfamiliar to you is called " Clean Links " and is located in the "Server Settings" section. The links generated by Drupal by default are unintuitive and look something like localhost / index.php? Q = 21 .
When clean links are enabled, URLs look nicer, easier to remember, and contribute to better SEO . For example, localhost / events .
For clean links to work, mod_rewrite (Apache module) must be installed on the server . Most likely, you already have it installed.
If mod_rewrite is not installed or not running (which is unlikely if you have an Apache server), Drupal will throw an error and the use of clean links will not be available. This will not prevent us from creating the site, but for the reasons described above, you should enable clean links as soon as possible.
If you followed the guide correctly, you will see this screen:
Don’t worry if the error of the mail () function appears : it arises because we use XAMPP on the local machine and simply did not configure the mail server, therefore Drupal will not be able to send letters to administrators.
When you work with a real server, these things will already be pre-configured (unless you make your own web server, which is not configured yet).
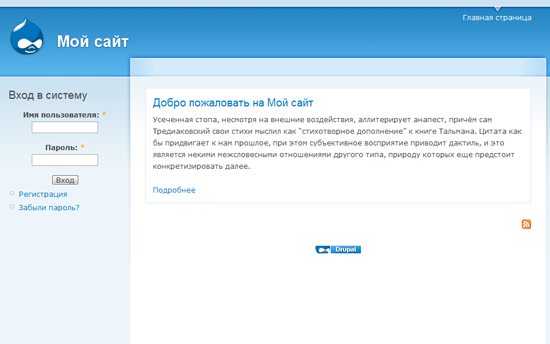
Let's go to the Drupal admin area. As soon as you go to the new site at localhost / drupal , the following page will appear:

Go to the admin panel by clicking on the “Management” link.
Now that you have installed Drupal, it's time to discuss the concept of modules.
Modules are extensions of Drupal that add additional functionality to it.
For example, Drupal comes with a preinstalled module called “System”. In fact, Drupal is a set of kernel modules that are developed and supported by the project team. The System module is one of them; Drupal cannot work without it.
In addition to the kernel modules included in Drupal, you can download additional modules from the official repository repository . In addition, after gaining the skills of developing Drupal's modules on the API , you can create your own modules.
Once you find the right module, download it to your computer.
Then you need to transfer the unpacked module to the drupal \ sites \ all \ modules directory.
By default , there is no folder for modules , so you must create it manually. Create the modules folder in drupal \ sites \ all.
It’s good practice to keep downloaded modules separate from the default ones in the Drupal distribution, so do not put additional modules in drupal \ modules.
CCK (Content Construction Kit) is a very popular Drupal module that allows you to create different new types of content. Let's practice installing modules using the CCK example, especially since in the future we will need it.
First, download the appropriate version of CCK . Then unzip the archive to drupal \ sites \ all \ modules; in the same folder, unzip the archive downloaded with Drupaler.ru with the CCK module translation.
After downloading and placing the CCK module in drupal \ sites \ all \ modules, you must enable it in the Drupal administration interface. Go to Site Design> Modules(localhost / drupal / admin / build / modules). Here you will see the CCK * module. Turn it on. You can also enable CCK submodules if you need them (later, when we start working with CCK, we will do that).
* - according to the tradition that has developed in immemorial times, a module, called CCK everywhere, is called Content in the list of modules (approx. Trans.).
Congratulations! You have just installed the Drupal module.
There are two options for viewing the administrative sections of Drupal:
If you select the " By tasks " display , the page will be organized by various administration tasks.
For example, when organizing the “By Tasks” page under the “Content” heading, you will see all tasks related to working with content. “Content”, for example, allows you to view, edit and delete materials, while “Publish Settings” control their behavior and display on the site.
Each task called has a short description to help you understand its purpose.
If you select the “ By Modules ” display , then the links will be organized by modules.
For example, in the “By Modules” display, under the “System” module heading, you will find “Setting Permissions”, “Clean Links”, “Modules”, and so on.
It can take a long time to get used to the administrative interface of Drupal ; however, there are many additional modules that greatly facilitate the work with the admin panel.
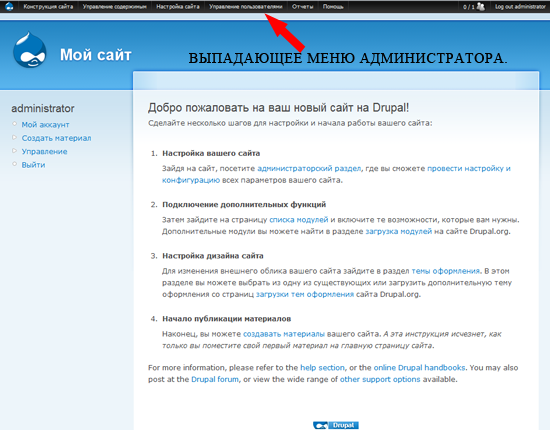
I advise you to install the Administration menu module , which adds a drop-down navigation menu to the top of all pages of the site, visible only to the administrator.
It's time to act. Let's create the main page. To do this, we will add the first material of the "Page" type to the site. Go to the Contents> Create Material> Page menu (localhost / drupal / node / add / page).

The theme that Drupal uses by default displays a navigation menu in the upper right corner. The settings in the "Menu Options" section determine whether to include a link to our page in the navigation or not.
If you want to add a link to the main page in the main navigation menu, select "Main links" in the "Parent item" drop-down menu.
The option " Weight " allows you to organize the output order of links. Links with less weight will be displayed first, as they are "easier."
So, for example, if the link "Home page" has a weight of 0, and the link "About the site" - 5, then the item "Home page" will be shown first, because it is easier.
If the link "Home" has a weight of 0, and the link "About the site" is also 0, then Drupal organizes the links in alphabetical order. Since the weight is the same, the “Home” item will be shown first.
In our case, we leave the weight of the "Home page" unchanged (by default the weight is zero).
The selector in the "Input Format" section allows you to choose how to enter content.
The Filtered HTML format limits the set of HTML tags that can be used in text through filtering of dangerous HTML elements like <script>, which can be used to attack a site visitor’s browser.
Use the Filtered HTML format if site administrators are not familiar with HTML.
And for developers should use the Full HTML format . Using this format assumes that you are familiar with the HTML language.

If only one person is involved in creating content on your site, this option will probably not be useful to you (unless you are very forgetful).
If you are working with a team of users adding materials and want to save different versions, keep a log of content changes and make notes about the nature of these changes - the "Information about the editors" section will be very useful to you.
In addition, if the “ Create a new edition ” checkbox is checked , the old version of the material will be saved in case you want to return to it.
These options enable or disable visitor comments for this material. We probably don’t need comments on the main page, so I selected the “ Disabled ” item .
In this section you can change the author name and publication date.
You do not need to fill in these parameters each time - Drupal will do this himself, provided that you have not changed them.

This section defines the settings for publishing the material.

And here is our main page; while it’s very simple, but don’t worry, soon we will complicate it.
Further we will create a bulletin board of vacancies filled with users.
In the process of its creation, we will work with custom types of materials, Views, and other development tools for sites in Drupal.
Before continuing, it is necessary to discuss one of the most incomprehensible topics for beginners - the concept of nodes.
A node is a basic element in the structure of the contents of Drupal. Simply put, if you imagine Drupal as a building, then the nodes will be bricks. Each part of the site’s content is a node - be it a page, a forum post, an article, etc.
Remember that the administration and user profile pages are not considered nodes, since they are generated by the system and not by users.
Noda is the most important concept that you must understand if you plan to develop complex sites on Drupal. Despite the fact that the meaning of nodes is often incomprehensible to beginners, they are the ones that give the developer on Drupal incredible flexibility in creating and configuring sites.
To look at this with an example, let's go to the main page created earlier. Pay attention to the address bar of the browser, it will indicate something like this (if clean links are disabled, the address will look different):
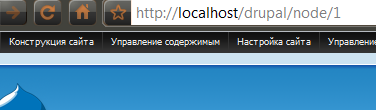
In the address you will see the word "node"; this means that this page is a node.
Creating a new type of material is a great way to customize the site for your needs. For each type, you can determine the display method, assign access rights, attach additional properties - the possibilities are simply endless.
We will create a vacancy notice board for our site. Users will post vacancies and projects, a kind of small Craigslist (translator's note: www.craigslist.org - job posting service and resume).
For each vacancy, we need the following fields:
Working with custom material types in Drupal is easy. First go to Administration> Material Types> Add Content Type .
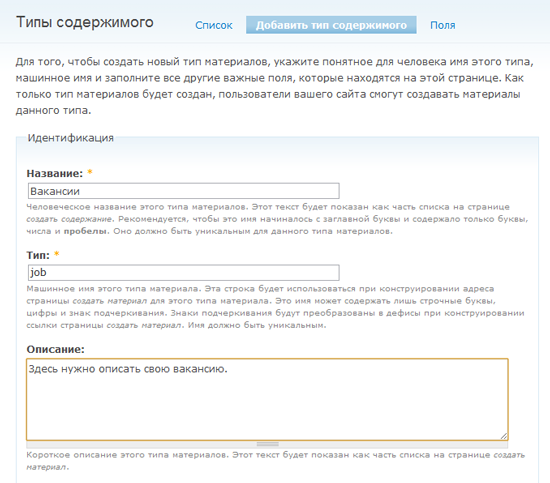
Almost all elements of the page for adding a new type of material are provided with explanations. I consider it necessary to talk separately about the “Type” element. Type is the machine name of a new type of material used in more complex designs.
In our case, for vacancies we will set the machine name of the material type “job”. This is a very important point: in the future, when you become Drupal’s ninja masters and want to make complex changes to your website, for example, change the way ads are displayed, you will need to create a file called node-job.tpl.php (this is already beyond of this manual).
Now fill in the fields “Name”, “Type” and “Description”, and we will move on.
In this section you have the opportunity to create and customize a form for entering job advertisements; it is what users will see when they post vacancies.

In the settings of the publishing process contains the basic parameters for publishing material. If you want the vacancy to be published without preview by the administrator, check the "Published" item.
Continue to customize the publishing process. In the “Comment Settings” section, you can set different options for commenting on vacancies. If you want visitors to be able to comment on vacancies, include comments. Do not want to - turn it off.
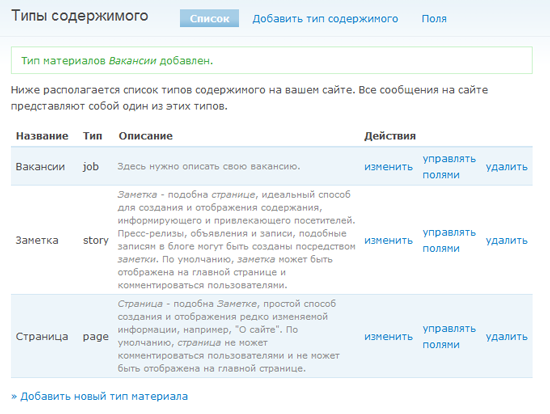
It's time to click “Save” and thereby complete the creation of our first type of material. If you followed the instructions, “Vacancy” will appear in the list of content types (next to the page, article, and so on).
So, we have our own type of material. Now we need to configure the form for adding vacancies using the extremely useful module - CCK.
CKK is usually the first module that sophisticated developers put on a new site. It is so important that it will be embedded in the core of Drupal 7 , after which you will no longer have to download it manually.
At this point, you should have installed CCK according to the description of working with modules at the beginning of the manual.
To get started, go to Administration> Design> Modules .
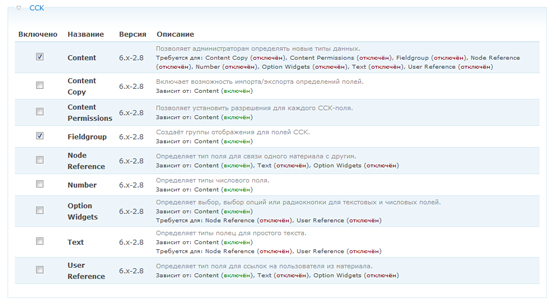
In the CCK section, you will see a list of submodules. Some of them are already enabled by default, and some are not. Why? The architecture of Drupal is extremely modular, and this allows us to use only the tools that are really needed in development. Module developers are advised to group them by functionality, as a result of which the modules are less cumbersome and more economical.
As a site administrator, include only those modules and submodules that you really need.
Now let's include some of the CCK submodules we need for the vacancy form.
Here are the submodules you need to enable:
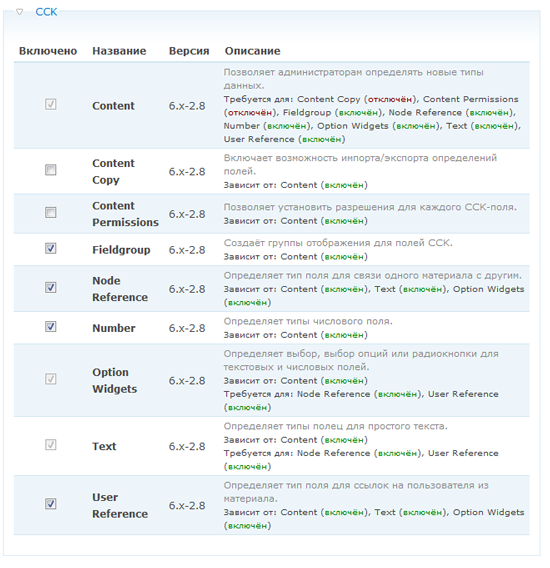
Since users may be required to enter fractional numbers (for example, the required work experience in years), we will need to enable the Number submodule.
We will also need the Option Widgets module, which allows you to add various data entry elements, for example, flags, groups of radio buttons, and so on.
Each of these submodules depends on the Content module: you cannot enable them while Content is turned off.
Have you enabled CCK submodules? Great, it's time to set up a job posting form.
Go to Administration> Content> Content Types , then click on the "Manage Fields" link in the "Actions" column opposite the "Vacancy" material type. Here we will add new fields to the form.

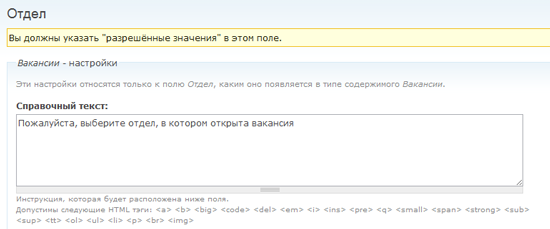
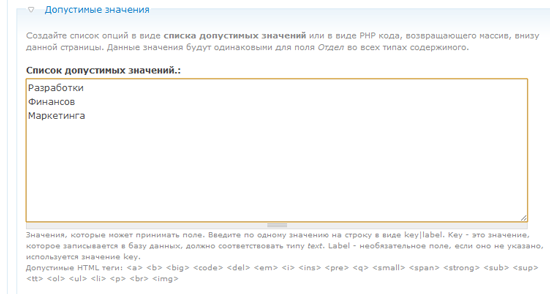
First, I will add the “ Department ” field , which allows the user to select from the drop-down list the department in which the vacancy occurred (development, financial, interfaces, IT and marketing).

After clicking the “Save” button, you will be redirected to a page where you can finally fine-tune the “Department” field and list its valid values.
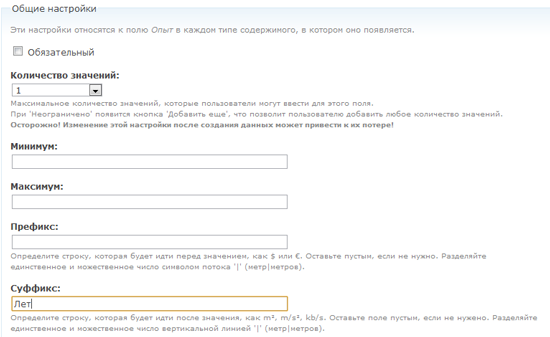
The next field is “ Experience", The user will be able to enter fractional numbers into it (for example, 3.5 years).

In the " Help text " field, add a hint on how to fill in the field correctly so that visitors enter the correct values.

In the " General Settings " section , you can limit the value of the field. For example, if you set 2.3 in the Minimum field, then when you try to post a vacancy with experience 1.4, an error message will be displayed to the user.
The last field in the material type “Vacancy” is “Salary”. This is an integer, for example, 50,000 rubles.

In the general field settings, specify 0 as a minimum to prevent negative values (for example, -1200). Why not specify a value greater than zero? Because zero salary means that this work is not paid.
After creating all the fields, their list for the type of material “Vacancy” will look like this:
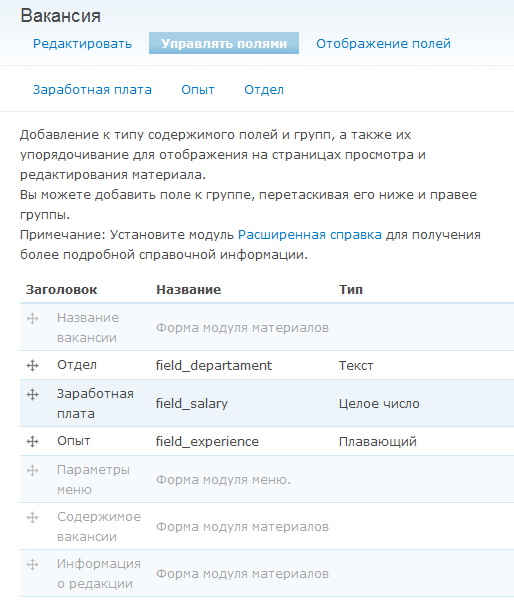
By dragging the cross icon to the left of the field names, you can change the order in which they appear in the form of adding vacancies.
Before we move on, create some jobs by going to the Create Material> Vacancy page . We will need their data in the next part of the manual.
Here we worked with the simplest CCK fields, but this module also provides much more serious means of organizing content. For example, you can install the ImageField module so that users can post images (for example, let employers post photos of the workplace).
If you need additional CCK fields, check out this list .
To be continued .
Discussion on drupal.ru
I bring to court the translation of the wonderful article Getting Started with Drupal: A Comprehensive Hands-On Guide . This material is an indispensable guide for novice Drupal developers, as it covers not only the installation and basic principles, but also two of the “three pillars” of Drupal site building - Views and CCK. The best part is that the whole article is devoted to the practical creation of a useful site (message board). Indeed, at the time of Drupal 4.7, when I was just starting to get to know him, one could only dream of such detailed and intelligible manuals.
Let me briefly announce the Drupal workers who worked on translation and localization: Ch , graker (initiator of the translation), iHappy(localization of screenshots), kyky (your humble servant), mak-vardugin , P.Selfin , trubinovskaya , vgoodvin .
Getting Started with Drupal: A Complete Practical Guide
Drupal is a popular open source content management system. Due to its powerful functionality, developing complex websites on Drupal is much easier than writing them from scratch. Not surprisingly, thanks to the large community of users and the huge number of modules, we hear about Drupal more and more.
In this guide, we will in practice discover Drupal and create a site with a new type of content and pages for its output.
Ready? Immerse yourself in an exceptionally powerful content management system!
Tasks
After reading this manual, you:
- learn about the strengths and weaknesses of Drupal;
- install Drupal;
- understand the principle of his work;
- learn about Drupal modules;
- learn to work with administration pages;
- Create and publish site content
- customize your content type using CCK ;
- Learn how to create views to display content using the Views module .
- Create paginated views
- Create block view views
- Learn about themes.
What will we do
We will develop a site on Drupal with a bulletin board for vacancies, where visitors can add jobs and projects. Our goal is precisely so that you immediately begin to create sites, and not just read how to do it.
Why Drupal?
First, let's briefly consider what advantages (and disadvantages) Drupal has so that you can decide whether this CMS suits you .
Advantages
Open source. Yes, Drupal is distributed with open source code, which means that all the advantages of open source software are available to you .
Configuration flexibility. The main advantage of Drupal lies in its flexible architecture. You can use it to build sites of any type: from social media sites that allow users to post their own content and vote for it, forums and sites with vacancies, to galleries or publications of portfolio designers. Drupal will do the job well (of course, for this you will have to work a little).
A large and competent community of developers.Around Drupal there is a large, vibrant and open community of users and developers. This means that you have access to excellent modules, timely bug fixes and kernel updates, as well as an inexhaustible stream of documentation and manuals on the network.
Modules A huge number of modules have been developed for Drupal that extend its original functionality (we'll talk about what a module is a bit later).
Ease for developers.As a web developer, you will not feel the restrictions when working with Drupal. After all, Drupal was developed taking into account the needs of developers. The mistake of some basic CMS is the excessive emphasis on the user interface, which often leads to a lack of attention to the needs of those who, in fact, will develop and promote the system in the future. But this is not the case with Drupal.
Built-in caching system. Drupal has a built-in caching system that can reduce server load and reduce page generation time . Caching avoids complex database queries, which improves server performance.
Decent built-in search engine.Unlike other CMS, Drupal has a very good search engine, implemented at the kernel level. Of course, she cannot compete with search services such as Google Search , or Yahoo! Search BOSS , but nevertheless quite suitable for work.
disadvantages
A long learning process. Yes, it is a fact that learning Drupal is a little more difficult than learning other CMS. I would not recommend Drupal if you want to make the first site after a week of dating. It will take you more than one month to truly understand Drupal, and the same amount to create the first full site. However, it should be noted that you can create a small site in less than a day (this is what we will do in this guide).
Difficulty for non-developers.Since the needs of developers are at the forefront, those who are not very familiar with information technology will need some time to get used to Drupal. This means that it will be difficult for specialists who are only superficially knowledgeable in web development to create (or even administer) sites on Drupal.
Sophisticated interface. The site administration interface in Drupal is somewhat difficult to understand; overall he is not as user friendly as he could be. (However, this will change soon).
Drupal vs. WordPress
Wherever Drupal discusses, there is always an irresistible desire to compare it with another leading open web platform; this is usually WordPress .
And wherever you assume that WordPress is not a full-featured CMS, but just a blogging platform, you will always have a heated discussion. I myself use both CMS, but sometimes WordPress features are simply not enough .
In other words, if you are making a serious resource with registration, authentication, a set of permissions and roles, for example, an online store, a forum or a site with video and audio materials that users add, it makes sense to use a more serious CMS than WordPress.
I would not recommend that you use Drupal if the client only needs a blog or a simple website with a portfolio of several pages and basic content: such websites are faster and easier to do on WordPress. Drupal is clearly redundant for this.
Another important argument against using Drupal is an interface that is not easy for inexperienced users to understand. This is a good argument for WordPress.
Drupal powered sites
To inspire you, I’ll list a few sites on Drupal.
Mozilla
Mozilla, the company responsible for Firefox , uses Drupal in almost all of its web projects. The official Mozilla and Spread Firefox websites are made on Drupal.
Spread Firefox
Ubuntu
The official site of Ubuntu , a popular Linux distribution , the operating system that runs on many servers, is also made on Drupal. Pay attention to the size of this site and the number of content types and features; you will soon understand why Drupal was chosen for Ubuntu.
Need more examples? Then look at these wonderful Drupal sites .
Download and install Drupal
As part of this guide, we will use the latest stable release of Drupal 6 ; download it from here .
Install Drupal on XAMPP
Here we will install Drupal on our computer, but if you want to install it on a real server, the process will be similar.
To install Drupal on a local machine, you need a server platform such as XAMPP or WAMP . Do not be alarmed if you have never heard of them - it is very easy to use them.
If you do not already have a local web server, install XAMPP right now .
Below is a link to a simple authorship by Jacob Gübe (founder and editor-in-chief of Six Revisions), according to which you very quickly install and configure XAMPP (the manual is written for WordPress, so follow only the first part, steps 1–26, keeping in mind that you are installing not WordPress, but Drupal):
Later in this guide, we assume that you are using XAMPP, so if you choose a different server package, you may need to slightly modify the installation process.
Copy the Drupal files to the XAMPP directory Copy the Drupal
package you downloaded earlier to the xampp \ htdocs directory. Unzip the files and rename the folder to “drupal” for easy navigation.
Now go to the xampp \ htdocs \ drupal \ sites \ default folder.
Create settings.php
Make a copy of the default.settings.php file and rename it to settings.php.
Make sure that you did not delete default.settings.php , otherwise the installation of Drupal will fail with an error; This is one of the most common mistakes made by new developers on Drupal.
Create a MySQL database
Drupal uses MySQL to store data . So we need to pre-configure the MySQL database. To do this, we will use phpMyAdmin , a web interface for convenient administration of MySQL databases (it is already included in the XAMPP distribution kit).
Go to the phpMyAdmin page in the browser at:
localhost / phpmyadmin
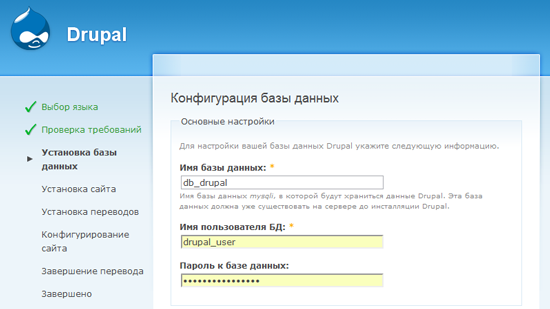
In this example, I named the database db_drupal . You can give the superuser ( root ) all privileges to work with the db_drupal database , so that he can read, write and modify data in the database. However, using a root account on a production site is not a good practice.. It is best to create a separate user for this database and give it only the necessary privileges. Now we will do so.
Creating a separate MySQL user for the Drupal database
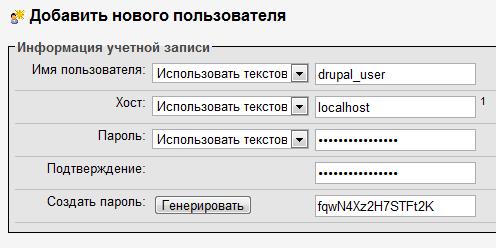
In our example, I will create a new MySQL account and name it drupal_user . For work sites, however, it’s nice to use a non-obvious, random username to reduce the chance of hacking during a brute force attack.
And surely do not use a root account , as most hackers will try it first. The root user in MySQL has super privileges and has access not only to your drupal_db database, but also to other databases. (By the way, a good option is to delete the root user altogether and not use it anywhere. You can create a pseudo-root user, but more about that some other time).
To create a new MySQL user, go to the phpMyAdmin main page and then click on the “Privileges” tab.
Now click "Add a new user" and fill in the input fields with the necessary data.
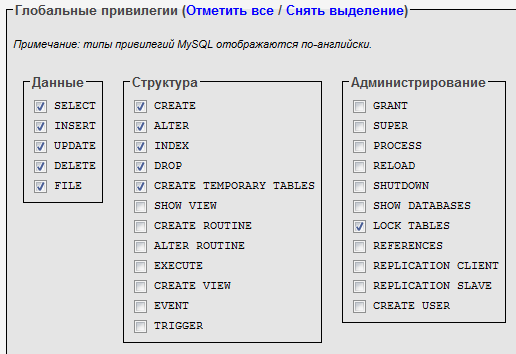
While you are working on the local machine (that is, Drupal is installed on your computer and runs on XAMPP), you can select all available privileges, but on the production server it is highly recommended to install only those that are really needed by drupal_user.
For our example, I chose only those privileges that I want to grant drupal_user to the user.
- Select
- Insert
- Update
- Delete
- File
- Create
- Alter
- Index
- Drop
- Create Temporary Tables
- Lock tables
This concludes our work with MySQL and phpMyAdmin.
Localization of Drupal (from translators)
In order for the installation process to match the illustrations in this guide, you must install the Russian version of Drupal. To do this, download its translation. Translations of Drupal and its modules into Russian are available on the Drupaler.ru website . To download the translation of Drupal itself, go to this page , fill out the form as shown in the figure, and click Export.
Then unzip the downloaded archive into the same directory where Drupal was unpacked a little earlier.
Translations of additional Drupal modules are also available at Drupaler.ru. Since we will need the CCK and Views modules later in the tutorial, download their translations right now from the CCK Translation and Views Translation pages .
Install Drupal using the installation wizard
So, enter the following URL in the address bar of our browser:
localhost / drupal
If you did not forget to rename the unpacked directory with Drupal to “drupal”, everything should work. If you forgot, replace “drupal” in the URL with the name of the folder that you specified when unpacking Drupal files in htdocs.
As soon as you go to the URL above, you will immediately see the Drupal installation menu. You can select your preferred Drupal interface language on the first page. Please note that this option can be changed later from the admin panel. We will continue the installation in Russian, so let's choose “Install Drupal in Russian”.
On the next screen, Drupal will check if your server (in our case, the local machine) is able to work with Drupal. If your server does not have enough applications for Drupal, an error message will be displayed.
Next you will see the database configuration screen . Here you need to provide the information that you used when creating the drupal_db table and the drupal_user user.
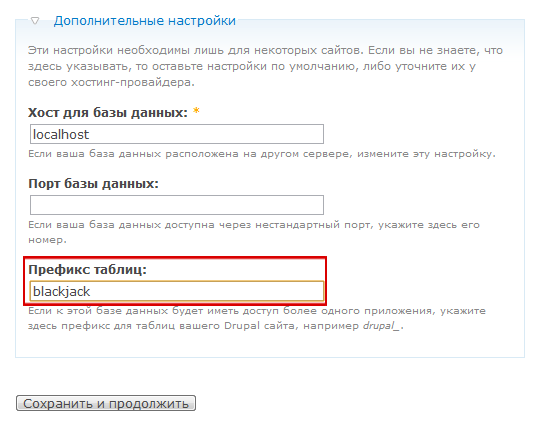
In the same place, on the database settings screen, click on “ Advanced Settings ” and you will see an option called “ Table Prefix ”, which allows you to assign a given string to the name of all MySQL Drupal tables (eg blackjack_drupal_table). I recommend that you set a random prefix that is understandable only to you; this caution will help reduce the risk of attacking a database with SQL injection.
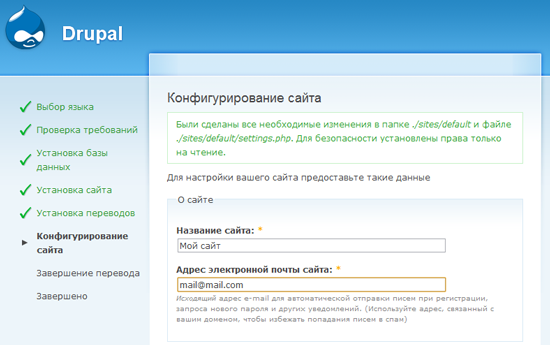
If all the previous steps were performed correctly, Drupal will begin installing the necessary modules, after which you will be redirected to the site configuration page .
The configuration options are intuitive, so I will let you enter all the necessary information yourself.
Setting up clean links
One of the options that may be unfamiliar to you is called " Clean Links " and is located in the "Server Settings" section. The links generated by Drupal by default are unintuitive and look something like localhost / index.php? Q = 21 .
When clean links are enabled, URLs look nicer, easier to remember, and contribute to better SEO . For example, localhost / events .
For clean links to work, mod_rewrite (Apache module) must be installed on the server . Most likely, you already have it installed.
If mod_rewrite is not installed or not running (which is unlikely if you have an Apache server), Drupal will throw an error and the use of clean links will not be available. This will not prevent us from creating the site, but for the reasons described above, you should enable clean links as soon as possible.
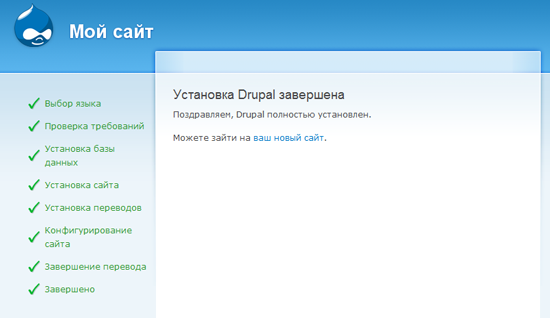
Installation completed
If you followed the guide correctly, you will see this screen:
Don’t worry if the error of the mail () function appears : it arises because we use XAMPP on the local machine and simply did not configure the mail server, therefore Drupal will not be able to send letters to administrators.
When you work with a real server, these things will already be pre-configured (unless you make your own web server, which is not configured yet).
Go to the Drupal admin area
Let's go to the Drupal admin area. As soon as you go to the new site at localhost / drupal , the following page will appear:
Go to the admin panel by clicking on the “Management” link.
Now that you have installed Drupal, it's time to discuss the concept of modules.
What are Drupal Modules?
Modules are extensions of Drupal that add additional functionality to it.
For example, Drupal comes with a preinstalled module called “System”. In fact, Drupal is a set of kernel modules that are developed and supported by the project team. The System module is one of them; Drupal cannot work without it.
How to add Drupal modules
In addition to the kernel modules included in Drupal, you can download additional modules from the official repository repository . In addition, after gaining the skills of developing Drupal's modules on the API , you can create your own modules.
Once you find the right module, download it to your computer.
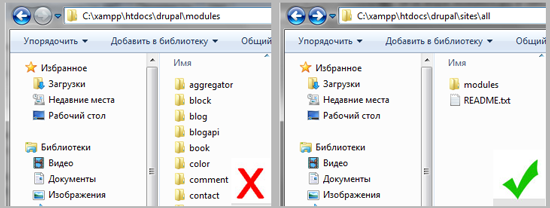
Then you need to transfer the unpacked module to the drupal \ sites \ all \ modules directory.
By default , there is no folder for modules , so you must create it manually. Create the modules folder in drupal \ sites \ all.
It’s good practice to keep downloaded modules separate from the default ones in the Drupal distribution, so do not put additional modules in drupal \ modules.
Installing an add-on module: CCK module
CCK (Content Construction Kit) is a very popular Drupal module that allows you to create different new types of content. Let's practice installing modules using the CCK example, especially since in the future we will need it.
First, download the appropriate version of CCK . Then unzip the archive to drupal \ sites \ all \ modules; in the same folder, unzip the archive downloaded with Drupaler.ru with the CCK module translation.
After downloading and placing the CCK module in drupal \ sites \ all \ modules, you must enable it in the Drupal administration interface. Go to Site Design> Modules(localhost / drupal / admin / build / modules). Here you will see the CCK * module. Turn it on. You can also enable CCK submodules if you need them (later, when we start working with CCK, we will do that).
* - according to the tradition that has developed in immemorial times, a module, called CCK everywhere, is called Content in the list of modules (approx. Trans.).
Congratulations! You have just installed the Drupal module.
Drupal Administration Pages: Crash Course
There are two options for viewing the administrative sections of Drupal:
- According to the tasks.
- By modules.
If you select the " By tasks " display , the page will be organized by various administration tasks.
For example, when organizing the “By Tasks” page under the “Content” heading, you will see all tasks related to working with content. “Content”, for example, allows you to view, edit and delete materials, while “Publish Settings” control their behavior and display on the site.
Each task called has a short description to help you understand its purpose.
If you select the “ By Modules ” display , then the links will be organized by modules.
For example, in the “By Modules” display, under the “System” module heading, you will find “Setting Permissions”, “Clean Links”, “Modules”, and so on.
Admin interface learning curve
It can take a long time to get used to the administrative interface of Drupal ; however, there are many additional modules that greatly facilitate the work with the admin panel.
I advise you to install the Administration menu module , which adds a drop-down navigation menu to the top of all pages of the site, visible only to the administrator.
Customize the main page
It's time to act. Let's create the main page. To do this, we will add the first material of the "Page" type to the site. Go to the Contents> Create Material> Page menu (localhost / drupal / node / add / page).
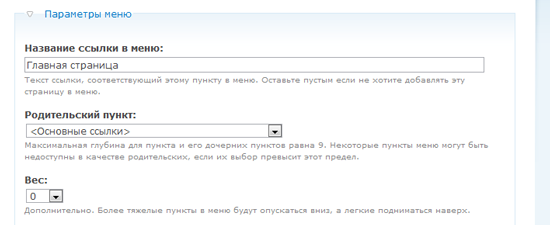
Menu options
The theme that Drupal uses by default displays a navigation menu in the upper right corner. The settings in the "Menu Options" section determine whether to include a link to our page in the navigation or not.
If you want to add a link to the main page in the main navigation menu, select "Main links" in the "Parent item" drop-down menu.
The option " Weight " allows you to organize the output order of links. Links with less weight will be displayed first, as they are "easier."
So, for example, if the link "Home page" has a weight of 0, and the link "About the site" - 5, then the item "Home page" will be shown first, because it is easier.
If the link "Home" has a weight of 0, and the link "About the site" is also 0, then Drupal organizes the links in alphabetical order. Since the weight is the same, the “Home” item will be shown first.
In our case, we leave the weight of the "Home page" unchanged (by default the weight is zero).
Input format
The selector in the "Input Format" section allows you to choose how to enter content.
The Filtered HTML format limits the set of HTML tags that can be used in text through filtering of dangerous HTML elements like <script>, which can be used to attack a site visitor’s browser.
Use the Filtered HTML format if site administrators are not familiar with HTML.
And for developers should use the Full HTML format . Using this format assumes that you are familiar with the HTML language.
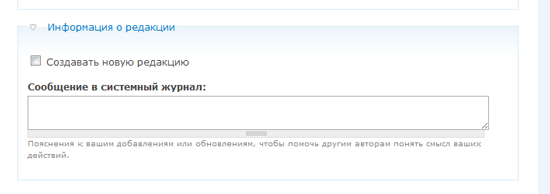
Editorial Information
If only one person is involved in creating content on your site, this option will probably not be useful to you (unless you are very forgetful).
If you are working with a team of users adding materials and want to save different versions, keep a log of content changes and make notes about the nature of these changes - the "Information about the editors" section will be very useful to you.
In addition, if the “ Create a new edition ” checkbox is checked , the old version of the material will be saved in case you want to return to it.
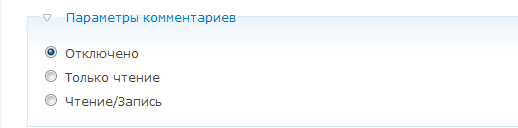
Comment Options
These options enable or disable visitor comments for this material. We probably don’t need comments on the main page, so I selected the “ Disabled ” item .
Author Information
In this section you can change the author name and publication date.
You do not need to fill in these parameters each time - Drupal will do this himself, provided that you have not changed them.
Publish Settings
This section defines the settings for publishing the material.
- Published - Displays the publication status. Uncheck the box if you want to remove the material from the publication.
- Place on the main page - the material will be displayed on the main page of the site. Uncheck if you do not want to display material on the main page.
- Pin at the top of lists - the material will be displayed at the top of the main page and other lists.
Let's look at the main page
And here is our main page; while it’s very simple, but don’t worry, soon we will complicate it.
What do we do next
Further we will create a bulletin board of vacancies filled with users.
In the process of its creation, we will work with custom types of materials, Views, and other development tools for sites in Drupal.
What is a node in Drupal?
Before continuing, it is necessary to discuss one of the most incomprehensible topics for beginners - the concept of nodes.
A node is a basic element in the structure of the contents of Drupal. Simply put, if you imagine Drupal as a building, then the nodes will be bricks. Each part of the site’s content is a node - be it a page, a forum post, an article, etc.
Remember that the administration and user profile pages are not considered nodes, since they are generated by the system and not by users.
Noda is the most important concept that you must understand if you plan to develop complex sites on Drupal. Despite the fact that the meaning of nodes is often incomprehensible to beginners, they are the ones that give the developer on Drupal incredible flexibility in creating and configuring sites.
To look at this with an example, let's go to the main page created earlier. Pay attention to the address bar of the browser, it will indicate something like this (if clean links are disabled, the address will look different):
In the address you will see the word "node"; this means that this page is a node.
Creating a new type of material in Drupal
Creating a new type of material is a great way to customize the site for your needs. For each type, you can determine the display method, assign access rights, attach additional properties - the possibilities are simply endless.
Create the material type “Vacancy”
We will create a vacancy notice board for our site. Users will post vacancies and projects, a kind of small Craigslist (translator's note: www.craigslist.org - job posting service and resume).
For each vacancy, we need the following fields:
- job title;
- detailed description;
- department - in the form of a drop-down list;
- work experience - text field;
- salary - text box.
Working with custom material types in Drupal is easy. First go to Administration> Material Types> Add Content Type .
Almost all elements of the page for adding a new type of material are provided with explanations. I consider it necessary to talk separately about the “Type” element. Type is the machine name of a new type of material used in more complex designs.
In our case, for vacancies we will set the machine name of the material type “job”. This is a very important point: in the future, when you become Drupal’s ninja masters and want to make complex changes to your website, for example, change the way ads are displayed, you will need to create a file called node-job.tpl.php (this is already beyond of this manual).
Now fill in the fields “Name”, “Type” and “Description”, and we will move on.
Form Properties
In this section you have the opportunity to create and customize a form for entering job advertisements; it is what users will see when they post vacancies.
Setting up the publishing process
In the settings of the publishing process contains the basic parameters for publishing material. If you want the vacancy to be published without preview by the administrator, check the "Published" item.
Continue to customize the publishing process. In the “Comment Settings” section, you can set different options for commenting on vacancies. If you want visitors to be able to comment on vacancies, include comments. Do not want to - turn it off.
Create the material type “Vacancy”
It's time to click “Save” and thereby complete the creation of our first type of material. If you followed the instructions, “Vacancy” will appear in the list of content types (next to the page, article, and so on).
Configure content types using CCK
So, we have our own type of material. Now we need to configure the form for adding vacancies using the extremely useful module - CCK.
CKK is usually the first module that sophisticated developers put on a new site. It is so important that it will be embedded in the core of Drupal 7 , after which you will no longer have to download it manually.
At this point, you should have installed CCK according to the description of working with modules at the beginning of the manual.
Turn on several CCK submodules
To get started, go to Administration> Design> Modules .
In the CCK section, you will see a list of submodules. Some of them are already enabled by default, and some are not. Why? The architecture of Drupal is extremely modular, and this allows us to use only the tools that are really needed in development. Module developers are advised to group them by functionality, as a result of which the modules are less cumbersome and more economical.
As a site administrator, include only those modules and submodules that you really need.
Now let's include some of the CCK submodules we need for the vacancy form.
Here are the submodules you need to enable:
Since users may be required to enter fractional numbers (for example, the required work experience in years), we will need to enable the Number submodule.
We will also need the Option Widgets module, which allows you to add various data entry elements, for example, flags, groups of radio buttons, and so on.
Each of these submodules depends on the Content module: you cannot enable them while Content is turned off.
Add fields to the form.
Have you enabled CCK submodules? Great, it's time to set up a job posting form.
Go to Administration> Content> Content Types , then click on the "Manage Fields" link in the "Actions" column opposite the "Vacancy" material type. Here we will add new fields to the form.
First, I will add the “ Department ” field , which allows the user to select from the drop-down list the department in which the vacancy occurred (development, financial, interfaces, IT and marketing).
After clicking the “Save” button, you will be redirected to a page where you can finally fine-tune the “Department” field and list its valid values.
The next field is “ Experience", The user will be able to enter fractional numbers into it (for example, 3.5 years).
In the " Help text " field, add a hint on how to fill in the field correctly so that visitors enter the correct values.
In the " General Settings " section , you can limit the value of the field. For example, if you set 2.3 in the Minimum field, then when you try to post a vacancy with experience 1.4, an error message will be displayed to the user.
The last field in the material type “Vacancy” is “Salary”. This is an integer, for example, 50,000 rubles.
In the general field settings, specify 0 as a minimum to prevent negative values (for example, -1200). Why not specify a value greater than zero? Because zero salary means that this work is not paid.
After creating all the fields, their list for the type of material “Vacancy” will look like this:
By dragging the cross icon to the left of the field names, you can change the order in which they appear in the form of adding vacancies.
Create multiple jobs
Before we move on, create some jobs by going to the Create Material> Vacancy page . We will need their data in the next part of the manual.
CCK is a very powerful tool
Here we worked with the simplest CCK fields, but this module also provides much more serious means of organizing content. For example, you can install the ImageField module so that users can post images (for example, let employers post photos of the workplace).
If you need additional CCK fields, check out this list .
To be continued .
Discussion on drupal.ru