Install Microsoft Hyper-V Server 2008 R2 on Flash-drive

When VMware released a free version of its hypervisor called ESXi, after some time diskless servers appeared on the market, loading the hypervisor itself from a small flash card. The files of virtual machines themselves are stored on external storage systems. This reduces the cost of equipment, since there is no need to equip the servers with their own hard drives and RAID controllers. Microsoft released its version of the hypervisor, called Hyper-V, which was included in Windows Server 2008. Following this, a free product was released called Hyper-V Server 2008, which is an extremely truncated version of Windows Server 2008 Server Core, with the only role is Hyper-V. Unlike VMware products, Hyper-V does not require the purchase of any licenses for individual "features" of the hypervisor, and it may be preferable if only OS of the MS Windows family are used as guest OSs. Hyper-V Server 2008 R2 uses a new hypervisor - Hyper-V 2.0 with support for its new features - in particular, Live Migration. Also, Hyper-V Server 2008 R2 can work on more powerful systems (with a large number of processors and RAM capacity) than the previous version, and can work as part of a failover cluster. Nevertheless - not everyone knows that Hyper-V Server 2008 R2 can also be loaded from a flash drive, in the same way, by the way, as well as Windows Server 2008 R2 and Windows 7. In this article I will tell you how to make Hyper-V Server 2008 R2 Bootable Flash Drive. Hyper-V Server 2008 R2 uses a new hypervisor - Hyper-V 2.0 with support for its new features - in particular, Live Migration. Also, Hyper-V Server 2008 R2 can work on more powerful systems (with a large number of processors and RAM capacity) than the previous version, and can work as part of a failover cluster. Nevertheless - not everyone knows that Hyper-V Server 2008 R2 can also be loaded from a flash drive, in the same way, by the way, as well as Windows Server 2008 R2 and Windows 7. In this article I will tell you how to make Hyper-V Server 2008 R2 Bootable Flash Drive. Hyper-V Server 2008 R2 uses a new hypervisor - Hyper-V 2.0 with support for its new features - in particular, Live Migration. Also, Hyper-V Server 2008 R2 can work on more powerful systems (with a large number of processors and RAM capacity) than the previous version, and can work as part of a failover cluster. Nevertheless - not everyone knows that Hyper-V Server 2008 R2 can also be loaded from a flash drive, in the same way, by the way, as well as Windows Server 2008 R2 and Windows 7. In this article I will tell you how to make Hyper-V Server 2008 R2 Bootable Flash Drive.
What is it for?
As you know, most often hard drives fail on computers. Relatively recently, flash drives based on flash memory appeared on the market. They differ from standard disks in much greater reliability and speed, since they do not contain moving parts. Unfortunately, their main drawback is the high cost: SSDs usually cost several times more than standard hard drives of the same size.
Flash drives are much cheaper, and may well go under the item "supplies" along with paper and printer cartridges. In addition, preparing a set of bootable flash drives in the manner described in the article is much simpler and faster than cloning hard drives, and therefore we get a more scalable solution: you can prepare several dozen servers in one day, which can only be set up later (which can also be automated, for example using scripts). In addition to scalability, fault tolerance is also increased: when a server fails, it will be enough just to rearrange the flash drive to a new server, and not restore it from backups.
So what do we need?
From the software we need:
- The installation disc or ISO-image of Hyper-V Server 2008 R2 can be downloaded here: www.microsoft.com/hyper-v-server/en/us/default.aspx
- Windows Automated Installation Kit (WAIK), download here: go.microsoft.com/fwlink/?LinkId=136976
From the "iron":
- A computer with Windows 7, on which a bootable flash drive will be created
- A server that meets the system requirements of Microsoft Hyper-V Server 2008 R2 and can boot from a USB device
- Actually, a USB flash drive or a flash card (SD / MMC / etc. - if the appropriate card format is supported by our computer and server), 8 GB or more (16 GB recommended).
Step 1: Create a VHD
The VHD (Virtual Hard Disk) file format was originally developed by Connectix, later acquired by Microsoft. The VHD format began to be used for virtual hard disk files in Microsoft VirtualPC and Virtual Server products, and then Hyper-V. The VHD format is open, and there is software from other developers using this format. In Windows 7 and Windows Server 2008 R2, VHD files are supported at the OS level, and can be mounted as a disk in the system. Moreover, the OS can even be installed and booted from VHD. In our case, we will create a VHD file on our flash drive, then write the files of the Hyper-V Server 2008 R2 system there and make the OS boot from this VHD.
So, insert our flash drive into a computer with Windows 7 and run the “Computer Management” snap-in (compmgmt.msc). Go to Disk Management and select “Create VHD”. We choose where our image file will be stored (some temporary folder on the hard drive - you can do it directly to a flash drive, but it will be faster), set the size - 25% of free space should remain on the flash drive in reserve, in the case of 16 make a 12 GB gigabyte flash drive and click Create. The process of creating a VHD will take some time, so you can safely go have a drink of something cool or strong and go in for boxing by correspondence on your favorite forum, how could it be without this ...
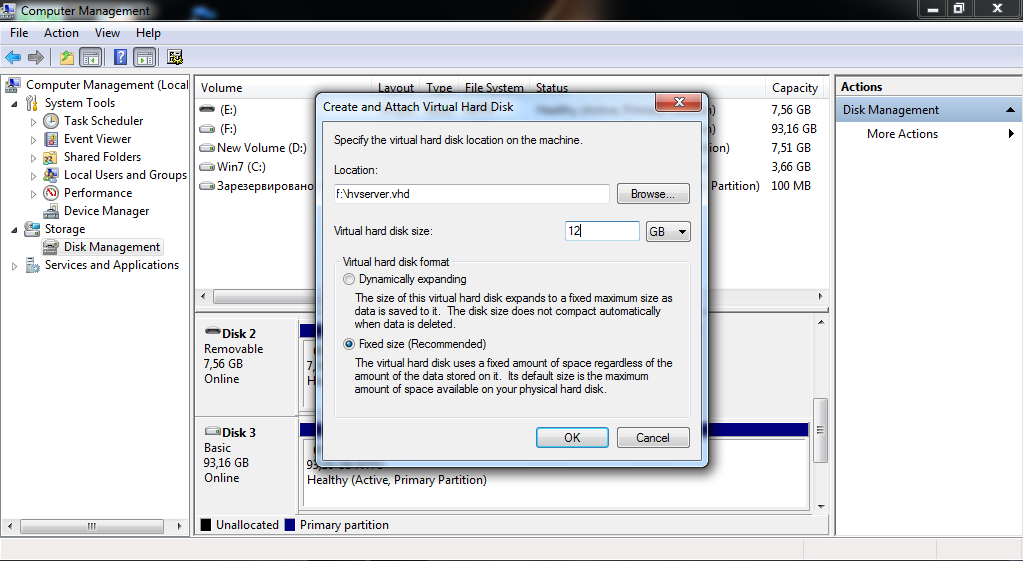
After we drank coffee, you can look at the automatically mounted new disk, initialize it and create a single partition on it, formatting it in NTFS.
Step 2. Unpack the installation image on VHD
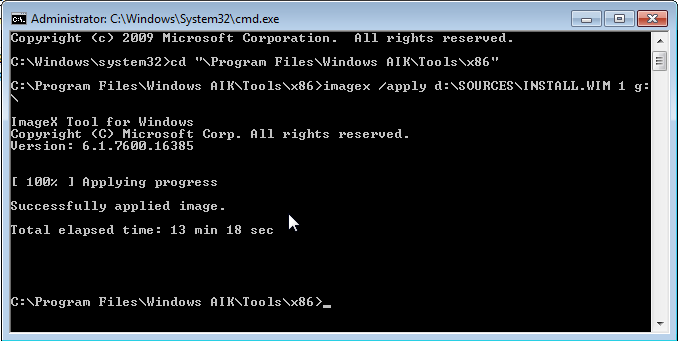
Now we need to unzip the installation image of Hyper-V Server to the created disk. We will need the Hyper-V Server 2008 R2 installation disc or its ISO image. More specifically, we need the install.wim file, which is stored in the SOURCES folder on the installation disk (or ISO image). If we have a downloaded ISO-image, you must either burn it to a DVD-ROM, or unzip it to your hard drive, or mount it using any suitable program (Alcohol 120%, Daemon Tools, UltraISO, Nero). Unpacking the WIM image is done using ImageX, which is part of WAIK. We execute the following command (assuming that the ISO image is mounted as E: drive, and VHD - as F: drive):
C: \ Program Files \ Windows AIK \ tools \ x86 \ imagex / apply E: \ SOURCES \ install. wim 1 F: \
Please note that for the command to execute successfully, the console must be started with Run as Administrator privileges. This process again will take some time, and you can still go smoke / read your favorite forum / drink coffee / etc.
Step 3. Preparing the flash drive
So, we have prepared our VHD image, and now we need to copy it to a flash drive and make it possible to boot the OS from it.
Format the flash drive and copy the VHD file
To begin with, oddly enough, we need to connect our flash drive to the computer on which we created VHD. The flash drive needs to be formatted in the NTFS file system (first, of course, by copying from it all the files you need, if any). Before copying, VHD must be unmounted - otherwise the system will not allow you to copy it to a USB flash drive. We go to the Computer Management console, right-click on the mounted VHD-disk and run Detach VHD. Now copy the newly created .vhd file to a flash drive in the root directory. I hope this step is quite simple and does not need additional explanations.
Create a boot sector
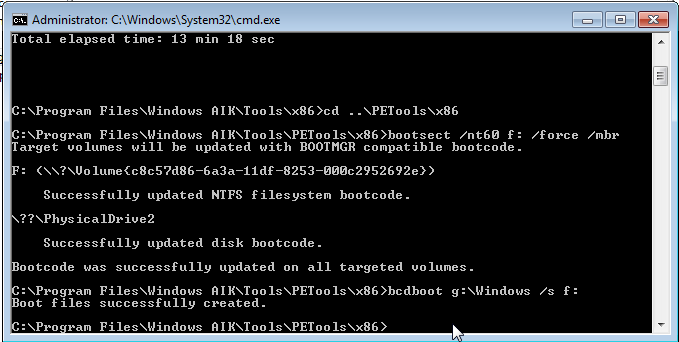
We copied the VHD file, but now we need to make sure that the server can load the OS from our flash drive. First, to do this, create a boot sector on it. This is done with the bootsect utility, which is also part of WAIK (again, you will need administrative privileges, D: flash drive):
C: \ Program Files \ Windows AIK \ tools \ PETools \ x86 \ bootsect / nt60 D: / force / mbr
Create a BCD repository (i.e. the bootloader itself)
Now you need to tell the bootloader that you need to boot the OS from our VHD. To do this, a so-called BCD (Boot Configuration Data) storage is created on the flash drive. This is done using the BCDboot utility that is included with Windows 7. First, you need to mount the VHD file located on the flash drive in the system. We go into Computer Management - Storage - Disk Management and do Attach VHD, choosing VHD from the flash drive. After that, we give the command (in the same way, with administrator privileges, D: - flash drive, F: - mounted VHD):
bcdboot F: \ WINDOWS / s D:
Now the flash drive is almost ready to work. It remains to make only one final touch ...
Step 4. Disable swap file
As you know, operating systems of the Microsoft Windows family use the so-called swap files (they are also swap files or paging files). By default, they are stored on the boot partition. Unfortunately, swap files are characterized by quite frequent recording, and this can significantly reduce the life of the flash drive. Therefore, you must first disable the use of swap files in the system. The easiest way to do this is using the registry editor. We start the registry editor (regedit) and open the registry hive from a system installed on VHD. We select HKEY_LOCAL_MACHINE, do File - Load Hive and select a file (remember that F: is a mounted VHD) F: \ Windows \ system32 \ config \ system. On request of a name - we give some name like HVTemp.
Now you can unload the registry bush with peace of mind (select HKLM / HVTemp, then File - Unload Hive), unmount VHD (Computer Management - Storage - Disk Management, Detach VHD), unmount the USB flash drive and plug it into the server.

Step 5: Finally, boot!
Well ... The result of our ordeals was a flash drive with the Microsoft Hyper-V Server 2008 R2 hypervisor installed on it. Now you can simply insert it into the server and boot from it. But before that - you need to make sure that the server meets the requirements for running Hyper-V and is configured to boot from a USB device. These requirements are as follows:
- 64-bit processor compatible with Intel x86
- The processor must support virtualization hardware extensions (Intel VT / AMD-V)
- The processor must support hardware-level execution prevention (DEP, Data Execution Prevention) (XD-bit, NX-bit)
Before booting the OS from a flash drive, you need to go into the BIOS Setup on the server and make sure that:
- Hardware Virtualization Support - Enabled
- Hardware DEP Enabled (Data Execution Prevention - Enabled)
- In the list of bootable devices, the USB drive is in first place.
Now you can boot, configure the system, connect the LUNs of the external storage system (and thus get a completely diskless server) and create virtual machines.
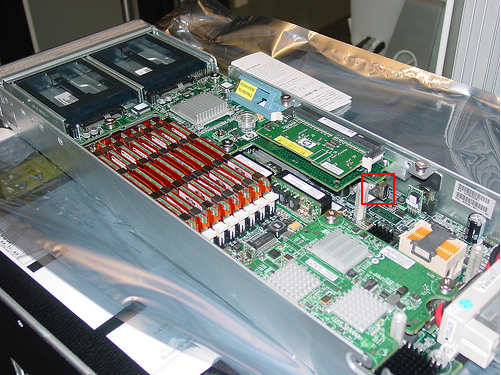
Finally, a small recommendation: it is better to hide the bootable flash drive in some way inside the server so that it does not stick out of the case - since it can be accidentally hit, broken or pulled out. Some servers are equipped with a card reader (Card Reader) - this may be an ideal solution: accidentally pulling out an SD card is almost impossible, since it protrudes only a millimeter out. Preparing an SD / MMC card is technically no different from a regular USB flash drive, and all the steps are the same as described above. In addition, some servers (in particular, HP in their blade servers) have internal USB connectors. They are located on the motherboard inside the case and allow you to connect standard USB-drives.
And now - the same thing, only even easier!
And now all of a sudden I will make you happy: everything that I wrote in the article above can not be done. Someone Paul Despe created the BootFromUSB utility (http://code.msdn.microsoft.com/BootHVSR2FromUSB), with which you can create a bootable flash drive in a couple of mouse clicks. The utility window looks quite simple: To use it to create a bootable flash drive, you need to do the following steps:
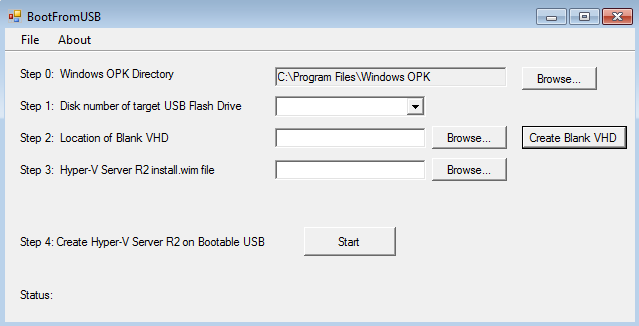
- Install WAIK (where to get it - see the beginning of the article)
- Insert the installation disk or mount the ISO image on the system or unzip the Microsoft Hyper-V Server 2008 R2 ISO image (again, see above)
- Connect a flash drive (USB flash drive or memory card)
- Run the utility with administrator privileges (Run as Administrator)
- Select the flash drive as target USB Flash Drive (Caution! In the process, it will be formatted!)
- Click Create Blank VHD and select a temporary folder for the VHD file on your computer’s hard drive
- Specify the path to the Install.wim file from the Microsoft Hyper-V Server 2008 R2 distribution
- Press Start and go to drink coffee / tea / beer. About half an hour later the flash drive is ready.
Conclusion
Well, that's all. I hope this article helped you. I will be happy to answer questions in the comments. Thanks for attention!
The original article was published in the journal System Administrator No. 07/08 for 2010.