DIY electric bike
The topic of electric transport has always interested me.
And then came the long-awaited moment when I finally switched from theory to practice. I will tell about my experience below.
A couple of thoughts as an introduction.
Why is it that they are now so actively talking about electric cars, electric planes, electric bikes? Finally, the main problem of electric transport was almost solved - fairly compact and capacious batteries began to appear. Moreover, they charge in a tolerable time. Actually, they were just waiting for this, everything else has long been created and "run-in" - the body, chassis, electronics, electric motors. All this has been used for a hundred years. And electric motors allow you to use unusual solutions - for example, install yourself in the hubs of the wheels themselves.
To business!
Specifications:
- an ordinary bike, of average dilapidation, the price is about $ 200
- an electric motor for 48V and a power of 380W
- a battery for 48V and 10A
- speed without pedals on a smooth road 35-40 km / h
- travel distance of 22-25 km in light hilly terrain and in the city
- a full charge time of 2 hours
It should be noted that the re-equipment is not very evident and most people on the street just do not notice anything unusual in a bicycle.
The entire kit is purchased in China through eBay. Searching for kits is based on the keywords "ebike, Motor Conversion, kit, LiFePO4". The whole purchase cost about $ 650 USD with shipping from China.
You will have to buy two sets - the KIT itself and the battery.
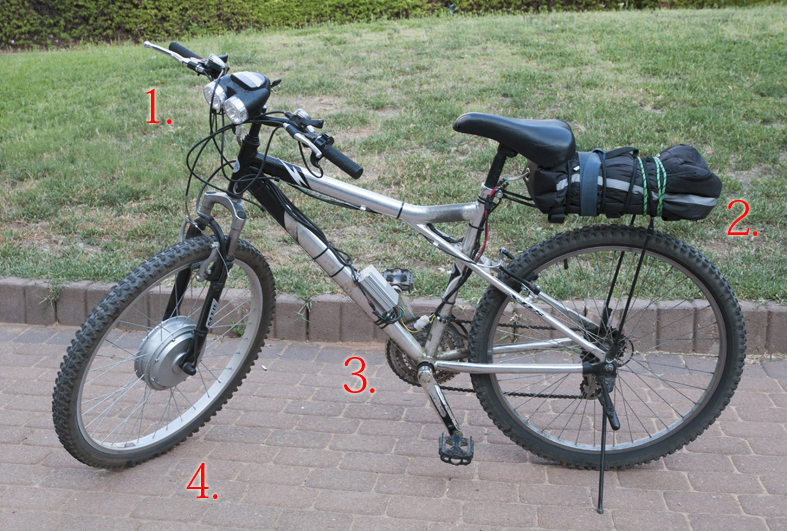
KIT consists of an already assembled wheel, controller, throttle, brake levers, pedal sensor, lights with lock, horn button, battery bag.
The second part of the kit is the battery and charger.
Kits come in 12, 24, 36, and 48 volts and with power of 250, 380, 500, and 1000 watts.
The battery selects the appropriate voltage. I would advise against chasing power. 380W for even and hilly terrain is enough. Increasing power, the speed will not increase significantly, but it will be better to "pull" uphill.
My personal experience is that I very rarely help with pedals and the stars are always in the “maximum speed” position.
It is worth noting that in many countries there is a limit of 250W.
Why I chose 48V, I won’t be able to say for sure, but in May, when I was combing the Internet before buying, the mark was put on - to take only 48V. With battery power, everything is simple - I have 10A, it's 25 km. If you buy 20A, there will be 50 km of run and 16 kg of battery instead of 8. Decide if you need to carry extra 4-8 kg of weight if you are not going to travel far. I understand that power is not measured in amperes, but this is how their sellers distinguish. Not watts / hour, namely voltage / amperes.
Wheel motor 4. already assembled. Tire and camera not included. The wheel should be chosen according to the size of the wheels of your bicycle, for me it was number 26 - the most common size. If you bought a camera or a tire - the size you know for sure.
The main thing to remember when mounting the wheel is that the cable should exit the wheel on the left! Then it will rotate in the right direction. The second and not obvious danger - three thick wires and several thin ones come out of the wheel. The first thing a person does is by mounting a wheel - he spins it. The wheel generates electricity, a spark jumps between the power wire and one of the thin wires and everything, the sensor burns out, the pokatushki are canceled. Therefore, having removed the wheel from the box, we immediately wrap these wires with electrical tape and until we connect them to the controller we hold them.
You may have to slightly grind the seat on the fork and the axle on the wheel, I just did it. Dremel and several cutting discs were enough to install the wheel.
Here you need to be as careful as possible, the denser the wheel sits in its place, the less problems there will be in the future. Do not waste too much. Owners of expensive bicycles with aluminum forks should choose the rear wheel, I read how a powerful kilowatt wheel simply broke out the mustache on the fork during trial operation. The front fork is designed to load up and back, and the wheel pulls forward and in a circle. But the motor on the rear wheel gives the load on the frame not different from the pedals.
The controller is a small aluminum box 3. with a bundle of wires. There are no special problems with it. Find a comfortable place on the frame and secure. I successfully had two bolts simply screwed into the frame on the lower beam. I hung the controller on one of them, the second did not match and I fixed it with a plastic strip. It is worth stocking them, an indispensable thing for fixing cables.

The only remark. Due to legislative speed limits, in some countries the controller has a lock. Most often this is a wire that you just need to open. A locked controller will not accelerate faster than 25 km / h.

First, the brake levers must be replaced. I did not change the handle of the front brake. Replaced only the rear. Why change? In the handle there is a contact that disables the electric motor at the time of braking.
Secondly, on the left side of the steering wheel, you need to install the gas handle. We remove the rubber handle, cut it off from the inside to the required width. Put everything in its place.
Thirdly, you need to install the headlight. In the headlight there is an “ignition lock” and a sound signal. I did not connect the horn button, I can yell. But a couple of keys are very pleased. The key replaces the power switch, and a further turn turns on the headlight. It's comfortable. Pull the key out of the "headlights" without turning off the bike will not work. The bike is quite heavy, and pedaling is also not so simple (because they are at maximum and you still need to crank the engine, which in this case becomes a generator) - it will not be so easy to jump in and ride off your bike to a thief. Even just roll it in your hands. This allows you not to “strain” too much while distracting from the bicycle for several minutes and not to fasten it with a lock each time.
The photo shows that the headlight is made of cheap plastic and began to be wiped from the rubberized gear cable.
LEDs in theory should indicate the degree of battery discharge. Perhaps it is on lead, but on a LiFePO4 battery this does not work. First, a full charge lights up, then a red LED - the battery is empty. In addition, this is a superlight LEDs and they are corny blind at night directly in the face, and also interfere during the day. Therefore, there is this strip of adhesive paper. Then I drain the tips of the LEDs and drip a drop of hot glue on top to get a matte glow.
I mentioned that there is a pedal sensor in the kit. I did not set it. It replaces the gas handle. Starting to pedal you turn on the motor, but it only helps to drive. No more, I think it should be quite economical, but I was not interested.
As I wrote this is a kind of lithium battery. LiFePO4 - it is cheaper than its counterparts from cell phones, does not explode, gives high currents well, charges quickly, has up to 1500 charge-discharge cycles before a significant decrease in capacity begins. Such batteries appeared only a year or two ago and are still little known on the market.
The Chinese themselves assemble them from the individual elements of the necessary voltozha, power and size.
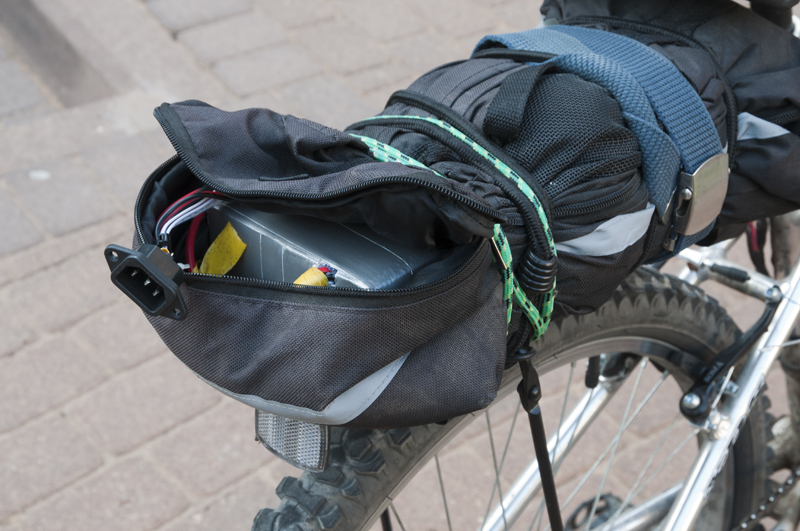
In addition to the battery in the bag is a charge-balancing board. A bundle of wires goes into the battery itself. That is, the battery is charged in parts and individual "banks" of elements are balanced among themselves.
Why not a regular lead acid battery? Similar in parameters of my battery will weigh more than 20 kg. There will be fuss with electrolyte, long charging, the number of charge-discharge cycles is not more than a thousand, but only a hundred or two. Not only that, if I go to buy such batteries in my store - it will cost not much less. So even for the money I won’t guess.
The device in the apartment is charging. A full charge takes two hours, the charge is light and relatively small, you can throw in a backpack and charge the bike on the road. In a roadside cafe, for example, or at a gas station.
The impressions of riding such a bike are indescribable. The sound of the motor is not heard. On the track you fall into a trance. The feeling is akin to what I felt flying in a dream. Uniform, silent movement through space. In the city, drivers interfere. They move slowly, move for a long time. In the fields, the front wheel rushes perfectly, but the battery runs out quickly.
What is nice - the rights are not needed, insurance is not needed, it rolls into the apartment, it does not smell of gasoline.
And then came the long-awaited moment when I finally switched from theory to practice. I will tell about my experience below.
A couple of thoughts as an introduction.
Why is it that they are now so actively talking about electric cars, electric planes, electric bikes? Finally, the main problem of electric transport was almost solved - fairly compact and capacious batteries began to appear. Moreover, they charge in a tolerable time. Actually, they were just waiting for this, everything else has long been created and "run-in" - the body, chassis, electronics, electric motors. All this has been used for a hundred years. And electric motors allow you to use unusual solutions - for example, install yourself in the hubs of the wheels themselves.
To business!
Specifications:
- an ordinary bike, of average dilapidation, the price is about $ 200
- an electric motor for 48V and a power of 380W
- a battery for 48V and 10A
- speed without pedals on a smooth road 35-40 km / h
- travel distance of 22-25 km in light hilly terrain and in the city
- a full charge time of 2 hours
It should be noted that the re-equipment is not very evident and most people on the street just do not notice anything unusual in a bicycle.
The entire kit is purchased in China through eBay. Searching for kits is based on the keywords "ebike, Motor Conversion, kit, LiFePO4". The whole purchase cost about $ 650 USD with shipping from China.
You will have to buy two sets - the KIT itself and the battery.
KIT consists of an already assembled wheel, controller, throttle, brake levers, pedal sensor, lights with lock, horn button, battery bag.
The second part of the kit is the battery and charger.
Kits come in 12, 24, 36, and 48 volts and with power of 250, 380, 500, and 1000 watts.
The battery selects the appropriate voltage. I would advise against chasing power. 380W for even and hilly terrain is enough. Increasing power, the speed will not increase significantly, but it will be better to "pull" uphill.
My personal experience is that I very rarely help with pedals and the stars are always in the “maximum speed” position.
It is worth noting that in many countries there is a limit of 250W.
Why I chose 48V, I won’t be able to say for sure, but in May, when I was combing the Internet before buying, the mark was put on - to take only 48V. With battery power, everything is simple - I have 10A, it's 25 km. If you buy 20A, there will be 50 km of run and 16 kg of battery instead of 8. Decide if you need to carry extra 4-8 kg of weight if you are not going to travel far. I understand that power is not measured in amperes, but this is how their sellers distinguish. Not watts / hour, namely voltage / amperes.
Motor
Wheel motor 4. already assembled. Tire and camera not included. The wheel should be chosen according to the size of the wheels of your bicycle, for me it was number 26 - the most common size. If you bought a camera or a tire - the size you know for sure.
The main thing to remember when mounting the wheel is that the cable should exit the wheel on the left! Then it will rotate in the right direction. The second and not obvious danger - three thick wires and several thin ones come out of the wheel. The first thing a person does is by mounting a wheel - he spins it. The wheel generates electricity, a spark jumps between the power wire and one of the thin wires and everything, the sensor burns out, the pokatushki are canceled. Therefore, having removed the wheel from the box, we immediately wrap these wires with electrical tape and until we connect them to the controller we hold them.
You may have to slightly grind the seat on the fork and the axle on the wheel, I just did it. Dremel and several cutting discs were enough to install the wheel.
Here you need to be as careful as possible, the denser the wheel sits in its place, the less problems there will be in the future. Do not waste too much. Owners of expensive bicycles with aluminum forks should choose the rear wheel, I read how a powerful kilowatt wheel simply broke out the mustache on the fork during trial operation. The front fork is designed to load up and back, and the wheel pulls forward and in a circle. But the motor on the rear wheel gives the load on the frame not different from the pedals.
Controller
The controller is a small aluminum box 3. with a bundle of wires. There are no special problems with it. Find a comfortable place on the frame and secure. I successfully had two bolts simply screwed into the frame on the lower beam. I hung the controller on one of them, the second did not match and I fixed it with a plastic strip. It is worth stocking them, an indispensable thing for fixing cables.
The only remark. Due to legislative speed limits, in some countries the controller has a lock. Most often this is a wire that you just need to open. A locked controller will not accelerate faster than 25 km / h.
Control
First, the brake levers must be replaced. I did not change the handle of the front brake. Replaced only the rear. Why change? In the handle there is a contact that disables the electric motor at the time of braking.
Secondly, on the left side of the steering wheel, you need to install the gas handle. We remove the rubber handle, cut it off from the inside to the required width. Put everything in its place.
Thirdly, you need to install the headlight. In the headlight there is an “ignition lock” and a sound signal. I did not connect the horn button, I can yell. But a couple of keys are very pleased. The key replaces the power switch, and a further turn turns on the headlight. It's comfortable. Pull the key out of the "headlights" without turning off the bike will not work. The bike is quite heavy, and pedaling is also not so simple (because they are at maximum and you still need to crank the engine, which in this case becomes a generator) - it will not be so easy to jump in and ride off your bike to a thief. Even just roll it in your hands. This allows you not to “strain” too much while distracting from the bicycle for several minutes and not to fasten it with a lock each time.
The photo shows that the headlight is made of cheap plastic and began to be wiped from the rubberized gear cable.
LEDs in theory should indicate the degree of battery discharge. Perhaps it is on lead, but on a LiFePO4 battery this does not work. First, a full charge lights up, then a red LED - the battery is empty. In addition, this is a superlight LEDs and they are corny blind at night directly in the face, and also interfere during the day. Therefore, there is this strip of adhesive paper. Then I drain the tips of the LEDs and drip a drop of hot glue on top to get a matte glow.
I mentioned that there is a pedal sensor in the kit. I did not set it. It replaces the gas handle. Starting to pedal you turn on the motor, but it only helps to drive. No more, I think it should be quite economical, but I was not interested.
Battery
As I wrote this is a kind of lithium battery. LiFePO4 - it is cheaper than its counterparts from cell phones, does not explode, gives high currents well, charges quickly, has up to 1500 charge-discharge cycles before a significant decrease in capacity begins. Such batteries appeared only a year or two ago and are still little known on the market.
The Chinese themselves assemble them from the individual elements of the necessary voltozha, power and size.
In addition to the battery in the bag is a charge-balancing board. A bundle of wires goes into the battery itself. That is, the battery is charged in parts and individual "banks" of elements are balanced among themselves.
Why not a regular lead acid battery? Similar in parameters of my battery will weigh more than 20 kg. There will be fuss with electrolyte, long charging, the number of charge-discharge cycles is not more than a thousand, but only a hundred or two. Not only that, if I go to buy such batteries in my store - it will cost not much less. So even for the money I won’t guess.
The device in the apartment is charging. A full charge takes two hours, the charge is light and relatively small, you can throw in a backpack and charge the bike on the road. In a roadside cafe, for example, or at a gas station.
Conclusion
The impressions of riding such a bike are indescribable. The sound of the motor is not heard. On the track you fall into a trance. The feeling is akin to what I felt flying in a dream. Uniform, silent movement through space. In the city, drivers interfere. They move slowly, move for a long time. In the fields, the front wheel rushes perfectly, but the battery runs out quickly.
What is nice - the rights are not needed, insurance is not needed, it rolls into the apartment, it does not smell of gasoline.