Implement Philips Ambilight effect in image preview
Yesterday in the topic “ Modification of images for the site, or what are the previews ” in the comments diGreez suggested , as it seemed to me, a very interesting way to organize image previews . I implemented a function in PHP that creates such thumbnails.
The function is documented by comments.
Usage example:
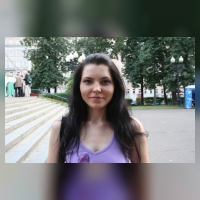
The result of the function:


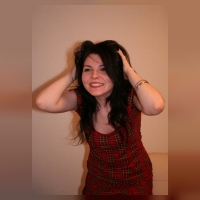
Update. Version 2: Another version with a different algorithm. This version requires the pixelate function, which I found on the Internet, it allows you to pixelate the image. The principle of operation of the second version is as follows: we find the average color values of every 5 pixels at the borders of the image and “smear” these colors to the edge of the frame. Then, to mitigate, all this is blocked.
And here is the result of the second version:


The function is documented by comments.
Copy Source | Copy HTML
// функция создаёт "миниатюру" изображения сохраняя пропорции
// и обрамляет неиспользуемое пространство в стиле Philips Ambilight
// Входные параметры:
//      $image_from         - имя файла исходного изображения
//      $image_to           - имя файла результирующего изображения
//      $width              - желаемая ширина результирующей "миниатюры"
//      $height             - желаемая высота результирующей "миниатюры"
//      $padding            - минимальная рамка в пикселях (по умолчанию = 5)
//      $dest_image_type    - тип изображения для сохранения (по умолчанию JPG):
//          2 - JPG
//          3 - PNG
// Возвращает:
//      TRUE   - в случае успеха
//      FALSE  - в случае неудачи
function aidsoid_resize_image($image_from, $image_to, $width=200, $height=200, $padding=5, $dest_image_type=2) {
    $image_vars = getimagesize($image_from);
    if (!$image_vars) {
        return FALSE;
    }
    $src_width = $image_vars[ 0];
    $src_height = $image_vars[1];
    $src_type = $image_vars[2];
    if (($src_type != IMAGETYPE_JPEG) and ($src_type != IMAGETYPE_PNG)) {
        return FALSE;
    }

    switch ($src_type) {
    case IMAGETYPE_JPEG:
        $src_image = imagecreatefromjpeg($image_from);
        break;
    case IMAGETYPE_PNG:
        $src_image = imagecreatefrompng($image_from);
        break;
    default:
        return FALSE;
        break;
    }
    if (!$src_image) return FALSE;

    // создаем задний фон для нового изображения
    $dest_image = imagecreatetruecolor($width, $height);

    // копируем из исходного изображения в фон и растягиваем без соблюдения пропорций
    $result = imagecopyresized($dest_image, $src_image,  0,  0,  0,  0, $width, $height, $src_width, $src_height);
    if (!$result) return FALSE;

    // применяем к фону размытие
    for ($i= 0; $i<=100; $i++) {
        $result = imagefilter($dest_image, IMG_FILTER_SMOOTH, 6);
        if (!$result) return FALSE;
    }

    // деление на ноль - плохая идея
    if ( ($src_width ==  0) or ($src_height ==  0) ) {
        return FALSE;
    }

    // вычисляем масштабный коэффициент
    $ratio = min( ($width-2*$padding)/$src_width , ($height-2*$padding)/$src_height );

    // вычисляем новые размеры изображения
    $new_width = $ratio * $src_width;
    $new_height = $ratio * $src_height;

    // если новая высота или новая длина больше оригинальных,
    // то это значит, что изображение будет растянуто, не нужно допускать этого,
    // в этом случае оставим оригинальное изображение без изменения размеров
    if ( ($new_width >= $src_width) or ($new_height >= $src_height) ) {
        $new_width = $src_width;
        $new_height = $src_height;
    }

    // скопируем поверх фона получившееся изображение
    $result = imagecopyresampled($dest_image, $src_image, round(($width-$new_width)/2), round(($height-$new_height)/2),  0,  0, $new_width, $new_height, $src_width, $src_height);
    if (!$result) return FALSE;

    // сохраняем на носитель
    switch ($dest_image_type) {
    case IMAGETYPE_JPEG: // качество изображения 100
        $result = imagejpeg($dest_image, $image_to, 100);
        break;
    case IMAGETYPE_PNG: // максимальный уровень сжатия 9
        $result = imagepng($dest_image, $image_to, 9);
        break;
    default:
        return FALSE;
        break;
    }
    if (!$result) return FALSE;
    chmod($image_to, 0777);

    return TRUE;
}
Usage example:
Copy Source | Copy HTML
aidsoid_resize_image("image.jpg", "i/news/image-mini.jpg", 200, 200, 5, 2);
The result of the function:
Update. Version 2: Another version with a different algorithm. This version requires the pixelate function, which I found on the Internet, it allows you to pixelate the image. The principle of operation of the second version is as follows: we find the average color values of every 5 pixels at the borders of the image and “smear” these colors to the edge of the frame. Then, to mitigate, all this is blocked.
Copy Source | Copy HTML
function pixelate(&$image) {
    $imagex = imagesx($image);
    $imagey = imagesy($image);
    $blocksize = 5;

    for ($x =  0; $x < $imagex; $x += $blocksize) {
        for ($y =  0; $y < $imagey; $y += $blocksize) {
            // get the pixel colour at the top-left of the square
            $thiscol = imagecolorat($image, $x, $y);

            // set the new red, green, and blue values to 0
            $newr =  0;
            $newg =  0;
            $newb =  0;

            // create an empty array for the colours
            $colours = array();

            // cycle through each pixel in the block
            for ($k = $x; $k < $x + $blocksize; ++$k) {
                for ($l = $y; $l < $y + $blocksize; ++$l) {
                    // if we are outside the valid bounds of the image, use a safe colour
                    if ($k <  0) { $colours[] = $thiscol; continue; }
                    if ($k >= $imagex) { $colours[] = $thiscol; continue; }
                    if ($l <  0) { $colours[] = $thiscol; continue; }
                    if ($l >= $imagey) { $colours[] = $thiscol; continue; }

                    // if not outside the image bounds, get the colour at this pixel
                    $colours[] = imagecolorat($image, $k, $l);
                }
            }

            // cycle through all the colours we can use for sampling
            foreach($colours as $colour) {
                // add their red, green, and blue values to our master numbers
                $newr += ($colour >> 16) & 0xFF;
                $newg += ($colour >> 8) & 0xFF;
                $newb += $colour & 0xFF;
            }

            // now divide the master numbers by the number of valid samples to get an average
            $numelements = count($colours);
            $newr /= $numelements;
            $newg /= $numelements;
            $newb /= $numelements;

            // and use the new numbers as our colour
            $newcol = imagecolorallocate($image, $newr, $newg, $newb);
            imagefilledrectangle($image, $x, $y, $x + $blocksize - 1, $y + $blocksize - 1, $newcol);
        }
    }
}

// функция создаёт "миниатюру" изображения сохраняя пропорции
// и обрамляет неиспользуемое пространство в стиле Philips Ambilight
// Входные параметры:
//      $image_from         - имя файла исходного изображения
//      $image_to           - имя файла результирующего изображения
//      $width              - желаемая ширина результирующей "миниатюры"
//      $height             - желаемая высота результирующей "миниатюры"
//      $padding            - минимальная рамка в пикселях (по умолчанию = 5)
//      $dest_image_type    - тип изображения для сохранения (по умолчанию JPG):
//          2 - JPG
//          3 - PNG
// Возвращает:
//      TRUE   - в случае успеха
//      FALSE  - в случае неудачи
function aidsoid_resize_image($image_from, $image_to, $width=200, $height=200, $padding=5, $dest_image_type=2) {
    $image_vars = getimagesize($image_from);
    if (!$image_vars) {
        return FALSE;
    }
    $src_width = $image_vars[ 0];
    $src_height = $image_vars[1];
    $src_type = $image_vars[2];
    // деление на ноль - плохая идея
    if ( ($src_width ==  0) or ($src_height ==  0) ) {
        return FALSE;
    }
    // проверяем тип файла
    if (($src_type != IMAGETYPE_JPEG) and ($src_type != IMAGETYPE_PNG)) {
        return FALSE;
    }

    switch ($src_type) {
    case IMAGETYPE_JPEG:
        $src_image = imagecreatefromjpeg($image_from);
        break;
    case IMAGETYPE_PNG:
        $src_image = imagecreatefrompng($image_from);
        break;
    default:
        return FALSE;
        break;
    }
    if (!$src_image) return FALSE;

    // создаем задний фон для нового изображения
    $dest_image = imagecreatetruecolor($width, $height);

    // копируем из исходного изображения в фон и растягиваем без соблюдения пропорций
    $result = imagecopyresized($dest_image, $src_image,  0,  0,  0,  0, $width, $height, $src_width, $src_height);
    if (!$result) return FALSE;

    // вычисляем масштабный коэффициент
    $ratio = min( ($width-2*$padding)/$src_width , ($height-2*$padding)/$src_height );

    // вычисляем новые размеры изображения
    $new_width = $ratio * $src_width;
    $new_height = $ratio * $src_height;

    // если новая высота или новая длина больше оригинальных,
    // то это значит, что изображение будет растянуто, не нужно допускать этого,
    // в этом случае оставим оригинальное изображение без изменения размеров
    if ( ($new_width >= $src_width) or ($new_height >= $src_height) ) {
        $new_width = $src_width;
        $new_height = $src_height;
    }

    // копируем из исходного изображения в фон с соблюдением пропорций
    $result = imagecopyresampled($dest_image, $src_image, round(($width-$new_width)/2), round(($height-$new_height)/2),  0,  0, $new_width, $new_height, $src_width, $src_height);
    if (!$result) return FALSE;

    // пикселизуем фон
    pixelate($dest_image);

    $tmp_x = round(($width-$new_width)/2);
    $tmp_y = round(($height-$new_height)/2);
    // размазываем вверх
    $result = imagecopyresized($dest_image, $dest_image, $tmp_x,  0, $tmp_x, $tmp_y, $new_width, $tmp_y, $new_width, 1);
    if (!$result) return FALSE;
    // размазываем вниз
    $result = imagecopyresized($dest_image, $dest_image, $tmp_x, $tmp_y+$new_height, $tmp_x, $tmp_y+$new_height-1, $new_width, $tmp_y, $new_width, 1);
    if (!$result) return FALSE;
    // размазываем влево
    $result = imagecopyresized($dest_image, $dest_image,  0, $tmp_y, $tmp_x, $tmp_y, $tmp_x, $new_height, 1, $new_height);
    if (!$result) return FALSE;
    // размазываем вправо
    $result = imagecopyresized($dest_image, $dest_image, $tmp_x+$new_width, $tmp_y, $tmp_x+$new_width-1, $tmp_y, $tmp_x, $new_height, 1, $new_height);
    if (!$result) return FALSE;

    // размываем фон
    for ($i= 0; $i<=50; $i++) {
        $result = imagefilter($dest_image, IMG_FILTER_SMOOTH, 6);
        if (!$result) return FALSE;
    }

    // скопируем поверх фона получившееся изображение
    $result = imagecopyresampled($dest_image, $src_image, round(($width-$new_width)/2), round(($height-$new_height)/2),  0,  0, $new_width, $new_height, $src_width, $src_height);
    if (!$result) return FALSE;

    // сохраняем на носитель
    switch ($dest_image_type) {
    case IMAGETYPE_JPEG: // качество изображения 100
        $result = imagejpeg($dest_image, $image_to, 100);
        break;
    case IMAGETYPE_PNG: // максимальный уровень сжатия 9
        $result = imagepng($dest_image, $image_to, 9);
        break;
    default:
        return FALSE;
        break;
    }
    if (!$result) return FALSE;
    chmod($image_to, 0777);

    return TRUE;
}
And here is the result of the second version: