February 4, 2010 at 18:10
Air hockey at your home
Good day, Khabravchany :)
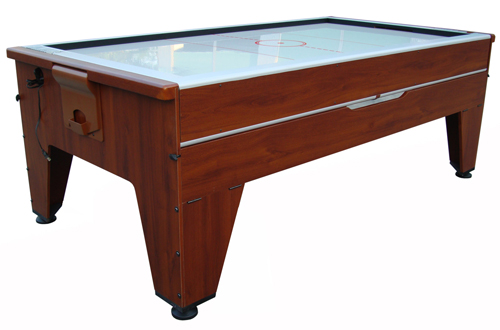
Today, having arrived once again from my favorite bar, I got the idea to make a home table for playing Air Hockey. After wandering around the Internet, I came across a pretty good instruction for making that very table . I want to present you a translation of this article.
Under the cut a lot of text and photos.
So, inspired by the idea of creating a miniature table, peeped at YouTube, we decided to build a full-sized (122x244cm) table for playing aero hockey. In this instruction, we will talk about all the stages of manufacturing this table (without "legs").
HereYou will find a 3D model of the table for air hockey. We hope that it will help you understand all the intricacies of the project. In order to view the drawing you need the free Google Sketchup Viewer application.
Do not forget to look at the instructions for making the "bats" for the game.
We hope that this information will be useful to you and begin construction right now :)
Step one:
Required components (all measurements in millimeters).
D-long, W-width, H-height.
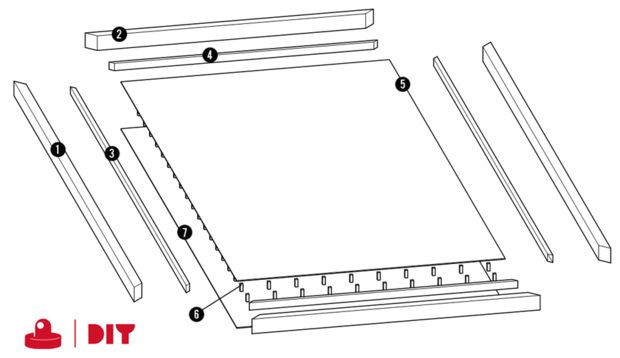
To make a frame from spruce you will need:
-Two long sides: D = 2530, W = 45, H = 70 (No. 1)
-Two short sides: D = 1310, W = 45, H = 70 (No. 2)
-Two long side: D = 2440, W = 20, H = 35 (No. 3)
-Two short sides: D = 1220, W = 20, H = 35 (No. 4)
Costs: about $ 37
For the manufacture of the playing surface (MDF):
D = 2440, W = 1220, H = 6 (No. 5)
Costs: about $ 15
Coasters:
Small wooden choppers with a height of 35 mm (No. 6)
Costs: about $ 11
Opposite surface (Particleboard):
D = 2440, W = 1220, H = 12 (No. 7)
Costs: about $ 15
Air source:
Centrifugal fan or vacuum cleaner (No. 8)
The required capacity for our table is about 400 cubic feet per minute. The average home vacuum cleaner has a capacity of about 140 cubic feet / minute. You will need at least 3 vacuum cleaners to move the washer freely around the table. Such an air source is relatively expensive for home use. More powerful industrial vacuum cleaners exist, but they are difficult to obtain.
Centrifugal blowers are highly specialized. Output power ranges from a few hundred to 1000 cubic feet / min. or more. Such superchargers are commonly used in air hockey tables. Centrifugal superchargers are also quite expensive.
Air inlet:
-One or two meters of pipe with a diameter of about 90mm.
- PVC sheets 250mm x 250mm, with a hole in which our pipe fits. (No. 9)
[If the pipe does not fit directly into the holes, buy a PVC sleeve (which fits around the pipe and the hole)]
-Two pieces of plywood 250mm x 250mm (No. 10 and 11)
Gate:
-Wooden beams about 400mm
long -Piece strong fabric 400mm x 400mm
The second action.
The manufacture of the frame.
A: It is necessary to saw 8 different parts with cuts of 45 degrees at the ends.
B: Fold all the components on the floor and check the accuracy of the cut.
C: Using nails and construction (polyurethane) glue, attach four short boards (No. 3 and 4) to the corresponding larger ones (No. 1 and 2).
D: Glue all four sides together, wrap the belt around the base and tighten it. The chipboard must be in the center of the frame. Leave the structure to dry the glue for at least 4 hours.
E: Drill the corners diagonally and tighten with bolts.
The third action.
Drilling holes / preparing the playing surface.
F: Before you drill holes, you need to make a mesh on the MDF. You need to draw a grid with 25mm squares.
G: Drill the holes according to the grid you just created. Use drills with a diameter of 1 mm (or 1/32 inch). This work is time consuming, but do not rush.
In total, 96x48 = 4608 holes need to be drilled.
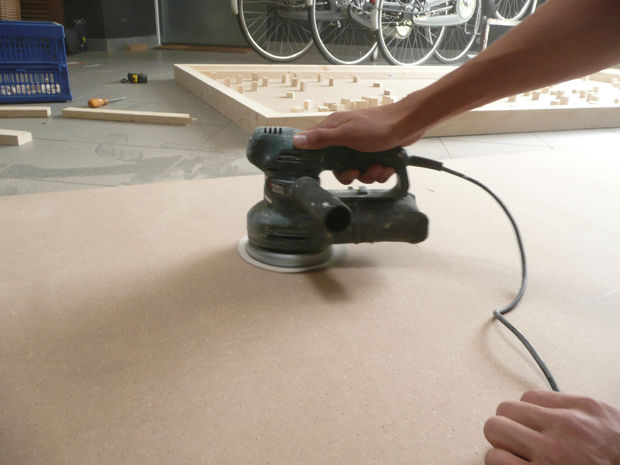
N: Use a grinder to debur the other side of the sheet. This side will be the playing surface.
The fourth action.
We place the columns on the surface.
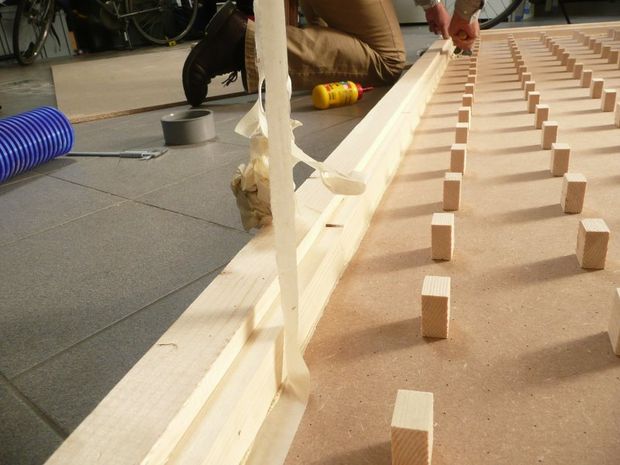
I: You need about 150-200 wooden posts with a height of 35mm. If you can stand on the surface of the table without breaking it, you should be on the right path :)
J: We placed the columns in 3 'squares' from the edge of the table (75 mm or 3 inches) and separated by 4 squares from each friend. In total, it turned out: 9x19-2 = 169 columns. But you can experiment with this circuit yourself.
K: With ordinary white wood glue, we glue the supporting posts on the non-smoothed sides of the MDF. It is advisable not to use polyurethane adhesive, because the countertops can move relative to each other. Give the glue time to harden.

The fifth action.
Attaching the playing surface to the frame.
L: Cover the air holes with a piece of cloth. This will prevent glue from entering the ducts.
M: Then grease the edges of the surface with glue and carefully slide it into the frame.
N: Finally, hammer 5 nails through the short sides and 10 nails along the long sides in the MDF at points 3 and 4.
Step Six.
Duct mountings.
We decided to connect the fan for cleaning foliage with the tube in the table not directly, but to mount it in the table. Since excessive vibration can cause the fan to fall if it is mounted directly on the table.
Particleboard sheets are cheap, but have one drawback: they are not strong enough. In order to strengthen the junction of the duct with the table, it is necessary that the force be distributed. That is why you will need a large sheet of PVC (with a hole in it), which covers a large area. We need to tightly connect the pipe coupling and the PVC sheet.
A: Glue the sleeve to the blue duct pipe. Connect the other end of the tube to the fan outlet.
P: Using a round sawing nozzle on a drill (see image below), make holes through two layers of plywood. The holes should be larger than in the PVC sheets, as this sheet will be sandwiched between the plywood. Now decide where you want to install the air inlet (we recommend that you place it in a corner on the bottom plate).
Q: Drill two layers of plywood according to the diagram: one piece of plywood should have four holes in each corner, the second should have eight evenly distributed holes. The same applies to PVC sheet.
R: Glue a layer of plywood (with four holes) to the hole in the table. Now attach a PVC sheet and a second piece of plywood. Screw all 8-bolts.


Seventh action.
Installing the playing surface on the
S frame : Remove the adhesive protection cloth and check that all holes are clean.
T: Apply glue to each post and frame border. Gently lower the chipboard and slide it into the frame. Press the table down with something heavy and leave the glue to dry.
The eighth action. Final
Gate Making and Finishing.
U: Drill two holes 15 cm from the center of the short side of the table so that the playing surface remains intact.
V: Use a jigsaw to cut off an unnecessary piece between these holes. Sandpaper give a neat appearance to the edges of the gate.
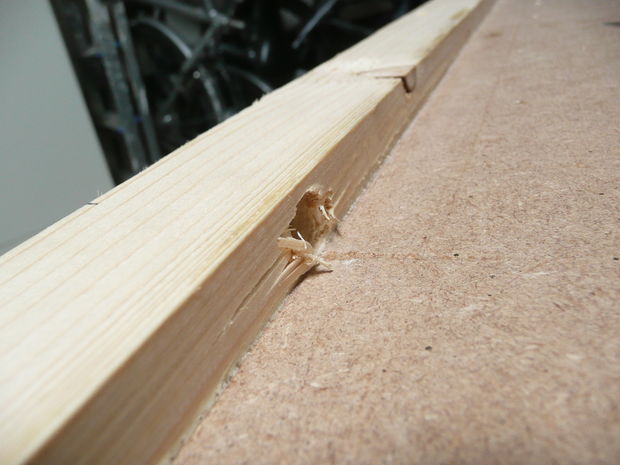
X: Fasten two 40cm long beams above and below the cut with strong fabric between them. By doing this, you create a kind of pocket around the target with holes on the sides, so that you can easily remove the puck from the pocket.
Repeat this process on the other side of the table.
Optional:
-Add aluminum sides that prevent the puck from slowing down upon impact.
-Add markup on the field.

If you did everything correctly, feel free to turn on the fan and start the game!
Have fun :)
Today, having arrived once again from my favorite bar, I got the idea to make a home table for playing Air Hockey. After wandering around the Internet, I came across a pretty good instruction for making that very table . I want to present you a translation of this article.
Under the cut a lot of text and photos.
So, inspired by the idea of creating a miniature table, peeped at YouTube, we decided to build a full-sized (122x244cm) table for playing aero hockey. In this instruction, we will talk about all the stages of manufacturing this table (without "legs").
HereYou will find a 3D model of the table for air hockey. We hope that it will help you understand all the intricacies of the project. In order to view the drawing you need the free Google Sketchup Viewer application.
Do not forget to look at the instructions for making the "bats" for the game.
We hope that this information will be useful to you and begin construction right now :)
Step one:
Required components (all measurements in millimeters).
D-long, W-width, H-height.
To make a frame from spruce you will need:
-Two long sides: D = 2530, W = 45, H = 70 (No. 1)
-Two short sides: D = 1310, W = 45, H = 70 (No. 2)
-Two long side: D = 2440, W = 20, H = 35 (No. 3)
-Two short sides: D = 1220, W = 20, H = 35 (No. 4)
Costs: about $ 37
For the manufacture of the playing surface (MDF):
D = 2440, W = 1220, H = 6 (No. 5)
Costs: about $ 15
Coasters:
Small wooden choppers with a height of 35 mm (No. 6)
Costs: about $ 11
Opposite surface (Particleboard):
D = 2440, W = 1220, H = 12 (No. 7)
Costs: about $ 15
Air source:
Centrifugal fan or vacuum cleaner (No. 8)
The required capacity for our table is about 400 cubic feet per minute. The average home vacuum cleaner has a capacity of about 140 cubic feet / minute. You will need at least 3 vacuum cleaners to move the washer freely around the table. Such an air source is relatively expensive for home use. More powerful industrial vacuum cleaners exist, but they are difficult to obtain.
Centrifugal blowers are highly specialized. Output power ranges from a few hundred to 1000 cubic feet / min. or more. Such superchargers are commonly used in air hockey tables. Centrifugal superchargers are also quite expensive.
Air inlet:
-One or two meters of pipe with a diameter of about 90mm.
- PVC sheets 250mm x 250mm, with a hole in which our pipe fits. (No. 9)
[If the pipe does not fit directly into the holes, buy a PVC sleeve (which fits around the pipe and the hole)]
-Two pieces of plywood 250mm x 250mm (No. 10 and 11)
Gate:
-Wooden beams about 400mm
long -Piece strong fabric 400mm x 400mm
The second action.
The manufacture of the frame.
A: It is necessary to saw 8 different parts with cuts of 45 degrees at the ends.
B: Fold all the components on the floor and check the accuracy of the cut.
C: Using nails and construction (polyurethane) glue, attach four short boards (No. 3 and 4) to the corresponding larger ones (No. 1 and 2).
D: Glue all four sides together, wrap the belt around the base and tighten it. The chipboard must be in the center of the frame. Leave the structure to dry the glue for at least 4 hours.
E: Drill the corners diagonally and tighten with bolts.
The third action.
Drilling holes / preparing the playing surface.
F: Before you drill holes, you need to make a mesh on the MDF. You need to draw a grid with 25mm squares.
G: Drill the holes according to the grid you just created. Use drills with a diameter of 1 mm (or 1/32 inch). This work is time consuming, but do not rush.
In total, 96x48 = 4608 holes need to be drilled.
N: Use a grinder to debur the other side of the sheet. This side will be the playing surface.
The fourth action.
We place the columns on the surface.
I: You need about 150-200 wooden posts with a height of 35mm. If you can stand on the surface of the table without breaking it, you should be on the right path :)
J: We placed the columns in 3 'squares' from the edge of the table (75 mm or 3 inches) and separated by 4 squares from each friend. In total, it turned out: 9x19-2 = 169 columns. But you can experiment with this circuit yourself.
K: With ordinary white wood glue, we glue the supporting posts on the non-smoothed sides of the MDF. It is advisable not to use polyurethane adhesive, because the countertops can move relative to each other. Give the glue time to harden.
The fifth action.
Attaching the playing surface to the frame.
L: Cover the air holes with a piece of cloth. This will prevent glue from entering the ducts.
M: Then grease the edges of the surface with glue and carefully slide it into the frame.
N: Finally, hammer 5 nails through the short sides and 10 nails along the long sides in the MDF at points 3 and 4.
Step Six.
Duct mountings.
We decided to connect the fan for cleaning foliage with the tube in the table not directly, but to mount it in the table. Since excessive vibration can cause the fan to fall if it is mounted directly on the table.
Particleboard sheets are cheap, but have one drawback: they are not strong enough. In order to strengthen the junction of the duct with the table, it is necessary that the force be distributed. That is why you will need a large sheet of PVC (with a hole in it), which covers a large area. We need to tightly connect the pipe coupling and the PVC sheet.
A: Glue the sleeve to the blue duct pipe. Connect the other end of the tube to the fan outlet.
P: Using a round sawing nozzle on a drill (see image below), make holes through two layers of plywood. The holes should be larger than in the PVC sheets, as this sheet will be sandwiched between the plywood. Now decide where you want to install the air inlet (we recommend that you place it in a corner on the bottom plate).
Q: Drill two layers of plywood according to the diagram: one piece of plywood should have four holes in each corner, the second should have eight evenly distributed holes. The same applies to PVC sheet.
R: Glue a layer of plywood (with four holes) to the hole in the table. Now attach a PVC sheet and a second piece of plywood. Screw all 8-bolts.
Seventh action.
Installing the playing surface on the
S frame : Remove the adhesive protection cloth and check that all holes are clean.
T: Apply glue to each post and frame border. Gently lower the chipboard and slide it into the frame. Press the table down with something heavy and leave the glue to dry.
The eighth action. Final
Gate Making and Finishing.
U: Drill two holes 15 cm from the center of the short side of the table so that the playing surface remains intact.
V: Use a jigsaw to cut off an unnecessary piece between these holes. Sandpaper give a neat appearance to the edges of the gate.
X: Fasten two 40cm long beams above and below the cut with strong fabric between them. By doing this, you create a kind of pocket around the target with holes on the sides, so that you can easily remove the puck from the pocket.
Repeat this process on the other side of the table.
Optional:
-Add aluminum sides that prevent the puck from slowing down upon impact.
-Add markup on the field.
If you did everything correctly, feel free to turn on the fan and start the game!
Have fun :)