Work with basic animation on iPhone
- Transfer
One of the attractive features of the Cocoa Touch interface is the simplified work with animation. In this tutorial, I'll show you a couple of simple examples of creating animations for the iPhone. Our animation will perform two tasks: move the object on the screen and change its size depending on the point of touch by its user.
Those who have not yet had to do programming on the iPhone, it will be useful to get acquainted with the basics here , here and here . As an example, I will also give a lesson from the Stanford iPhone Development series (English), which examined the basics of motion animation.
Below is a short video of the application that we have to create. As mentioned above, two things can be done with it. One click will move the internal view to the touch point. Double-tapping the view will move with resizing. Focusing on touch points, the application creates a rectangle with a frame for presentation.
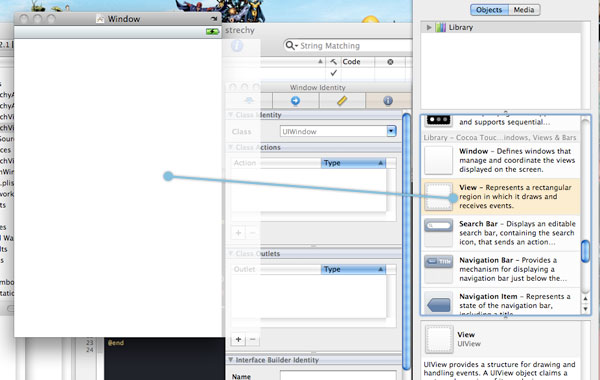
Well, let's get started ... First of all, we need a project. Having created a simple Window-Based Application , add a view to it. To do this, open the " MainWindow.xib " file in the Interface Builder editor by double-clicking on it. In running the editor will open the library window Library then (team of the Tools -> Library then ). One of its elements is the View component . Drag it to the main Window, focusing on the image below. Now you need to tell the main idea that a multi-tangent method of work will be allowed. This can be done in the inspector window, called by the command " Tools -> Attributes Inspector
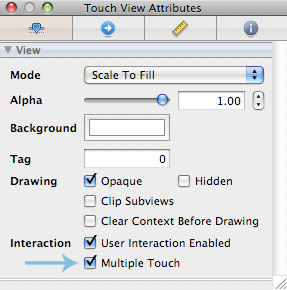
". Make sure that the" Multiple Touch " option at the bottom of the window is checked.
Inside the first view, drag the second one that will move and resize. For the second view, you will need to configure a number of parameters: size, color, initial position. Correct size and position can be in the window of the size inspector ( Tools > Size Inspector ). I set the position to 0, 0, size - 30, 30. In the window of the attribute inspector uncheck the box " User Interaction Enabled ".

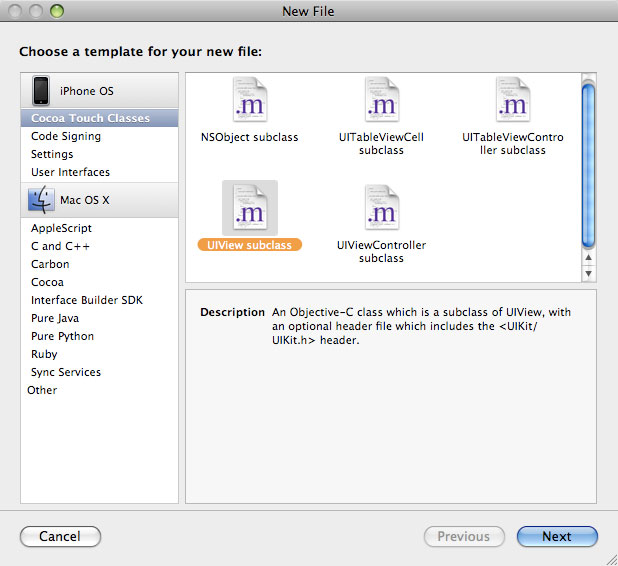
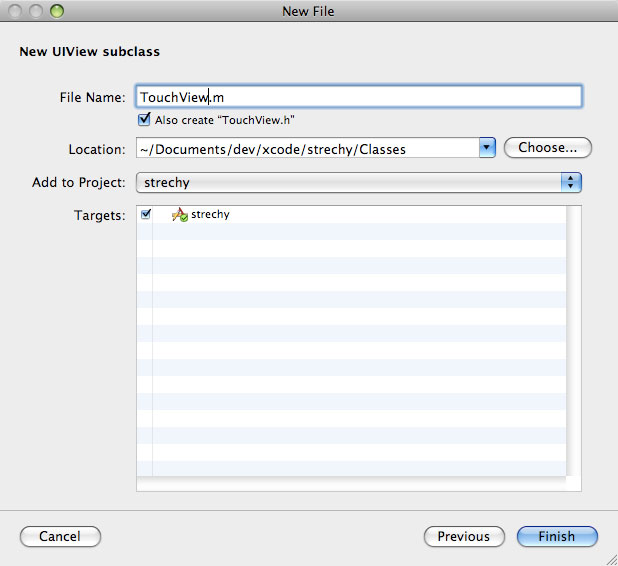
Next, create a user subclass of " UIView ", which will include all of the code for this lesson. His name I assigned " TouchView ".
TouchView.h "for a small internal view (moving and resizing) add a single instance variable . Assign it the label" IBOutlet "to associate it with the view in the IB editor . As a result, the header file will look like this:
To tie in IB performance with a custom class ( custom class ), we point out the class name for the view. To do this, in the IB editor, select the main view and open the Identity Inspector window for it . In the " Class " box at the top of the window, enter " TouchView ."
Let's go back to the editor and associate the small view with the instance variable. To do this, hold down the key
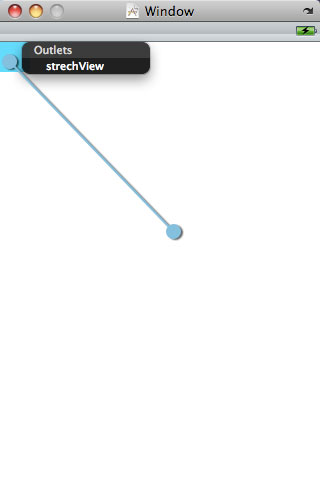
The rest of the code refers to " TouchView.m ". First, delete all the current code, since we will not need any of the methods implemented in it. However, you can add the following fragment processing the moment the screen is touched.
The first thing you need to do is start the animation. For this method will answer " beginAnimations: context The: " class " a UIView ". We pass it the name of the animation and " nil " as context. In my case, the name will be @ “MoveAndStrech” . To start and stop the animation, we turn to the method of the class " commitAnimations ". Events between two requests constitute the actual animation. Two methods will help you quickly adjust your animation behavior: " setAnimationDuration: " and " setAnimationBeginsFromCurrentState". The function of the first, in principle, is clear from the name, and the second tells the animation that it will start from the current state of the view. Here's what the updated touchesBegan method will look like :
The rest of the code is responsible for updating the view. First, consider a one-touch situation. In this case, we get the UITouch object from the set of touches . Then set the “strechVie ” center to the touch point relative to the main view (self). As a result, in two simple lines we have a moving representation that follows the touch.
It remains only to implement resizing the view. Below we will consider in detail the following fragment:
To move the view with resizing, you need to fix two touches. This will easily execute the instance method of the " allObjects " class on the " touches " set. We get both addresses and determine the upper coordinates x and y . Width and height are calculated from the difference in coordinates. The last step is to set the " frame " for presentation using " CGRectMake ". The resulting file " TouchView.m " is shown below:
That, in fact, is all. We are discussing, learning :)
The source code for the lesson can be downloaded here .
Those who have not yet had to do programming on the iPhone, it will be useful to get acquainted with the basics here , here and here . As an example, I will also give a lesson from the Stanford iPhone Development series (English), which examined the basics of motion animation.
Below is a short video of the application that we have to create. As mentioned above, two things can be done with it. One click will move the internal view to the touch point. Double-tapping the view will move with resizing. Focusing on touch points, the application creates a rectangle with a frame for presentation.
Well, let's get started ... First of all, we need a project. Having created a simple Window-Based Application , add a view to it. To do this, open the " MainWindow.xib " file in the Interface Builder editor by double-clicking on it. In running the editor will open the library window Library then (team of the Tools -> Library then ). One of its elements is the View component . Drag it to the main Window, focusing on the image below. Now you need to tell the main idea that a multi-tangent method of work will be allowed. This can be done in the inspector window, called by the command " Tools -> Attributes Inspector

". Make sure that the" Multiple Touch " option at the bottom of the window is checked.

Inside the first view, drag the second one that will move and resize. For the second view, you will need to configure a number of parameters: size, color, initial position. Correct size and position can be in the window of the size inspector ( Tools > Size Inspector ). I set the position to 0, 0, size - 30, 30. In the window of the attribute inspector uncheck the box " User Interaction Enabled ".

Next, create a user subclass of " UIView ", which will include all of the code for this lesson. His name I assigned " TouchView ".


TouchView.h "for a small internal view (moving and resizing) add a single instance variable . Assign it the label" IBOutlet "to associate it with the view in the IB editor . As a result, the header file will look like this:
#import


@interface TouchView : UIView {

IBOutlet UIView *strechView;

}


@end


* This source code was highlighted with Source Code Highlighter.
To tie in IB performance with a custom class ( custom class ), we point out the class name for the view. To do this, in the IB editor, select the main view and open the Identity Inspector window for it . In the " Class " box at the top of the window, enter " TouchView ."
Let's go back to the editor and associate the small view with the instance variable. To do this, hold down the key

The rest of the code refers to " TouchView.m ". First, delete all the current code, since we will not need any of the methods implemented in it. However, you can add the following fragment processing the moment the screen is touched.
- (void)touchesBegan:(NSSet *)touches withEvent:(UIEvent *)event

{

}


* This source code was highlighted with Source Code Highlighter.
The first thing you need to do is start the animation. For this method will answer " beginAnimations: context The: " class " a UIView ". We pass it the name of the animation and " nil " as context. In my case, the name will be @ “MoveAndStrech” . To start and stop the animation, we turn to the method of the class " commitAnimations ". Events between two requests constitute the actual animation. Two methods will help you quickly adjust your animation behavior: " setAnimationDuration: " and " setAnimationBeginsFromCurrentState". The function of the first, in principle, is clear from the name, and the second tells the animation that it will start from the current state of the view. Here's what the updated touchesBegan method will look like :
- (void)touchesBegan:(NSSet *)touches withEvent:(UIEvent *)event

{

[UIView beginAnimations:@"MoveAndStrech" context:nil];

[UIView setAnimationDuration:1];

[UIView setAnimationBeginsFromCurrentState:YES];


[UIView commitAnimations];

}


* This source code was highlighted with Source Code Highlighter.
The rest of the code is responsible for updating the view. First, consider a one-touch situation. In this case, we get the UITouch object from the set of touches . Then set the “strechVie ” center to the touch point relative to the main view (self). As a result, in two simple lines we have a moving representation that follows the touch.
- (void)touchesBegan:(NSSet *)touches withEvent:(UIEvent *)event

{

[UIView beginAnimations:@"MoveAndStrech" context:nil];

[UIView setAnimationDuration:1];

[UIView setAnimationBeginsFromCurrentState:YES];

if([touches count] == 1) {

UITouch *touch = [touches anyObject];

strechView.center = [touch locationInView:self];

}

[UIView commitAnimations];

}


* This source code was highlighted with Source Code Highlighter.
It remains only to implement resizing the view. Below we will consider in detail the following fragment:
- (void)touchesBegan:(NSSet *)touches withEvent:(UIEvent *)event

{

[UIView beginAnimations:@"MoveAndStrech" context:nil];

[UIView setAnimationDuration:1];

[UIView setAnimationBeginsFromCurrentState:YES];

if([touches count] == 1) {

UITouch *touch = [touches anyObject];

strechView.center = [touch locationInView:self];

} else if([touches count] == 2) {

NSArray *touchArray = [touches allObjects];

UITouch *touchOne = [touchArray objectAtIndex:0];

UITouch *touchTwo = [touchArray objectAtIndex:1];

CGPoint pt1 = [touchOne locationInView:self];

CGPoint pt2 = [touchTwo locationInView:self];

CGFloat x, y, width, height;

if(pt1.x < pt2.x) {

x = pt1.x;

width = pt2.x - pt1.x;

} else {

x = pt2.x;

width = pt1.x - pt2.x;

}

if(pt1.y < pt2.y) {

y = pt1.y;

height = pt2.y - pt1.y;

} else {

y = pt2.y;

height = pt1.y - pt2.y;

}

strechView.frame = CGRectMake(x, y, width, height);

}

[UIView commitAnimations];

}


* This source code was highlighted with Source Code Highlighter.
To move the view with resizing, you need to fix two touches. This will easily execute the instance method of the " allObjects " class on the " touches " set. We get both addresses and determine the upper coordinates x and y . Width and height are calculated from the difference in coordinates. The last step is to set the " frame " for presentation using " CGRectMake ". The resulting file " TouchView.m " is shown below:
#import "TouchView.h"


@implementation TouchView


- (void)touchesBegan:(NSSet *)touches withEvent:(UIEvent *)event

{

[UIView beginAnimations:@"MoveAndStrech" context:nil];

[UIView setAnimationDuration:1];

[UIView setAnimationBeginsFromCurrentState:YES];

if([touches count] == 1) {

UITouch *touch = [touches anyObject];

strechView.center = [touch locationInView:self];

} else if([touches count] == 2) {

NSArray *touchArray = [touches allObjects];

UITouch *touchOne = [touchArray objectAtIndex:0];

UITouch *touchTwo = [touchArray objectAtIndex:1];

CGPoint pt1 = [touchOne locationInView:self];

CGPoint pt2 = [touchTwo locationInView:self];

CGFloat x, y, width, height;

if(pt1.x < pt2.x) {

x = pt1.x;

width = pt2.x - pt1.x;

} else {

x = pt2.x;

width = pt1.x - pt2.x;

}

if(pt1.y < pt2.y) {

y = pt1.y;

height = pt2.y - pt1.y;

} else {

y = pt2.y;

height = pt1.y - pt2.y;

}

strechView.frame = CGRectMake(x, y, width, height);

}

[UIView commitAnimations];

}


@end


* This source code was highlighted with Source Code Highlighter.
That, in fact, is all. We are discussing, learning :)
The source code for the lesson can be downloaded here .
