With the help of the ServoStudio 12 program and the Arduino board, you can create your own robot without writing a single line of code
Probably many of those who discovered the world of electronics, sooner or later think about how to create a certain robot of their own, or just consumer automation or radio-controlled models. But if everything was more or less clear with the mechanics, then the development of a program to control such a device, in which a large number of servo drives must work together, caused quite a few difficulties. ServoStudio 12 software and hardware complex allows you to control such a device, control 12 servos at the same time, and create sequences of movements using a visual editor. Also, this complex will be a convenient tool for debugging the mechanics of the device and the creation of its program.
If necessary, the created sequence of movements can be exported as an Arduino IDE sketch, for offline work, without a PC. Or just as an array of key point values for further use in your program. ServoStudio 12 has an intuitive interface and even a beginner can understand it. And the use of the Arduino board as an executive control device made this system easily accessible in repetition and manufacture.
A little background. Inspired by the idea of creating a convenient servo tester from Sergey Grishchenko , I decided to create my own system, which would be easy to use and at the same time convenient and functional. Unlike the above servo tester, the ServoStudio 12 software is responsible for all control on a personal computer, and the Arduino board supports up to 12 servo drives simultaneously. The hardware part is a widespread Arduino Nano or Arduino Uno board. This software also supports operation with the above servo tester.
I originally planned to create a small program in which a sequence of servo control signal values would be reproduced in turn, but in the course of development I had new ideas and a simple program developed into a full-fledged robot mechanic control unit, with the ability to set the speed of movements and reproduction of movements using hot keys.
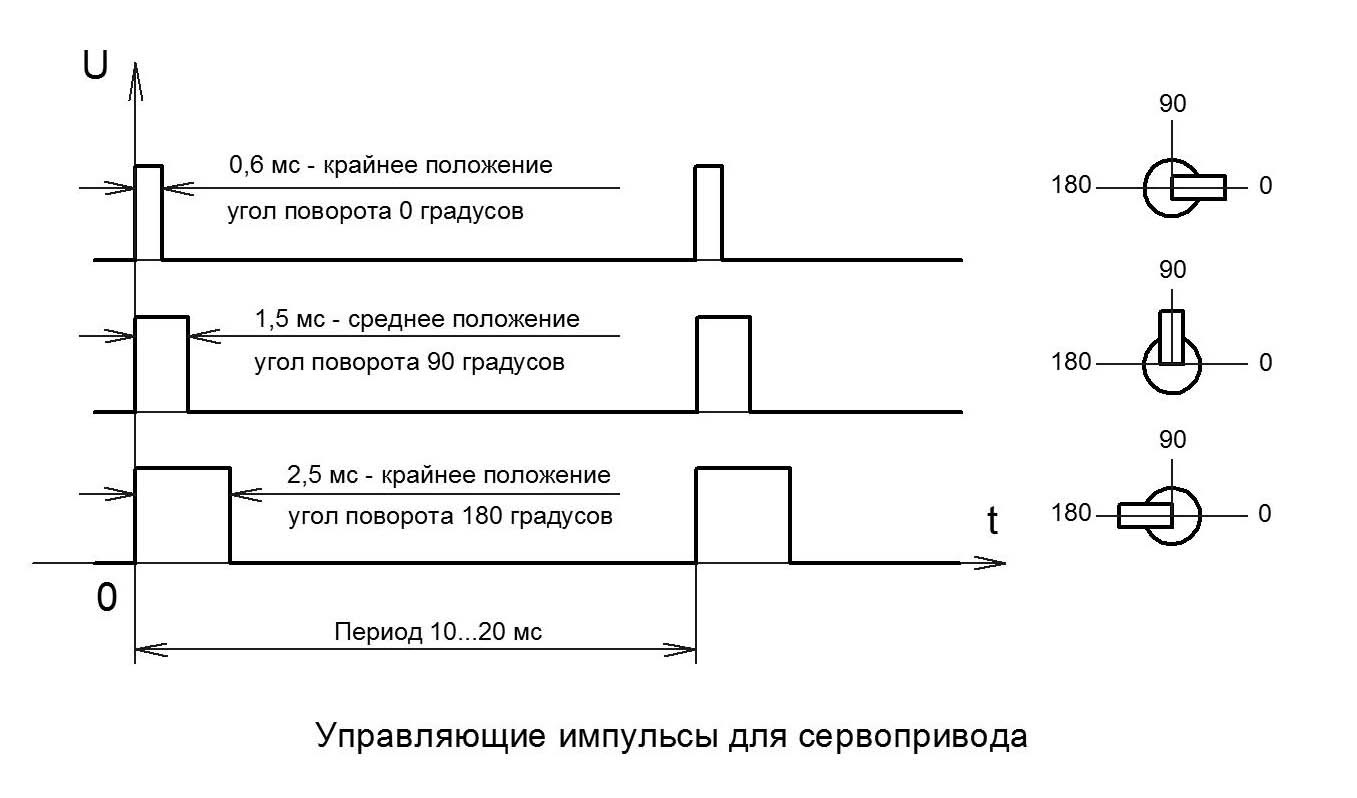
Servo - unlike the collector motor, allows you to make a turn at a certain angle. The angle of rotation is set by the width of the pulses of the control signal. The width of these pulses can vary within 800 - 2300 μs.
To get started, we need the following:
- Fee Arduino Nano / Uno.
- Arduino IDE to program this board.
- And software ServoStudio 12 .
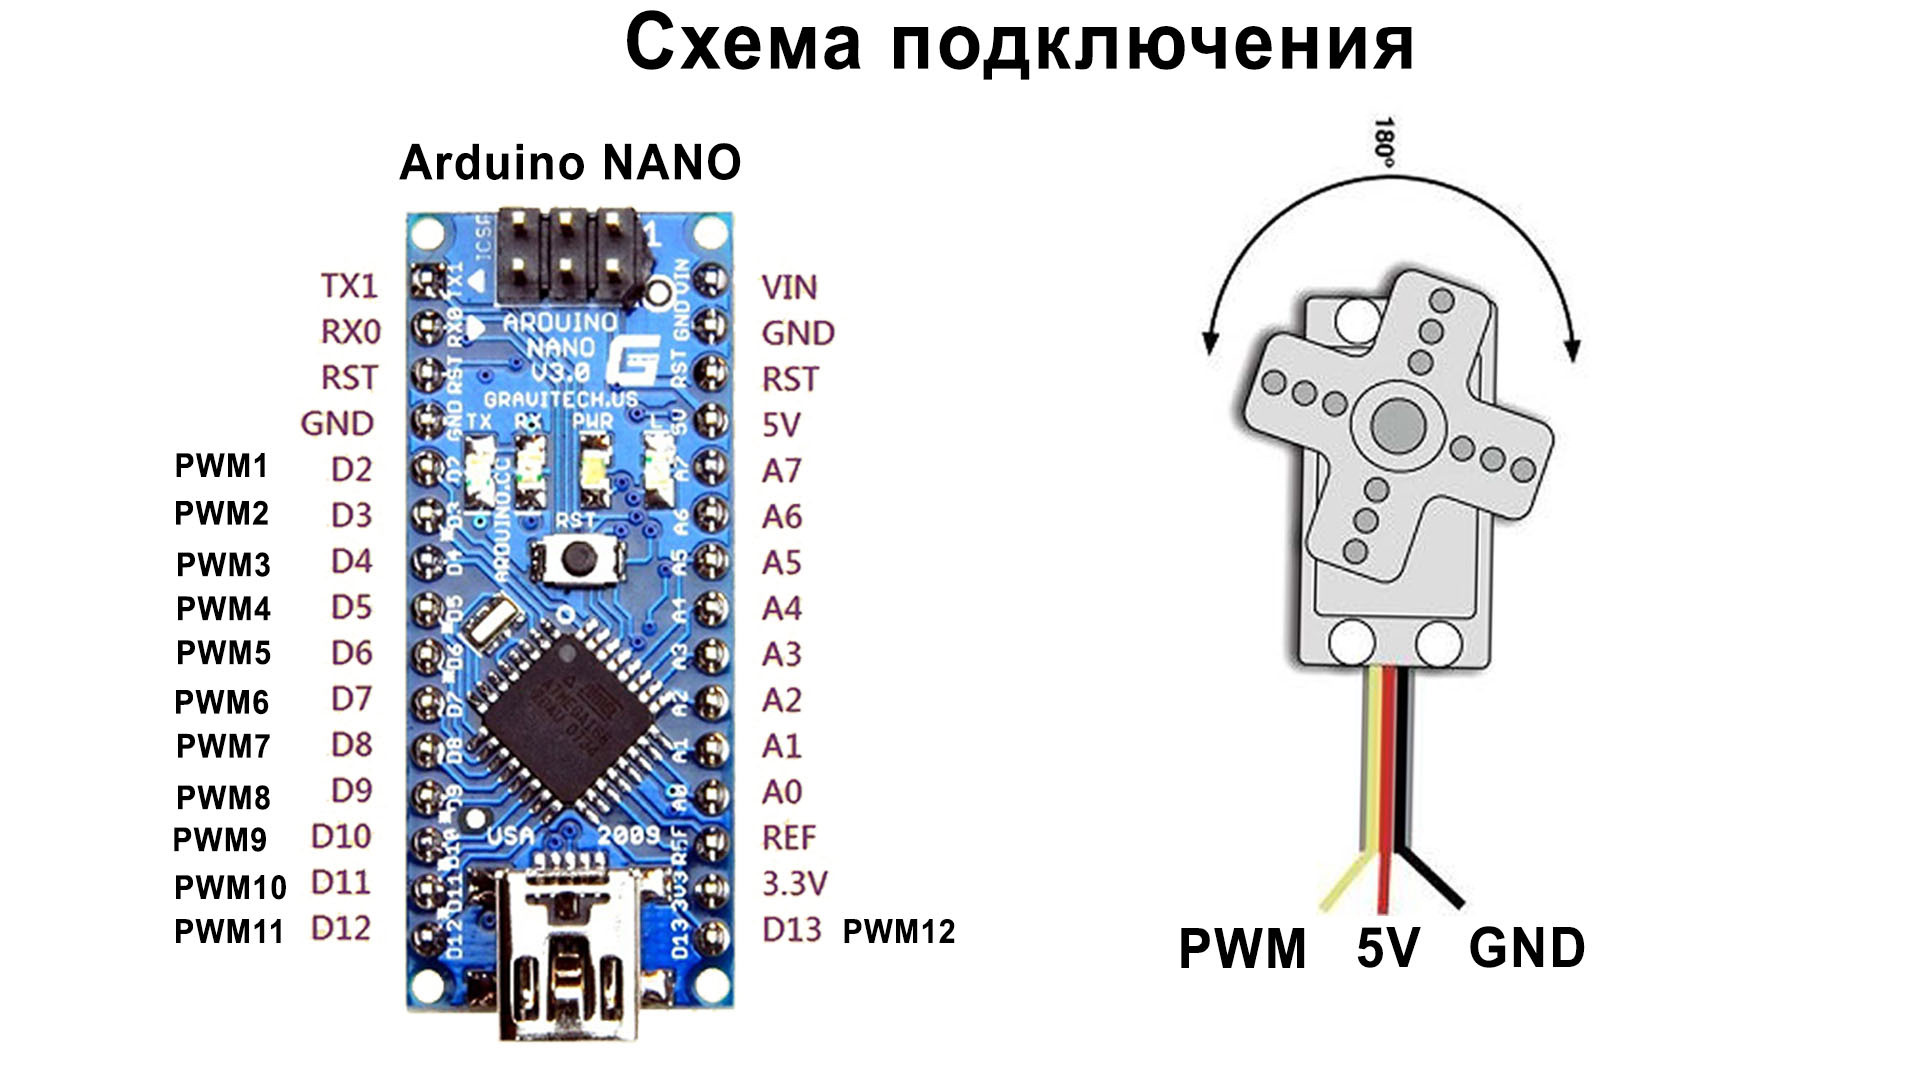
The wiring diagram is very simple. Pins D2-D13 are connected to control inputs of servo drives. Power connects to Arduino power pins. With a large current consumption of servos, it is necessary to connect an external power source.
First of all, in the menu of the ServoStudio 12 program, select the “Code Generator” item and the sub-item “Create a ServoStudio HardWare Sketch”, save this sketch to a disk and open it in the Arduino IDE and upload it to the Arduino Nano / Uno. That's all, the hardware is ready! This action is performed only once, with a new Arduino board.
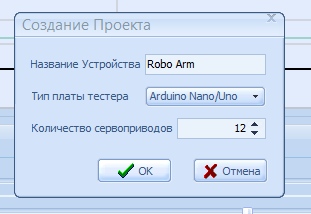
To get started, you need to create a new project (File / New menu). In the dialog box, select the required number of PWM channels (number of servos), select the type of tester board and write the name of your device (for convenience).
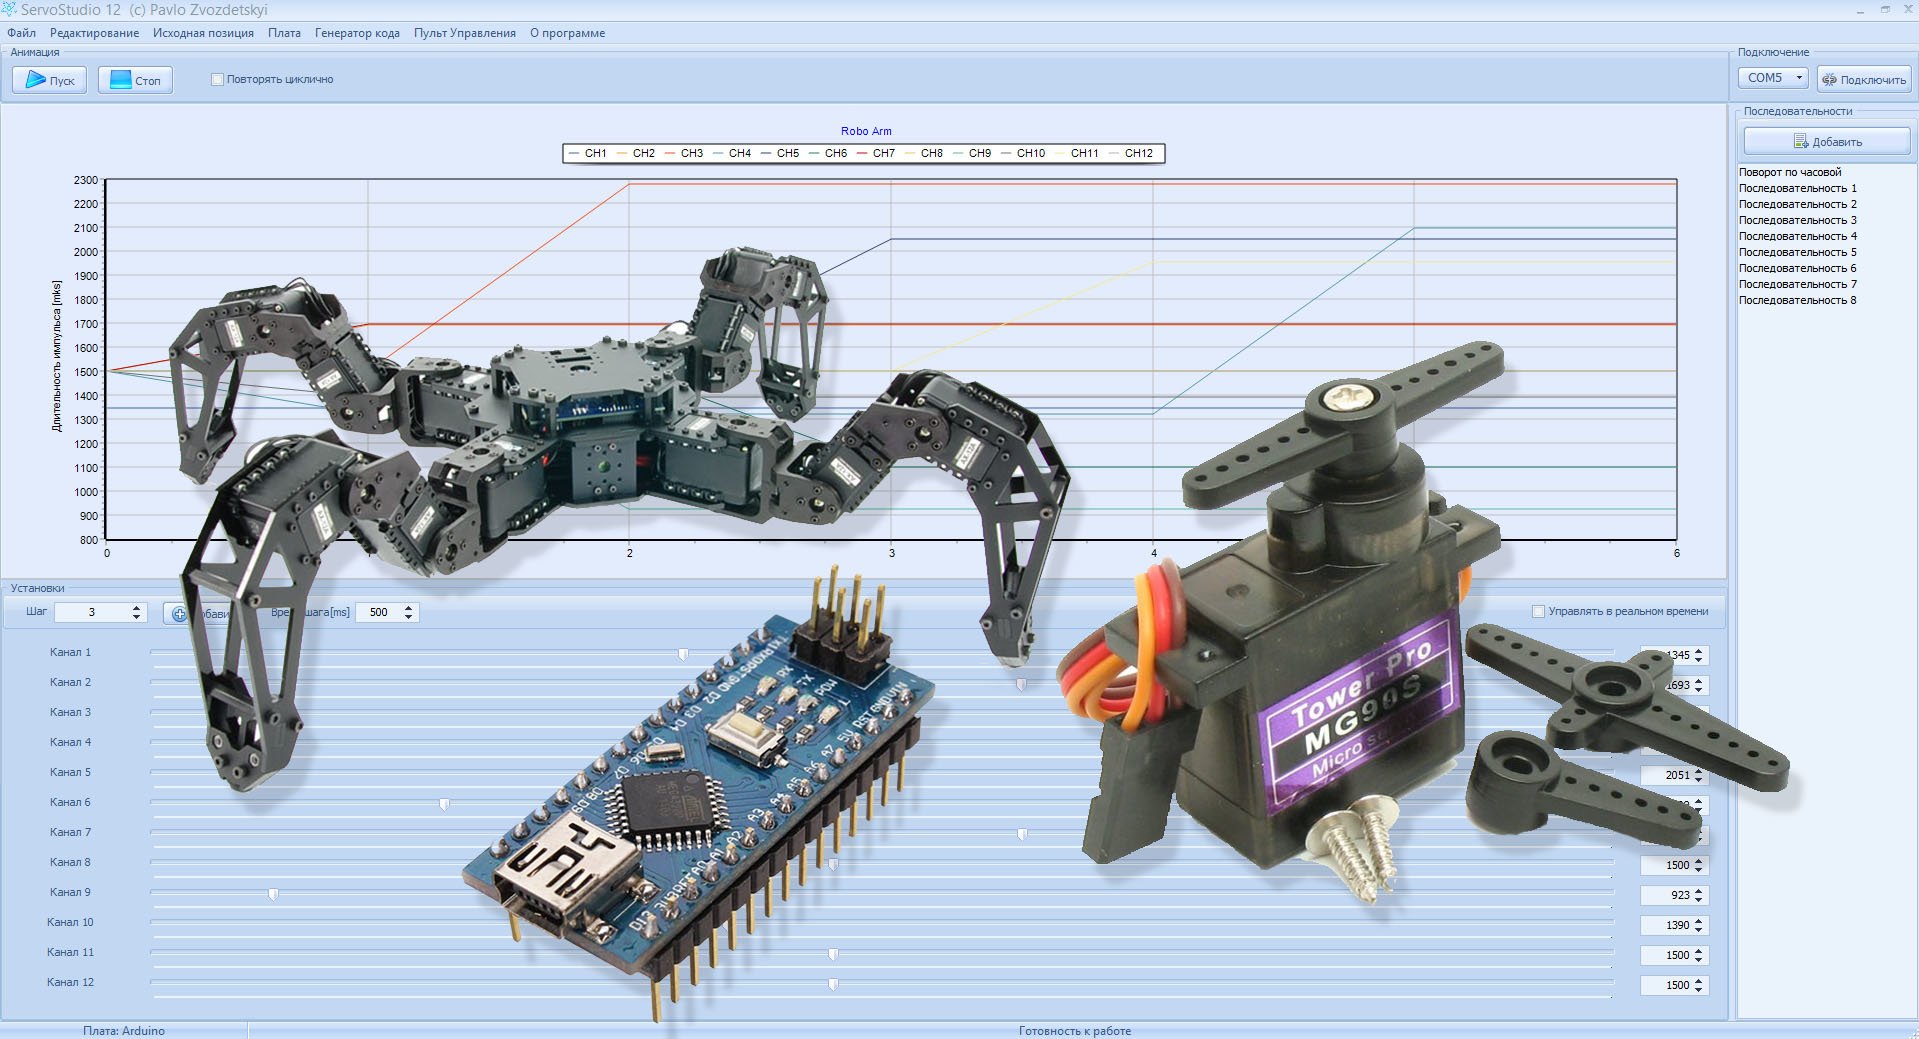
Now about the program interface
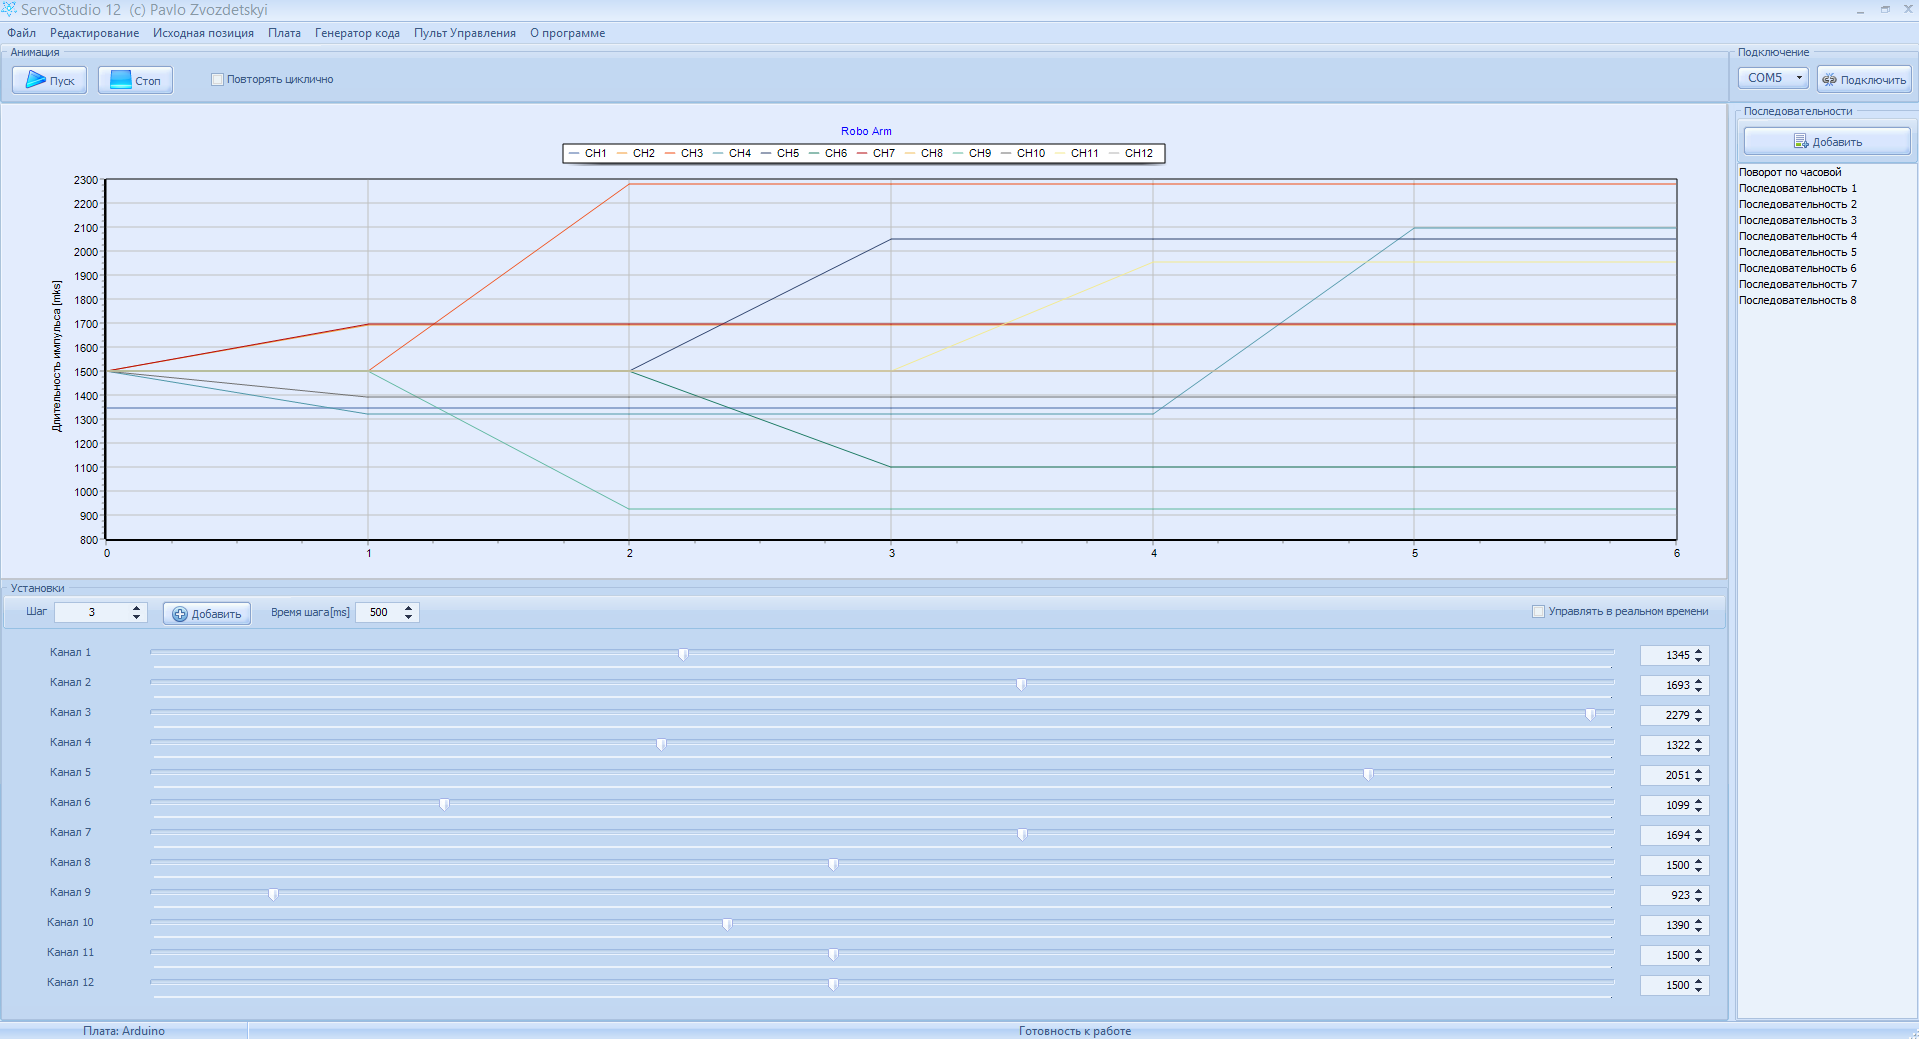
At the bottom are the tools for creating a sequence of key points. Moving the sliders of the regulators for the corresponding channels sets the value of the pulse width of the control signal (the angle of rotation of the servo) on the corresponding channel. If you select the “control in real time” checkbox, then when you move the slider, the servo drive connected to this channel will move, which is very convenient, since you can immediately see the position of the drive at this point. After you have installed the control signal on all the necessary channels, you need to create the next “frame” (the next key point), using the “Add” button. And in the same way, with the help of regulators, create a new key point, and as much as necessary. The time for which the servos should turn to this angle is set for each frame separately, in the field "step time", the time is set in milliseconds. The greater this value, the slower the movement will be, the smaller the faster. The “step” field displays the current frame of the sequence. If necessary, by changing the step number in this field, you can edit the previous steps. For convenience, channel names can be changed by clicking 2 times on the channel name, to the left of the controller.
In the upper part, on the graph, the change in the width of the control signal of the servos is visually displayed.
And when a complete movement has been created (for example, a step forward), you can save the current sequence as a separate finished sequence by clicking the “add” button in the “Sequences” panel, in the right-hand part of the program window. For example, you can create several sequences for moving forward, backward, left, right, and so on. And these sequences can be reproduced independently of each other, by double-clicking the mouse, or from the context menu, as well as from the “control panel” window (but more on that later). Thus, reproducing these sequences, the device (robot) is controlled. You can also add saved sequences to the main sequence, creating one big sequence of actions. This can be very useful for demonstrating the operation of the device.
Also, the main sequence (which is currently open in the editor) can be exported as a sketch for Arduino IDE, for offline playback by the Arduino board, without PC involvement. To do this, select the Export Sequence item in the Code Generator menu and click the Generate button in the dialog box, after which this sketch can be copied to the clipboard, or saved as a sketch for Arduino IDE. Then this sketch can be poured in the usual way into the controller of the Arduino board.
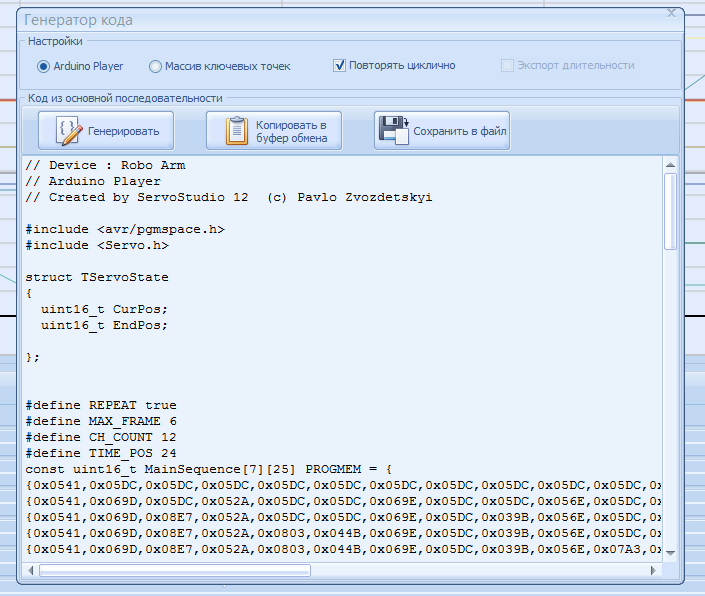
It is possible to reproduce this sequence cyclically or only once, by setting or clearing the flag “repeat cyclically”. It is also possible to export key points to an array, this can be useful if you already have your own program for the microcontroller and you need to specify the movements in it, and you can optionally add position positioning values to the array using the appropriate checkbox. If, after flashing this sketch, the Arduino board needs to be used again with the ServoStudio 12 program, then you need to select the “Code Generator” item in the menu and the sub-item “Create a ServoStudio HardWare sketch”, save the sketch to disk and open it in the Arduino IDE Nano / Uno.
Window "remote control"
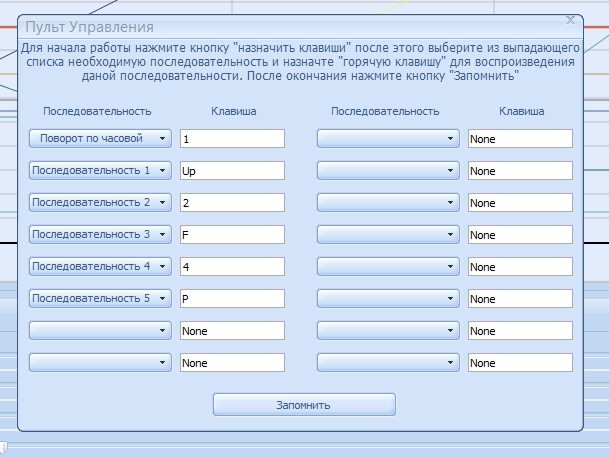
Allows you to use hot keys to play individual sequences. First you need to press the button “Assign keys”, select the necessary sequence from the drop-down list and assign a hot key to it. When everything is installed, you must click the "Remember" button. Now, while this window is open, pressing the hot key will play the sequence assigned to it.
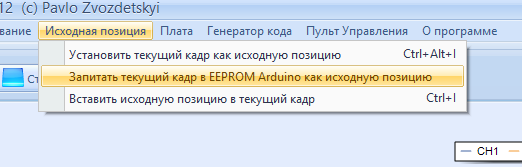
Not unimportant is the menu item "Starting Position" - this is the position of the servos when turned on, or simply the "normal position" for the angle of rotation of the servos. In other words, if you don’t want your robot to skew when turned on, you need to choose the optimal position for the regulators and select the “Record current frame in Arduino EEPROM as starting position” menu item, this function is available only for Arduino boards. There are also items “Write current frame as starting position” and “Insert starting position into current frame”, this will be very useful if you need to start a new sequence and starting point. The original position is saved in the project file and is available when the file is opened, so it will not need to be re-selected.
The program also has the ability to associate project files with ServoStudio 12. To do this, you need to run it once with administrator rights. ServoStudio 12 is fully Portable, consists of 1 file (when the program is closed, the file of the last open project is still created) and does not require installation.
More details about the work can be viewed in the video.
Download link for ServoStudio 12 Software
A bit about future plans:
- I want to create an application for Android, which could open the project file and it would be possible to use the phone to control the robot. Control over BlueTooth or WiFi via TCP-UART adapter.
- I also want to create a version for more channels, for managing more complex devices.
- Add signal processing from connected sensors (for example, if there is an obstacle ahead, go around it).
- Add the ability to control digital outputs (for example, to turn on LEDs or something else)
But will these plans remain just plans, or will they be released in the next release of the program? It directly depends on the interest in this complex.