Ambilight for World of Tanks - New Year Lights
To start the video. (This is not exactly Ambilight - this is a color indicator of tank health). The video shakes and shakes due to the fact that with one hand I take off, the second I try to play.
In the manufacture of everything came out very simple.
Necessary ingredients:
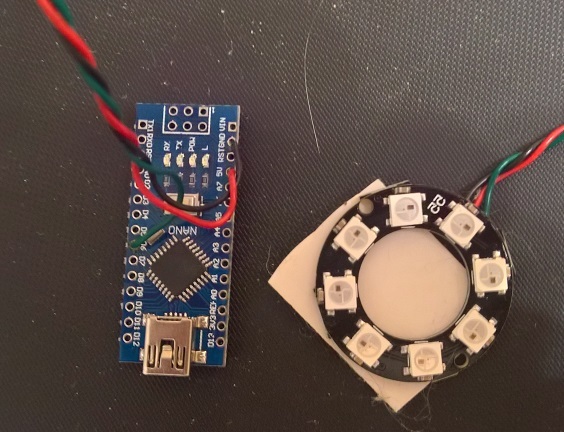
1. Arduino - what is;
2. WS2812B LEDs (I used the ring - I bought it a long time ago, now I decided to use it);
3. Mod for tanks . Mod for my project was written by comrade Kotyarko_O from the forum koreanrandom, for which a special thank you to him. The archive with the mod attached source;
4. Application for PC. - in the archive source and application in the bin folder.
All this does not look very nice, I stuck it to the monitor on double-sided tape.
BUT! Minimum details. For the code, please do not judge strictly, it is crooked :) I am a programmer for copy-and-paste :) Who doesn’t like it much, you can remake it beautifully and practically.
Well, that's all, respectively. It works in the simplest way. The mod for tanks adds all the necessary information to the xml file, and the PC application in turn reads xml and transmits all the information to Arduin, which in turn controls the color.
PS All this can be improved, completed, finished, improved ... But I already want to sleep :)
PPS Happy New Year !
In the manufacture of everything came out very simple.
Necessary ingredients:
1. Arduino - what is;
2. WS2812B LEDs (I used the ring - I bought it a long time ago, now I decided to use it);
3. Mod for tanks . Mod for my project was written by comrade Kotyarko_O from the forum koreanrandom, for which a special thank you to him. The archive with the mod attached source;
4. Application for PC. - in the archive source and application in the bin folder.
All this does not look very nice, I stuck it to the monitor on double-sided tape.
BUT! Minimum details. For the code, please do not judge strictly, it is crooked :) I am a programmer for copy-and-paste :) Who doesn’t like it much, you can remake it beautifully and practically.
Arduino code
#include<Adafruit_NeoPixel.h>#ifdef __AVR__#include<avr/power.h>#endif#define PIN            6#define NUMPIXELS      8
Adafruit_NeoPixel pixels = Adafruit_NeoPixel(NUMPIXELS, PIN, NEO_GRB + NEO_KHZ800);
String ser;
int red = 0;
int green =0;
voidsetup(){
  pixels.begin(); // This initializes the NeoPixel library.
    Serial.begin(9600);
    while (!Serial) {
    ; // wait for port to be ready
  }
  Serial.setTimeout(100);
}
voidloop(){
  if (Serial.available() > 0)
  {
    ser = Serial.readString();
    if (ser != "end")
    {
      green = ser.toInt()*2;
      red = green-100;
      for(int i=0;i<NUMPIXELS;i++)
      {
        pixels.setPixelColor(i, pixels.Color(red,green,0));
      }
      pixels.show();
    }
    else
    {
     for(int i=0;i<NUMPIXELS;i++)
      {
        pixels.setPixelColor(i, pixels.Color(0,0,0));
      }
      pixels.show();
    }
  }
}
PC program written in C #
private void button1_Click(object sender, EventArgs e)
{
timer1.Enabled = true;
}
private void timer1_Tick(object sender, EventArgs e)
{
XmlDocument doc = new XmlDocument();
SerialPort serialPort1 = new SerialPort();
doc.Load(@«C:\World_of_Tanks\res_mods\0.9.17.0.1\scripts\client\gui\mods\mod_ArduinoHP.xml»);
string maxHealth = doc.DocumentElement.ChildNodes[0].InnerText;
string currentHealth = doc.DocumentElement.ChildNodes[1].InnerText;
string healthProgress = doc.DocumentElement.ChildNodes[2].InnerText;
serialPort1.PortName = «COM13»; //задаем имя COM-порта, с которым работает Arduino
serialPort1.Open(); //открываем COM-порт
if (healthProgress != "")
{
serialPort1.Write(healthProgress);
}
else
serialPort1.Write(«end»);
serialPort1.Close(); //закрываем COM-порт
}
Well, that's all, respectively. It works in the simplest way. The mod for tanks adds all the necessary information to the xml file, and the PC application in turn reads xml and transmits all the information to Arduin, which in turn controls the color.
PS All this can be improved, completed, finished, improved ... But I already want to sleep :)
PPS Happy New Year !