Budget light for RC model
Hello. I want to talk about how I did the semblance of neon lights and headlights with dimensions for a radio-controlled drift model of 1:10 scale.
To begin with, I made up for myself a list of the "Wishlist":
1. Highlighting the bottom of the model, the so-called. "neon";
2. Headlights (high beam);
3. Dimensions.
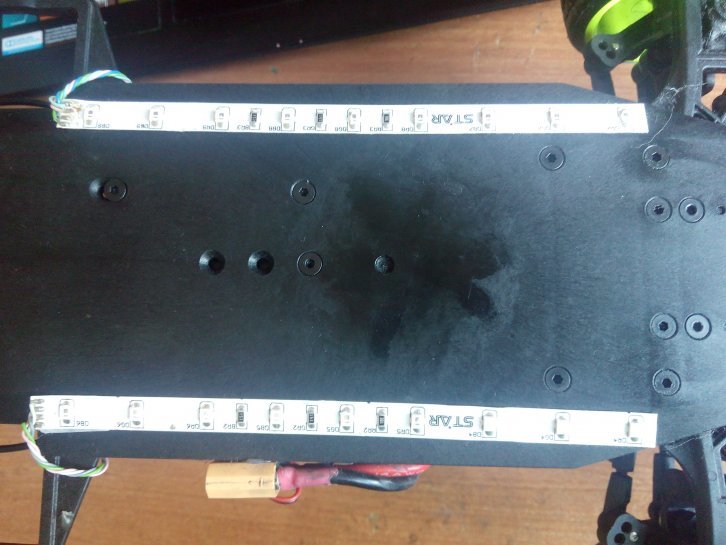
To illuminate, I dug out a LED pseudo-RGB tape in the bins of the cabinet. The R, G and B LEDs are not in the same package, but simply stand one after another (I missed this fact when ordering, so the tape moved into the cabinet). The length of one tape segment is 147mm and it fits two LEDs of each color. But whatever the RGB tape, it still needs a controlling controller - I planned to implement it on ATTiny13, since they were recognized by me as “unreliable” for the projects and lay quietly in the same cabinet.
The inclusion of headlights and dimensions was also planned using the same ATTini, but ... did not work out, in general. Although both on the signet and in the code everything is drawn and described, maybe someday I will add; Now the light and dimensions are switched on by a 2-section dip switch.
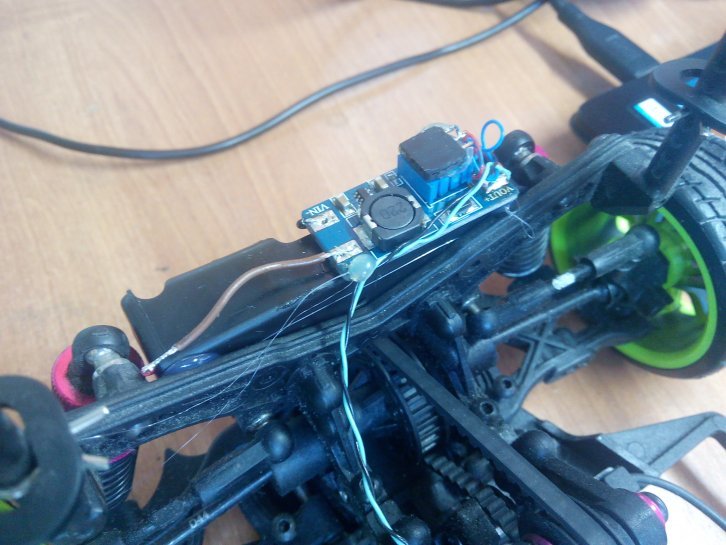
In the original version of the "light unit", the power was planned to be combined with the power supply of the power unit; whether it’s interfering with the voltage or the voltage dropping due to the gluttony of my regulator, the controller was dropped, so I had to add (in version 2) 2 18650 batteries connected in series. The voltage of 6-8.4V was enough to power the LED strips. Then, due to the lack of a large number of compartments for the 18650, we had to replace the double compartment with a single compartment and add a Chinese DC-DC Step-Up module on a small chip with unreadable marking. The voltage at the output I put 10V, now and the tape, and the lights shine brighter, however, you often have to charge the battery; but it is still more than enough for 2-3 pokatushki for 2.5 hours. Yes, and carry a 2 18650 battery - not such a big problem.
Practically, the implementation of the light controller is not a miracle, I did not bother much and decided to do 5 modes of operation - everything is off, R, G, B, RGB. Due to the relatively small clearance of the model, in the RGB mode, all three LEDs are clearly visible. The ribbon itself has a common anode, the cathodes are switched using small N-channel field-effect transistors in the SOT-23 package. For some reason, the wiring of the power section was the biggest problem for me - I’m undermining a little when I draw circuits with transistors. And after the elimination of the problem, I found the connection scheme in the collection of Arduino Basic Connections.
LEDs are mounted on the case of the model (for headlights it is on stars, dimensions are simply glued to hot melt glue) and a board on which a DIP switch and current limiting resistors are mounted. A battery with a boost converter stand on the chassis, power is supplied via a 3-pin connector, of which 1 is not connected (to protect against polarity reversal).
The firmware for the microcontroller (all at the end of the article in the archive) was written in BASCOM-AVR, which, IMHO, was unfairly described by one or two articles on Habré, because the environment deserves attention due to the simplicity of writing the program and decent exit code.
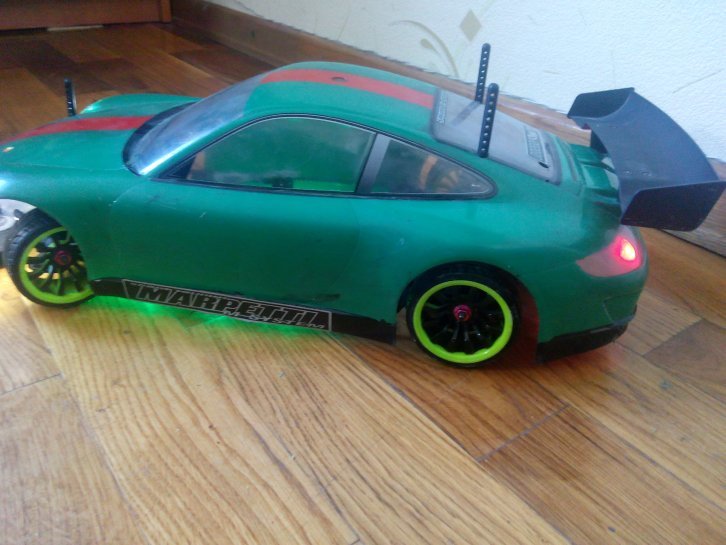
In conclusion, some photos of the resulting:


Photos of the board without heat shrinking have not been preserved. The
archive with printed circuit boards and code can be downloaded here.. Printed circuit boards are drawn in Sprint Layout 6, the code is written in BASCOM-AVR 2.0.5.0.
Thanks for attention!
Prehistory
В ноябре 2015 я заинтересовался дрифтом на RC-моделях, неожиданно появились деньги, и тут понеслась… Дрифт меня вовлёк, и я решил перейти к этапу, который в электронике обычно начинается с изготовления корпусов для своих устройств, а в моделизме — с добавления «красунек» на модель. Корпус у меня уже был — побитый жизнью Porsce 911 GT2 RS, и я решил добавить немного света. Что из этого вышло — смотрим.
Part 1, theoretical and philosophical
To begin with, I made up for myself a list of the "Wishlist":
1. Highlighting the bottom of the model, the so-called. "neon";
2. Headlights (high beam);
3. Dimensions.
To illuminate, I dug out a LED pseudo-RGB tape in the bins of the cabinet. The R, G and B LEDs are not in the same package, but simply stand one after another (I missed this fact when ordering, so the tape moved into the cabinet). The length of one tape segment is 147mm and it fits two LEDs of each color. But whatever the RGB tape, it still needs a controlling controller - I planned to implement it on ATTiny13, since they were recognized by me as “unreliable” for the projects and lay quietly in the same cabinet.
The inclusion of headlights and dimensions was also planned using the same ATTini, but ... did not work out, in general. Although both on the signet and in the code everything is drawn and described, maybe someday I will add; Now the light and dimensions are switched on by a 2-section dip switch.
In the original version of the "light unit", the power was planned to be combined with the power supply of the power unit; whether it’s interfering with the voltage or the voltage dropping due to the gluttony of my regulator, the controller was dropped, so I had to add (in version 2) 2 18650 batteries connected in series. The voltage of 6-8.4V was enough to power the LED strips. Then, due to the lack of a large number of compartments for the 18650, we had to replace the double compartment with a single compartment and add a Chinese DC-DC Step-Up module on a small chip with unreadable marking. The voltage at the output I put 10V, now and the tape, and the lights shine brighter, however, you often have to charge the battery; but it is still more than enough for 2-3 pokatushki for 2.5 hours. Yes, and carry a 2 18650 battery - not such a big problem.
Part 2, practical
Practically, the implementation of the light controller is not a miracle, I did not bother much and decided to do 5 modes of operation - everything is off, R, G, B, RGB. Due to the relatively small clearance of the model, in the RGB mode, all three LEDs are clearly visible. The ribbon itself has a common anode, the cathodes are switched using small N-channel field-effect transistors in the SOT-23 package. For some reason, the wiring of the power section was the biggest problem for me - I’m undermining a little when I draw circuits with transistors. And after the elimination of the problem, I found the connection scheme in the collection of Arduino Basic Connections.
LEDs are mounted on the case of the model (for headlights it is on stars, dimensions are simply glued to hot melt glue) and a board on which a DIP switch and current limiting resistors are mounted. A battery with a boost converter stand on the chassis, power is supplied via a 3-pin connector, of which 1 is not connected (to protect against polarity reversal).
The firmware for the microcontroller (all at the end of the article in the archive) was written in BASCOM-AVR, which, IMHO, was unfairly described by one or two articles on Habré, because the environment deserves attention due to the simplicity of writing the program and decent exit code.
In conclusion, some photos of the resulting:
Photos of the board without heat shrinking have not been preserved. The
archive with printed circuit boards and code can be downloaded here.. Printed circuit boards are drawn in Sprint Layout 6, the code is written in BASCOM-AVR 2.0.5.0.
Thanks for attention!