Practical guidelines for developing large-scale React applications. Part 2: state management, routing
- Transfer
Today we publish the second part of the translation of the material, which is devoted to the development of large-scale React-applications. Here we will talk about managing the state of applications, routing, and interface development.
Part 1: Practical guidelines for developing large-scale React applications. Planning, actions, data sources, and APIs
Part 2: Practical guidelines for developing large-scale React applications. Part 2: state management, routing

Here we will talk about how you can extend the functionality of Redux in order to be able to orderfully perform complex operations in the application. If such mechanisms are implemented poorly, they may violate the pattern used in designing the repository. JavaScript
generator functions can solve many of the problems associated with asynchronous programming. The fact is that these functions can be started and stopped at the request of the programmer. Redux-saga middleware uses this concept to manage problematic aspects of an application. In particular, we are talking about solving such problems, which cannot be solved with the help of reducers, presented in the form of pure functions.
Consider the following scenario. You were offered to work on an application designed for a company that works in the real estate market. The client wants to get a new, better website. At your disposal there is a REST API, you have layouts of all pages prepared using Zapier, you have outlined an application plan. But then a hefty problem crept up.
The client company has long been using a certain content management system (CMS). Employees of the company are well aware of this system, so the customer does not want to switch to a new CMS just to make it easier to write new posts on a corporate blog. In addition, you also need to copy existing publications from the blog to a new site, and this can also lead to a problem.
The good thing is that the CMS used by the client has a convenient API through which you can access publications from the blog. But, if you created an agent for working with this API, the situation is complicated by the fact that it is located on a certain server on which the data is presented not at all as you need.
This is an example of a problem, something that could pollute the application code, since here you have to include in the project mechanisms for working with the new API used to download blog posts. You can deal with this situation with redux-saga.
Take a look at the following diagram. This is how our application and API interact. We download publications in the background using redux-saga.
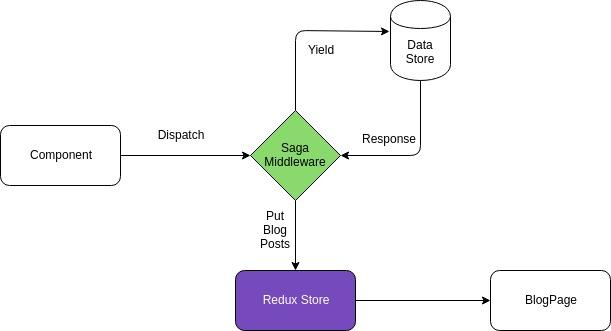
An application diagram that uses Redux and redux-saga repository.
Here, the component submits the action
Here is an example of how the generator function for loading publications (such functions are called “sagas”) might look like in the described situation. Sagas can be used in other scenarios. For example, to organize the storage of user data (say, it can be tokens), since this is another example of a task for which pure functions are not suitable.
The saga presented here is awaiting the appearance of type actions
When developing large applications, it is impossible to plan in advance the device of all the necessary models. Moreover, as the size of the application increases, the use of the technology of introducing reducers helps to save a large amount of man-hours. This technique allows developers to add new reducers to the system without rewriting the entire repository.
There are libraries that are designed to create dynamic Redux repositories. However, I prefer the mechanism of introducing reducers, as it gives the developer a certain level of flexibility. For example, an existing application can be equipped with this mechanism without the need to seriously reorganize the application.
The introduction of reducers is a form of code separation. The React developer community is enthusiastically embracing this technology. I will use this piece of code to demonstrate the appearance and features of the implementation mechanism of the reducers.
First, let's look at its integration with Redux:
This code is part of the file
Here we, in the export team, use not a function
You can learn from the documentation for Redux that a function
The right-most function in a composition can take many arguments, but only one argument can be passed to functions following it. As a result, by calling the function that turned out as a result of use
There are a number of tools that are used to solve routing problems in applications. In this section, however, we will focus on the react-router-dom library . We will expand its capabilities so that it can work with Redux.
Most often, the React router is used like this: the root component is enclosed in a tag
With this approach, the child component receives, through the mechanism
This routing option can lead to problems in large applications. This happens due to the fact that they do not have a centralized object
To solve this problem, we will use the connected-react-router library , which will allow us to establish routing using the method
After the completion of its configuration, the new routing system can be used through Redux. So, navigation in the application can be implemented by sending actions.
In order to take advantage of the capabilities of the connected-react-router library in the component, we simply map the method
Here, the method
Over time, despite the presence of an adequate backend for the application and a high-quality client part, some elements of the user interface begin to affect the user’s work badly. This is due to the irrational implementation of the components, which, at first glance, seems very simple. In this section, we will discuss recommendations for creating some widgets. Their correct implementation, as the application grows, becomes more complicated.
The best part about the asynchronous nature of JavaScript is that it takes advantage of the full potential of the browser. Perhaps the true good is that to start a certain process you do not need to wait for the completion of the previous task. However, developers cannot influence the network and the speed with which the various materials necessary for the functioning of the sites are loaded.
Network subsystems are usually perceived as unreliable and error prone.
The developer, in an effort to make his application as high-quality as possible, can subject it to many checks and achieve their successful passage. But still there are some things, like the status of the network connection or the server response time, which the developer cannot influence.
But the creators of the software do not seek to justify the poor-quality work of applications with phrases like "this is not my business." They found interesting ways to deal with network problems.
In some parts of the front-end application, you may need to show some backup materials (such as loading much faster than real materials). This will save the user from contemplating the "twitching" of the loading pages or, even worse, about such icons.

It’s better for users not to see anything like this
. React Suspense technology can deal with just such problems. For example, it allows you to display a certain indicator during data loading. Although you can do this manually by setting the property
Here you can watch a good video about Suspense, in which Jared Palmer introduces the audience to this technology and shows some of its features using an example of a real application .
Here's how the app works without using Suspense.

An application in which Suspense is not used
It is much easier to equip a component with Suspense support than to use it at the application level
Components wrapped in tags

Application that uses Suspense
In large front-end applications, the manifestation of repeating patterns is common. At the same time, at the very beginning of the work, this can be almost completely unobvious. There is nothing to be done about it, but you must have come across this.
For example, there are two models in the application. One of them is intended for the description of racing tracks, and the second - for the description of cars. The car list page uses square elements. Each of them contains an image and a brief description.
The trace list uses similar elements. Their main feature is that, in addition to the image and description of the track, they also have a small field indicating whether it is possible for spectators of a race taking place on this track to buy something to eat.
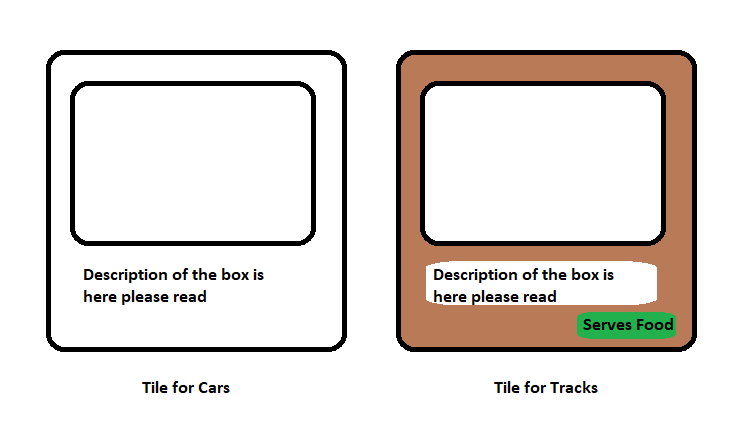
Element for the description of the car and element for the description of the track
These two components are slightly different from each other in terms of style (they have different background colors). The component that describes the route contains some additional information about the real-world object that it describes, while the component that symbolizes the car does not have such information. This example shows just two models. In a large application, many similar models can be typed, differing only in small things.
The creation of separate independent components for each of these entities is contrary to common sense.
A programmer can save himself the need to write code fragments that almost completely repeat each other. This can be done through the development of adaptive components. They, in the course of work, take into account the environment in which they were loaded. Consider the search bar of a certain application.

Search bar.
It will be used on many pages. At the same time, minor changes will be made to its appearance and the order of its work on different pages. For example, on the project’s home page, it will be slightly larger than on other pages. In order to solve this problem, you can create one single component that will be displayed in accordance with the properties transferred to it.
Using this technique, you can control the use of HTML classes when rendering such elements, which allows you to influence their appearance.
Another interesting situation in which adaptive components can find application is the mechanism for breaking certain materials into pages. A navigation bar may be present on every page of the application. The instances of this panel on each of the pages will be almost exactly the same as on the other pages.

Pagination panel
Assume that a certain application needs a similar panel. When working on this application, developers adhere to timely articulated requirements. In such a situation, the adaptive component used to break the material into pages only needs to pass a couple of properties. This is the
The React ecosystem has become so mature these days that it is unlikely that anyone will ever need to “invent a bicycle” at any stage of application development. Although this plays into the hands of developers, it leads to the fact that it becomes difficult to choose exactly what works well for each specific project.
Each project is unique in terms of its scope and functionality. There is no single approach or universal rule in developing React applications. Therefore, before starting development, it is important to plan it correctly.
When planning, it is very easy to understand which tools are directly created for the project and which ones are clearly not suitable for him, being too large for him. For example, an application consisting of 2-3 pages and performing very few requests to certain APIs does not need data stores similar to the ones we talked about. I am ready to go even further in these considerations, and say that in small projects you do not need to use Redux.
At the planning stage of the application, while drawing layouts of its pages, it is easy to see that many similar components are used on these pages. If you try to reuse the code of such components or strive to write universal components, this will help to save a lot of time and effort.
And finally, I would like to note that data is the core of any application. And React applications are no exception. As the scale of the application grows, the volumes of processed data grow, additional software mechanisms for working with them appear. Something like this, if the application was poorly designed, can easily “crush” programmers, filling them with complex and confusing tasks. If, in the course of planning, the issues of using data warehouses were decided in advance, if the order of work of actions, reducers, sag was thought out in advance, then working on the application would be much easier.
Dear readers! If you know of any libraries or development methodologies that perform well when creating large-scale React applications, please share them.

Application state management, Redux integration, routing organization
Here we will talk about how you can extend the functionality of Redux in order to be able to orderfully perform complex operations in the application. If such mechanisms are implemented poorly, they may violate the pattern used in designing the repository. JavaScript
generator functions can solve many of the problems associated with asynchronous programming. The fact is that these functions can be started and stopped at the request of the programmer. Redux-saga middleware uses this concept to manage problematic aspects of an application. In particular, we are talking about solving such problems, which cannot be solved with the help of reducers, presented in the form of pure functions.
▍Solving tasks that cannot be solved with pure functions
Consider the following scenario. You were offered to work on an application designed for a company that works in the real estate market. The client wants to get a new, better website. At your disposal there is a REST API, you have layouts of all pages prepared using Zapier, you have outlined an application plan. But then a hefty problem crept up.
The client company has long been using a certain content management system (CMS). Employees of the company are well aware of this system, so the customer does not want to switch to a new CMS just to make it easier to write new posts on a corporate blog. In addition, you also need to copy existing publications from the blog to a new site, and this can also lead to a problem.
The good thing is that the CMS used by the client has a convenient API through which you can access publications from the blog. But, if you created an agent for working with this API, the situation is complicated by the fact that it is located on a certain server on which the data is presented not at all as you need.
This is an example of a problem, something that could pollute the application code, since here you have to include in the project mechanisms for working with the new API used to download blog posts. You can deal with this situation with redux-saga.
Take a look at the following diagram. This is how our application and API interact. We download publications in the background using redux-saga.
An application diagram that uses Redux and redux-saga repository.
Here, the component submits the action
GET.BLOGS. The application uses redux-saga, so this request will be intercepted. After that, the generator function will download data from the data store in the background and update the application state supported by Redux. Here is an example of how the generator function for loading publications (such functions are called “sagas”) might look like in the described situation. Sagas can be used in other scenarios. For example, to organize the storage of user data (say, it can be tokens), since this is another example of a task for which pure functions are not suitable.
...
function* fetchPosts(action) {
 if (action.type === WP_POSTS.LIST.REQUESTED) {
   try {
     const response = yield call(wpGet, {
       model: WP_POSTS.MODEL,
       contentType: APPLICATION_JSON,
       query: action.payload.query,
     });
     if (response.error) {
       yield put({
         type: WP_POSTS.LIST.FAILED,
         payload: response.error.response.data.msg,
       });
       return;
     yield put({
       type: WP_POSTS.LIST.SUCCESS,
       payload: {
         posts: response.data,
         total: response.headers['x-wp-total'],
         query: action.payload.query,
       },
       view: action.view,
     });
   } catch (e) {
     yield put({ type: WP_POSTS.LIST.FAILED, payload: e.message });
...
The saga presented here is awaiting the appearance of type actions
WP_POSTS.LIST.REQUESTED. By receiving such an action, it loads data from the API. She, after receiving the data, sends another action - WP_POSTS.LIST.SUCCESS. Its processing leads to updating the repository using the appropriate reducer.▍ Introduction of reducers
When developing large applications, it is impossible to plan in advance the device of all the necessary models. Moreover, as the size of the application increases, the use of the technology of introducing reducers helps to save a large amount of man-hours. This technique allows developers to add new reducers to the system without rewriting the entire repository.
There are libraries that are designed to create dynamic Redux repositories. However, I prefer the mechanism of introducing reducers, as it gives the developer a certain level of flexibility. For example, an existing application can be equipped with this mechanism without the need to seriously reorganize the application.
The introduction of reducers is a form of code separation. The React developer community is enthusiastically embracing this technology. I will use this piece of code to demonstrate the appearance and features of the implementation mechanism of the reducers.
First, let's look at its integration with Redux:
...
const withConnect = connect(
 mapStateToProps,
 mapDispatchToProps,
);
const withReducer = injectReducer({
 key: BLOG_VIEW,
 reducer: blogReducer,
});
class BlogPage extends React.Component {
  ...
}
export default compose(
 withReducer,
 withConnect,
)(BlogPage);
This code is part of the file
BlogPage.jsthat contains the application component. Here we, in the export team, use not a function
connect, but a function compose. This is one of the functions of the Redux library that allows you to compose several functions. The list of functions transferred composemust be read from right to left or from bottom to top. You can learn from the documentation for Redux that a function
composeallows you to create transformations of deeply nested functions. In this case, the programmer is freed from the need to use very long structures. These constructions look like lines of code representing calls to some functions with passing them the results of calls to other functions as arguments. The documentation notes that the functioncomposeuse with caution. The right-most function in a composition can take many arguments, but only one argument can be passed to functions following it. As a result, by calling the function that turned out as a result of use
compose, we pass to it what it takes from the original functions, which is to the right of all the others. That is why we passed the compose function withConnectto the function as the last parameter. As a result, a function composecan be used just like a function connect.▍ Routing and Redux
There are a number of tools that are used to solve routing problems in applications. In this section, however, we will focus on the react-router-dom library . We will expand its capabilities so that it can work with Redux.
Most often, the React router is used like this: the root component is enclosed in a tag
BrowserRouter, and child containers are wrapped in a method withRouter()and exported ( here is an example). With this approach, the child component receives, through the mechanism
props, an object historycontaining some properties specific to the current user session. There are some methods in this object that can be used to control navigation.This routing option can lead to problems in large applications. This happens due to the fact that they do not have a centralized object
history. In addition, components that are not rendered with help history. Here is a usage example To solve this problem, we will use the connected-react-router library , which will allow us to establish routing using the method
dispatch. Integration of this library into the project will require some modifications. In particular, it will be necessary to create a new reducer designed specifically for routes (this is quite obvious), and also to add some auxiliary mechanisms to the system. After the completion of its configuration, the new routing system can be used through Redux. So, navigation in the application can be implemented by sending actions.
In order to take advantage of the capabilities of the connected-react-router library in the component, we simply map the method
dispatchto the storage, doing this in accordance with the needs of the application. Here is an example of code that demonstrates the use of the connected-react-router library (in order for this code to work, you need the rest of the system to be configured to use connected-react-router).import { push } from 'connected-react-router'
...
const mapDispatchToProps = dispatch => ({
goTo: payload => {
dispatch(push(payload.path));
},
});
class DemoComponent extends React.Component {
render() {
return (
{
this.props.goTo({ path: `/gallery/`});
/>
}
... Here, the method
goTodispatches an action that pushes the required URL onto the browser history stack. Previously, the method was mapped goToto the store. Therefore, this method is passed DemoComponentin the object props.Dynamic user interface and needs of a growing application
Over time, despite the presence of an adequate backend for the application and a high-quality client part, some elements of the user interface begin to affect the user’s work badly. This is due to the irrational implementation of the components, which, at first glance, seems very simple. In this section, we will discuss recommendations for creating some widgets. Their correct implementation, as the application grows, becomes more complicated.
▍ Lazy loading and React.Suspense
The best part about the asynchronous nature of JavaScript is that it takes advantage of the full potential of the browser. Perhaps the true good is that to start a certain process you do not need to wait for the completion of the previous task. However, developers cannot influence the network and the speed with which the various materials necessary for the functioning of the sites are loaded.
Network subsystems are usually perceived as unreliable and error prone.
The developer, in an effort to make his application as high-quality as possible, can subject it to many checks and achieve their successful passage. But still there are some things, like the status of the network connection or the server response time, which the developer cannot influence.
But the creators of the software do not seek to justify the poor-quality work of applications with phrases like "this is not my business." They found interesting ways to deal with network problems.
In some parts of the front-end application, you may need to show some backup materials (such as loading much faster than real materials). This will save the user from contemplating the "twitching" of the loading pages or, even worse, about such icons.
It’s better for users not to see anything like this
. React Suspense technology can deal with just such problems. For example, it allows you to display a certain indicator during data loading. Although you can do this manually by setting the property
isLoadedto true, using the Suspense API makes the code much cleaner. Here you can watch a good video about Suspense, in which Jared Palmer introduces the audience to this technology and shows some of its features using an example of a real application .
Here's how the app works without using Suspense.
An application in which Suspense is not used
It is much easier to equip a component with Suspense support than to use it at the application level
isLoaded. Let's start by putting the parent container Appin React.StrictMode. We make sure that among the React modules used in the application, there would not be those that are considered obsolete.}>
Components wrapped in tags
React.Suspense, while loading the main content, load and display what is specified in the property fallback. We must strive to ensure that the components used in the property fallbackhave the smallest possible volume and are arranged as simple as possible.Application that uses Suspense
▍Adaptive components
In large front-end applications, the manifestation of repeating patterns is common. At the same time, at the very beginning of the work, this can be almost completely unobvious. There is nothing to be done about it, but you must have come across this.
For example, there are two models in the application. One of them is intended for the description of racing tracks, and the second - for the description of cars. The car list page uses square elements. Each of them contains an image and a brief description.
The trace list uses similar elements. Their main feature is that, in addition to the image and description of the track, they also have a small field indicating whether it is possible for spectators of a race taking place on this track to buy something to eat.
Element for the description of the car and element for the description of the track
These two components are slightly different from each other in terms of style (they have different background colors). The component that describes the route contains some additional information about the real-world object that it describes, while the component that symbolizes the car does not have such information. This example shows just two models. In a large application, many similar models can be typed, differing only in small things.
The creation of separate independent components for each of these entities is contrary to common sense.
A programmer can save himself the need to write code fragments that almost completely repeat each other. This can be done through the development of adaptive components. They, in the course of work, take into account the environment in which they were loaded. Consider the search bar of a certain application.
Search bar.
It will be used on many pages. At the same time, minor changes will be made to its appearance and the order of its work on different pages. For example, on the project’s home page, it will be slightly larger than on other pages. In order to solve this problem, you can create one single component that will be displayed in accordance with the properties transferred to it.
static propTypes = {
  open: PropTypes.bool.isRequired,
  setOpen: PropTypes.func.isRequired,
  goTo: PropTypes.func.isRequired,
};
Using this technique, you can control the use of HTML classes when rendering such elements, which allows you to influence their appearance.
Another interesting situation in which adaptive components can find application is the mechanism for breaking certain materials into pages. A navigation bar may be present on every page of the application. The instances of this panel on each of the pages will be almost exactly the same as on the other pages.
Pagination panel
Assume that a certain application needs a similar panel. When working on this application, developers adhere to timely articulated requirements. In such a situation, the adaptive component used to break the material into pages only needs to pass a couple of properties. This is the
URLnumber of elements per page.Summary
The React ecosystem has become so mature these days that it is unlikely that anyone will ever need to “invent a bicycle” at any stage of application development. Although this plays into the hands of developers, it leads to the fact that it becomes difficult to choose exactly what works well for each specific project.
Each project is unique in terms of its scope and functionality. There is no single approach or universal rule in developing React applications. Therefore, before starting development, it is important to plan it correctly.
When planning, it is very easy to understand which tools are directly created for the project and which ones are clearly not suitable for him, being too large for him. For example, an application consisting of 2-3 pages and performing very few requests to certain APIs does not need data stores similar to the ones we talked about. I am ready to go even further in these considerations, and say that in small projects you do not need to use Redux.
At the planning stage of the application, while drawing layouts of its pages, it is easy to see that many similar components are used on these pages. If you try to reuse the code of such components or strive to write universal components, this will help to save a lot of time and effort.
And finally, I would like to note that data is the core of any application. And React applications are no exception. As the scale of the application grows, the volumes of processed data grow, additional software mechanisms for working with them appear. Something like this, if the application was poorly designed, can easily “crush” programmers, filling them with complex and confusing tasks. If, in the course of planning, the issues of using data warehouses were decided in advance, if the order of work of actions, reducers, sag was thought out in advance, then working on the application would be much easier.
Dear readers! If you know of any libraries or development methodologies that perform well when creating large-scale React applications, please share them.