RectTransformUtility, or how to make a component that animates UI elements behind the screen
In the last article - Varieties of coordinates used in the Unity3d GUI, I tried to briefly talk about the varieties of coordinates in Unity UI / RectTransform. Now I want to highlight a little such a useful thing for the UI as RectTransformUtility. Which is one of the main tools for calculating something in the UI in relation to something else.
There is a task - you need a component that animatedly removes the UI element beyond the selected edge of the screen. The component should be purple where it is hierarchically located, in what places the anchors are, what size of the screen, and in what place of the screen it is. The component should be able to clean the object in 4 sides (up, down, left, right) for a given time.
Thoughts
In principle, how can this be done? Find out the size of the screen in the coordinates of the object, move the object to the coordinate beyond the edge of the screen, and it seems that the matter is in the hat. But there are a couple but:
How do I know the screen coordinates relative to the UI?
If you google on the forehead, then google some nonsense or not useful things, or even unanswered questions. The closest thing that suits you is when some UI element follows the cursor, which just exists in the coordinates of the screen.
These are RectTransformUtility and ScreenPointToLocalPointInRectangle directly. Here we get the local coordinates inside the rect (RectTransform), based on the position of the point on the screen.
In the current example, we find the local coordinates of the mouse cursor, we need to replace them with the edge of the screen:
And so we got the coordinate of the upper right point of the screen so that the object leaves the screen to the right, our object should be farther than this point + let's say the width of the rect or the specified indent.
So, the first nuance:
We got local coordinates that are suitable for objects directly inside the canvas, if the river to be shifted lies in a different rect, then its local coordinates will be considered relative to the parent, not the canvas. That is, these coordinates themselves do not suit us.
There are two ways , the first is to use global coordinates, for that they are global. Or calculate the coordinates of the screen in the local coordinates of each rect separately.
Consider the first case - how to convert local coordinates to global.
Most googled methods use - TransformPoint.
Thus, we convert local coordinates to global.
In my opinion, this is generally an extra step, since RectTransformUtility has a ScreenPointToWorldPointInRectangle method that immediately returns the global position.
We need to shift the rect beyond the right edge of the screen, for this we take the X coordinate from the found position, and Y leave the rect that we move so that it simply moves to the right.
The resulting coordinate is fed by DoTween.
And hurray, the object leaves to the right. But ... The
second nuance
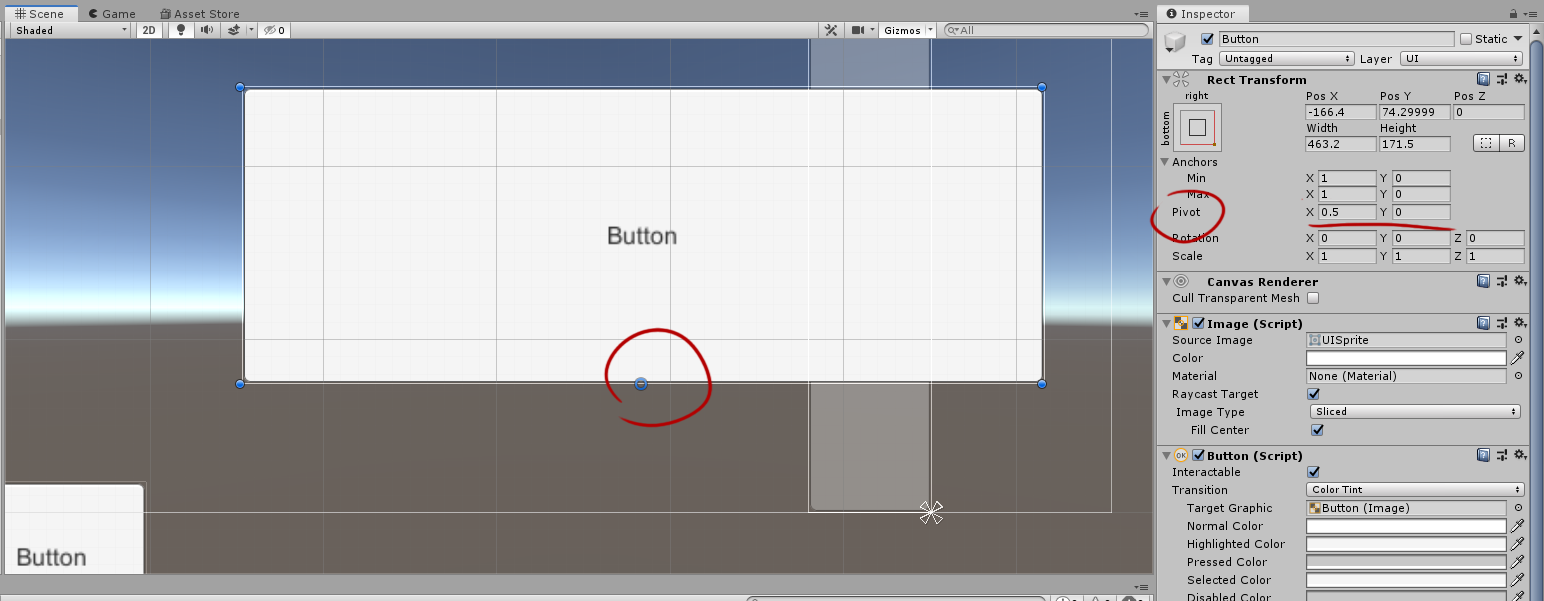
Here we find out that in fact the positioning of the rect depends on the rect pivot.
Therefore, the object can dance with positioning depending on the pivot, plus the object can be very large and offset will not push it completely behind the screen, there will always be a chance that the piece will stick out.
That is, we need to screw compensation to offset which will take into account the size of rect + pivot.
The second nuance is to move the object by the size of the rect, you need to know the local or anchor coordinates, and we get global coordinates. I must say right away that global coordinates cannot be taken and converted to local UI coordinates, or to anchor ones.
I came up with the following crutch, we remember the starting position of the rect, move it to the final global position, shift the anchor position by the size of the rect to the right, remember the global position that takes into account the offset, taking into account the size of the object, and feed it with a hollow, not forgetting to return to the original position.
It looks like a giant crutch, but this crutch allows you to synchronize global and other coordinates. This helps when there are objects in the interface that move relative to each other, and they are in different hierarchies. Well, plus so far this is the only way I have found to get rect coordinates from global.
At this point, we will say no to crutches, and return to the idea of getting the screen size in local coordinates.
The second way is to get the screen sizes for each rect individually, so we will know the local coordinates of the edges of the screen, regardless of canvas or hierarchy.
Third nuance
Objects can be located anywhere on the screen, unlike the canvas that covers the entire screen. Therefore, the distances to the left and right edges of the screen can differ significantly. In the case of canvas, we would have had only the upper right edge, and minus the upper right it would be the upper left. In this case, you need to get the lower left and upper right points separately, as shown in the code example.
The fourth nuance. The
local coordinate is the offset relative to the center of the parent, when the rect is embedded in another rect, which occupies a small part of the canvas, then we need a coordinate that takes into account both displacements, well, everything is simple.
add the vectors and get the coordinate we need. It turns out more confusing than with global coordinates, but now we can carry out any calculations related to the size of the rect. And calmly finally add compensation without crutches.
This is what the coordinate looks like for shifting to the right with compensation for the width of the rect and shifting beyond the screen to the width of the rect, there is no way to set the offset, I plan to add it a bit later, but I think someone will be interested to try to write this myself.
Well, the component itself, if anyone wants to play with it, DoTween will be needed for this:
Simple challenge
There is a task - you need a component that animatedly removes the UI element beyond the selected edge of the screen. The component should be purple where it is hierarchically located, in what places the anchors are, what size of the screen, and in what place of the screen it is. The component should be able to clean the object in 4 sides (up, down, left, right) for a given time.
Thoughts
In principle, how can this be done? Find out the size of the screen in the coordinates of the object, move the object to the coordinate beyond the edge of the screen, and it seems that the matter is in the hat. But there are a couple but:
How do I know the screen coordinates relative to the UI?
If you google on the forehead, then google some nonsense or not useful things, or even unanswered questions. The closest thing that suits you is when some UI element follows the cursor, which just exists in the coordinates of the screen.
RectTransformUtility.ScreenPointToLocalPointInRectangle(canvas, new Vector2(Input.mousePosition), null, out topRightLocalCoord);These are RectTransformUtility and ScreenPointToLocalPointInRectangle directly. Here we get the local coordinates inside the rect (RectTransform), based on the position of the point on the screen.
In the current example, we find the local coordinates of the mouse cursor, we need to replace them with the edge of the screen:
RectTransformUtility.ScreenPointToLocalPointInRectangle(canvas, new Vector2(Screen.width, Screen.height), null, out topRightLocalCoord);And so we got the coordinate of the upper right point of the screen so that the object leaves the screen to the right, our object should be farther than this point + let's say the width of the rect or the specified indent.
So, the first nuance:
We got local coordinates that are suitable for objects directly inside the canvas, if the river to be shifted lies in a different rect, then its local coordinates will be considered relative to the parent, not the canvas. That is, these coordinates themselves do not suit us.
There are two ways , the first is to use global coordinates, for that they are global. Or calculate the coordinates of the screen in the local coordinates of each rect separately.
Consider the first case - how to convert local coordinates to global.
Most googled methods use - TransformPoint.
transform.position = myCanvas.transform.TransformPoint(pos);Thus, we convert local coordinates to global.
In my opinion, this is generally an extra step, since RectTransformUtility has a ScreenPointToWorldPointInRectangle method that immediately returns the global position.
We need to shift the rect beyond the right edge of the screen, for this we take the X coordinate from the found position, and Y leave the rect that we move so that it simply moves to the right.
new Vector3(topRightCoord.x+offset, rectTransform.position.y, 0);The resulting coordinate is fed by DoTween.
rectTransform.DOMove(new Vector3(correctedTargetRight.x, rectTransform.position.y, 0), timeForHiding);And hurray, the object leaves to the right. But ... The
second nuance
Here we find out that in fact the positioning of the rect depends on the rect pivot.
Therefore, the object can dance with positioning depending on the pivot, plus the object can be very large and offset will not push it completely behind the screen, there will always be a chance that the piece will stick out.
That is, we need to screw compensation to offset which will take into account the size of rect + pivot.
The second nuance is to move the object by the size of the rect, you need to know the local or anchor coordinates, and we get global coordinates. I must say right away that global coordinates cannot be taken and converted to local UI coordinates, or to anchor ones.
I came up with the following crutch, we remember the starting position of the rect, move it to the final global position, shift the anchor position by the size of the rect to the right, remember the global position that takes into account the offset, taking into account the size of the object, and feed it with a hollow, not forgetting to return to the original position.
Code example
 var targetRight = new Vector3(topRightLocalCoord.x, rectTransform.position.y, 0);
                rectTransform.position = targetRight;
                rectTransform.anchoredPosition += rectTransform.sizeDelta;
                var correctedTargetRight = rectTransform.position;
                rectTransform.localPosition = startPoint;
                rectTransform.DOMove(new Vector3(correctedTargetRight.x, rectTransform.position.y, 0), timeForHiding);
It looks like a giant crutch, but this crutch allows you to synchronize global and other coordinates. This helps when there are objects in the interface that move relative to each other, and they are in different hierarchies. Well, plus so far this is the only way I have found to get rect coordinates from global.
At this point, we will say no to crutches, and return to the idea of getting the screen size in local coordinates.
Second way
The second way is to get the screen sizes for each rect individually, so we will know the local coordinates of the edges of the screen, regardless of canvas or hierarchy.
Third nuance
RectTransformUtility.ScreenPointToLocalPointInRectangle(rectTransform, new Vector2(Screen.width, Screen.height), null, out topRightCoord);
        RectTransformUtility.ScreenPointToLocalPointInRectangle(rectTransform, new Vector2(0, 0), null, out bottomScreenCoord);
Objects can be located anywhere on the screen, unlike the canvas that covers the entire screen. Therefore, the distances to the left and right edges of the screen can differ significantly. In the case of canvas, we would have had only the upper right edge, and minus the upper right it would be the upper left. In this case, you need to get the lower left and upper right points separately, as shown in the code example.
The fourth nuance. The
local coordinate is the offset relative to the center of the parent, when the rect is embedded in another rect, which occupies a small part of the canvas, then we need a coordinate that takes into account both displacements, well, everything is simple.
((Vector3)bottomLeftCoord + rectTransform.localPosition) add the vectors and get the coordinate we need. It turns out more confusing than with global coordinates, but now we can carry out any calculations related to the size of the rect. And calmly finally add compensation without crutches.
(Vector3)topRightCoord + rectTransform.localPosition + (new Vector3((rectTransform.sizeDelta.x * rectTransform.pivot.x) + rectTransform.sizeDelta.x, 0, 0));This is what the coordinate looks like for shifting to the right with compensation for the width of the rect and shifting beyond the screen to the width of the rect, there is no way to set the offset, I plan to add it a bit later, but I think someone will be interested to try to write this myself.
conclusions
- For UI elements, it is better to use local or anchor coordinates, and you should try to understand them. Global coordinates can be used for special cases, but they do not make it possible to conveniently work, for example, with the sizes of rects and in many other micro episodes.
- You need to look at RectTransformUtility, it has a lot of useful functionality for the UI, all calculations related to the position of something inside and around the rectangle are done through it.
Well, the component itself, if anyone wants to play with it, DoTween will be needed for this:
Component
using DG.Tweening;
using UnityEngine;
public enum Direction { DEFAULT, RIGHT, LEFT, TOP, BOTTOM }
public enum CanvasType {OVERLAY, CAMERATYPE}
public class HideBeyondScreenComponent : MonoBehaviour
{
    [SerializeField] private Direction direction;
    [SerializeField] private CanvasType canvasType;
    [SerializeField] private float timeForHiding = 1;
    [SerializeField] private float offset = 50;
    private Vector3 startPoint;
    private RectTransform rectTransform;
    private Vector2 topRightCoord;
    private Vector2 bottomLeftCoord;
    private void Start()
    {
        rectTransform = transform as RectTransform;
        startPoint = rectTransform.localPosition;
        Camera camera = null;
        if (canvasType == CanvasType.CAMERATYPE)
            camera = Camera.main;
        RectTransformUtility.ScreenPointToLocalPointInRectangle(rectTransform, new Vector2(Screen.width, Screen.height), camera, out topRightCoord);
        RectTransformUtility.ScreenPointToLocalPointInRectangle(rectTransform, new Vector2(0, 0), camera, out bottomLeftCoord);
        Hide();
    }
    public void Show()
    {
        rectTransform.DOLocalMove(startPoint, timeForHiding);
    }
    public void Hide()
    {
        switch (direction)
        {
            case Direction.LEFT:
                rectTransform.DOLocalMove(new Vector3(EndPosition(Direction.LEFT).x, rectTransform.localPosition.y, 0), timeForHiding);
                break;
            case Direction.RIGHT:
                rectTransform.DOLocalMove(new Vector3(EndPosition(Direction.RIGHT).x, rectTransform.localPosition.y, 0), timeForHiding);
                break;
            case Direction.TOP:
                rectTransform.DOLocalMove(new Vector3(rectTransform.localPosition.x, EndPosition(Direction.TOP).y, 0), timeForHiding);
                break;
            case Direction.BOTTOM:
                rectTransform.DOLocalMove(new Vector3(rectTransform.localPosition.x, EndPosition(Direction.BOTTOM).y, 0), timeForHiding);
                break;
        }
    }
    private Vector3 NegativeCompensation()
    {
        return new Vector2((-rectTransform.sizeDelta.x - offset) + rectTransform.sizeDelta.x * rectTransform.pivot.x,
                        (-rectTransform.sizeDelta.y - offset) + rectTransform.sizeDelta.y * rectTransform.pivot.y);
    }
    private Vector3 PositiveCompensation()
    {
        return new Vector2((rectTransform.sizeDelta.x * rectTransform.pivot.x) + offset,
                                (rectTransform.sizeDelta.y * rectTransform.pivot.y) + offset);
    }
    private Vector2 EndPosition(Direction direction)
    {
        switch (direction)
        {
            case Direction.LEFT:
                return ((Vector3)bottomLeftCoord + rectTransform.localPosition) + NegativeCompensation();
            case Direction.RIGHT:
                return (Vector3)topRightCoord + rectTransform.localPosition + PositiveCompensation();
            case Direction.TOP:
                return ((Vector3)topRightCoord + rectTransform.localPosition) + PositiveCompensation();
            case Direction.BOTTOM:
                return ((Vector3)bottomLeftCoord + rectTransform.localPosition) + NegativeCompensation();
        }
        return startPoint;
    }
}