Android Application Architecture Guide
Hello, Habr! I present to you the free translation of “Guide to app architecture” from JetPack . I ask you to leave all comments on the translation in the comments, and they will be fixed. Also, comments from those who used the presented architecture with recommendations for its use will be useful to everyone.
This guide covers best practices and recommended architecture for building robust applications. This page assumes a basic introduction to the Android Framework. If you're new to Android app development, check out our developer guidesto get started and learn more about the concepts mentioned in this guide. If you are interested in application architecture and would like to familiarize yourself with the materials in this guide in terms of programming on Kotlin, check out the Udacity course, “Developing Applications for Android with Kotlin,” .
In most cases, desktop applications have a single entry point from the desktop or launcher, and then run as a single monolithic process. Android applications have a much more complex structure. A typical Android application contains several application components , including Activities , Fragments , Services , ContentProviders, and BroadcastReceivers .
You declare all or some of these application components in the application manifest. Android then uses this file to decide how to integrate your application into the device’s common user interface. Given that a well-written Android application contains several components, and users often interact with several applications in a short period of time, applications must adapt to different types of workflows and user-driven tasks.
For example, consider what happens when you share a photo in your favorite social media application:
At any time in the process, the user may be interrupted by a phone call or notification. After the action associated with this interrupt, the user expects to be able to return and resume this photo-sharing process. This application switching behavior is common on mobile devices, so your application must correctly handle these points (tasks).
Remember that mobile devices are also limited in resources, so at any time the operating system may destroy some application processes in order to free up space for new ones.
Given the conditions of this environment, the components of your application can be launched individually and not in order, and the operating system or user can destroy them at any time. Since these events are not under your control,you should not store any data or states in your application components, and your application components should not depend on each other.
If you should not use application components to store data and application state, how should you develop your application?
The most important principle to follow is the sharing of responsibilities . A common mistake is when you write all your code in Activity or Fragment . These are user interface classes that should contain only logic processing the interaction of the user interface and the operating system. By sharing responsibility as much as possible in these classes (SRPs) , you can avoid many of the problems associated with the application life cycle.
Another important principle is that you must control your user interface from a model , preferably from a permanent model. Models are the components that are responsible for processing the data for the application. They are independent of View objects and application components, therefore, they are not affected by the application life cycle and related problems.
A permanent model is ideal for the following reasons:
By organizing the foundation of your application into model classes with a clearly defined responsibility for data management, your application becomes more testable and supported.
This section demonstrates how to structure an application using architectural components , working in an end- to- end usage scenario .
Note. It is not possible to have one way of writing applications that works best for each scenario. However, the recommended architecture is a good starting point for most situations and workflows. If you already have a good way to write Android applications that meets the general architectural principles, you should not change it.
Imagine we are creating a user interface that displays a user profile. We use a private API and a REST API to retrieve profile data.
To begin, consider the interaction scheme of the modules of the architecture of the finished application:
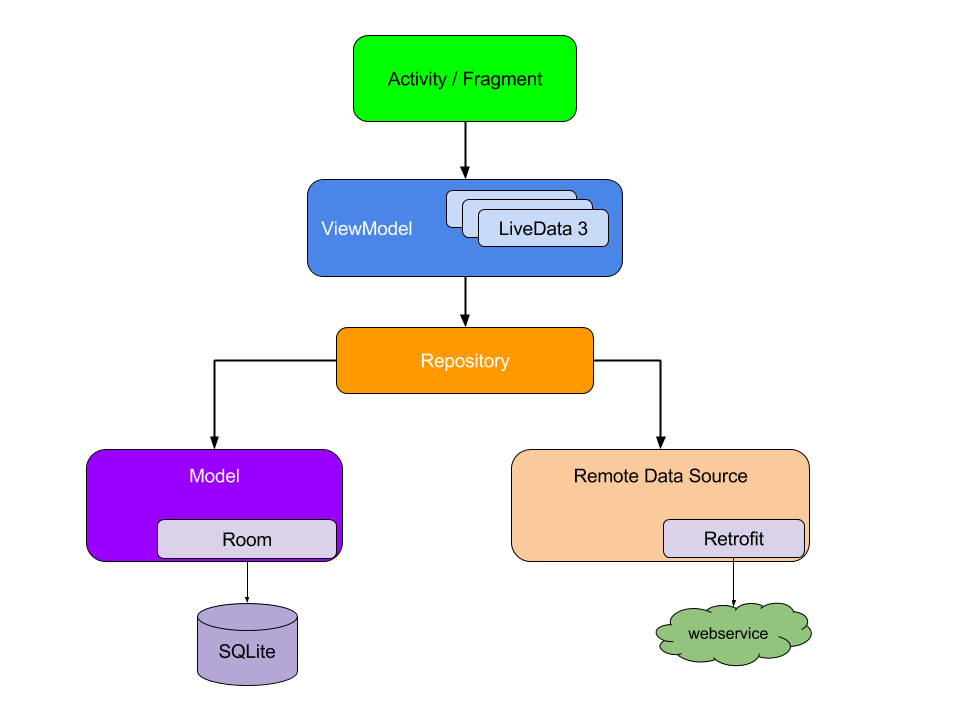
Note that each component depends only on the component one level below it. For example, Activity and Fragments depend only on the view model. Repository is the only class that depends on many other classes; in this example, the storage depends on a persistent data model and a remote internal data source.
This design pattern creates a consistent and enjoyable user experience. Regardless of whether the user returns to the application a few minutes after closing it or a few days later, he will instantly see user information that the application is saved locally. If this data is out of date, the application storage module starts updating data in the background.
The user interface consists of a fragment
To manage the user interface, our data model must contain the following data elements:
We use
The ViewModel object provides data for a specific user interface component, such as fragment or Activity, and contains business data processing logic for interacting with the model. For example, the ViewModel may call other components to load data and may forward user requests for data changes. ViewModel does not know about the components of the user interface, so it is not affected by configuration changes, such as recreating Activity when the device is rotated.
Now we have identified the following files:
The following code snippets show the initial contents of these files. (The layout file is omitted for simplicity.)
Now that we have these code modules, how do we connect them? After the user field is set in the UserProfileViewModel class, we need a way to inform the user interface.
Note. SavedStateHandle allows the ViewModel to access the saved state and arguments of the associated fragment or action.
Now we need to inform our Fragment when the user object is received. This is where the component of the LiveData architecture appears.
LiveData is an observable data holder. Other components in your application can track changes to objects using this holder, without creating explicit and hard paths of dependency between them. The LiveData component also takes into account the life cycle state of the components of your application, such as Activities, Fragments, and Services, and includes cleanup logic to prevent object leakage and excessive memory consumption.
Note. If you already use libraries like RxJava or Agera, you can continue to use them instead of LiveData. However, when using libraries and similar approaches, make sure that you properly handle the life cycle of your application. In particular, ensure that you suspend your data streams when the associated LifecycleOwner is stopped, and destroy these streams when the associated LifecycleOwner has been destroyed. You can also add the artifact android.arch.lifecycle: jet streams to use LiveData with another jet stream library such as RxJava2.
To enable the LiveData component in our application, we change the type of the field in
Now we modify
Each time the user profile data is updated, the onChanged () callback is called and the user interface is updated.
If you are familiar with other libraries that use observable callbacks, you may have realized that we did not redefine the onStop () method of the fragment to stop observing the data. This step is optional for LiveData, because it supports the life cycle, which means that it will not call a callback
We have not added any logic to handle configuration changes, such as rotating the device’s screen by the user.
Now that we have used LiveData to connect
In this example, we assume that our backend provides a REST API. We use the Retrofit library to access our backend, although you can use a different library that serves the same purpose.
Here is our definition
The first idea for implementation
Instead, ours
modules handle data operations. They provide a clean API so that the rest of the application can easily get this data. They know where to get the data from and what API calls to make when updating the data. You can think of repositories as intermediaries between different data sources, such as persistent models, web services, and caches.
Our class
Although the storage module seems unnecessary, it serves an important purpose: it abstracts data sources from the rest of the application. Now ours
Note. We missed the case of network errors for simplicity. For an alternative implementation that exposes errors and download status, see Appendix: Network Status Disclosure.
Managing dependencies between components The
class
To solve this problem, you can use the following design patterns:
Implementing a service registry is easier than using DI, so if you are new to DI, use the template: service location instead.
These templates allow you to scale your code because they provide clear templates for managing dependencies without duplicating or complicating the code. In addition, these templates allow you to quickly switch between test and production implementations of data sampling.
Our sample application uses Dagger 2 to manage object dependencies
Now we modify ours
The implementation
The main problem with the implementation
This design is not optimal for the following reasons:
To eliminate these shortcomings, we add a new data source to ours
Using our current implementation, if the user rotates the device or leaves and immediately returns to the application, the existing user interface becomes immediately visible, because the store retrieves data from our cache in memory.
However, what happens if a user leaves the application and returns a few hours after the Android OS completes the process? Relying on our current implementation in this situation, we need to get data from the network again. This upgrade process is not just a bad user experience; it is also wasteful because it consumes valuable mobile data.
You can solve this problem by caching web requests, but this creates a key new problem: what happens if the same user data is displayed in a request of a different type, for example, when receiving a list of friends? The application will display conflicting data, which is confusing at best. For example, our application may display two different versions of the data of the same user if the user sent a friend list request and a single-user request at different times. Our application would have to figure out how to combine this conflicting data.
The right way to deal with this situation is to use a constant model. The Room Permanent Data Library (DB) comes to our aid .
Room- This is a library of object-relational mapping (object-mapping), which provides local data storage with a minimum standard code. At compile time, it checks each query for compliance with your data schema, so broken SQL queries result in errors during compilation, and not crashes at runtime. Room abstracts from some basic implementation details of raw SQL tables and queries. It also allows you to observe changes in database data, including collections and connection requests, exposing such changes using LiveData objects. It even explicitly defines execution constraints that solve common threading issues, such as access to storage in the main thread.
Note.If your application already uses another solution, such as SQLite Object Relational Mapping (ORM), you do not need to replace the existing solution with Room. However, if you are writing a new application or reorganizing an existing application, we recommend using Room to save your application data. Thus, you can take advantage of the abstraction of the library and query validation.
To use Room, we need to define our local layout. First, we add annotation
Then we create a database class, implementing
Note that
Now we need a way to insert user data into the database. For this task, we create a data access object (DAO) .
Note that the method
Note: Room checks for invalidation based on table modifications, which means that it can send false positive notifications.
Having defined our class
Now we can change ours
Please note that even if we changed the data source to
If users return in a few days, then an application using this architecture is likely to display outdated information until the repository receives updated information. Depending on your use case, you may not display outdated information. Instead, you can display placeholder data ( placeholderdata), which show dummy values and indicate that your application is currently downloading and loading up-to-date information.
The only source of truth.
Typically, different REST API endpoints return the same data. For example, if our backend has another endpoint that returns a list of friends, the same user object can come from two different API endpoints, possibly even using different levels of detail. If we
For this reason, our implementation
In some use cases, such as pull-to-refresh, it is important that the user interface shows the user that a network operation is currently in progress. It is recommended that the user interface action be separated from the actual data, since the data can be updated for various reasons. For example, if we get a list of friends, the same user can be selected again programmatically, which will lead to an update to LiveData. From the point of view of the user interface, the fact of having a request in flight is just another data point, similar to any other piece of data in the object itself
We can use one of the following strategies to display the agreed data update status in the user interface, regardless of where the data update request came from:
In the section on separation of interests, we mentioned that one of the key advantages of following this principle is testability.
The following list shows how to test each code module from our extended example:
Programming is a creative field, and the creation of Android applications is no exception. There are many ways to solve the problem, be it transferring data between several actions or fragments, retrieving deleted data and storing it locally offline, or any number of other common scenarios encountered by non-trivial applications.
Although the following recommendations are not required, our experience shows that their implementation makes your code base more reliable, testable, and supported in the long run:
Avoid designating entry points for your application - such as actions, services, and broadcast receivers - as data sources.
Instead, they only need to coordinate with other components to get a subset of the data related to this entry point. Each component of the application is quite short-lived, depending on the interaction of the user with his device and the general current state of the system.
Create clear lines of responsibility between the various modules of your application.
For example, do not distribute code that downloads data from the network to several classes or packages in your code base. Similarly, do not define multiple unrelated responsibilities — such as data caching and data binding — in the same class.
Expose as little as possible from each module.
Resist the temptation to create a “just one” label that reveals the details of an internal implementation from one module. You may gain some time in the short term, but then you will incur a technical debt many times as your code base develops.
Think about how to make each module testable in isolation.
For example, having a well-defined API for retrieving data from the network makes it easy to test a module that stores this data in a local database. If instead you mix the logic of these two modules in one place or distribute your network code throughout the code base, testing becomes much more difficult - in some cases not even impossible.
Focus on the unique core of your application to stand out from other applications.
Do not reinvent the wheel by writing the same pattern over and over again. Instead, focus your time and energy on what makes your application unique, and let the Android architecture components and other recommended libraries cope with a repeating pattern.
Keep as much relevant and fresh data as possible.
Thus, users can enjoy the functionality of your application, even if their device is offline. Remember that not all of your users use a constant high-speed connection.
Designate a single data source as the only true source.
Whenever your application needs access to this piece of data, it should always come from this single source of truth.
In the above section of the recommended application architecture, we skipped network errors and boot states to simplify code snippets.
This section shows how to display network status using the Resource class, which encapsulates both data and its state.
The following code snippet provides an example implementation
Since downloading data from the network when displaying a copy of this data is common practice, it is useful to create a helper class that can be reused in several places. For this example, we create a class with the name
The following diagram shows the decision tree for

It begins by observing the database for the resource. When a record is downloaded from the database for the first time, it
If the network call succeeds, it stores the response in the database and reinitializes the stream. In the event of a network request
Keep in mind that relying on a database to submit changes involves the use of related side effects, which is not very good, because the undefined behavior of these side effects can occur if the database does not send the changes because the data has not changed.
Also, do not send results received from the network, as this violates the principle of a single source of truth. In the end, it is possible that the database contains triggers that change data values during the save operation. Similarly, do not send `SUCCESS` without new data, because then the client will receive the wrong version of the data.
The following code snippet shows the open API provided by the class
Pay attention to the following important details of class definition:
The full implementation of the class
Once created,
This guide covers best practices and recommended architecture for building robust applications. This page assumes a basic introduction to the Android Framework. If you're new to Android app development, check out our developer guidesto get started and learn more about the concepts mentioned in this guide. If you are interested in application architecture and would like to familiarize yourself with the materials in this guide in terms of programming on Kotlin, check out the Udacity course, “Developing Applications for Android with Kotlin,” .
Mobile App User Experience
In most cases, desktop applications have a single entry point from the desktop or launcher, and then run as a single monolithic process. Android applications have a much more complex structure. A typical Android application contains several application components , including Activities , Fragments , Services , ContentProviders, and BroadcastReceivers .
You declare all or some of these application components in the application manifest. Android then uses this file to decide how to integrate your application into the device’s common user interface. Given that a well-written Android application contains several components, and users often interact with several applications in a short period of time, applications must adapt to different types of workflows and user-driven tasks.
For example, consider what happens when you share a photo in your favorite social media application:
- The application triggers the intent of the camera. Android launches a camera application to process the request. At the moment, the user has left the application for social networks, and his experience as a user is impeccable.
- A camera application may trigger other intentions, such as launching a file picker, which may launch another application.
- In the end, the user returns to the social network application and shares the photo.
At any time in the process, the user may be interrupted by a phone call or notification. After the action associated with this interrupt, the user expects to be able to return and resume this photo-sharing process. This application switching behavior is common on mobile devices, so your application must correctly handle these points (tasks).
Remember that mobile devices are also limited in resources, so at any time the operating system may destroy some application processes in order to free up space for new ones.
Given the conditions of this environment, the components of your application can be launched individually and not in order, and the operating system or user can destroy them at any time. Since these events are not under your control,you should not store any data or states in your application components, and your application components should not depend on each other.
General architectural principles
If you should not use application components to store data and application state, how should you develop your application?
Division of responsibility
The most important principle to follow is the sharing of responsibilities . A common mistake is when you write all your code in Activity or Fragment . These are user interface classes that should contain only logic processing the interaction of the user interface and the operating system. By sharing responsibility as much as possible in these classes (SRPs) , you can avoid many of the problems associated with the application life cycle.
User Interface Control from Model
Another important principle is that you must control your user interface from a model , preferably from a permanent model. Models are the components that are responsible for processing the data for the application. They are independent of View objects and application components, therefore, they are not affected by the application life cycle and related problems.
A permanent model is ideal for the following reasons:
- Your users will not lose data if the Android OS destroys your application to free up resources.
- Your application continues to work when the network connection is unstable or unavailable.
By organizing the foundation of your application into model classes with a clearly defined responsibility for data management, your application becomes more testable and supported.
Recommended Application Architecture
This section demonstrates how to structure an application using architectural components , working in an end- to- end usage scenario .
Note. It is not possible to have one way of writing applications that works best for each scenario. However, the recommended architecture is a good starting point for most situations and workflows. If you already have a good way to write Android applications that meets the general architectural principles, you should not change it.
Imagine we are creating a user interface that displays a user profile. We use a private API and a REST API to retrieve profile data.
Overview
To begin, consider the interaction scheme of the modules of the architecture of the finished application:
Note that each component depends only on the component one level below it. For example, Activity and Fragments depend only on the view model. Repository is the only class that depends on many other classes; in this example, the storage depends on a persistent data model and a remote internal data source.
This design pattern creates a consistent and enjoyable user experience. Regardless of whether the user returns to the application a few minutes after closing it or a few days later, he will instantly see user information that the application is saved locally. If this data is out of date, the application storage module starts updating data in the background.
Create a user interface
The user interface consists of a fragment
UserProfileFragmentand its corresponding layout file user_profile_layout.xml. To manage the user interface, our data model must contain the following data elements:
- User ID: user ID. The best solution is to pass this information to the fragment using the arguments of the fragment. If the Android OS destroys our process, this information is saved, so the identifier will be available the next time we launch our application.
- User object: a data class that contains user information.
We use
UserProfileViewModelcomponent-based ViewModel to store this information. The ViewModel object provides data for a specific user interface component, such as fragment or Activity, and contains business data processing logic for interacting with the model. For example, the ViewModel may call other components to load data and may forward user requests for data changes. ViewModel does not know about the components of the user interface, so it is not affected by configuration changes, such as recreating Activity when the device is rotated.
Now we have identified the following files:
user_profile.xml: Defined the layout of the user interface.UserProfileFragment: described the user interface controller, which is responsible for displaying information to the user.UserProfileViewModel: The class is responsible for preparing data for displaying it inUserProfileFragmentand responds to user interaction.
The following code snippets show the initial contents of these files. (The layout file is omitted for simplicity.)
class UserProfileViewModel : ViewModel() {
   val userId : String = TODO()
   val user : User = TODO()
}
class UserProfileFragment : Fragment() {
   private val viewModel: UserProfileViewModel by viewModels()
   override fun onCreateView(
       inflater: LayoutInflater, container: ViewGroup?,
       savedInstanceState: Bundle?
   ): View {
       return inflater.inflate(R.layout.main_fragment, container, false)
   }
}
Now that we have these code modules, how do we connect them? After the user field is set in the UserProfileViewModel class, we need a way to inform the user interface.
Note. SavedStateHandle allows the ViewModel to access the saved state and arguments of the associated fragment or action.
// UserProfileViewModel
class UserProfileViewModel(
   savedStateHandle: SavedStateHandle
) : ViewModel() {
   val userId : String = savedStateHandle["uid"] ?:
          throw IllegalArgumentException("missing user id")
   val user : User = TODO()
}
// UserProfileFragment
private val viewModel: UserProfileViewModel by viewModels(
   factoryProducer = { SavedStateVMFactory(this) }
   ...
)
Now we need to inform our Fragment when the user object is received. This is where the component of the LiveData architecture appears.
LiveData is an observable data holder. Other components in your application can track changes to objects using this holder, without creating explicit and hard paths of dependency between them. The LiveData component also takes into account the life cycle state of the components of your application, such as Activities, Fragments, and Services, and includes cleanup logic to prevent object leakage and excessive memory consumption.
Note. If you already use libraries like RxJava or Agera, you can continue to use them instead of LiveData. However, when using libraries and similar approaches, make sure that you properly handle the life cycle of your application. In particular, ensure that you suspend your data streams when the associated LifecycleOwner is stopped, and destroy these streams when the associated LifecycleOwner has been destroyed. You can also add the artifact android.arch.lifecycle: jet streams to use LiveData with another jet stream library such as RxJava2.
To enable the LiveData component in our application, we change the type of the field in
UserProfileViewModelto LiveData. It is now UserProfileFragmentinformed about data updates. Also, since this is a LiveData fieldsupports the life cycle, it automatically clears links when they are no longer needed.class UserProfileViewModel(
savedStateHandle: SavedStateHandle
) : ViewModel() {
val userId : String = savedStateHandle["uid"] ?:
throw IllegalArgumentException("missing user id")
val user : LiveData = TODO()
} Now we modify
UserProfileFragmentto monitor the data in ViewModeland to update the user interface in accordance with the changes:override fun onViewCreated(view: View, savedInstanceState: Bundle?) {
super.onViewCreated(view, savedInstanceState)
viewModel.user.observe(viewLifecycleOwner) {
// обновляем UI
}
}Each time the user profile data is updated, the onChanged () callback is called and the user interface is updated.
If you are familiar with other libraries that use observable callbacks, you may have realized that we did not redefine the onStop () method of the fragment to stop observing the data. This step is optional for LiveData, because it supports the life cycle, which means that it will not call a callback
onChanged()if the fragment is in an inactive state; that is, he received a call to onStart () , but has not yet received onStop()). LiveData also automatically removes the observer when calling the onDestroy () method on the fragment.We have not added any logic to handle configuration changes, such as rotating the device’s screen by the user.
UserProfileViewModelit is automatically restored when the configuration is changed, therefore, as soon as a new fragment is created, it receives the same instance ViewModel, and the callback is called immediately using the current data. Given that objects ViewModelare designed to survive the corresponding objects Viewthat they update, you should not include direct references to objects Viewin your ViewModel implementation. For more information about the life span, it ViewModelcorresponds to the life cycle of the user interface components, see ViewModel Life Cycle.Data retrieval
Now that we have used LiveData to connect
UserProfileViewModelto UserProfileFragment, how can we get user profile data? In this example, we assume that our backend provides a REST API. We use the Retrofit library to access our backend, although you can use a different library that serves the same purpose.
Here is our definition
Webservice that links to our backend:interface Webservice {
/**
* @GET declares an HTTP GET request
* @Path("user") annotation on the userId parameter marks it as a
* replacement for the {user} placeholder in the @GET path
*/
@GET("/users/{user}")
fun getUser(@Path("user") userId: String): Call
} The first idea for implementation
ViewModelmay include a direct call Webserviceto retrieve data and assign that data to our object LiveData. This design works, but using it makes our application harder to maintain as it grows. This gives the class too much responsibility UserProfileViewModel, which violates the principle of separation of interests . In addition, the scope of the ViewModel is associated with the Activity or Fragment life cycle , which means that data is Webservicelost when the life cycle of the associated user interface object ends. This behavior creates an undesirable user experience. Instead, ours
ViewModeldelegates the process of extracting data to a new module, the repository. Repositorymodules handle data operations. They provide a clean API so that the rest of the application can easily get this data. They know where to get the data from and what API calls to make when updating the data. You can think of repositories as intermediaries between different data sources, such as persistent models, web services, and caches.
Our class
UserRepository, shown in the following code snippet, uses an instance WebServiceto retrieve user data:class UserRepository {
private val webservice: Webservice = TODO()
// ...
fun getUser(userId: String): LiveData {
// Это не оптимальная реализация. Мы исправим это позже.
val data = MutableLiveData()
webservice.getUser(userId).enqueue(object : Callback {
override fun onResponse(call: Call, response: Response) {
data.value = response.body()
}
// Случай ошибки опущен для краткости.
override fun onFailure(call: Call, t: Throwable) {
TODO()
}
})
return data
}
} Although the storage module seems unnecessary, it serves an important purpose: it abstracts data sources from the rest of the application. Now ours
UserProfileViewModeldoesn’t know how the data is extracted, so we can provide data representation models obtained from several different data extraction implementations. Note. We missed the case of network errors for simplicity. For an alternative implementation that exposes errors and download status, see Appendix: Network Status Disclosure.
Managing dependencies between components The
class
UserRepositoryabove needs an instance Webserviceto retrieve user data. He could just create an instance, but for this he also needs to know the class dependencies Webservice. Moreover,UserRepositoryprobably not the only class that needs a web service. This situation requires us to duplicate the code, since every class that needs a reference to Webservicemust know how to create it and its dependencies. If each class creates a new one WebService, our application can become very resource intensive. To solve this problem, you can use the following design patterns:
- Dependency Injection (DI) . Dependency injection allows classes to define their dependencies without creating them. At run time, another class is responsible for providing these dependencies. We recommend the Dagger 2 library for implementing dependency injection in Android applications. Dagger 2 automatically creates objects, bypassing the dependency tree, and provides compile-time guarantees for dependencies.
- (Service location) Service locator: The service locator template provides a registry in which classes can get their dependencies instead of building them.
Implementing a service registry is easier than using DI, so if you are new to DI, use the template: service location instead.
These templates allow you to scale your code because they provide clear templates for managing dependencies without duplicating or complicating the code. In addition, these templates allow you to quickly switch between test and production implementations of data sampling.
Our sample application uses Dagger 2 to manage object dependencies
Webservice.Connect ViewModel and Storage
Now we modify ours
UserProfileViewModelto use the object UserRepository:class UserProfileViewModel @Inject constructor(
savedStateHandle: SavedStateHandle,
userRepository: UserRepository
) : ViewModel() {
val userId : String = savedStateHandle["uid"] ?:
throw IllegalArgumentException("missing user id")
val user : LiveData = userRepository.getUser(userId)
} Caching
The implementation
UserRepositoryabstracts the call to the object Webservice, but since it relies on only one data source, it is not very flexible. The main problem with the implementation
UserRepositoryis that after receiving data from our backend, this data is not stored anywhere. Therefore, if the user leaves UserProfileFragmentand then returns to him, our application must re-extract the data, even if they have not changed. This design is not optimal for the following reasons:
- It spends valuable traffic resources.
- This makes the user wait for the completion of a new request.
To eliminate these shortcomings, we add a new data source to ours
UserRepository, which caches objects Userin memory://Информируем Dagger, что этот класс должен быть создан только единожды.
@Singleton
class UserRepository @Inject constructor(
private val webservice: Webservice,
// Простой кэш в памяти. Детали опущены для краткости.
private val userCache: UserCache
) {
fun getUser(userId: String): LiveData {
val cached = userCache.get(userId)
if (cached != null) {
return cached
}
val data = MutableLiveData()
userCache.put(userId, data)
// Эта реализация все еще неоптимальная, но лучше, чем раньше.
// Полная реализация также обрабатывает случаи ошибок.
webservice.getUser(userId).enqueue(object : Callback {
override fun onResponse(call: Call, response: Response) {
data.value = response.body()
}
// Случай ошибки опущен для краткости.
override fun onFailure(call: Call, t: Throwable) {
TODO()
}
})
return data
}
} Persistent data
Using our current implementation, if the user rotates the device or leaves and immediately returns to the application, the existing user interface becomes immediately visible, because the store retrieves data from our cache in memory.
However, what happens if a user leaves the application and returns a few hours after the Android OS completes the process? Relying on our current implementation in this situation, we need to get data from the network again. This upgrade process is not just a bad user experience; it is also wasteful because it consumes valuable mobile data.
You can solve this problem by caching web requests, but this creates a key new problem: what happens if the same user data is displayed in a request of a different type, for example, when receiving a list of friends? The application will display conflicting data, which is confusing at best. For example, our application may display two different versions of the data of the same user if the user sent a friend list request and a single-user request at different times. Our application would have to figure out how to combine this conflicting data.
The right way to deal with this situation is to use a constant model. The Room Permanent Data Library (DB) comes to our aid .
Room- This is a library of object-relational mapping (object-mapping), which provides local data storage with a minimum standard code. At compile time, it checks each query for compliance with your data schema, so broken SQL queries result in errors during compilation, and not crashes at runtime. Room abstracts from some basic implementation details of raw SQL tables and queries. It also allows you to observe changes in database data, including collections and connection requests, exposing such changes using LiveData objects. It even explicitly defines execution constraints that solve common threading issues, such as access to storage in the main thread.
Note.If your application already uses another solution, such as SQLite Object Relational Mapping (ORM), you do not need to replace the existing solution with Room. However, if you are writing a new application or reorganizing an existing application, we recommend using Room to save your application data. Thus, you can take advantage of the abstraction of the library and query validation.
To use Room, we need to define our local layout. First, we add annotation
@Entityto our data model class Userand annotation @PrimaryKeyto the idclass field . These annotations are marked Useras a table in our database, and idas the primary key of the table:@Entity
data class User(
@PrimaryKey private val id: String,
private val name: String,
private val lastName: String
)Then we create a database class, implementing
RoomDatabasefor our application:@Database(entities = [User::class], version = 1)
abstract class UserDatabase : RoomDatabase()Note that
UserDatabaseis abstract. The Room library automatically provides an implementation of this. See the documentation for Room for details . Now we need a way to insert user data into the database. For this task, we create a data access object (DAO) .
@Dao
interface UserDao {
   @Insert(onConflict = REPLACE)
   fun save(user: User)
   @Query("SELECT * FROM user WHERE id = :userId")
   fun load(userId: String): LiveData
}
Note that the method
loadreturns an object of type LiveData. Room knows when the database is changed, and automatically notifies all active observers of data changes. Since Room uses LiveData , this operation is efficient; it updates data only if there is at least one active observer. Note: Room checks for invalidation based on table modifications, which means that it can send false positive notifications.
Having defined our class
UserDao, we then refer to the DAO from our database class:@Database(entities = [User::class], version = 1)
abstract class UserDatabase : RoomDatabase() {
abstract fun userDao(): UserDao
}Now we can change ours
UserRepositoryto include the Room data source:// Информирует Dagger, что этот класс должен быть создан только один раз.
@Singleton
class UserRepository @Inject constructor(
private val webservice: Webservice,
// Простой кэш в памяти. Детали опущены для краткости.
private val executor: Executor,
private val userDao: UserDao
) {
fun getUser(userId: String): LiveData {
refreshUser(userId)
// Возвращает объект LiveData непосредственно из базы данных.
return userDao.load(userId)
}
private fun refreshUser(userId: String) {
// Работает в фоновом потоке.
executor.execute {
// Проверьте, если пользовательские данные были получены недавно.
val userExists = userDao.hasUser(FRESH_TIMEOUT)
if (!userExists) {
// Обновляем данные.
val response = webservice.getUser(userId).execute()
// Проверьте на ошибки здесь.
// Обновляем базу данных. Объект LiveData автоматически обновляется,
// поэтому нам здесь больше ничего не нужно делать.
userDao.save(response.body()!!)
}
}
}
companion object {
val FRESH_TIMEOUT = TimeUnit.DAYS.toMillis(1)
}
} Please note that even if we changed the data source to
UserRepository, we did not need to change our UserProfileViewModelor UserProfileFragment. This small update demonstrates the flexibility our application architecture provides. It is also great for testing, because we can provide fake UserRepositoryand test our production at the same time UserProfileViewModel. If users return in a few days, then an application using this architecture is likely to display outdated information until the repository receives updated information. Depending on your use case, you may not display outdated information. Instead, you can display placeholder data ( placeholderdata), which show dummy values and indicate that your application is currently downloading and loading up-to-date information.
The only source of truth.
Typically, different REST API endpoints return the same data. For example, if our backend has another endpoint that returns a list of friends, the same user object can come from two different API endpoints, possibly even using different levels of detail. If we
UserRepositoryreturned the response from the request Webserviceas is, without checking for consistency, our user interfaces could show confusing information, because the version and format of the data from the storage would depend on the last called endpoint. For this reason, our implementation
UserRepositorystores web service responses in a database. Changes to the database then trigger callbacks for active LiveData objects . Using this model, the database serves as the only source of truth , and other parts of the application access it through ours UserRepository. Regardless of whether you use a disk cache, we recommend that your repository identify the data source as the only source of truth for the rest of your application.Show operation progress
In some use cases, such as pull-to-refresh, it is important that the user interface shows the user that a network operation is currently in progress. It is recommended that the user interface action be separated from the actual data, since the data can be updated for various reasons. For example, if we get a list of friends, the same user can be selected again programmatically, which will lead to an update to LiveData. From the point of view of the user interface, the fact of having a request in flight is just another data point, similar to any other piece of data in the object itself
User.We can use one of the following strategies to display the agreed data update status in the user interface, regardless of where the data update request came from:
- Change
getUser ()it to return a type objectLiveData. This object will include the status of the network. For an example, see the NetworkBoundResource implementation in the GitHub android-Architecture-components project . - Provide another public function in the class
UserRepositorythat can return the user's update status. This option is best used if you want to display network status in your user interface only if the data extraction process has arisen from an explicit user action, such as pull-to-refresh.
Test each component
In the section on separation of interests, we mentioned that one of the key advantages of following this principle is testability.
The following list shows how to test each code module from our extended example:
- User Interface and Interaction : Use the Android UI Test Toolkit . The best way to create this test is to use the Espresso library . You can create a fragment and provide it with a layout
UserProfileViewModel. Since the fragment is associated only withUserProfileViewModel, mocking (imitation) of only this class is sufficient to fully test the user interface of your application. - ViewModel: вы можете протестировать класс
UserProfileViewModelс помощью теста JUnit. Вам нужно только смоделировать один класс,UserRepository. - UserRepository: вы также можете протестировать
UserRepositoryс помощью теста JUnit. Вам нужно испытыватьWebserviceиUserDao. В этих тестах проверьте следующее поведение:- Хранилище делает правильные вызовы веб-службы.
- Репозиторий сохраняет результаты в базе данных.
- Хранилище не делает ненужных запросов, если данные кэшируются и обновляются.
- Поскольку и
Webservice, иUserDaoявляются интерфейсами, вы можете имитировать их или создавать поддельные реализации для более сложных тестовых случаев. - UserDao: тестируйте классы DAO с помощью инструментальных тестов. Поскольку эти инструментальные тесты не требуют каких-либо компонентов пользовательского интерфейса, они выполняются быстро. Для каждого теста создайте базу данных в памяти, чтобы убедиться, что у теста нет побочных эффектов, таких как изменение файлов базы данных на диске…
Внимание: Room позволяет указать реализацию базы данных, поэтому можно протестировать DAO, предоставив реализацию JSQL для SupportSQLiteOpenHelper. Однако такой подход не рекомендуется, поскольку работающая на устройстве версия SQLite может отличаться от версии SQLite на компьютере разработчика. - Веб-сервис: в этих тестах избегайте сетевых вызовов на ваш сервер. Для всех тестов, особенно веб-, важно быть независимым от внешнего мира. Несколько библиотек, включая MockWebServer, могут помочь вам создать поддельный локальный сервер для этих тестов.
- Тестирование артефактов: Компоненты архитектуры предоставляют артефакт maven для управления фоновыми потоками. Артефакт тестирования ядра
androidx.arch.core: содержит следующие правила JUnit:InstantTaskExecutorRule:Используйте это правило для мгновенного выполнения любой фоновой операции в вызывающем потоке.CountingTaskExecutorRule:Используйте это правило для ожидания фоновых операций компонентов архитектуры. Вы также можете связать это правило с Espresso в качестве ресурса в режиме ожидания.
Лучшие практики
Programming is a creative field, and the creation of Android applications is no exception. There are many ways to solve the problem, be it transferring data between several actions or fragments, retrieving deleted data and storing it locally offline, or any number of other common scenarios encountered by non-trivial applications.
Although the following recommendations are not required, our experience shows that their implementation makes your code base more reliable, testable, and supported in the long run:
Avoid designating entry points for your application - such as actions, services, and broadcast receivers - as data sources.
Instead, they only need to coordinate with other components to get a subset of the data related to this entry point. Each component of the application is quite short-lived, depending on the interaction of the user with his device and the general current state of the system.
Create clear lines of responsibility between the various modules of your application.
For example, do not distribute code that downloads data from the network to several classes or packages in your code base. Similarly, do not define multiple unrelated responsibilities — such as data caching and data binding — in the same class.
Expose as little as possible from each module.
Resist the temptation to create a “just one” label that reveals the details of an internal implementation from one module. You may gain some time in the short term, but then you will incur a technical debt many times as your code base develops.
Think about how to make each module testable in isolation.
For example, having a well-defined API for retrieving data from the network makes it easy to test a module that stores this data in a local database. If instead you mix the logic of these two modules in one place or distribute your network code throughout the code base, testing becomes much more difficult - in some cases not even impossible.
Focus on the unique core of your application to stand out from other applications.
Do not reinvent the wheel by writing the same pattern over and over again. Instead, focus your time and energy on what makes your application unique, and let the Android architecture components and other recommended libraries cope with a repeating pattern.
Keep as much relevant and fresh data as possible.
Thus, users can enjoy the functionality of your application, even if their device is offline. Remember that not all of your users use a constant high-speed connection.
Designate a single data source as the only true source.
Whenever your application needs access to this piece of data, it should always come from this single source of truth.
Addendum: disclosure of network status
In the above section of the recommended application architecture, we skipped network errors and boot states to simplify code snippets.
This section shows how to display network status using the Resource class, which encapsulates both data and its state.
The following code snippet provides an example implementation
Resource:// Общий класс, который содержит данные и статус о загрузке этих данных.
sealed class Resource(
val data: T? = null,
val message: String? = null
) {
class Success(data: T) : Resource(data)
class Loading(data: T? = null) : Resource(data)
class Error(message: String, data: T? = null) : Resource(data, message)
} Since downloading data from the network when displaying a copy of this data is common practice, it is useful to create a helper class that can be reused in several places. For this example, we create a class with the name
NetworkBoundResource. The following diagram shows the decision tree for
NetworkBoundResource: It begins by observing the database for the resource. When a record is downloaded from the database for the first time, it
NetworkBoundResourcechecks to see if the result is good enough to be sent, or if it needs to be retrieved from the network. Please note that both of these situations can occur simultaneously, given that you probably want to show cached data when updating it from the network.If the network call succeeds, it stores the response in the database and reinitializes the stream. In the event of a network request
NetworkBoundResourcefailure, it sends the failure directly. Примечание. После сохранения новых данных на диск мы повторно инициализируем поток из базы данных. Однако обычно нам не нужно этого делать, потому что сама база данных отправляет изменения. Keep in mind that relying on a database to submit changes involves the use of related side effects, which is not very good, because the undefined behavior of these side effects can occur if the database does not send the changes because the data has not changed.
Also, do not send results received from the network, as this violates the principle of a single source of truth. In the end, it is possible that the database contains triggers that change data values during the save operation. Similarly, do not send `SUCCESS` without new data, because then the client will receive the wrong version of the data.
The following code snippet shows the open API provided by the class
NetworkBoundResourcefor its subclasses:// ResultType: Введите данные ресурса.
// RequestType: Введите ответ API.
abstract class NetworkBoundResource {
// Вызывается для сохранения результата ответа API в базу данных.
@WorkerThread
protected abstract fun saveCallResult(item: RequestType)
// Вызывается с данными в базе данных, чтобы решить, следует ли извлекать
// потенциально обновленные данные из сети.
@MainThread
protected abstract fun shouldFetch(data: ResultType?): Boolean
// Вызывается для получения кэшированных данных из базы данных.
@MainThread
protected abstract fun loadFromDb(): LiveData
// Вызывается для создания вызова API.
@MainThread
protected abstract fun createCall(): LiveData>
// Вызывается, когда получение не удается. Дочерний класс
// может захотеть сбросить компоненты, такие как ограничитель скорости.
protected open fun onFetchFailed() {}
// Возвращает объект LiveData, представляющий ресурс,
// реализованный в базовом классе.
fun asLiveData(): LiveData = TODO()
} Pay attention to the following important details of class definition:
- It defines two type parameters,
ResultTypeandRequestTypesince the data type returned from the API may not correspond to the data type used locally. - It uses a class
ApiResponsefor network requests.ApiResponseIs a simple wrapper for a classRetrofit2.Callthat converts responses to instancesLiveData.
The full implementation of the class
NetworkBoundResourceappears as part of the GitHub android-Architecture-components project . Once created,
NetworkBoundResourcewe can use it to write our disk and network-attached implementations Userin the class UserRepository:// Информирует Dagger2, что этот класс должен быть создан только один раз.
@Singleton
class UserRepository @Inject constructor(
private val webservice: Webservice,
private val userDao: UserDao
) {
fun getUser(userId: String): LiveData {
return object : NetworkBoundResource() {
override fun saveCallResult(item: User) {
userDao.save(item)
}
override fun shouldFetch(data: User?): Boolean {
return rateLimiter.canFetch(userId) && (data == null || !isFresh(data))
}
override fun loadFromDb(): LiveData {
return userDao.load(userId)
}
override fun createCall(): LiveData> {
return webservice.getUser(userId)
}
}.asLiveData()
}
}