Training Cisco 200-125 CCNA v3.0. Day 9. The physical world of switches. Part 2
- Transfer
- Tutorial
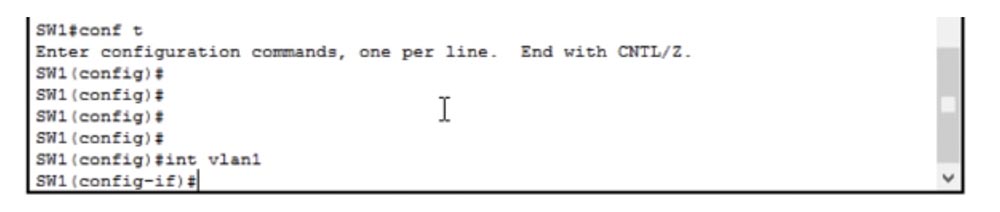
So, we looked at how to set up a network on a computer. As for the switch, let me remind you that it is a device of the 2nd level of the OSI model, and we must configure the IP address, which belongs to the 3rd level. To do this, we use IP address management and go to the VLAN1 interface. We will consider VLAN in detail in one of the following video tutorials, for now just remember that the new switch “out of the box” has all the ports configured to use VLAN1. Therefore, in order to assign the IP address 10.1.1.10 to the switch, we turn to this interface.
If we want to assign the IP address of the default gateway, we must use the ip default gateway 10.1.1.100 command.

This is necessary so that our switch can communicate with another network. If we return to the working configuration of the switch interfaces, we will see that there are lines:
interface Vlan1
ip-address 10.1.1.10 255.255.255.0
This means that any device with the first three octets of the IP address is 10.1.1., Use the default gateway address 10.1.1.100 to connect to another network. This is how the default gateway address is assigned.
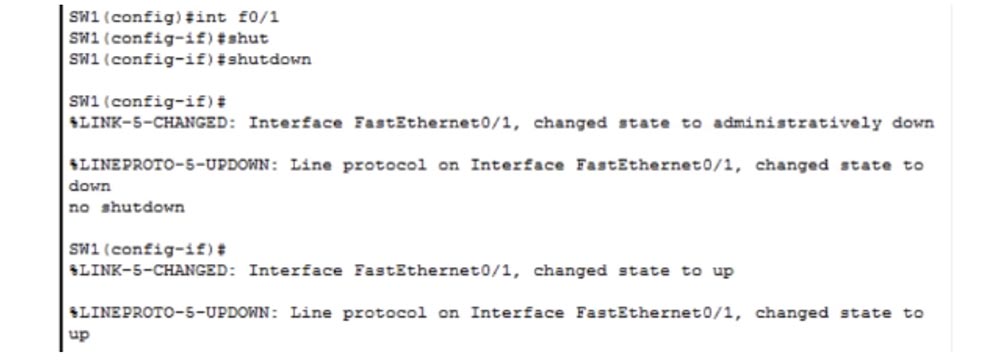
Let's consider how it is possible to disconnect any port of a switch. Now I have made a mistake and will try to benefit from it. If we have a router, its designation starts with f0 / 0 or g0 / 0, and the designation of the switch always starts with f0 / 1 or g0 / 1, depending on whether FastEthernet or GigabitEthernet is used. In our case, this is FastEthernet, so we use the switch designation f0 / 1.
As you know, routers were invented by Cisco and it decided that the router numbers always start with f0 / 0. So, if I want to disable this port, I just type the shutdown command, and FastEthernet 0/1 port is physically disabled. If I want to enable this port again, I enter the no shutdown command. As you can see, in the first case we get a message that the state of the port is “administratively down”, in the second case - that the state of the port is “up”.
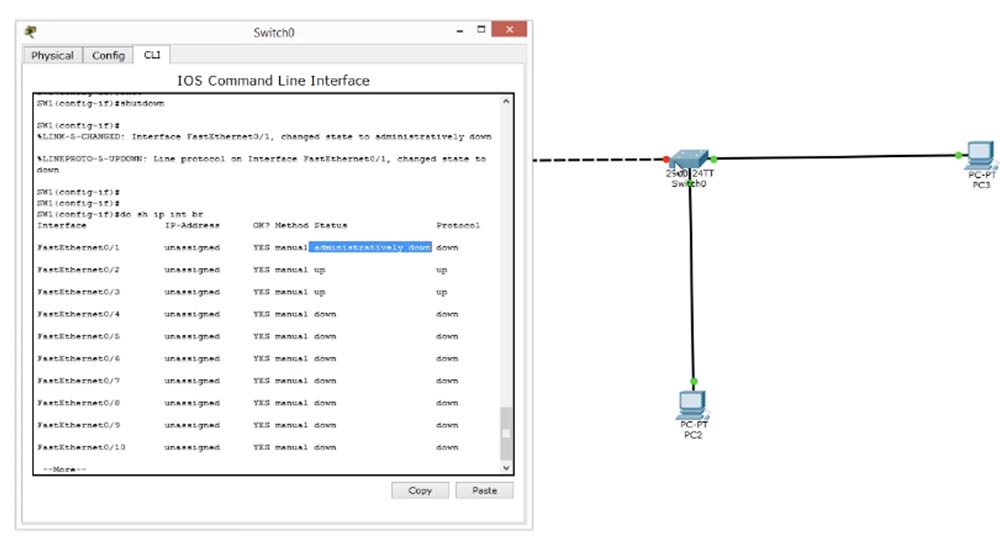
Now I will disconnect the port again and give the command do sh ip interface br - this is one of my favorite commands, which makes it possible to quickly view the current state of all switch interfaces.

We see that the FastEthernet0 / 1 interface is administratively disabled. Administratively means that this interface has been disabled using the shutdown command. In the right column, we see that the protocol of this interface is also disabled and is in the down state, however, when traffic appears on this port, it will immediately go into the up state.
The status of the FastEthernet0 / 4 interface is also shown as down, that is, at the moment it is in the open state, but does not work. The FastEthernet0 / 2 and FastEthernet0 / 3 interfaces are up, because if you look at the logical topology of our network, you can see that PC2 and PC3 are connected to them. In the picture, these switch ports are marked with green dots, and the administratively disconnected port connected to the hub is marked with a red dot.
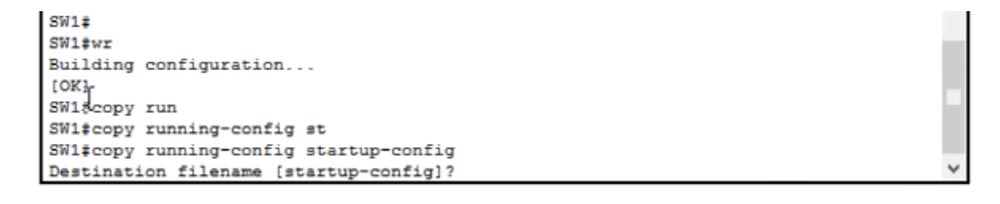
Now I will enter the no shutdown command, and you will see how after a few seconds the red dot will change color, indicating that the port is turned on. Thus, we made the Shutdown and Negating Command settings. We still have the last item of settings - saving the configuration of the Saving Configuration switch. To do this, we enter the wr (wright) command and save the settings. Next, we copy these settings to the boot switch configuration file.
Now let's get back to our network layout, where we have one big problem. People who understand networks know the difference between a hub and a switch.
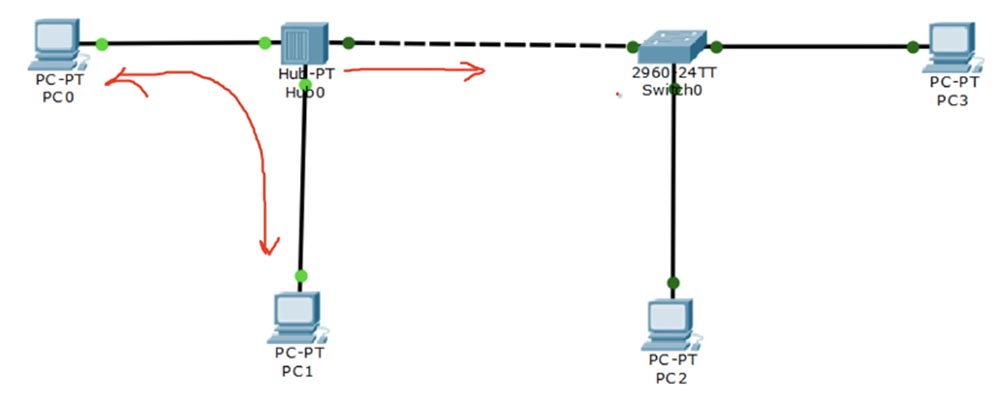
If PC2 is connected to the switch or communicates with PC3, traffic flows only between these two devices - PC2 and PC3. If PC0 communicates with the hub or PC1 through the hub, then the traffic flows not only between the two computers, because the hub sends a copy of this traffic to the switch.
Suppose you are a network administrator sitting at PC1 and you are trying to connect to the switch using the remote access protocol to the Telnet terminal through the hub. However, all the traffic that you direct to the switch can be viewed by a hacker sitting at PC0, because the hub will send a copy of this traffic to his computer.

Since you use a username and password to connect to the switch, the hacker can use the free Wireshark software, which allows you to analyze traffic and get your credentials. That's why we try not to use hubs when creating modern networks. Currently, almost all companies have replaced hubs with switches.
A way to prevent leakage of traffic through the hub may be to use another transmission technology based on the SSH protocol, or “secure shell”. This protocol is similar to Telnet and does the same, but in a more secure way, using traffic encryption.
Consider this example. When the Ministry of Defense wants to transport some secret equipment to the other side of the country, it uses a truck to do this. This truck must pass through the gate with a guard who asks the driver for documents. In our case, this is the username and password. As soon as the guard receives the correct password, she will miss the truck. This is how the Telnet protocol works, but our truck carries cargo in an open body and while it is traveling to its destination, anyone can see what is in it. However, we do not want anyone to know what kind of cargo we are transporting, we need the truck to be closed. This means that anyone who sees him will not be able to find out what is in the back. This is what SSH does - it protects the contents of traffic from outsiders.
Telnet is good enough for trusted networks, when you contact the recipient you know, use authorization to enter the network, to send and receive messages. But he cannot protect the contents of your messages from a hacker who manages to infiltrate your network. SSH provides such a connection when messages can be decrypted by only two people - the sender and the recipient. This can be done only by the devices for which this message is intended.
Thus, if we exchange messages between PC1 and the switch using the SSH protocol, the hub will also copy it to other devices, but this will in no way help the hacker at PC0, because he will not be able to decrypt it. That is, he sees our truck, but cannot find out what kind of cargo is in a closed box. Let's look at what the SSH protocol is.

In order to use this protocol, you need to make 6 settings. The first is setting up the host name, but since we have already completed it for the switch, you can immediately proceed to the second setting - setting the domain name. To do this, enter the ip domain-name Nwking.org command in the switch command window, but you can use any other name. Then we need to ensure the security of the Secure Key, that is, enable encryption using the crypto key command and then use the crypto key generate command to activate the encryption key generation function.

I’ll talk in detail about the operation of the SSH protocol in the following videos, so stay tuned for more interesting things about Internet security. You see that after I used this command, the message Generate RSA keys appeared on the line, where RSA is one of the most common encryption standards in the field of networking.
After I pressed “Enter”, a message appeared on the screen stating that you can select the length of the session encryption key from 360 to 2048 bits and that creating a 512-bit key may take several minutes. Let's assign a key size of 1024 bits, this is a fairly secure key.
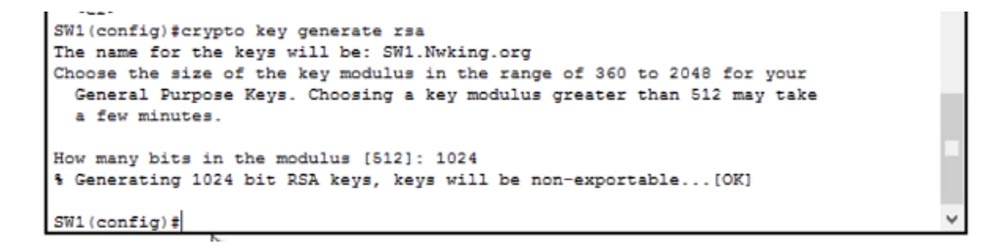
I want to note that a 1024-bit key is many times more reliable than a 512-bit key, so do not be confused that it is only 2 times larger. This is just the number of source bits required to generate a session key, the key itself will have a size many times greater than this number.
So, we have the host name, domain name and encryption key, now we need to make the SSH version 2 function available, this second version of the security protocol that is not compatible with the first version of SSH. The ip ssh version 2 command is used for this. This means that all traffic arriving via SSH will use the second version.
Next we need to create users - Create Users. This can be done by entering a line like this: username Imran password ssh123. Now you need to enable the switch to use SSH. We know that SSH and Telnet use the vty line, so we type the line vty 0 15 command, because we want to use all 16 communication lines.
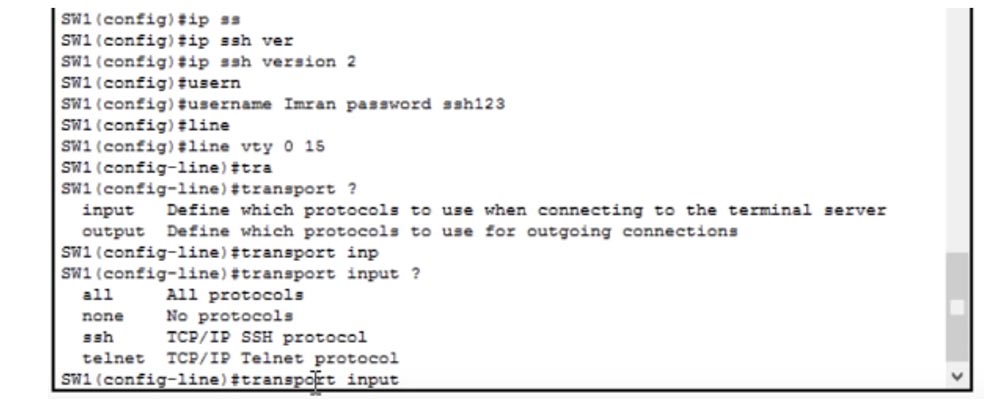
To disable SSH or Telnet protocols for this switch, you need to use the transport input command, after which the system will display a hint from 4 possible options:
all - the ability to use both protocols;
none - disable both protocols;
ssh - use the SSH TCP / IP protocol;
telnet - use the Telnet TCP / IP protocol.
If you enter the transport input none command, any traffic via SSH and Telnet will be denied and all vty lines from 0 to 15 will be disabled.
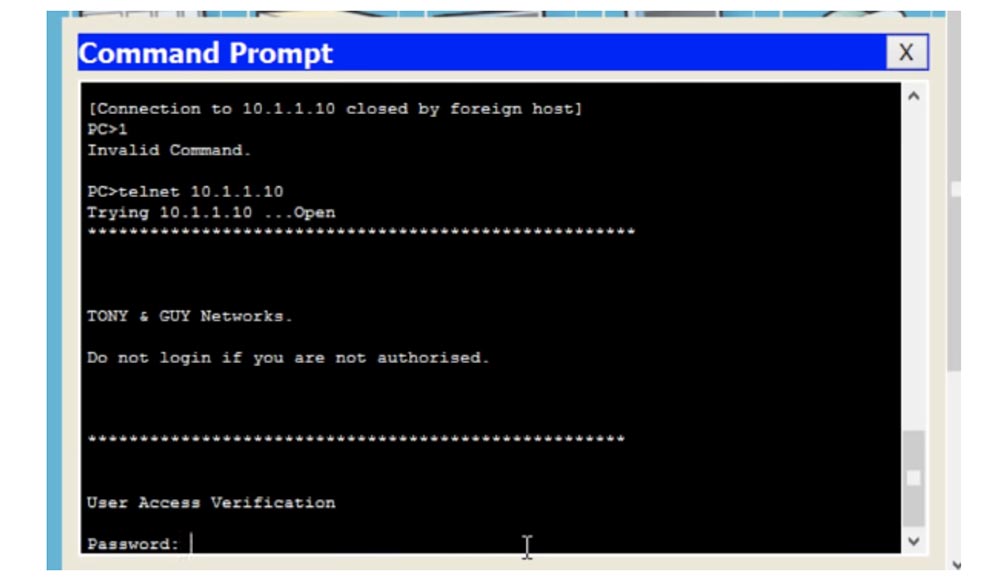
If I return to the PC0 command line terminal again, exit the switch settings and try to connect via Telnet, then I will see that the connection is closed. The reason is that we have banned the use of any communication protocols. Now, if I want to use Telnet, I will enter the transport input telnet command in the switch settings window.

If after this we try again to contact the switch through the computer and type telnet 10.1.1.10 in the command line terminal, the connection will be established and we will see a welcome banner and a suggestion to enter a password for user verification.
What have we done? As a security measure, we have prohibited the use of Telnet traffic, allowing the use of only SSH traffic. If you now enter the transport input ssh command in the switch settings and try to log in through the computer, the system will refuse to provide access. In this case, you need to type ssh in the PC0 command prompt window - this will mean that the user wants to establish communication using the SSH protocol.
After that, a template will appear on the command line for the data format that the user must enter: SSH - 1 username target.

I have to enter the protocol version, username and IP address of the device I want to communicate with, so I type in the following line:
ssh -1 Imran 10.1.1.10
After that, an Open message appears, indicating that the interface of the target device is open, prompting you to enter the Password Password. I enter the password ssh123, but for some reason it is not accepted. The fact is that I made one mistake, and this is good, because thanks to this I can focus your attention on another necessary step.
Let's try to figure out what happened. I entered the password ssh123, which was previously entered into the switch settings. Let's look again at the current configuration of the switch, to understand what kind of password I set.

We see that we have a connection running on the vty 0 line, and the password for this line is not ssh123, but telnet. If I enter this password on the command line of the computer, I can go into the switch settings. Why is ssh123 password not accepted? It's all about the login command. It means that you can only log in with the password that was previously set, that is, you must use the telnet word above as the password. However, if we want to use the user password, then instead of the login command, we must use the login local command.
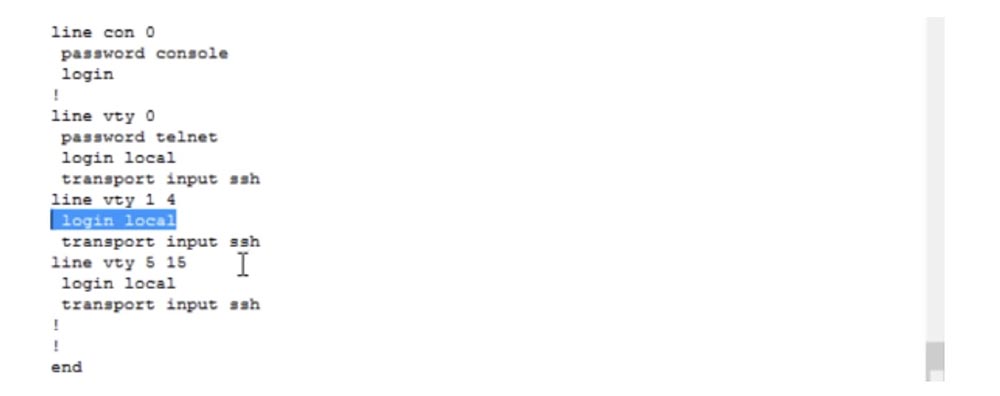
Now we see that all of our settings containing the login command have changed to login local, which means: "use a local username and password." And the local username and password are in the username Imran password ssh123 line. I want to check if Packet Tracer supports the local command and see what it supports - this command means checking the local password.
In the following video tutorials on Internet security, I’ll show that user login settings can be made much easier using Cisco’s special access control protocols. Even when using the Cisco Identity Services Engine (ISE), which is not used for routers and switches and is designed to work with other devices, we must be sure that these devices can access the central database using a local username and password.
So, in the switch command line terminal we used the login local command, which tells the system that it is necessary to use a local username and password. Now I will enter the Exit command on the computer’s command line and try to reconnect to the switch using the ssh123 password. As you can see, now it worked.
Today we looked at how you can use the SSH protocol in practice. I want to note that each of you, when you start working in a company, should first of all ask the manager if it is possible to put all devices into operation mode using the SSH protocol to protect your traffic.
I think that for today we have considered enough useful material. I advise you to take notes in order to better understand the issues at hand. If you do not understand something from today's video tutorial regarding the physical and logical network topology or switch settings, feel free to ask questions, including in the Facebook group www.facebook.com/NetworKingConsultant , and I will answer them.
Thank you for staying with us. Do you like our articles? Want to see more interesting materials? Support us by placing an order or recommending it to your friends, a 30% discount for Habr users on a unique analogue of entry-level servers that we invented for you: The whole truth about VPS (KVM) E5-2650 v4 (6 Cores) 10GB DDR4 240GB SSD 1Gbps from $ 20 or how to divide the server? (options are available with RAID1 and RAID10, up to 24 cores and up to 40GB DDR4).
Dell R730xd 2 times cheaper? Only we have 2 x Intel TetraDeca-Core Xeon 2x E5-2697v3 2.6GHz 14C 64GB DDR4 4x960GB SSD 1Gbps 100 TV from $ 199 in the Netherlands! Dell R420 - 2x E5-2430 2.2Ghz 6C 128GB DDR3 2x960GB SSD 1Gbps 100TB - from $ 99! Read aboutHow to build the infrastructure of the building. class using Dell R730xd E5-2650 v4 servers costing 9,000 euros for a penny?
If we want to assign the IP address of the default gateway, we must use the ip default gateway 10.1.1.100 command.
This is necessary so that our switch can communicate with another network. If we return to the working configuration of the switch interfaces, we will see that there are lines:
interface Vlan1
ip-address 10.1.1.10 255.255.255.0
This means that any device with the first three octets of the IP address is 10.1.1., Use the default gateway address 10.1.1.100 to connect to another network. This is how the default gateway address is assigned.
Let's consider how it is possible to disconnect any port of a switch. Now I have made a mistake and will try to benefit from it. If we have a router, its designation starts with f0 / 0 or g0 / 0, and the designation of the switch always starts with f0 / 1 or g0 / 1, depending on whether FastEthernet or GigabitEthernet is used. In our case, this is FastEthernet, so we use the switch designation f0 / 1.
As you know, routers were invented by Cisco and it decided that the router numbers always start with f0 / 0. So, if I want to disable this port, I just type the shutdown command, and FastEthernet 0/1 port is physically disabled. If I want to enable this port again, I enter the no shutdown command. As you can see, in the first case we get a message that the state of the port is “administratively down”, in the second case - that the state of the port is “up”.
Now I will disconnect the port again and give the command do sh ip interface br - this is one of my favorite commands, which makes it possible to quickly view the current state of all switch interfaces.
We see that the FastEthernet0 / 1 interface is administratively disabled. Administratively means that this interface has been disabled using the shutdown command. In the right column, we see that the protocol of this interface is also disabled and is in the down state, however, when traffic appears on this port, it will immediately go into the up state.
The status of the FastEthernet0 / 4 interface is also shown as down, that is, at the moment it is in the open state, but does not work. The FastEthernet0 / 2 and FastEthernet0 / 3 interfaces are up, because if you look at the logical topology of our network, you can see that PC2 and PC3 are connected to them. In the picture, these switch ports are marked with green dots, and the administratively disconnected port connected to the hub is marked with a red dot.
Now I will enter the no shutdown command, and you will see how after a few seconds the red dot will change color, indicating that the port is turned on. Thus, we made the Shutdown and Negating Command settings. We still have the last item of settings - saving the configuration of the Saving Configuration switch. To do this, we enter the wr (wright) command and save the settings. Next, we copy these settings to the boot switch configuration file.
Now let's get back to our network layout, where we have one big problem. People who understand networks know the difference between a hub and a switch.
If PC2 is connected to the switch or communicates with PC3, traffic flows only between these two devices - PC2 and PC3. If PC0 communicates with the hub or PC1 through the hub, then the traffic flows not only between the two computers, because the hub sends a copy of this traffic to the switch.
Suppose you are a network administrator sitting at PC1 and you are trying to connect to the switch using the remote access protocol to the Telnet terminal through the hub. However, all the traffic that you direct to the switch can be viewed by a hacker sitting at PC0, because the hub will send a copy of this traffic to his computer.
Since you use a username and password to connect to the switch, the hacker can use the free Wireshark software, which allows you to analyze traffic and get your credentials. That's why we try not to use hubs when creating modern networks. Currently, almost all companies have replaced hubs with switches.
A way to prevent leakage of traffic through the hub may be to use another transmission technology based on the SSH protocol, or “secure shell”. This protocol is similar to Telnet and does the same, but in a more secure way, using traffic encryption.
Consider this example. When the Ministry of Defense wants to transport some secret equipment to the other side of the country, it uses a truck to do this. This truck must pass through the gate with a guard who asks the driver for documents. In our case, this is the username and password. As soon as the guard receives the correct password, she will miss the truck. This is how the Telnet protocol works, but our truck carries cargo in an open body and while it is traveling to its destination, anyone can see what is in it. However, we do not want anyone to know what kind of cargo we are transporting, we need the truck to be closed. This means that anyone who sees him will not be able to find out what is in the back. This is what SSH does - it protects the contents of traffic from outsiders.
Telnet is good enough for trusted networks, when you contact the recipient you know, use authorization to enter the network, to send and receive messages. But he cannot protect the contents of your messages from a hacker who manages to infiltrate your network. SSH provides such a connection when messages can be decrypted by only two people - the sender and the recipient. This can be done only by the devices for which this message is intended.
Thus, if we exchange messages between PC1 and the switch using the SSH protocol, the hub will also copy it to other devices, but this will in no way help the hacker at PC0, because he will not be able to decrypt it. That is, he sees our truck, but cannot find out what kind of cargo is in a closed box. Let's look at what the SSH protocol is.
In order to use this protocol, you need to make 6 settings. The first is setting up the host name, but since we have already completed it for the switch, you can immediately proceed to the second setting - setting the domain name. To do this, enter the ip domain-name Nwking.org command in the switch command window, but you can use any other name. Then we need to ensure the security of the Secure Key, that is, enable encryption using the crypto key command and then use the crypto key generate command to activate the encryption key generation function.
I’ll talk in detail about the operation of the SSH protocol in the following videos, so stay tuned for more interesting things about Internet security. You see that after I used this command, the message Generate RSA keys appeared on the line, where RSA is one of the most common encryption standards in the field of networking.
After I pressed “Enter”, a message appeared on the screen stating that you can select the length of the session encryption key from 360 to 2048 bits and that creating a 512-bit key may take several minutes. Let's assign a key size of 1024 bits, this is a fairly secure key.
I want to note that a 1024-bit key is many times more reliable than a 512-bit key, so do not be confused that it is only 2 times larger. This is just the number of source bits required to generate a session key, the key itself will have a size many times greater than this number.
So, we have the host name, domain name and encryption key, now we need to make the SSH version 2 function available, this second version of the security protocol that is not compatible with the first version of SSH. The ip ssh version 2 command is used for this. This means that all traffic arriving via SSH will use the second version.
Next we need to create users - Create Users. This can be done by entering a line like this: username Imran password ssh123. Now you need to enable the switch to use SSH. We know that SSH and Telnet use the vty line, so we type the line vty 0 15 command, because we want to use all 16 communication lines.
To disable SSH or Telnet protocols for this switch, you need to use the transport input command, after which the system will display a hint from 4 possible options:
all - the ability to use both protocols;
none - disable both protocols;
ssh - use the SSH TCP / IP protocol;
telnet - use the Telnet TCP / IP protocol.
If you enter the transport input none command, any traffic via SSH and Telnet will be denied and all vty lines from 0 to 15 will be disabled.
If I return to the PC0 command line terminal again, exit the switch settings and try to connect via Telnet, then I will see that the connection is closed. The reason is that we have banned the use of any communication protocols. Now, if I want to use Telnet, I will enter the transport input telnet command in the switch settings window.
If after this we try again to contact the switch through the computer and type telnet 10.1.1.10 in the command line terminal, the connection will be established and we will see a welcome banner and a suggestion to enter a password for user verification.
What have we done? As a security measure, we have prohibited the use of Telnet traffic, allowing the use of only SSH traffic. If you now enter the transport input ssh command in the switch settings and try to log in through the computer, the system will refuse to provide access. In this case, you need to type ssh in the PC0 command prompt window - this will mean that the user wants to establish communication using the SSH protocol.
After that, a template will appear on the command line for the data format that the user must enter: SSH - 1 username target.
I have to enter the protocol version, username and IP address of the device I want to communicate with, so I type in the following line:
ssh -1 Imran 10.1.1.10
After that, an Open message appears, indicating that the interface of the target device is open, prompting you to enter the Password Password. I enter the password ssh123, but for some reason it is not accepted. The fact is that I made one mistake, and this is good, because thanks to this I can focus your attention on another necessary step.
Let's try to figure out what happened. I entered the password ssh123, which was previously entered into the switch settings. Let's look again at the current configuration of the switch, to understand what kind of password I set.
We see that we have a connection running on the vty 0 line, and the password for this line is not ssh123, but telnet. If I enter this password on the command line of the computer, I can go into the switch settings. Why is ssh123 password not accepted? It's all about the login command. It means that you can only log in with the password that was previously set, that is, you must use the telnet word above as the password. However, if we want to use the user password, then instead of the login command, we must use the login local command.
Now we see that all of our settings containing the login command have changed to login local, which means: "use a local username and password." And the local username and password are in the username Imran password ssh123 line. I want to check if Packet Tracer supports the local command and see what it supports - this command means checking the local password.
In the following video tutorials on Internet security, I’ll show that user login settings can be made much easier using Cisco’s special access control protocols. Even when using the Cisco Identity Services Engine (ISE), which is not used for routers and switches and is designed to work with other devices, we must be sure that these devices can access the central database using a local username and password.
So, in the switch command line terminal we used the login local command, which tells the system that it is necessary to use a local username and password. Now I will enter the Exit command on the computer’s command line and try to reconnect to the switch using the ssh123 password. As you can see, now it worked.
Today we looked at how you can use the SSH protocol in practice. I want to note that each of you, when you start working in a company, should first of all ask the manager if it is possible to put all devices into operation mode using the SSH protocol to protect your traffic.
I think that for today we have considered enough useful material. I advise you to take notes in order to better understand the issues at hand. If you do not understand something from today's video tutorial regarding the physical and logical network topology or switch settings, feel free to ask questions, including in the Facebook group www.facebook.com/NetworKingConsultant , and I will answer them.
Thank you for staying with us. Do you like our articles? Want to see more interesting materials? Support us by placing an order or recommending it to your friends, a 30% discount for Habr users on a unique analogue of entry-level servers that we invented for you: The whole truth about VPS (KVM) E5-2650 v4 (6 Cores) 10GB DDR4 240GB SSD 1Gbps from $ 20 or how to divide the server? (options are available with RAID1 and RAID10, up to 24 cores and up to 40GB DDR4).
Dell R730xd 2 times cheaper? Only we have 2 x Intel TetraDeca-Core Xeon 2x E5-2697v3 2.6GHz 14C 64GB DDR4 4x960GB SSD 1Gbps 100 TV from $ 199 in the Netherlands! Dell R420 - 2x E5-2430 2.2Ghz 6C 128GB DDR3 2x960GB SSD 1Gbps 100TB - from $ 99! Read aboutHow to build the infrastructure of the building. class using Dell R730xd E5-2650 v4 servers costing 9,000 euros for a penny?