Creating Tower Defense in Unity: Enemies
- Transfer
[ First part: tiles and finding the path ]
This is the second part of a tutorial on a simple tower defense game . It examines the process of creating enemies and their movement to the nearest endpoint.
This tutorial is made in Unity 2018.3.0f2.

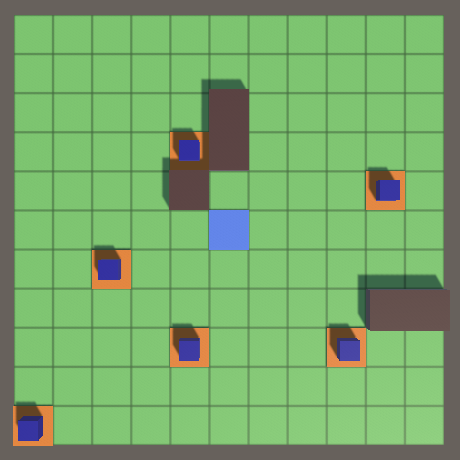
Enemies on the way to the end point.
Before we start creating enemies, we need to decide where to place them on the field. To do this, we will create spawn points.
A spawn point is another type of tile content, so add an entry for it in
And then create a prefab to visualize it. A duplicate of the prefab of the starting point is quite suitable for us, just change its type of content and give it another material. I made it orange.

Spawn point configuration.
Add spawn point support to the content factory and give it a link to the prefab.

Factory with support for spawn points.
The method for switching the state of the spawn point, like other switching methods, we will add to
The game makes sense only if we have enemies, and they need spawn points. Therefore, the game field must contain at least one spawn point. We will also need access to the spawn points in the future, when we will add enemies, so let's use the list to track all the tiles with these points. We will update the list when switching the state of the spawn point and prevent the removal of the last spawn point.
The method
We will make sure that now an alternative touch switches the state of the spawn points, but when holding Shift left (the keystroke is checked by the method

Field with spawn dots.
The field deals with all its tiles, but enemies are not its responsibility. We will make it possible to access its spawn points through a common method
To know which indices are correct, information is needed on the number of spawn points, so we will make it general using the general getter property.
Spawning an enemy is somewhat similar to creating the contents of a tile. We create a prefab instance through the factory, which we then place on the field.
We will create a factory for enemies that will put everything that it creates on its own stage. This functionality is common with the factory that we already have, so let's put the code for it in a common base class
Change it
After that, create a new type
The new type
Enemies need visualization, which can be anything - a robot, a spider, a ghost, something simpler, for example, a cube, which we use. But in general, the enemy has a 3D model of any complexity. To ensure its convenient support, we will use the root object for the enemy prefab hierarchy, to which only the component is attached
Prefab Root
Let's create this object the only child element, which will be the root of the model. It must have Transform unit values.

The root of the model.
The task of this model root is to position the 3D model relative to the local point of origin of the enemy’s coordinates, so that he considers it a reference point over which the enemy stands or hangs. In our case, the model will be a standard half-size cube, to which I will give a dark blue color. We make it a child of the model root and set the Y position to 0.25 so that it stands on the ground.
Cube model
Thus, the enemy’s prefab consists of three nested objects: the prefab root, the model root, and the cube. It might seem like a bust for a simple cube, but such a system allows you to move and animate any enemy without worrying about its features.

The prefab hierarchy of the enemy.
Let's create an enemy factory and assign a prefab to it.

Asset factory.
To place enemies on the field, you

Game with a factory of enemies and speed of spawning 4.
We will track the progress of spawning in
Let him
For now, all I have to do
Enemies appear at spawn points.
After the enemy appears, he must begin to move along the path to the nearest end point. To achieve this, you need to animate enemies. We start with a simple smooth glide from tile to tile, and then make their movement more difficult.
To update the status of enemies, we will use the same approach that was used in the Object Management series of tutorials . Add a
In addition, we need to maintain a list of living enemies and update all of them, removing them from the list of dead enemies. We can put all this code in
Now it

Enemies are moving forward.
Enemies are already moving, but so far do not follow the path. To do this, they need to know where to go next. Therefore, we will give a
Knowing the tile from which you want to exit, and the tile into which you need to get, the enemies can determine the start and end points to move one tile. The enemy can interpolate the position between these two points, tracking their movement. After the move is complete, this process is repeated for the next tile. But the paths can change at any time. Instead of determining where to move further in the process of movement, we simply continue to move along the planned route and check it, reaching the next tile.
Let it
We initialize these fields in
Increment progress will be performed in
This forces the enemies to follow the path, but will not act when reaching the end point. Therefore, before changing positions
Enemies follow the shortest path.
Enemies are now moving from the center of one tile to another. It is worth considering that they change their state of movement only in the centers of the tiles, therefore they cannot immediately respond to changes in the field. This means that sometimes enemies will move through the walls just set. Once they started moving towards the cell, nothing will stop them. That is why walls also need real paths.
Enemies react to changing paths.
The movement between the centers of the tiles and a sharp change of direction looks normal for an abstract game in which the enemies are moving cubes, but usually the smooth movement looks more beautiful. The first step to its implementation is not to move along the centers, but along the edges of the tiles.
The edge point between adjacent tiles can be found by averaging their positions. Instead of calculating it at every step for each enemy, we will only calculate it when changing the path to
The only special case is the final cell, the exit point of which will be its center.
Change
Enemies move between the edges.
A side effect of this change is that when enemies turn due to a change in path, they remain motionless for a second.
When turning, enemies stop.
Although the enemies move along the paths until they change their orientation. So that they can look in the direction of movement, they need to know the direction of the path that they are following. We will also determine this during the search for ways, so that this does not have to be done by the enemies.
We have four directions: north, east, south and west. Let us enumerate them.
Then we give the
Add the direction parameter k
We need to convert directions into turns expressed as quaternions. It would be convenient if we could just call
Now we can turn
Instead of instantly changing direction, it is better to interpolate values between turns, similar to how we interpolated between positions. To move from one orientation to another, we need to know the change in direction that needs to be done: without turning, turning right, turning left or turning back. We add for this an enumeration, which again can be placed in the same file as that
We add another extension method, this time
We make a rotation in only one dimension, so linear interpolation of angles will be enough for us. Add another expanding method that gets the angle of direction in degrees.
Now you have
At this stage, we create something like a small state machine. To keep things simple
When transitioning to a new state, you always need to change positions, find a change of direction, update the current direction and shift the angle
Other actions depend on a change of direction. Let's add a method for each option. In case we move forward, then the angle
In the case of a turn, we do not turn instantly. We need to interpolate to a different angle: 90 ° more to turn right, 90 ° less to turn left, and 180 ° more to turn back. To avoid turning in the wrong direction due to a change in angle values from 359 ° to 0 °, the angle
In the end,
Now in the end
Enemies are turning.
We can improve movement by making enemies move along a curve when turning. Instead of walking from edge to edge of tiles, let them walk a quarter of a circle. The center of this circle lies in a corner common to tiles

A quarter circle rotation to turn right.
We can realize this by moving the enemy in an arc using trigonometry, while at the same time turning it. But this can be simplified by using only rotation, temporarily moving the local origin of the enemy’s coordinates to the center of the circle. To do this, we need to change the position of the enemy model, so we will give a

Enemy with reference to the model.
In preparation for moving forward or turning backward, the model should move to the standard position, to the local origin of the enemy’s coordinates. Otherwise, the model must be shifted by half the unit of measurement - the radius of the circle of rotation, far from the turning point.
Now the enemy himself needs to be moved to the turning point. To do this, it must also be moved half the unit of measure, but the exact offset depends on the direction. Let's add
Add the corresponding vector when turning right or left.
And when turning back, the position should be the usual starting point.
In addition, when calculating the exit point, we can use
Now, when changing directions, we do not have to interpolate the position in
Enemies smoothly bend around corners.
Up to this point, the speed of enemies has always been equal to one tile per second, regardless of how they move inside the tile. But the distance they cover depends on their condition, so their speed, expressed in units per second, varies. For this speed to be constant, we need to change the speed of progress depending on the state. Therefore, add the progress multiplier field and use it to scale the delta in
But if progress changes depending on the state, the remaining progress value cannot be used directly for the next state. Therefore, before preparing for a new state, we need to normalize progress and apply the new multiplier already in a new state.
Moving forward does not require changes, therefore, it uses a factor of 1. When turning right or left, the enemy passes a quarter of a circle with a radius of ½, so the distance covered is ¼π.
Since we have an introductory state, let's add a final one. Enemies are currently disappearing immediately after reaching the endpoint, but let's postpone their disappearance until they reach the center of the end tile. Let's create a method for this
In order
In
Enemies with a constant speed and final state.
We have a stream of enemies, and they are all the same cube, moving at the same speed. The result is more like a long snake than individual enemies. Let's make them more different by randomizing their size, displacement, and speed.
We will change the parameters of the enemies, randomly choosing their characteristics from the range of values. The structure
We also copy the attribute set to it in order to limit its interval.
We only need the visualization of the slider, so copy it
We will start by changing the scale of the enemy. Add
The method


The range of scales is from 0.5 to 1.5.
To further destroy the uniformity of the flow of enemies, we can change their relative position inside the tiles. They move forward, so the shift in this direction only changes the timing of their movement, which is not very noticeable. Therefore, we will shift them to the side, away from the ideal path passing through the centers of the tiles. Add a
Since the displacement of the path affects the path traveled,
When moving exactly straight (during the introductory, final, or normal forward movement), we simply apply the offset directly to the model. The same thing happens when you turn back. With a right or left turn, we already displace the model, which becomes relative to the displacement of the path.
Since the displacement of the path during rotation changes the radius, we need to change the process of calculating the progress multiplier. The path offset must be subtracted from ½ to get the radius of rotation to the right, and added in the case of turning to the left.
We also get the turning radius when turning 180 °. In this case, we cover half the circle with a radius equal to the offset of the path, so the distance is π times the offset. However, this does not work when the displacement is zero, and at small displacements, the turns are too fast. To avoid instant turns, we can force the minimum radius to calculate the speed, say 0.2.

The path offset is in the range −0.25–0.25.
Note that now enemies never change their relative path displacement, even when turning. Therefore, the total length of the path for each enemy has its own.
To prevent enemies from reaching neighboring tiles, one must also take into account their maximum possible scale. I just limited the size to a maximum value of 1, so the maximum allowable offset for the cube is 0.25. If the maximum size were 1.5, then the maximum displacement should be reduced to 0.125.
The last thing we randomize is the speed of the enemies. We add one more interval for it in
Now I
When we did not set the speed explicitly, we simply always used the value 1. Now we just need to create the dependence of the progress multiplier on the speed.

Speed in the range 0.75–1.25.
So, we got a beautiful stream of enemies moving to the end point. In the next tutorial we will learn how to deal with them. Want to know when it will be released? Follow my page on Patreon !
repository
PDF article
- Placement of enemy creation points.
- The appearance of enemies and their movement across the field.
- Creating smooth motion at a constant speed.
- Change the size, speed and placement of enemies.
This is the second part of a tutorial on a simple tower defense game . It examines the process of creating enemies and their movement to the nearest endpoint.
This tutorial is made in Unity 2018.3.0f2.
Enemies on the way to the end point.
Enemy creation (spawn) points
Before we start creating enemies, we need to decide where to place them on the field. To do this, we will create spawn points.
Tile Content
A spawn point is another type of tile content, so add an entry for it in
GameTileContentType.public enum GameTileContentType {
Empty, Destination, Wall, SpawnPoint
}And then create a prefab to visualize it. A duplicate of the prefab of the starting point is quite suitable for us, just change its type of content and give it another material. I made it orange.
Spawn point configuration.
Add spawn point support to the content factory and give it a link to the prefab.
	[SerializeField]
	GameTileContent spawnPointPrefab = default;
	…
	public GameTileContent Get (GameTileContentType type) {
		switch (type) {
			case GameTileContentType.Destination: return Get(destinationPrefab);
			case GameTileContentType.Empty: return Get(emptyPrefab);
			case GameTileContentType.Wall: return Get(wallPrefab);
			case GameTileContentType.SpawnPoint: return Get(spawnPointPrefab);
		}
		Debug.Assert(false, "Unsupported type: " + type);
		return null;
	}
Factory with support for spawn points.
Enable or disable spawn points
The method for switching the state of the spawn point, like other switching methods, we will add to
GameBoard. But spawn points do not affect the search for the path, so after the change we do not need to look for new paths. public void ToggleSpawnPoint (GameTile tile) {
if (tile.Content.Type == GameTileContentType.SpawnPoint) {
tile.Content = contentFactory.Get(GameTileContentType.Empty);
}
else if (tile.Content.Type == GameTileContentType.Empty) {
tile.Content = contentFactory.Get(GameTileContentType.SpawnPoint);
}
}The game makes sense only if we have enemies, and they need spawn points. Therefore, the game field must contain at least one spawn point. We will also need access to the spawn points in the future, when we will add enemies, so let's use the list to track all the tiles with these points. We will update the list when switching the state of the spawn point and prevent the removal of the last spawn point.
	List spawnPoints = new List();
	…
	public void ToggleSpawnPoint (GameTile tile) {
		if (tile.Content.Type == GameTileContentType.SpawnPoint) {
			if (spawnPoints.Count > 1) {
				spawnPoints.Remove(tile);
				tile.Content = contentFactory.Get(GameTileContentType.Empty);
			}
		}
		else if (tile.Content.Type == GameTileContentType.Empty) {
			tile.Content = contentFactory.Get(GameTileContentType.SpawnPoint);
			spawnPoints.Add(tile);
		}
	}
The method
Initializeshould now set the spawn point to create the initial correct state of the field. Let's just include the first tile, which is in the lower left corner. public void Initialize (
Vector2Int size, GameTileContentFactory contentFactory
) {
…
ToggleDestination(tiles[tiles.Length / 2]);
ToggleSpawnPoint(tiles[0]);
}We will make sure that now an alternative touch switches the state of the spawn points, but when holding Shift left (the keystroke is checked by the method
Input.GetKey), the state of the end point will switch void HandleAlternativeTouch () {
GameTile tile = board.GetTile(TouchRay);
if (tile != null) {
if (Input.GetKey(KeyCode.LeftShift)) {
board.ToggleDestination(tile);
}
else {
board.ToggleSpawnPoint(tile);
}
}
}Field with spawn dots.
Gain access to spawn points
The field deals with all its tiles, but enemies are not its responsibility. We will make it possible to access its spawn points through a common method
GetSpawnPointwith an index parameter. public GameTile GetSpawnPoint (int index) {
return spawnPoints[index];
}To know which indices are correct, information is needed on the number of spawn points, so we will make it general using the general getter property.
public int SpawnPointCount => spawnPoints.Count;Enemy spawn
Spawning an enemy is somewhat similar to creating the contents of a tile. We create a prefab instance through the factory, which we then place on the field.
Factories
We will create a factory for enemies that will put everything that it creates on its own stage. This functionality is common with the factory that we already have, so let's put the code for it in a common base class
GameObjectFactory. One method CreateGameObjectInstancewith the general prefab parameter will be enough for us, which creates and returns an instance, and also manages the entire scene. We will make a method protected, that is, it will be available only to the class and all types that inherit from it. That's all the class does; it is not intended to be used as a fully functional factory. Therefore, mark it as abstract, which will not allow you to create instances of its objects.using UnityEngine;
using UnityEngine.SceneManagement;
public abstract class GameObjectFactory : ScriptableObject {
Scene scene;
protected T CreateGameObjectInstance (T prefab) where T : MonoBehaviour {
if (!scene.isLoaded) {
if (Application.isEditor) {
scene = SceneManager.GetSceneByName(name);
if (!scene.isLoaded) {
scene = SceneManager.CreateScene(name);
}
}
else {
scene = SceneManager.CreateScene(name);
}
}
T instance = Instantiate(prefab);
SceneManager.MoveGameObjectToScene(instance.gameObject, scene);
return instance;
}
} Change it
GameTileContentFactoryso that it inherits this type of factory and uses it CreateGameObjectInstancein its method Get, and then remove the scene control code from it.using UnityEngine;
[CreateAssetMenu]
public class GameTileContentFactory : GameObjectFactory {
…
//Scene contentScene;
…
GameTileContent Get (GameTileContent prefab) {
GameTileContent instance = CreateGameObjectInstance(prefab);
instance.OriginFactory = this;
//MoveToFactoryScene(instance.gameObject);
return instance;
}
//void MoveToFactoryScene (GameObject o) {
// …
//}
}After that, create a new type
EnemyFactorythat creates an instance of one prefab Enemyusing the method Getalong with the accompanying method Reclaim.using UnityEngine;
[CreateAssetMenu]
public class EnemyFactory : GameObjectFactory {
[SerializeField]
Enemy prefab = default;
public Enemy Get () {
Enemy instance = CreateGameObjectInstance(prefab);
instance.OriginFactory = this;
return instance;
}
public void Reclaim (Enemy enemy) {
Debug.Assert(enemy.OriginFactory == this, "Wrong factory reclaimed!");
Destroy(enemy.gameObject);
}
}The new type
Enemyinitially only had to keep track of its original factory.using UnityEngine;
public class Enemy : MonoBehaviour {
EnemyFactory originFactory;
public EnemyFactory OriginFactory {
get => originFactory;
set {
Debug.Assert(originFactory == null, "Redefined origin factory!");
originFactory = value;
}
}
}Prefab
Enemies need visualization, which can be anything - a robot, a spider, a ghost, something simpler, for example, a cube, which we use. But in general, the enemy has a 3D model of any complexity. To ensure its convenient support, we will use the root object for the enemy prefab hierarchy, to which only the component is attached
Enemy.Prefab Root
Let's create this object the only child element, which will be the root of the model. It must have Transform unit values.
The root of the model.
The task of this model root is to position the 3D model relative to the local point of origin of the enemy’s coordinates, so that he considers it a reference point over which the enemy stands or hangs. In our case, the model will be a standard half-size cube, to which I will give a dark blue color. We make it a child of the model root and set the Y position to 0.25 so that it stands on the ground.
Cube model
Thus, the enemy’s prefab consists of three nested objects: the prefab root, the model root, and the cube. It might seem like a bust for a simple cube, but such a system allows you to move and animate any enemy without worrying about its features.
The prefab hierarchy of the enemy.
Let's create an enemy factory and assign a prefab to it.
Asset factory.
Placing enemies on the field
To place enemies on the field, you
Gamemust receive a link to the factory of enemies. Since we need a lot of enemies, we’ll add a configuration option to adjust the speed of spawning, expressed in the number of enemies per second. An acceptable range is 0.1–10 with a default value of 1. [SerializeField]
EnemyFactory enemyFactory = default;
[SerializeField, Range(0.1f, 10f)]
float spawnSpeed = 1f;Game with a factory of enemies and speed of spawning 4.
We will track the progress of spawning in
Update, increasing it by the speed multiplied by the delta of time. If the prggress value exceeds 1, then we decrement it and spawn the enemy using the new method SpawnEnemy. We continue to do this until progress exceeds 1 in case the speed is too high and the frame time is very long so that several enemies are not created at the same time. float spawnProgress;
…
void Update () {
…
spawnProgress += spawnSpeed * Time.deltaTime;
while (spawnProgress >= 1f) {
spawnProgress -= 1f;
SpawnEnemy();
}
}Isn't it necessary to update progress in FixedUpdate?
Yes, it is possible, but such accurate timings are not needed for the tower defense game. We will simply update the state of the game every frame and make it work well enough for any time delta.
Let him
SpawnEnemyget a random spawn point from the field and create an enemy in this tile. We will give a Enemymethod SpawnOnto correctly position itself. void SpawnEnemy () {
GameTile spawnPoint =
board.GetSpawnPoint(Random.Range(0, board.SpawnPointCount));
Enemy enemy = enemyFactory.Get();
enemy.SpawnOn(spawnPoint);
}For now, all I have to do
SpawnOnis set my own position equal to the center of the tile. Since the prefab model is positioned correctly, the enemy cube will be on top of this tile. public void SpawnOn (GameTile tile) {
transform.localPosition = tile.transform.localPosition;
}Enemies appear at spawn points.
Moving enemies
After the enemy appears, he must begin to move along the path to the nearest end point. To achieve this, you need to animate enemies. We start with a simple smooth glide from tile to tile, and then make their movement more difficult.
Collection of enemies
To update the status of enemies, we will use the same approach that was used in the Object Management series of tutorials . Add a
Enemygeneral method GameUpdatethat returns information about whether he is alive, which at this stage will always be true. For now, just make him move forward according to the delta of time. public bool GameUpdate () {
transform.localPosition += Vector3.forward * Time.deltaTime;
return true;
}In addition, we need to maintain a list of living enemies and update all of them, removing them from the list of dead enemies. We can put all this code in
Game, but instead, isolate it and create a type EnemyCollection. This is a serializable class that does not inherit from anything. We give him a general method for adding an enemy and another method for updating the entire collection.using System.Collections.Generic;
[System.Serializable]
public class EnemyCollection {
List enemies = new List();
public void Add (Enemy enemy) {
enemies.Add(enemy);
}
public void GameUpdate () {
for (int i = 0; i < enemies.Count; i++) {
if (!enemies[i].GameUpdate()) {
int lastIndex = enemies.Count - 1;
enemies[i] = enemies[lastIndex];
enemies.RemoveAt(lastIndex);
i -= 1;
}
}
}
} Now it
Gamewill be enough to create only one such collection, in each frame update it and add created enemies to it. We will update the enemies immediately after the possible spawning of a new enemy so that the update takes place instantly. EnemyCollection enemies = new EnemyCollection();
…
void Update () {
…
enemies.GameUpdate();
}
…
void SpawnEnemy () {
…
enemies.Add(enemy);
}Enemies are moving forward.
Movement along the way
Enemies are already moving, but so far do not follow the path. To do this, they need to know where to go next. Therefore, we will give a
GameTilecommon getter property to get the next tile on the path. public GameTile NextTileOnPath => nextOnPath;Knowing the tile from which you want to exit, and the tile into which you need to get, the enemies can determine the start and end points to move one tile. The enemy can interpolate the position between these two points, tracking their movement. After the move is complete, this process is repeated for the next tile. But the paths can change at any time. Instead of determining where to move further in the process of movement, we simply continue to move along the planned route and check it, reaching the next tile.
Let it
Enemytrack both tiles so that it is not affected by a change in path. He will also track positions so that we do not have to receive them in each frame, and track the process of moving. GameTile tileFrom, tileTo;
Vector3 positionFrom, positionTo;
float progress;We initialize these fields in
SpawnOn. The first point is the tile from which the enemy is moving, and the end point is the next tile on the path. This assumes that the next tile exists, unless the enemy was created at the endpoint, which should be impossible. Then we cache the positions of the tiles and reset the progress. We do not need to set the enemy’s position here, because his method GameUpdateis called in the same frame. public void SpawnOn (GameTile tile) {
//transform.localPosition = tile.transform.localPosition;
Debug.Assert(tile.NextTileOnPath != null, "Nowhere to go!", this);
tileFrom = tile;
tileTo = tile.NextTileOnPath;
positionFrom = tileFrom.transform.localPosition;
positionTo = tileTo.transform.localPosition;
progress = 0f;
}Increment progress will be performed in
GameUpdate. Let’s add a constant time delta so that the enemies move at a speed of one tile per second. When the progress is complete, we shift the data so that it Tobecomes a value From, and the Tonext tile on the path becomes new . Then we decrement progress. When the data becomes relevant, interpolate the position of the enemy between Fromand To. Since the interpolator is progress, its value is necessarily in the range from 0 and 1, so we can use s Vector3.LerpUnclamped. public bool GameUpdate () {
progress += Time.deltaTime;
while (progress >= 1f) {
tileFrom = tileTo;
tileTo = tileTo.NextTileOnPath;
positionFrom = positionTo;
positionTo = tileTo.transform.localPosition;
progress -= 1f;
}
transform.localPosition =
Vector3.LerpUnclamped(positionFrom, positionTo, progress);
return true;
}This forces the enemies to follow the path, but will not act when reaching the end point. Therefore, before changing positions
Fromand To, you need to compare the next tile on the path with null. If so, then we have reached the end point and the enemy has finished the movement. We execute Reclaim for it and return false. while (progress >= 1f) {
tileFrom = tileTo;
tileTo = tileTo.NextTileOnPath;
if (tileTo == null) {
OriginFactory.Reclaim(this);
return false;
}
positionFrom = positionTo;
positionTo = tileTo.transform.localPosition;
progress -= 1f;
}Enemies follow the shortest path.
Enemies are now moving from the center of one tile to another. It is worth considering that they change their state of movement only in the centers of the tiles, therefore they cannot immediately respond to changes in the field. This means that sometimes enemies will move through the walls just set. Once they started moving towards the cell, nothing will stop them. That is why walls also need real paths.
Enemies react to changing paths.
Edge to Edge Movement
The movement between the centers of the tiles and a sharp change of direction looks normal for an abstract game in which the enemies are moving cubes, but usually the smooth movement looks more beautiful. The first step to its implementation is not to move along the centers, but along the edges of the tiles.
The edge point between adjacent tiles can be found by averaging their positions. Instead of calculating it at every step for each enemy, we will only calculate it when changing the path to
GameTile.GrowPathTo. Make it available using the property ExitPoint. public Vector3 ExitPoint { get; private set; }
…
GameTile GrowPathTo (GameTile neighbor) {
…
neighbor.ExitPoint =
(neighbor.transform.localPosition + transform.localPosition) * 0.5f;
return
neighbor.Content.Type != GameTileContentType.Wall ? neighbor : null;
}The only special case is the final cell, the exit point of which will be its center.
	public void BecomeDestination () {
		distance = 0;
		nextOnPath = null;
		ExitPoint = transform.localPosition;
	}
Change
Enemyso that it uses the exit points, not the centers of the tiles. public bool GameUpdate () {
progress += Time.deltaTime;
while (progress >= 1f) {
…
positionTo = tileFrom.ExitPoint;
progress -= 1f;
}
transform.localPosition = Vector3.Lerp(positionFrom, positionTo, progress);
return true;
}
public void SpawnOn (GameTile tile) {
…
positionTo = tileFrom.ExitPoint;
progress = 0f;
}Enemies move between the edges.
A side effect of this change is that when enemies turn due to a change in path, they remain motionless for a second.
When turning, enemies stop.
Orientation
Although the enemies move along the paths until they change their orientation. So that they can look in the direction of movement, they need to know the direction of the path that they are following. We will also determine this during the search for ways, so that this does not have to be done by the enemies.
We have four directions: north, east, south and west. Let us enumerate them.
public enum Direction {
	North, East, South, West
}
Then we give the
GameTileproperty to store the direction of its path. public Direction PathDirection { get; private set; }Add the direction parameter k
GrowTo, which sets the property. Since we are growing a path from end to beginning, the direction will be opposite to where we are growing the path from. public GameTile GrowPathNorth () => GrowPathTo(north, Direction.South);
public GameTile GrowPathEast () => GrowPathTo(east, Direction.West);
public GameTile GrowPathSouth () => GrowPathTo(south, Direction.North);
public GameTile GrowPathWest () => GrowPathTo(west, Direction.East);
GameTile GrowPathTo (GameTile neighbor, Direction direction) {
…
neighbor.PathDirection = direction;
return
neighbor.Content.Type != GameTileContentType.Wall ? neighbor : null;
}We need to convert directions into turns expressed as quaternions. It would be convenient if we could just call
GetRotationfor directions, so let's do this by creating an extension method. Add a general static method DirectionExtensions, give it an array to cache the necessary quaternions, as well as a method GetRotationto return the corresponding direction value. In this case, it makes sense to put the extension class in the same file as the enumeration type.using UnityEngine;
public enum Direction {
North, East, South, West
}
public static class DirectionExtensions {
static Quaternion[] rotations = {
Quaternion.identity,
Quaternion.Euler(0f, 90f, 0f),
Quaternion.Euler(0f, 180f, 0f),
Quaternion.Euler(0f, 270f, 0f)
};
public static Quaternion GetRotation (this Direction direction) {
return rotations[(int)direction];
}
}What is an extension method?
An extension method is a static method inside a static class that behaves like an instance method of some type. This type can be a class, interface, structure, primitive value, or enumeration. The first argument to the extension method must have a keyword
Does this allow you to add methods to anything? Yes, just as you can write any static method whose parameter is any type.
this. It defines the value of the type and instance with which the method will work. This approach means that expanding properties are not possible. Does this allow you to add methods to anything? Yes, just as you can write any static method whose parameter is any type.
Now we can turn
Enemywhen spawning and every time we enter a new tile. After updating the data, the tile Fromgives us direction. public bool GameUpdate () {
progress += Time.deltaTime;
while (progress >= 1f) {
…
transform.localRotation = tileFrom.PathDirection.GetRotation();
progress -= 1f;
}
transform.localPosition =
Vector3.LerpUnclamped(positionFrom, positionTo, progress);
return true;
}
public void SpawnOn (GameTile tile) {
…
transform.localRotation = tileFrom.PathDirection.GetRotation();
progress = 0f;
}Change of direction
Instead of instantly changing direction, it is better to interpolate values between turns, similar to how we interpolated between positions. To move from one orientation to another, we need to know the change in direction that needs to be done: without turning, turning right, turning left or turning back. We add for this an enumeration, which again can be placed in the same file as that
Direction, because they are small and closely related.public enum Direction {
North, East, South, West
}
public enum DirectionChange {
None, TurnRight, TurnLeft, TurnAround
}We add another extension method, this time
GetDirectionChangeTo, which returns a change of direction from the current direction to the next. If the directions coincide, then there is no shift. If the next one is more than the current, then this is a turn to the right. But since the directions are repeated, the same situation will be when the next is three less than the current one. With a left turn it will be the same, only addition and subtraction will switch places. The only remaining case is a turn back. public static DirectionChange GetDirectionChangeTo (
this Direction current, Direction next
) {
if (current == next) {
return DirectionChange.None;
}
else if (current + 1 == next || current - 3 == next) {
return DirectionChange.TurnRight;
}
else if (current - 1 == next || current + 3 == next) {
return DirectionChange.TurnLeft;
}
return DirectionChange.TurnAround;
}We make a rotation in only one dimension, so linear interpolation of angles will be enough for us. Add another expanding method that gets the angle of direction in degrees.
	public static float GetAngle (this Direction direction) {
		return (float)direction * 90f;
	}
Now you have
Enemyto track the direction, change of direction and angles between which you need to perform interpolation. Direction direction;
DirectionChange directionChange;
float directionAngleFrom, directionAngleTo;SpawnOngetting harder, so let's move the state preparation code to another method. We will designate the initial state of the enemy as an introductory state, so we will call it PrepareIntro. In this state, the enemy moves from the center to the edge of his initial tile, so there is no change of direction. The angles Fromand Tothe same. public void SpawnOn (GameTile tile) {
Debug.Assert(tile.NextTileOnPath != null, "Nowhere to go!", this);
tileFrom = tile;
tileTo = tile.NextTileOnPath;
//positionFrom = tileFrom.transform.localPosition;
//positionTo = tileFrom.ExitPoint;
//transform.localRotation = tileFrom.PathDirection.GetRotation();
progress = 0f;
PrepareIntro();
}
void PrepareIntro () {
positionFrom = tileFrom.transform.localPosition;
positionTo = tileFrom.ExitPoint;
direction = tileFrom.PathDirection;
directionChange = DirectionChange.None;
directionAngleFrom = directionAngleTo = direction.GetAngle();
transform.localRotation = direction.GetRotation();
}At this stage, we create something like a small state machine. To keep things simple
GameUpdate, move the status code to a new method PrepareNextState. We will leave only the changes of the tiles Fromand To, because we use them here to check whether the enemy has finished the path. public bool GameUpdate () {
progress += Time.deltaTime;
while (progress >= 1f) {
…
//positionFrom = positionTo;
//positionTo = tileFrom.ExitPoint;
//transform.localRotation = tileFrom.PathDirection.GetRotation();
progress -= 1f;
PrepareNextState();
}
…
}When transitioning to a new state, you always need to change positions, find a change of direction, update the current direction and shift the angle
Toto From. We no longer set a turn. void PrepareNextState () {
positionFrom = positionTo;
positionTo = tileFrom.ExitPoint;
directionChange = direction.GetDirectionChangeTo(tileFrom.PathDirection);
direction = tileFrom.PathDirection;
directionAngleFrom = directionAngleTo;
}Other actions depend on a change of direction. Let's add a method for each option. In case we move forward, then the angle
Tocoincides with the direction of the path of the current cell. In addition, we need to set the rotation so that the enemy is looking straight ahead. void PrepareForward () {
transform.localRotation = direction.GetRotation();
directionAngleTo = direction.GetAngle();
}In the case of a turn, we do not turn instantly. We need to interpolate to a different angle: 90 ° more to turn right, 90 ° less to turn left, and 180 ° more to turn back. To avoid turning in the wrong direction due to a change in angle values from 359 ° to 0 °, the angle
Toshould be indicated relative to the current direction. We don’t need to worry that the angle will become less than 0 ° or more than 360 °, because we Quaternion.Eulercan handle it. void PrepareTurnRight () {
directionAngleTo = directionAngleFrom + 90f;
}
void PrepareTurnLeft () {
directionAngleTo = directionAngleFrom - 90f;
}
void PrepareTurnAround () {
directionAngleTo = directionAngleFrom + 180f;
}In the end,
PrepareNextStatewe can use switchto change directions to decide which of the four methods to call. void PrepareNextState () {
…
switch (directionChange) {
case DirectionChange.None: PrepareForward(); break;
case DirectionChange.TurnRight: PrepareTurnRight(); break;
case DirectionChange.TurnLeft: PrepareTurnLeft(); break;
default: PrepareTurnAround(); break;
}
}Now in the end
GameUpdatewe need to check if the direction has changed. If so, then interpolate between the two corners and set the rotation. public bool GameUpdate () {
…
transform.localPosition =
Vector3.LerpUnclamped(positionFrom, positionTo, progress);
if (directionChange != DirectionChange.None) {
float angle = Mathf.LerpUnclamped(
directionAngleFrom, directionAngleTo, progress
);
transform.localRotation = Quaternion.Euler(0f, angle, 0f);
}
return true;
}Enemies are turning.
Curve movement
We can improve movement by making enemies move along a curve when turning. Instead of walking from edge to edge of tiles, let them walk a quarter of a circle. The center of this circle lies in a corner common to tiles
Fromand Toon the same edge along which the enemy entered the tile From.A quarter circle rotation to turn right.
We can realize this by moving the enemy in an arc using trigonometry, while at the same time turning it. But this can be simplified by using only rotation, temporarily moving the local origin of the enemy’s coordinates to the center of the circle. To do this, we need to change the position of the enemy model, so we will give a
Enemylink to this model, accessible through the configuration field. [SerializeField]
Transform model = default;Enemy with reference to the model.
In preparation for moving forward or turning backward, the model should move to the standard position, to the local origin of the enemy’s coordinates. Otherwise, the model must be shifted by half the unit of measurement - the radius of the circle of rotation, far from the turning point.
	void PrepareForward () {
		transform.localRotation = direction.GetRotation();
		directionAngleTo = direction.GetAngle();
		model.localPosition = Vector3.zero;
	}
	void PrepareTurnRight () {
		directionAngleTo = directionAngleFrom + 90f;
		model.localPosition = new Vector3(-0.5f, 0f);
	}
	void PrepareTurnLeft () {
		directionAngleTo = directionAngleFrom - 90f;
		model.localPosition = new Vector3(0.5f, 0f);
	}
	void PrepareTurnAround () {
		directionAngleTo = directionAngleFrom + 180f;
		model.localPosition = Vector3.zero;
	}
Now the enemy himself needs to be moved to the turning point. To do this, it must also be moved half the unit of measure, but the exact offset depends on the direction. Let's add
Directionan auxiliary extension method to this GetHalfVector. static Vector3[] halfVectors = {
Vector3.forward * 0.5f,
Vector3.right * 0.5f,
Vector3.back * 0.5f,
Vector3.left * 0.5f
};
…
public static Vector3 GetHalfVector (this Direction direction) {
return halfVectors[(int)direction];
}Add the corresponding vector when turning right or left.
	void PrepareTurnRight () {
		directionAngleTo = directionAngleFrom + 90f;
		model.localPosition = new Vector3(-0.5f, 0f);
		transform.localPosition = positionFrom + direction.GetHalfVector();
	}
	void PrepareTurnLeft () {
		directionAngleTo = directionAngleFrom - 90f;
		model.localPosition = new Vector3(0.5f, 0f);
		transform.localPosition = positionFrom + direction.GetHalfVector();
	}
And when turning back, the position should be the usual starting point.
	void PrepareTurnAround () {
		directionAngleTo = directionAngleFrom + 180f;
		model.localPosition = Vector3.zero;
		transform.localPosition = positionFrom;
	}
In addition, when calculating the exit point, we can use
GameTile.GrowPathTohalf the vector so that we do not need access to the two positions of the tiles. neighbor.ExitPoint =
neighbor.transform.localPosition + direction.GetHalfVector();Now, when changing directions, we do not have to interpolate the position in
Enemy.GameUpdate, because the rotation is engaged in the movement. public bool GameUpdate () {
…
if (directionChange == DirectionChange.None) {
transform.localPosition =
Vector3.LerpUnclamped(positionFrom, positionTo, progress);
}
//if (directionChange != DirectionChange.None) {
else {
float angle = Mathf.LerpUnclamped(
directionAngleFrom, directionAngleTo, progress
);
transform.localRotation = Quaternion.Euler(0f, angle, 0f);
}
return true;
}Enemies smoothly bend around corners.
Constant speed
Up to this point, the speed of enemies has always been equal to one tile per second, regardless of how they move inside the tile. But the distance they cover depends on their condition, so their speed, expressed in units per second, varies. For this speed to be constant, we need to change the speed of progress depending on the state. Therefore, add the progress multiplier field and use it to scale the delta in
GameUpdate. float progress, progressFactor;
…
public bool GameUpdate () {
progress += Time.deltaTime * progressFactor;
…
}But if progress changes depending on the state, the remaining progress value cannot be used directly for the next state. Therefore, before preparing for a new state, we need to normalize progress and apply the new multiplier already in a new state.
	public bool GameUpdate () {
		progress += Time.deltaTime * progressFactor;
		while (progress >= 1f) {
			…
			//progress -= 1f;
			progress = (progress - 1f) / progressFactor;
			PrepareNextState();
			progress *= progressFactor;
		}
		…
	}
Moving forward does not require changes, therefore, it uses a factor of 1. When turning right or left, the enemy passes a quarter of a circle with a radius of ½, so the distance covered is ¼π.
progressequal to one divided by this value. Turning back should not take too much time, so double the progress so that it takes half a second. Finally, the introductory movement covers only half of the tile, so to maintain a constant speed, its progress also needs to be doubled. void PrepareForward () {
…
progressFactor = 1f;
}
void PrepareTurnRight () {
…
progressFactor = 1f / (Mathf.PI * 0.25f);
}
void PrepareTurnLeft () {
…
progressFactor = 1f / (Mathf.PI * 0.25f);
}
void PrepareTurnAround () {
…
progressFactor = 2f;
}
void PrepareIntro () {
…
progressFactor = 2f;
}Why is the distance equal to 1/4 * pi?
The circumference is 2π times the radius. Turning to the right or left covers only a quarter of this length, and the radius is ½, so the distance is ½π × ½.
Final state
Since we have an introductory state, let's add a final one. Enemies are currently disappearing immediately after reaching the endpoint, but let's postpone their disappearance until they reach the center of the end tile. Let's create a method for this
PrepareOutro, set the forward movement, but only to the center of the tile with doubled progress to maintain a constant speed. void PrepareOutro () {
positionTo = tileFrom.transform.localPosition;
directionChange = DirectionChange.None;
directionAngleTo = direction.GetAngle();
model.localPosition = Vector3.zero;
transform.localRotation = direction.GetRotation();
progressFactor = 2f;
}In order
GameUpdatenot to destroy the enemy too early, we will remove the tile shift from it. He’ll do it now PrepareNextState. Thus, checking for nullreturns trueonly after the end of the final state. public bool GameUpdate () {
progress += Time.deltaTime * progressFactor;
while (progress >= 1f) {
//tileFrom = tileTo;
//tileTo = tileTo.NextTileOnPath;
if (tileTo == null) {
OriginFactory.Reclaim(this);
return false;
}
…
}
…
}In
PrepareNextStatewe will start with the shift of tiles. Then, after setting the position From, but before setting the position, Towe will check whether the tile is equal to the Tovalue null. If so, then prepare the final state and skip the rest of the method. void PrepareNextState () {
tileFrom = tileTo;
tileTo = tileTo.NextTileOnPath;
positionFrom = positionTo;
if (tileTo == null) {
PrepareOutro();
return;
}
positionTo = tileFrom.ExitPoint;
…
}Enemies with a constant speed and final state.
Enemy Variability
We have a stream of enemies, and they are all the same cube, moving at the same speed. The result is more like a long snake than individual enemies. Let's make them more different by randomizing their size, displacement, and speed.
Float Value Range
We will change the parameters of the enemies, randomly choosing their characteristics from the range of values. The structure
FloatRangethat we created in the Object Management, Configuring Shapes article will be useful here , so let's copy it. The only changes were adding a constructor with one parameter and opening access to minimum and maximum using readonly-properties, so that the interval was unchangeable.using UnityEngine;
[System.Serializable]
public struct FloatRange {
[SerializeField]
float min, max;
public float Min => min;
public float Max => max;
public float RandomValueInRange {
get {
return Random.Range(min, max);
}
}
public FloatRange(float value) {
min = max = value;
}
public FloatRange (float min, float max) {
this.min = min;
this.max = max < min ? min : max;
}
}We also copy the attribute set to it in order to limit its interval.
using UnityEngine;
public class FloatRangeSliderAttribute : PropertyAttribute {
	public float Min { get; private set; }
	public float Max { get; private set; }
	public FloatRangeSliderAttribute (float min, float max) {
		Min = min;
		Max = max < min ? min : max;
	}
}
We only need the visualization of the slider, so copy it
FloatRangeSliderDrawerto the Editor folder .using UnityEditor;
using UnityEngine;
[CustomPropertyDrawer(typeof(FloatRangeSliderAttribute))]
public class FloatRangeSliderDrawer : PropertyDrawer {
public override void OnGUI (
Rect position, SerializedProperty property, GUIContent label
) {
int originalIndentLevel = EditorGUI.indentLevel;
EditorGUI.BeginProperty(position, label, property);
position = EditorGUI.PrefixLabel(
position, GUIUtility.GetControlID(FocusType.Passive), label
);
EditorGUI.indentLevel = 0;
SerializedProperty minProperty = property.FindPropertyRelative("min");
SerializedProperty maxProperty = property.FindPropertyRelative("max");
float minValue = minProperty.floatValue;
float maxValue = maxProperty.floatValue;
float fieldWidth = position.width / 4f - 4f;
float sliderWidth = position.width / 2f;
position.width = fieldWidth;
minValue = EditorGUI.FloatField(position, minValue);
position.x += fieldWidth + 4f;
position.width = sliderWidth;
FloatRangeSliderAttribute limit = attribute as FloatRangeSliderAttribute;
EditorGUI.MinMaxSlider(
position, ref minValue, ref maxValue, limit.Min, limit.Max
);
position.x += sliderWidth + 4f;
position.width = fieldWidth;
maxValue = EditorGUI.FloatField(position, maxValue);
if (minValue < limit.Min) {
minValue = limit.Min;
}
if (maxValue < minValue) {
maxValue = minValue;
}
else if (maxValue > limit.Max) {
maxValue = limit.Max;
}
minProperty.floatValue = minValue;
maxProperty.floatValue = maxValue;
EditorGUI.EndProperty();
EditorGUI.indentLevel = originalIndentLevel;
}
}Model scale
We will start by changing the scale of the enemy. Add
EnemyFactorythe scale settings to the option. The scale interval should not be too large, but sufficient to create miniature and gigantic varieties of enemies. Anything within 0.5–2 with a standard value of 1. We will choose a random scale in this interval in Getand pass it to the enemy through a new method Initialize. [SerializeField, FloatRangeSlider(0.5f, 2f)]
FloatRange scale = new FloatRange(1f);
public Enemy Get () {
Enemy instance = CreateGameObjectInstance(prefab);
instance.OriginFactory = this;
instance.Initialize(scale.RandomValueInRange);
return instance;
}The method
Enemy.Initializesimply sets the scale of its model that is the same across all dimensions. public void Initialize (float scale) {
model.localScale = new Vector3(scale, scale, scale);
}The range of scales is from 0.5 to 1.5.
Path offset
To further destroy the uniformity of the flow of enemies, we can change their relative position inside the tiles. They move forward, so the shift in this direction only changes the timing of their movement, which is not very noticeable. Therefore, we will shift them to the side, away from the ideal path passing through the centers of the tiles. Add a
EnemyFactorypath offset to the interval and pass the random offset to the method Initialize. The offset can be negative or positive, but never more than ½, because this would move the enemy to a neighboring tile. In addition, we do not want enemies to go beyond the tiles that they follow, so in fact the interval will be less, for example, 0.4, but the true limits depend on the size of the enemy. [SerializeField, FloatRangeSlider(-0.4f, 0.4f)]
FloatRange pathOffset = new FloatRange(0f);
public Enemy Get () {
Enemy instance = CreateGameObjectInstance(prefab);
instance.OriginFactory = this;
instance.Initialize(
scale.RandomValueInRange, pathOffset.RandomValueInRange
);
return instance;
}Since the displacement of the path affects the path traveled,
Enemyit is necessary to track it. float pathOffset;
…
public void Initialize (float scale, float pathOffset) {
model.localScale = new Vector3(scale, scale, scale);
this.pathOffset = pathOffset;
}When moving exactly straight (during the introductory, final, or normal forward movement), we simply apply the offset directly to the model. The same thing happens when you turn back. With a right or left turn, we already displace the model, which becomes relative to the displacement of the path.
	void PrepareForward () {
		transform.localRotation = direction.GetRotation();
		directionAngleTo = direction.GetAngle();
		model.localPosition = new Vector3(pathOffset, 0f);
		progressFactor = 1f;
	}
	void PrepareTurnRight () {
		directionAngleTo = directionAngleFrom + 90f;
		model.localPosition = new Vector3(pathOffset - 0.5f, 0f);
		transform.localPosition = positionFrom + direction.GetHalfVector();
		progressFactor = 1f / (Mathf.PI * 0.25f);
	}
	void PrepareTurnLeft () {
		directionAngleTo = directionAngleFrom - 90f;
		model.localPosition = new Vector3(pathOffset + 0.5f, 0f);
		transform.localPosition = positionFrom + direction.GetHalfVector();
		progressFactor = 1f / (Mathf.PI * 0.25f);
	}
	void PrepareTurnAround () {
		directionAngleTo = directionAngleFrom + 180f;
		model.localPosition = new Vector3(pathOffset, 0f);
		transform.localPosition = positionFrom;
		progressFactor = 2f;
	}
	void PrepareIntro () {
		…
		model.localPosition = new Vector3(pathOffset, 0f);
		transform.localRotation = direction.GetRotation();
		progressFactor = 2f;
	}
	void PrepareOutro () {
		…
		model.localPosition = new Vector3(pathOffset, 0f);
		transform.localRotation = direction.GetRotation();
		progressFactor = 2f;
	}
Since the displacement of the path during rotation changes the radius, we need to change the process of calculating the progress multiplier. The path offset must be subtracted from ½ to get the radius of rotation to the right, and added in the case of turning to the left.
	void PrepareTurnRight () {
		…
		progressFactor = 1f / (Mathf.PI * 0.5f * (0.5f - pathOffset));
	}
	void PrepareTurnLeft () {
		…
		progressFactor = 1f / (Mathf.PI * 0.5f * (0.5f + pathOffset));
	}
We also get the turning radius when turning 180 °. In this case, we cover half the circle with a radius equal to the offset of the path, so the distance is π times the offset. However, this does not work when the displacement is zero, and at small displacements, the turns are too fast. To avoid instant turns, we can force the minimum radius to calculate the speed, say 0.2.
	void PrepareTurnAround () {
		directionAngleTo = directionAngleFrom + (pathOffset < 0f ? 180f : -180f);
		model.localPosition = new Vector3(pathOffset, 0f);
		transform.localPosition = positionFrom;
		progressFactor =
			1f / (Mathf.PI * Mathf.Max(Mathf.Abs(pathOffset), 0.2f));
	}
The path offset is in the range −0.25–0.25.
Note that now enemies never change their relative path displacement, even when turning. Therefore, the total length of the path for each enemy has its own.
To prevent enemies from reaching neighboring tiles, one must also take into account their maximum possible scale. I just limited the size to a maximum value of 1, so the maximum allowable offset for the cube is 0.25. If the maximum size were 1.5, then the maximum displacement should be reduced to 0.125.
Speed
The last thing we randomize is the speed of the enemies. We add one more interval for it in
EnemyFactoryand we will transfer value to the created copy of the enemy. Let's make it the second argument to the method Initialize. Enemies should not be too slow or fast so that the game does not become trivially simple or impossible difficult. Let's limit the interval to 0.2–5. Speed is expressed in units per second, which corresponds to tiles per second only when moving forward. [SerializeField, FloatRangeSlider(0.2f, 5f)]
FloatRange speed = new FloatRange(1f);
[SerializeField, FloatRangeSlider(-0.4f, 0.4f)]
FloatRange pathOffset = new FloatRange(0f);
public Enemy Get () {
Enemy instance = CreateGameObjectInstance(prefab);
instance.OriginFactory = this;
instance.Initialize(
scale.RandomValueInRange,
speed.RandomValueInRange,
pathOffset.RandomValueInRange
);
return instance;
}Now I
Enemyhave to track and speed. float speed;
…
public void Initialize (float scale, float speed, float pathOffset) {
model.localScale = new Vector3(scale, scale, scale);
this.speed = speed;
this.pathOffset = pathOffset;
}When we did not set the speed explicitly, we simply always used the value 1. Now we just need to create the dependence of the progress multiplier on the speed.
	void PrepareForward () {
		…
		progressFactor = speed;
	}
	void PrepareTurnRight () {
		…
		progressFactor = speed / (Mathf.PI * 0.5f * (0.5f - pathOffset));
	}
	void PrepareTurnLeft () {
		…
		progressFactor = speed / (Mathf.PI * 0.5f * (0.5f + pathOffset));
	}
	void PrepareTurnAround () {
		…
		progressFactor =
			speed / (Mathf.PI * Mathf.Max(Mathf.Abs(pathOffset), 0.2f));
	}
	void PrepareIntro () {
		…
		progressFactor = 2f * speed;
	}
	void PrepareOutro () {
		…
		progressFactor = 2f * speed;
	}
Speed in the range 0.75–1.25.
So, we got a beautiful stream of enemies moving to the end point. In the next tutorial we will learn how to deal with them. Want to know when it will be released? Follow my page on Patreon !
repository
PDF article