In the wake of RTM. Forensic investigation of a computer infected with a banking trojan

Quite a lot has been written about the attacks of the RTM banking trojan against accountants and financial directors, including Group-IB experts , but so far there has not been a single case study of devices infected with RTM in the public field. To correct this injustice, Oleg Skulkin , one of the Group-IB leading experts in computer forensics, spoke in detail about how to conduct a forensic investigation of a computer infected with a banking trojan as part of an incident response / investigation.
How it all started
Researchers learned about the activities of the RTM criminal group in December 2015. Since then, phishing mailings distributing this trojan have been sent to potential victims' electronic mailboxes with enviable constancy.
As you already know, from September to December, the RTM group sent out more than 11,000 malicious emails. Cybercriminals are not going to stop at what has been achieved, as evidenced by all the new mailings that we record both on sensors protecting our clients and in the framework of collecting data on current threats.
In this article I will tell you how to conduct a forensic investigation, or simply forensics, of the image of a computer drive infected with a banking Trojan RTM.
Necessary Introductory
Imagine that we do not know about the infection of the RTM computer, but only the fact of compromise, the result of which was the theft of money - this will allow us to build the research process more interestingly, and also make it applicable to other cases. I also want to draw attention to the fact that in the framework of this article I will not dwell on the reverse engineering of the trojan: firstly, this is not the competence of the forensic scientist, and secondly, my colleague, Semyon Rogachev, already wrote about this in detail on Habré .
So, all that we have is the image of the computer’s drive in the “E01” format (Encase Image File Format). To begin with, it would be nice to find out what's inside. At a minimum, the operating system, because it is from it and its version, of course, that the presence of certain forensic artifacts that we have to investigate depends.
1. We will use the mmls utility from the pack of the Sleuth Kit of Brian Carrier:
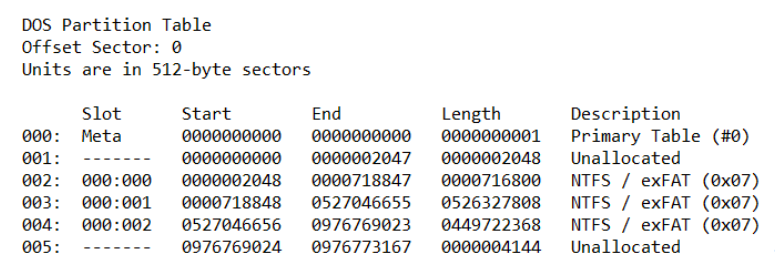
What do we have? Several NTFS partitions similar to Windows. We need to make sure - we will try to find registry files, for example, SOFTWARE.
2. We will use the utilities fls (the Sleuth Kit) and findstr to find out the corresponding record number in the main file table (MFT):

Great, now we can copy the file we need for further analysis using icat (the Sleuth Kit):
icat -o 718848 E: \ RTM.E01 234782> SOFTWARE
So, we have a SOFTWARE registry file, we can extract the most significant information from it, for example, using RegRipper Harlan Carvey. At the moment, we are interested in the contents of the Microsoft \ Windows NT \ CurrentVersion section:

Now we know that the computer under study was running Windows 7 Professional with Service Pack SP1, which means we know which forensic artifacts we may encounter and which ones we may need.
Where to start our searches? Recall the paradox of Jesse Kornblum: "Malware can hide, but it must run." A good start may be the search for potential locking mechanisms in the system that allow malicious programs to restart after a computer reboot.
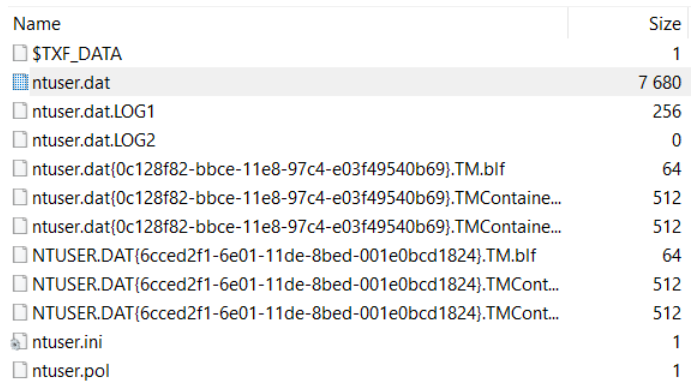
Let's start with a simple one: take the NTUSER.DAT registry file from the user directory (C: \ Users \% username% \) with the most recent modification date and extract the data from it using the same RegRipper. If we want to get the record number of the file we need using fls and findstr again, we need to add the –p option to fls - this will allow the utility to display the full paths to the files. Why is this needed? The fact is that each user has an NTUSER.DAT file in the directory, and SOFTWARE is the only one for the entire system, so in this case it is important to get the record number of a specific file. In general, using the Sleuth Kit is not necessary at all, there are more convenient tools, for example, FTK Imager- a free development tool AccessData, which can be used not only to create forensic copies, but also to study their contents:
Let's start with low-hanging fruits, the so-called “run keys” :

So, what do we have? The section was last modified on November 7, and we see that when the user logs in, the apg.exe file is launched from a non-standard location. Let's see what else can be found in the b7mg81 directory:

TeamViewer? Interesting. Let's take a closer look at apg.exe - we ’ll use PPEE :

It looks like TeamViewer, is signed as TeamViewer, so is it TeamViewer? It seems like that. But it’s not so simple. Let's look at the import table:

So, msi.dll, somewhere we already saw this file, and it’s not C: \ Windows \ System32, but the same b7mg81 directory. Judging by the size, it has nothing to do with the original msi.dll, which means it is available - DLL Search Order Hijacking : the operating system starts searching for the necessary libraries from the current directory, which means that instead of the legitimate msi.dll, the one that is located will be loaded in b7mg81.
Another interesting file is TeamViewer.ini :

And here is the counter-forensics: judging by the configuration file, our TeamViewer did not keep any logs, and, apparently, was used as a RAT. Well, not bad. It's time to find out if it started at all.
There are quite a few artifacts on Windows that indicate executable files are running. Let's continue to work with the registry, this time with the SYSTEM file . In order to extract data from it, you can again use RegRipper.
We are interested in ControlSet001 \ Control \ Session Manager \ AppCompatCache. Here we will find a list of executable files with paths to them, dates of the last modification (according to the attribute $ STANDARD_INFORMATION), as well as a flag indicating whether the file was launched or not:

Great, our file was launched at least once. So, we have some “pivot point”, we know that on November 7 TeamViewer appeared on the computer’s drive, which didn’t keep logs, and most likely was not visible to the user, because instead of the legitimate library it loaded the one that is in one with it catalog.
It's time to start building a timeline. I think that's enough of what can be built using the Sleuth Kit. Let's start with the fls utility we already know:
fls.exe -m “C: /” -o 718848 -r -z GMT D: \ RTM.E01> bodyfile.txt
Now we will use mactime to convert the resulting file to timeline:
mactime.pl -d -b bodyfile.txt> timeline.csv
Timelines are very convenient to analyze in Eric Zimmerman’s Timeline Explorer. Our timeline will include only file system events. If you want it to include changes in the registry, magazines, etc., you can use plaso. Personally, I use it extremely rarely, since data processing takes a very long time, and the result is often quite redundant.
Back to the timeline. The b7mg81 directory was created on November 7, 2018 at 13:59:37:

And two seconds before the file 21DA.tmp is created:

If you look for its checksum, for example, on VirusTotal, we will get pretty interesting results:

Obviously, from this file and our RAT was unpacked. Go ahead:

Even earlier, the LocalDataNT directory is created with some pretty interesting files inside. Take a look, for example, at WinPrintSvc.exe:

Remote Utilities- Another remote control tool. And here is another suspicious file created a few seconds earlier:

Check its checksum:

Several anti-virus products immediately detect it as “ RemoteAdmin ”. Apparently, he is the source of Remote Utilities. Check if the detected RAT was launched. This time we will use the AmCache.hve registry file from C: \ Windows \ AppCompat \ Programs (the same RegRipper

will allow us to get data from it in a digestible form): As you can see in the illustration, AmCache allows us to get not only the date of the first launch, but also file checksum.
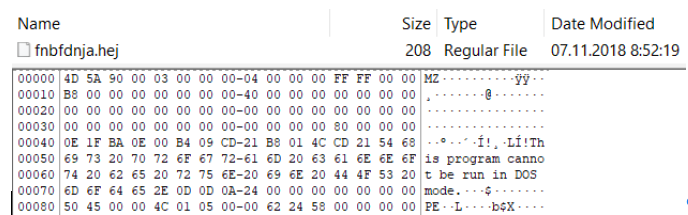
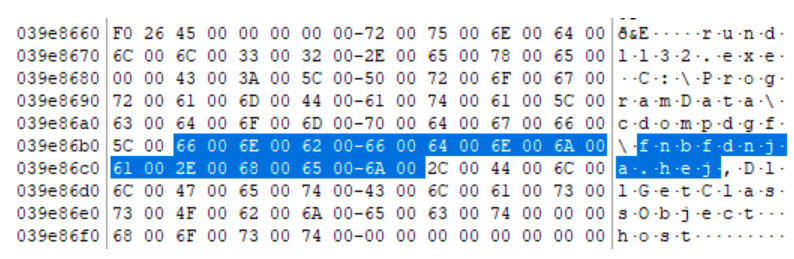
So, we have two RATs, but where did they come from? Good question! If we still scroll through the timeline, we will see traces of creating a rather suspicious directory and file:

Despite the strange extension, fnbfdnja.hej has the usual headline:
What will the search for checksum on VirusTotal show us? And here's what:
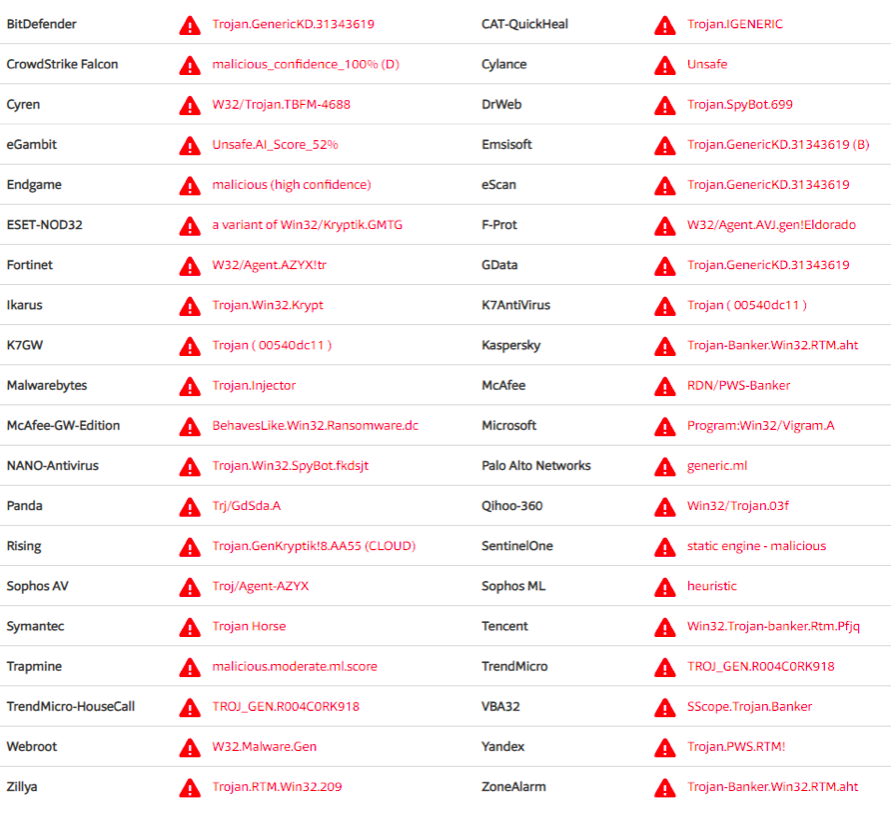
As you can see in the illustration, some anti-virus software detects our file quite definitely - we are dealing with RTM . VT can help us some more. If we look at the “Relations” tab, we will see this:

It seems that we found the hero of the occasion - this is “Documents for October.exe”. Or maybe not, the name associated with our file is different, although the checksum is the same. So, again .exe, which means we again need to look for traces of startup. Personally, I really like working with the registry, so again I will use the help of the already well-known NTUSER.DAT and RegRipper file. This time take a look at UserAssist - from it we get the names and paths to the files, the dates of their last launch, as well as the number of these launches. The file “Documents for October.exe” is not visible, but another file is visible:
C: \ Users \% username% \ Desktop \ Documents environment.exe
Excellent, it looks like this is what we need. True, there is a small problem - there is no file in the right place. Back to the timeline. After creating the fnbfdnja.hej file, this is what happens:
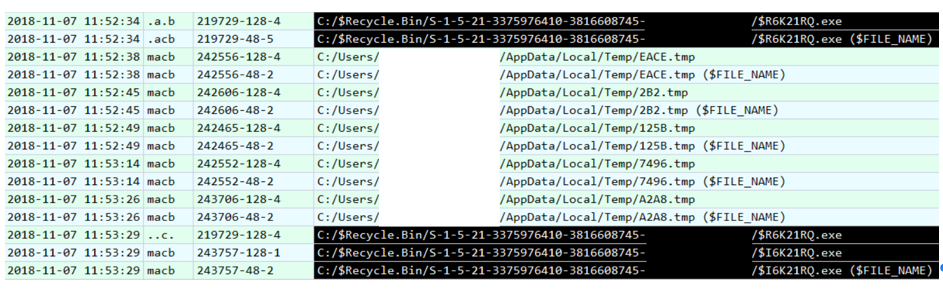
Files in the Temp directory probably belong to RTM, but we are not interested in them. We are interested in the files $ R6K21RQ.exe and $ I6K21RQ.exe. This is what the files placed in the Recycle Bin look like - the first one contains the data itself, the second one contains the metadata. If we look at the contents of $ I6K21RQ.exe, we immediately see the path to the desired file - “Documents environment.exe”.
It's time to take a look at what VT will offer us by its checksum:

We see the detections we already know - “RTM”. As it turned out, the checksum of our file coincided with the checksum “Documents for October.exe”. Moreover, VT knows a few more files with the same checksum:

It would be nice to get some kind of network indicators of compromise. We don’t have a memory dump, network traffic dump too, what should I do? Swap file! But how to find a needle in a haystack? And here VT will also help us a little, this time the Behavior tab :

It looks like C2, right? Let's see if there is anything like this in our swap file (pagefile.sys). Of course, there is:

So, we confirmed that our file interacted with 185.141.61 [.] 246. Let's try to find more network indicators. One of the RATs was TeamViewer, we’ll try to find something similar to its ID. For this, you can, for example, use regular expressions:
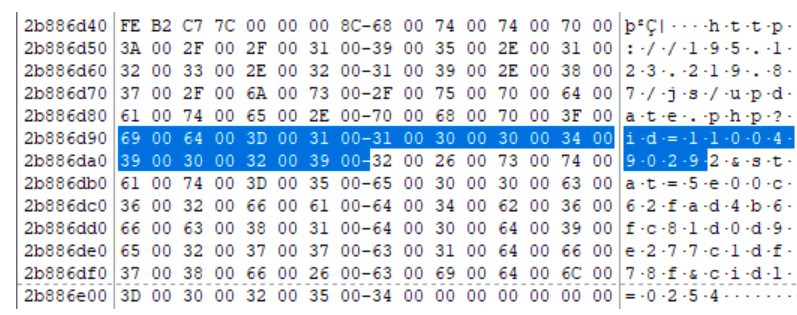
Great, we have another network indicator - 195.123.219 [.] 87. Of course, swap files are not only suitable for finding network indicators. If we return to the Behavior tab on VT, we will see that our file creates tasks in the scheduler. If we look for the line “fnbfdnja.hej”, we find this:
The created task launches fnbfdnja.hej using rundll32.exe.
Well, it's time to round off. It's time to determine where the file "Documents environment.exe" came from. We already know that this is RTM, and since it is RTM, the most likely vector of infection is a phishing email. In this case, the victim used Microsoft Outlook, so we found the .ost file with mail in the usual place, and in it the same phishing email:

However, I do not want to finish our post on this, but on another interesting artifact. If we go back to the NTUSER.DAT file and look at the value of the “Shell” parameter in the Software \ Microsoft \ Windows NT \ CurrentVersion \ Winlogon section, then instead of the usual “explorer.exe” we will see this:

And this means that after the user logs in instead of starting “ Explorer ”will complete the system, and with it the completion of this article.