Weekend Design: Simple MIDI Adapter
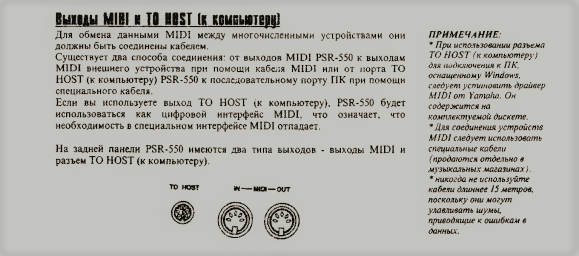
I once bought a Yamaha PSR-550 synthesizer for my children. The tool was not the first youth, but serviceable. The children showed enthusiasm and quickly got used to the synthesizer: they figured out the controls, learned to "write cans", etc. The presence of “MIDI IN” and “MIDI OUT” connectors on the back of the synthesizer did not bother me.
Formulation of the problem
In the last century the most simple by connecting a computer and synthesizer via MIDI was to use the game port . To match the signals of the interfaces (the “current loop” in MIDI and TTL on the connector of the game port), a simple adapter was made, a diagram of which is given in the MIDI Wikipedia article :

At present, game ports from sound and motherboards have disappeared as a class. Game port drivers for modern OSs cannot be found.
The “physics” of the interface was understandable in principle from a Wikipedia article: data is exchanged using the start-stop protocol at a speed of 31,250 bps with 8-bit data packets without parity with one stop bit. Logical zero in the signal circuits corresponds to a current flow of 5 mA, to a logical unit there is no current in the circuit.
In principle, the game port can be replaced with USB UART and attach the adapter described in the Wikipedia article to it.
The first problem with this solution is to force the OS to define the UART COM port as a MIDI port. Unexpectedly for me, a solution to the problem was found on the Arduino forums. There I found a link to a free MIDI port emulator "on top" of a virtual COM port. To connect the emulated port with a MIDI editor, the developer recommended using a virtual loopMIDI cord.
The second problem: getting UART to run at 31,250 bps.
All these data have been enough for the formulation of technical proposals :
"To communicate the computer with a synthesizer via MIDI are encouraged to use USB UART in conjunction with the adapter to match the TTL signals with signals of" current loop 0 ... 5 mA "software loopMIDI, Hairless MIDI <- > Serial Bridge and UART drivers that enable it to run at 31,250 bps. ”
Hardware
The choice of a hardware solution was extremely simple - in the bins of the author of the article were found:
- USB UART based on CP2102;
- AOT101A optocoupler;
- microcircuit K1533LN2;
- a pair of connectors SSH-5 (other designations: ONC-VG-4-5 / 16-V, DIN 41524);
- several meters of shielded acoustic cable SHGES.
As a result, such an adapter circuit was assembled on cropping a universal breadboard 40x15 in size:
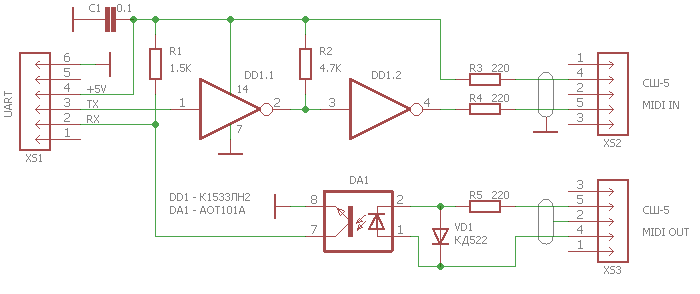
The operability of the assembled circuit was checked as follows:
- The adapter was connected to the MIDI connectors of the synthesizer.
- The synthesizer has been disabled local control (MIDI Local = Off).
- After installing a jumper between the RX and TX signals of the adapter, the synthesizer began to respond to keystrokes.
I hope that the operation of the circuit is clear without explanation. I only note that:
- elements of the K1533LN2 chip have an “open collector” type output that does not work without external load;
- capacitor C1 is connected as close as possible to the power terminals DD1;
- the braid of the cable going to the “MIDI IN” connector of the synthesizer is connected only to the adapter’s common wire;
- the braid of the cable going to the MIDI OUT connector of the synthesizer is connected only to terminal 2 of the connector.
Software
Next, the following software was installed on the computer:
- VCP driver for CP2102 .
- Utility package for configuring CP2102 .
- MIDI port emulator Hairless MIDI <-> Serial Bridge by Angus Gratton.
- MIDI virtual cord loopMIDI by Tobias Erichsen.
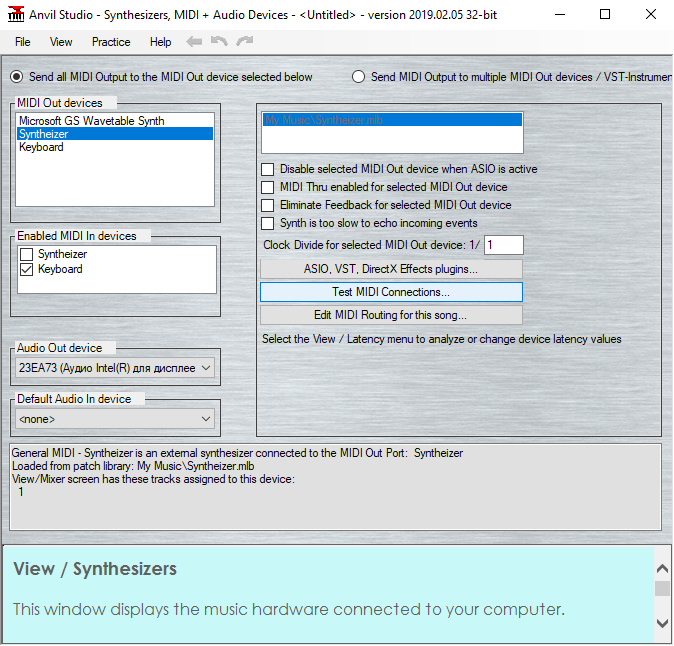
- MIDI Editor Anvil Studio.
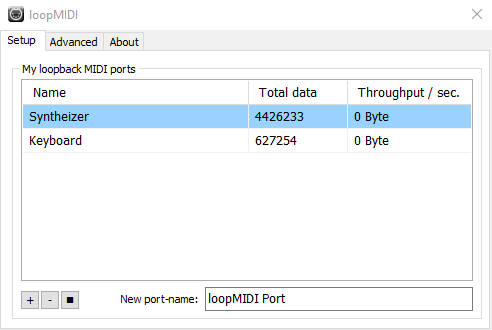
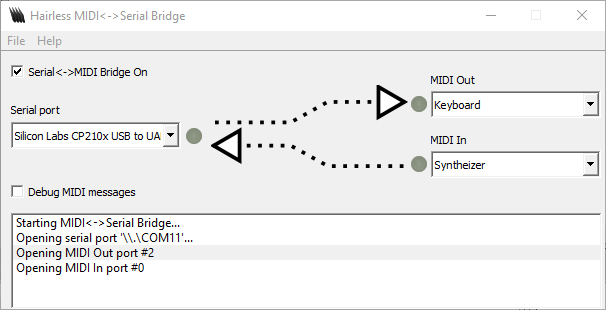
Then two cords were created in loopMIDI - Synthesizer and Keyboard:
To connect the MIDI editor with the MIDI IN synthesizer connector, the Synthesizer cord was connected between the Anvil Studio output and the MIDI port emulator input.
To connect the MIDI editor with the MIDI OUT synthesizer connector, a Keyboard cable was connected between the output of the MIDI port emulator and the Anvil Studio input.
The last and very important step in configuring the software was to set the CP2102 baud rate to 31,250 bps instead of 38,400 bps:

After setting the baud rate, click the “Set Configuration” button. Then, in the Device Manager and in the Hairless MIDI <-> Serial Bridge, in the settings for the communication speed of the UART CP2102 COM port, select 38400.
Brief Summary
As a result, Anvil Studio's MIDI editor received a communication channel with the Yamaha PSR-550 synthesizer. Children enthusiastically began to learn how to work with a MIDI editor. I regained peace of mind.
PS How to set the speed to 31,250 bps instead of 38,400 bps for the PL2303 was discussed here .
PPS As set rate 31250 bit / s instead of 38400 bit / s for CH341 nowhere to be found.