Particle system in Core Animation. Chrismas story
- Transfer

Hello!
Christmas is long gone, but after it we have an interesting story about how to use the infrequently used Core Animation feature to create a festive mood for users. I share the translation of an article by my London colleague Alexis.
Christmas has always been one of my favorite days of the year for me. It brings a lot of love, laughter, happiness and magic to our lives.
I was born and raised in Spain, on Tenerife - a sunny island in the middle of the Atlantic Ocean off the coast of Africa. And, believe me, Christmas in Tenerife is very different from Christmas in London, where I met him the last two years (since I started working at Badoo).
One of the benefits of living in London for me was contemplating snowflakes. Here I saw them for the first time in my life, it was simply unbelievable!
Remembering this, I decided to share with you one interesting story that happened to me in the office shortly before Christmas, before I went to Tenerife to celebrate the holiday with my family.
It just so happened that I was entrusted with one unusual task with the following description:
Hmm, pretty interesting. We wanted to add Christmas animation with snowflakes to our iOS application, and I became the lucky one to create it. But I did not know where to start.
As usual, a Sketch file was attached to the task with the necessary design, which looked something like this:
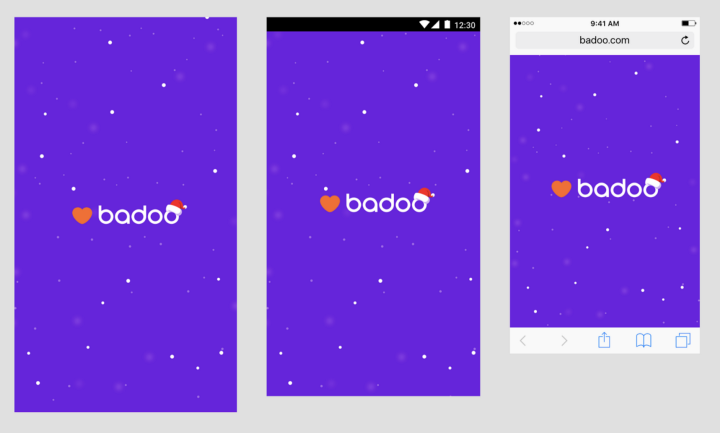
At least I saw what we needed, but I was not completely sure how these snowflakes should behave. To clarify all the details, I went to talk with the designers.
As I suspected, they already had a great animation drawn in After Effects .
The designers explained to me that they wanted to add snowflakes falling from above into the already existing animation of launching the application (as well as the Santa hat on our logo, but it was a simple substitution of the picture, unworthy of mention in this article).
I knew that the animation of launching the application on iOS was made using Lottie , as it was added after I joined the company (details can be found in the article Radek Cieciwa) However, I told the designers that I would try to find simpler solutions for displaying snowflakes (without the need to use Lottie) - and began to explore various approaches.
Here's an animation my colleague Radek made for Badoo. Impeccable!
And so I added falling snowflakes. Want to know how I did it? You will find the answer below.
Particle Systems
While reading various documentation about animations, I remembered that in games and films, particle systems are often used to solve such problems.
" Wikipedia " describes this concept fairly accurately:
“Particle system is a method used in computer graphics for representing objects that do not have clear geometric boundaries (various clouds, nebulae, explosions, jets of steam, trains from missiles, smoke, snow, rain, etc.). Particle systems can be implemented in both two-dimensional and three-dimensional graphics. "
This technique was first used in 1982 in Star Trek 2: The Wrath of Khan, to create a “genesis effect”.
A particle system consists of one or more graphic primitives, such as points, lines, or images, called particles. These particles are created and emitted by an emitter that is part of a particle system.
Each particle has a set of parameters that directly or indirectly affect its behavior and determine how it will be drawn. Particles can move simultaneously in large numbers and in different directions, for example, to create the effect of a liquid.
Animation takes effect when particles are emitted by the system. The system emits particles in random places within the specified area of the particle system. It can take various forms: circle, rectangle, sphere, box, line, point, etc.
The system also determines the properties of particles that affect their geometry, speed and other parameters. Different emitter APIs have different names for similar properties.
When particles are emitted by the system at the same time, they create stunning animations that can look like rain, fire or snow.
From theory to practice
I thought that Apple most likely has built-in particle system support in one of its frameworks. And the results of my searches have shown that I am right.
The particle system is part of the Core Animation framework and is well described in the CAEmitterLayer and CAEmitterCell classes .
After studying all the necessary information about the particle system and the supported APIs on iOS, I proceeded to my favorite part - implementing our idea.
Unfortunately, Christmas is not forever, so we needed the ability to turn off snowflakes remotely after December 25th.
As I mentioned above, the application launch animation was implemented using Lottie. That is, I needed to find a way to add snowflakes in such a way that it did not affect the existing animation and its code, because my solution had to be deleted immediately after the release.
I found a very simple way to do this - I added a new transparent UIView to show snowflakes in front of the existing animation and background and then controlled its appearance remotely using a flag.
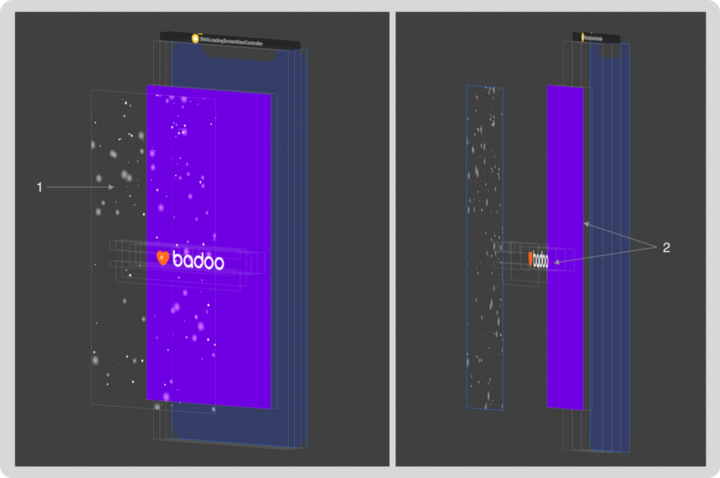
The image above shows the UIView that were used in the final solution:
- UIView with a particle system that emitted snowflakes.
- UIViews used in Lottie-driven application launch animations.
After this problem was solved, I had to create a component containing the logic of particle emission to generate animated snowflakes.
For starters, I needed images of snowflakes that I could use as content for the emitter. They should be pretty simple, right?
Each snowflake was either an ordinary or a blurred white circle. I created them myself in Sketch.
Some implementation details
CAEmitterLayer is a special CALayer that creates, animates, and renders a particle system. It allows you to control your geometry, position, drawing mode and much more.
I started developing animation by creating a layer:
snowEmitterLayer.emitterShape = CAEmitterLayerEmitterShape.line
snowEmitterLayer.beginTime = CACurrentMediaTime()
snowEmitterLayer.timeOffset = 10.0
I needed to change only three properties:
- emitterShape : defines the shape of the layer. I used a line that allowed snowflakes to appear along the entire screen;
- beginTime : is part of the CAMediaTiming protocol and represents the start time of the layer animation relative to the parent layer animations;
- timeOffset : is also part of the CAMediaTiming protocol and, in essence, is a fast-forward animation for a given time relative to its beginning. I specified a value of 10 seconds, which led to the fact that at the time the animation started, the snowflakes already covered the whole screen, and that’s exactly what we wanted (if I had set the value to 0 seconds, then the snowflakes would start to appear on top and covered the screen entirely only after some time).
Having a finished layer, I created two different emitters: heavier for snowflakes and easier for snowflakes.
For heavy snowflakes, I set up the emitter as follows:
let flakeEmitterCell = CAEmitterCell()
flakeEmitterCell.contents = UIImage(named: "snowflake_dot")!.cgImage
flakeEmitterCell.emissionRange = .pi
flakeEmitterCell.lifetime = 20.0
flakeEmitterCell.birthRate = 30
flakeEmitterCell.scale = 0.15
flakeEmitterCell.scaleRange = 0.6
flakeEmitterCell.velocity = 30.0
flakeEmitterCell.velocityRange = 20
flakeEmitterCell.spin = -0.5
flakeEmitterCell.spinRange = 1.0
flakeEmitterCell.yAcceleration = 30.0
flakeEmitterCell.xAcceleration = 5.0
As you can see, I had to change a significant number of properties, each of which is very important to achieve the desired effect:
- contents : CGImage used to display one snowflake (as you recall, this is one of those images that I created myself);
- emissionRange : angle in radians defining the cone inside which particles will appear (I chose the PI angle so that the particles are visible on the entire screen);
- lifetime : determines the lifetime of one particle;
- birthRate : determines the number of particles emitted every second;
- scale and scaleRange : affects the particle size, where a value of 1.0 is the maximum size; the interval determines the deviations in size between the created particles, which allows particles of random sizes to be emitted;
- velocity and velocityRange : affects the speed of appearance of particles; deviates randomly within the value specified in velocityRange;
- spin and spinRange : affect the speed of rotation, measured in radians per second, and random deviation within the value specified in spinRange;
- yAcceleration and xAcceleration : these are two components of the acceleration vector applied to the emitter.
I also needed a second emitter to create light snowflakes. All properties remained unchanged, with the exception of two:
- contents : here I used images with a blurry circle;
- velocity : and here I had to reduce the speed of falling to make snowflakes light.
let blurryFlakeEmitterCell = CAEmitterCell()
blurryFlakeEmitterCell.contents = UIImage(named: "snowflake_blurry_dot")?.cgImage
blurryFlakeEmitterCell.velocity = 40
// Остальные свойства остались без изменений
I could only connect the layer and the emitters, which turned out to be very easy:
snowEmitterLayer.emitterCells = [flakeEmitterCell, blurryFlakeEmitterCell]
self.layer.addSublayer(snowEmitterLayer)
Conclusion
I quickly created a working version with falling snowflakes, which looked very good. It was fairly simple to implement and did not change existing code. I showed it to the designers, and they really liked it.
Particle system animations can be quite impressive and relatively easy to implement if you have the right tools.
More information about particle systems can be found in the following sources: