Immersion in the driver: the general principle of reverse using the example of the NeoQUEST-2019 job

Like all programmers, you love code. You and him are best friends. But sooner or later in life there will come such a moment when there is no code with you. Yes, it's hard to believe, but there will be a huge gap between you: you are outside, and he is deep inside. From hopelessness, you, like everyone else, will have to go to the other side. To the side of reverse engineering.
Using task No. 2 from the online phase of NeoQUEST-2019 as an example, we will analyze the general principle of reverse driver Windows. Of course, the example is quite simplified, but the essence of the process does not change from this - the only question is the amount of code that needs to be viewed. Armed with experience and luck, let's get started!
Given
According to legend, we were given two files: a traffic dump and a binary file that generated the same traffic. First, take a look at the dump using Wireshark:

The dump contains a stream of UDP packets, each of which contains 6 bytes of data. This data, at first glance, is some random set of bytes - it is not possible to get anything out of traffic. Therefore, we turn our attention to the binar, which should tell you how to decrypt everything.
Open it in the IDA:

It seems that we are facing some kind of driver. Functions with the WSK prefix refer to Winsock Kernel, the Windows kernel-mode network programming interface. On MSDN, you can see a description of the structures and functions used in WSK.
For convenience, you can load the Windows Driver Kit 8 (kernel mode) - wdk8_km (or any newer) library into the IDA to use the types defined there:

Caution, reverse!
As always, start from the entry point:
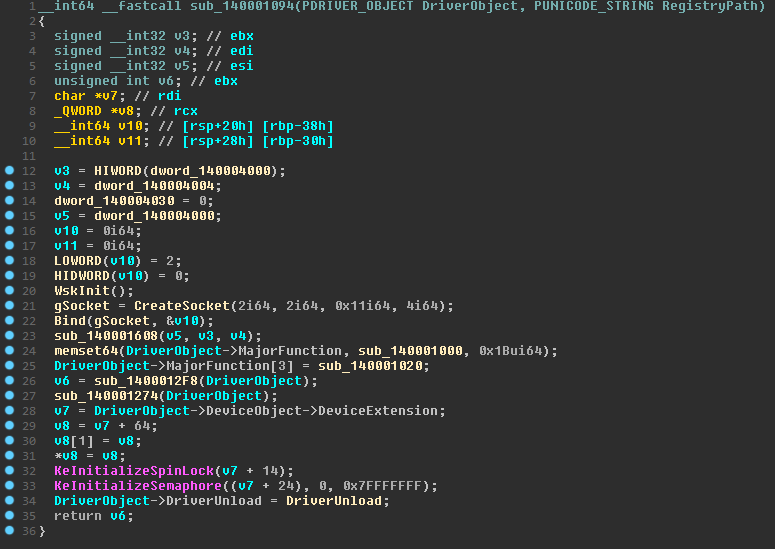
Let's go in order. First, Wsk is initialized, a socket is created and binned - we will not describe these functions in detail, they do not carry any information that is useful to us.
The sub_140001608 function sets 4 global variables. Let's call it InitVars. In one of them, a value is written at the address 0xFFFFF78000000320. Googling this address a little, we can make an assumption that it records the number of ticks of the system timer from the moment the system boots. For now, let's name the variable TickCount.

EntryPoint then sets up functions for processing IRP packets (I / O Request Packets). You can read more about them on MSDN. For all types of requests, a function is defined that simply passes the packet to the next driver in the stack.

But for the type IRP_MJ_READ (3) a separate function is defined; let's call it IrpRead.


In it, in turn, CompletionRoutine is installed.

CompletionRoutine populates the unknown structure with data received from the IRP and puts it on the list. So far, we do not know what is inside the package - we will return to this function later.
We look further in EntryPoint. After defining the IRP handlers, the sub_1400012F8 function is called. Let's look inside and immediately notice that a device (IoCreateDevice) is created in it.

Call the function AddDevice. If the types are correct, then we will see that the device name is "\\ Device \\ KeyboardClass0". So our driver interacts with the keyboard. Googling about IRP_MJ_READ in the context of the keyboard, you can find that the KEYBOARD_INPUT_DATA structure is transmitted in packets. Let's go back to CompletionRoutine and see what kind of data it passes.
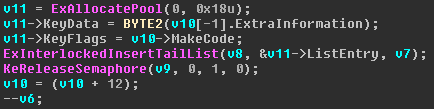
The IDA here does not parse the structure well, but you can understand from offsets and further calls that it consists of ListEntry, KeyData (the scan code of the key is stored here) and KeyFlags.
After AddDevice, the function sub_140001274 is called in EntryPoint. She creates a new stream.

Let's see what happens in ThreadFunc.
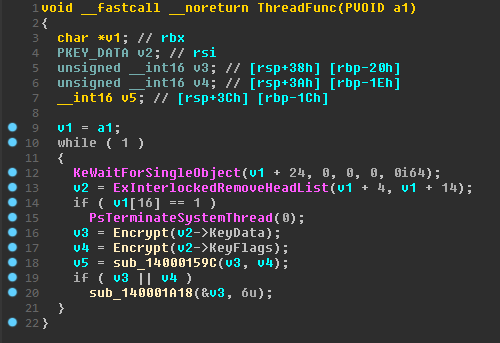
She gets the value from the list and processes them. Immediately pay attention to the function sub_140001A18.

It passes the processed data to the input of the sub_140001A68 function, together with a pointer to WskSocket and the number 0x89E0FEA928230002. Having analyzed the parameter number by bytes (0x89 = 137, 0xE0 = 224, 0xFE = 243, 0xA9 = 169, 0x2328 = 9000), we get exactly the same address and port from the traffic dump: 169.243.224.137:9000. It is logical to assume that this function sends a network packet to the specified address and port - we will not consider it in detail.
Let's see how the data is processed before sending.
For the first two elements, an equivalent is performed with the generated value. Since the number of ticks is used to calculate, it can be assumed that we are faced with the generation of a pseudo-random number.

After generating the number, it overwrites the value of the variable that we previously called TickCount. Variables for the formula are set in InitVars. If we return to the call to this function, we will find out the values for these variables, and as a result we will get the following formula:
(54773 + 7141 * prev_value)% 259200
This is a linear congruent pseudorandom number generator . It is initialized in InitVars using TickCount. For each subsequent number, the previous one acts as the initial value (the generator returns a double-byte value, and the same is used for subsequent generation).

After equivalent with a random number of two values transmitted from the keyboard, a function is called that forms the remaining two bytes of the message. It simply produces xor of two already encrypted parameters and some constant value. This is unlikely to somehow decrypt the data, so the last two bytes of the message for us do not carry any useful information, and they can not be considered. But what to do with encrypted data?
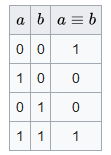
Let's take a closer look at what exactly is encrypted. KeyData is a scan code that can take on a fairly wide range of values; guessing it is not easy. But KeyFlags is a bit field:

If you look at the tablescan codes, you can see that most often the flag will be either 0 (the key is down) or 1 (the key is raised). KEY_E0 will be exposed quite rarely, but it may come across, but the chances of meeting KEY_E1 are very small. Therefore, you can try to do the following: we go through the data from the dump, select a value that is encrypted KeyFlags, make an equivalent with 0, generate two successive PSCs. Firstly, KeyData is a single byte, and we can check the correctness of the generated MSS by high byte. And secondly, the next encrypted KeyFlags, when performing an equivalent with the correct PSC, will take the same bit values. If this turned out to be not so, then we accept that the KeyFlags that we originally looked at were 1, etc.
Let's try to implement our algorithm. We will use python for this:
Algorithm implementation
# соответствие скан-кодов и клавиш
keymap = […]
# данные, полученные из Wireshark
traffic_dump = […]
# эквиваленцияdefbxnor(a, b):return ((~a & 0xffff) | b) & (a | (~b & 0xffff))
# генерация ПСЧdefbrgen(a):return ((7141 * a + 54773) % 259200) & 0xffffdefdecode():# проходим по всему дампуfor i in range(0, len(traffic_dump) - 1):
        # берем зашифрованный KeyFlags
        probe = traffic_dump[i][1]
        # берем зашифрованный скан-код
        scancode = traffic_dump[i+1][0]
        # берем следующий зашифрованный KeyFlags
        tester = traffic_dump[i+1][1]
        fail = True# пробегаем по возможным значениям (не рассматривая KEY_E1)for flag in range(4):
            rnd_flag = bxnor(flag, probe)
            rnd_sc = brgen(rnd_flag)
            next_flag = bxnor(tester, brgen(rnd_sc))
            # проверяем следующий KeyFlagsif next_flag in range(4):
                sc = bxnor(rnd_sc, scancode)
                if sc < len(keymap):
                    sym = keymap[sc]
                    if next_flag % 2 == 0:
                        print(sym, end='')
                fail = Falsebreak# если на каком-то этапе ни один из вариантов KeyFlags не сработалif fail:
            print('Something went wrong on {} pair'.format(i))
            return
    print()
if __name__ == "__main__":
    decode()
Run our script on the data received from the dump:

And in the decrypted traffic we find our most desirable line!
NQ2019DABE17518674F97DBA393415E9727982FC52C202549E6C1740BC0933C694B3DE

Soon there will be articles with analysis of the remaining tasks, do not miss!
PS And we remind you that everyone who has completed at least one task on NeoQUEST-2019 completely is entitled to a prize! Check your mail for a letter, and if it didn’t come to you, write to support@neoquest.ru !