Terraform Provider Selectel
- Tutorial

We launched the official Terraform provider to work with Selectel. This product allows users to fully implement resource management through the Infrastructure-as-code methodology.
Currently, the provider supports the resource management of the Virtual Private Cloud service (hereinafter referred to as VPC). In the future, we plan to add to it the resource management of other services provided by Selectel.
As you already know, the VPC service is based on OpenStack. However, due to the fact that OpenStack does not provide native tools for servicing the public cloud, we have implemented the missing functionality in a set of additional APIs that simplify the management of complex composite objects and make work more convenient. Part of the functionality available in OpenStack is closed from direct use, but is accessible through our API .
The Selectel Terraform provider now provides the ability to manage the following VPC resources:
- projects and their quotas;
- users, their roles and tokens;
- public subnets, including cross-regional and VRRP;
- software licenses.
The provider uses our public Go-library to work with the VPC API. Both the library and the provider itself are open-source, they are being developed on Github:
- Go-selvpcclient library repository ,
- Terraform-provider Selectel provider repository .
To manage other cloud resources, such as virtual machines, disks, Kubernetes clusters, you can use the OpenStack Terraform provider. The official documentation for both providers is available at the following links:
- Selectel Resource Documentation: Terraform-provider Selectel ,
- OpenStack Resource Documentation: Terraform-provider OpenStack .
Beginning of work
To get started, you need to install Terraform (instructions and links to installation packages can be found on the official website ).
To work, the provider requires the Selectel API key, which is created in the control panel for the account .
Manifests for working with Selectel are created using Terraform or using a set of ready-made examples that are available in our Github repository: terraform-examples .
The repository with examples is divided into two directories:
- modules , containing small reusable modules that take a set of parameters as input and manage a small set of resources;
- examples , containing examples of a complete set of interconnected modules.
After installing Terraform, creating a Selectel API key and familiarizing yourself with examples, we move on to practical examples.
Example of creating a server with a local disk
Consider the example of creating a project, a user with a role and a virtual machine with a local disk: terraform-examples / examples / vpc / server_local_root_disk .
The vars.tf file describes all the parameters that will be used when calling the modules. Some of them have default values, for example, the server will be created in the ru-3a zone with the following configuration:
variable "server_vcpus" {
default = 4
}
variable "server_ram_mb" {
default = 8192
}
variable "server_root_disk_gb" {
default = 8
}
variable "server_image_name" {
default = "Ubuntu 18.04 LTS 64-bit"
}
In the main.tf file , the Selectel provider is initialized:
provider "selectel" {
token    = "${var.sel_token}"
}
This file also contains the default value for the SSH key that will be installed on the server:
module "server_local_root_disk" {
...
server_ssh_key      = "${file("~/.ssh/id_rsa.pub")}"
}
If necessary, you can specify a different public key. The key does not have to be specified as a path to the file; you can also add a value as a string.
Further in this file the project_with_user and server_local_root_disk modules are launched , which manage the necessary resources.
We will analyze these modules in more detail.
Creating a project and user with a role
The first module creates a project and a user with a role in this project: terraform-examples / modules / vpc / project_with_user .
The created user will be able to log in to OpenStack and manage its resources. The module is simple and manages only three entities:
- selectel_vpc_project_v2,
- selectel_vpc_user_v2,
- selectel_vpc_role_v2.
Creating a virtual server with a local disk
The second module manages the OpenStack objects that are needed to create a server with a local disk.
You should pay attention to some of the arguments that are specified in this module for the openstack_compute_instance_v2 resource :
resource "openstack_compute_instance_v2" "instance_1" {
  ...
  lifecycle {
    ignore_changes = ["image_id"]
  }
  vendor_options {
    ignore_resize_confirmation = true
  }
}
The ignore_changes argument allows you to ignore the id attribute change for the image used to create the virtual machine. In the VPC service, most public images are updated automatically once a week, and their id also changes. This is due to the features of the OpenStack - Glance component, in which images are considered immutable entities.
If an existing server or disk is created or modified that uses the id of the public image as the image_id argument , then after this image is updated, restarting the Terraform manifest will recreate the server or disk. Using ignore_changes Argumentavoids such a situation.
Note: the ignore_changes argument appeared in Terraform a long time ago: pull # 2525 .
The ignore_resize_confirmation argument is needed to successfully resize the local disk, cores, or server memory. Such changes are made through the OpenStack Nova component using the resize request . By default, Nova after a resize request puts the server into verify_resize status and waits for additional confirmation from the user. However, this behavior can be changed so that Nova does not wait for additional actions from the user.
The specified argument allows Terraform not to wait for verify_resize statusfor the server and be prepared for the server to be in active status after changing its settings. The argument is available from version 1.10.0 of the OpenStack Terraform provider: pull # 422 .
Resource creation
Before launching manifests, it should be noted that in our example two different providers are launched, and the OpenStack provider depends on the resources of the Selectel provider, since it is impossible to manage the objects belonging to it without creating a user in the project. Unfortunately, for the same reason, we cannot just run the terraform apply command inside our example. We will need to first apply for the project_with_user module and after that for everything else.
Note: this problem has not yet been resolved in Terraform, you can follow its discussion on Github in issue # 2430 and issue # 4149 .
To create resources, go to the directoryterraform-examples / examples / vpc / server_local_root_disk , its contents should be like this:
$ ls
README.md	   main.tf		vars.tf
We initialize the modules using the command:
$ terraform init
The output shows that Terraform downloads the latest versions of the providers used and checks all the modules described in the example.
First, apply the project_with_user module . In this case, you need to manually transfer the values for variables that have not been set:
- sel_account with your Selectel account number;
- sel_token with your key for the Selectel API;
- user_password with password for the OpenStack user.
The values for the first two variables must be taken from the control panel .
For the last variable, you can think of any password.
To use the module, it is necessary to replace the values SEL_ACCOUNT , SEL_TOKEN and USER_PASSWORD by running the command:
$ env \
TF_VAR_sel_account=SEL_ACCOUNT \
TF_VAR_sel_token=SEL_TOKEN \
TF_VAR_user_password=USER_PASSWORD \
terraform apply -target=module.project_with_user
After running the Terraform command, it will show what resources it wants to create and will require confirmation:
Plan: 3 to add, 0 to change, 0 to destroy.
Do you want to perform these actions?
Terraform will perform the actions described above.
Only 'yes' will be accepted to approve.
Enter a value: yes
Once the project, user and role are created, you can start creating the remaining resources:
$ env \
TF_VAR_sel_account=SEL_ACCOUNT \
TF_VAR_sel_token=SEL_TOKEN \
TF_VAR_user_password=USER_PASSWORD \
terraform apply
When creating resources, pay attention to the Terraform output with an external IP address at which the created server will be accessible:
module.server_local_root_disk.openstack_networking_floatingip_associate_v2.association_1: Creating...
  floating_ip: "" => "x.x.x.x"
You can work with the created virtual machine via SSH on the specified IP.
Resource editing
In addition to creating resources through Terraform, they can also be modified.
For example, increase the number of cores and memory for our server by changing the values for the server_vcpus and server_ram_mb parameters in the examples / vpc / server_local_root_disk / main.tf file :
-  server_vcpus        = "${var.server_vcpus}"
-  server_ram_mb       = "${var.server_ram_mb}"
+  server_vcpus        = 8
+  server_ram_mb       = 10240
After that, we check what changes this will lead to using the following command:
$ env \
TF_VAR_sel_account=SEL_ACCOUNT \
TF_VAR_sel_token=SEL_TOKEN \
TF_VAR_user_password=USER_PASSWORD \
terraform plan
As a result, Terraform made changes to the resources openstack_compute_instance_v2 and openstack_compute_flavor_v2 .
Please note that this will result in a reboot of the created virtual machine.
To apply the new virtual machine configuration, use the terraform apply command , which we already ran earlier.
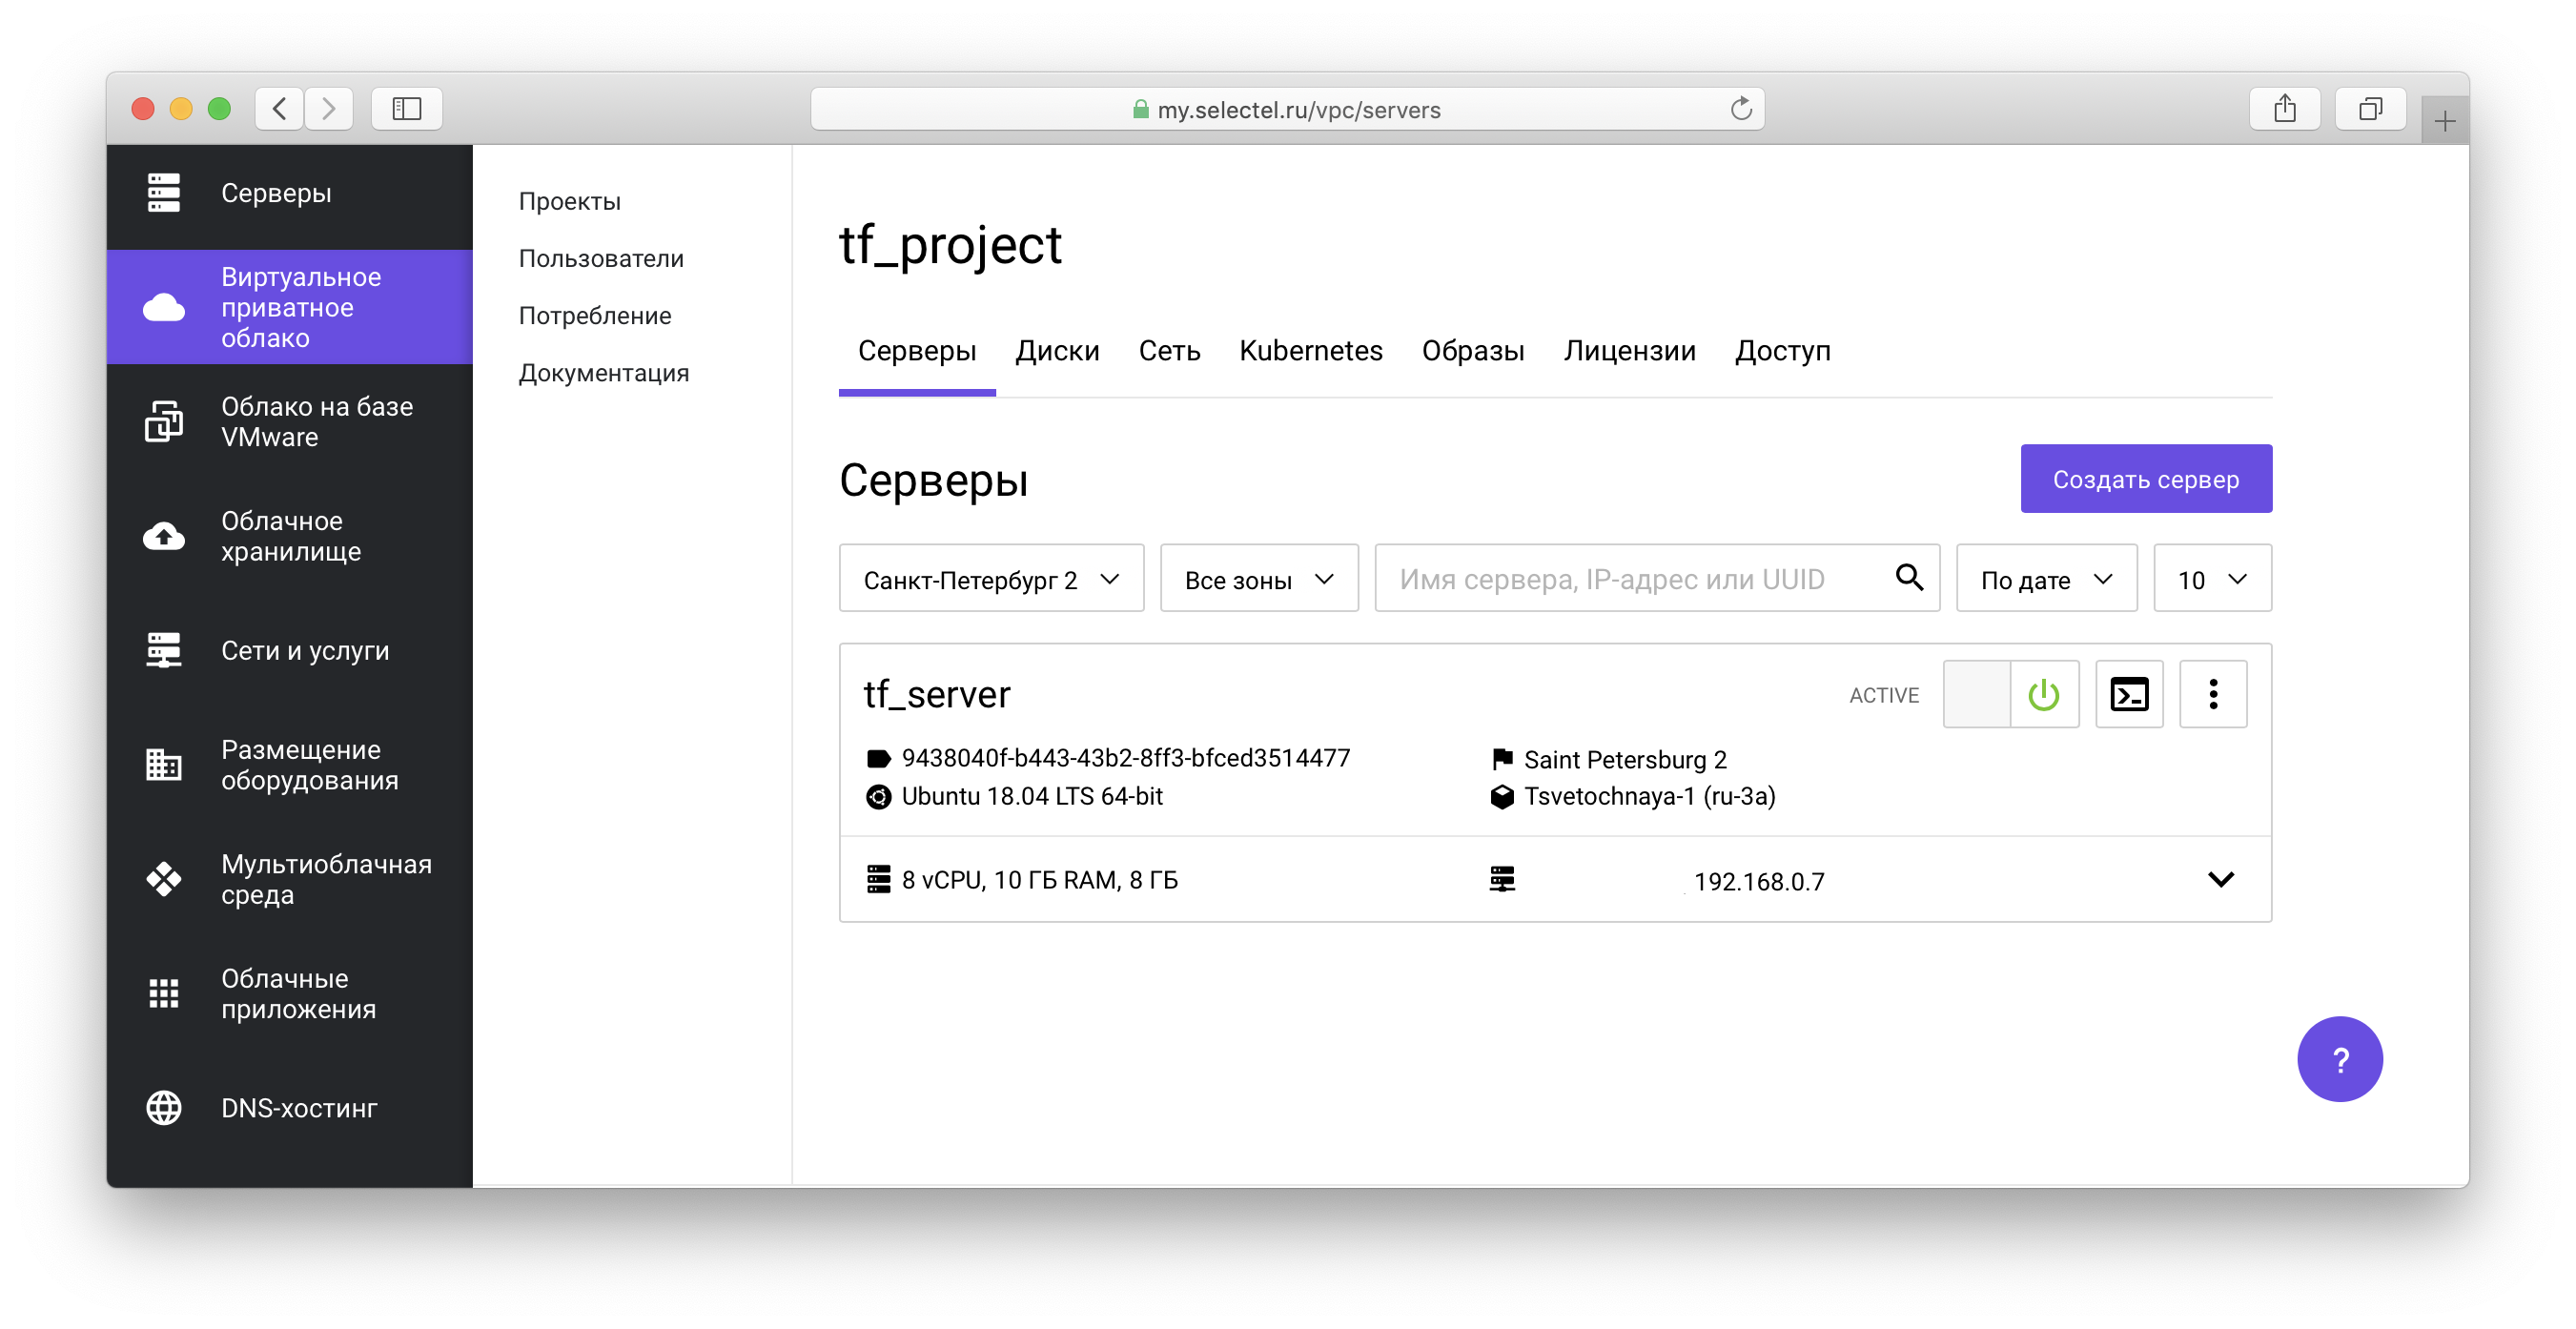
All created objects will be displayed in the VPC control panel :
In our example repository, you can also familiarize yourself with manifests for creating virtual machines with network drives.
Kubernetes Cluster Example
Before proceeding to the next example, we will clear the previously created resources. To do this, in the project root terraform-examples / examples / vpc / server_local_root_disk, run the command to delete OpenStack objects:
$ env \
TF_VAR_sel_account=SEL_ACCOUNT \
TF_VAR_sel_token=SEL_TOKEN \
TF_VAR_user_password=USER_PASSWORD \
terraform destroy -target=module.server_local_root_disk
Next, run the Selectel VPC API Object Cleanup command:
$ env \
TF_VAR_sel_account=SEL_ACCOUNT \
TF_VAR_sel_token=SEL_TOKEN \
TF_VAR_user_password=USER_PASSWORD \
terraform destroy -target=module.project_with_user
In both cases, you will need to confirm the deletion of all objects:
Do you really want to destroy all resources?
Terraform will destroy all your managed infrastructure, as shown above.
There is no undo. Only 'yes' will be accepted to confirm.
Enter a value: yes
The following example is in the terraform-examples / examples / vpc / kubernetes_cluster directory .
This example creates a project, a user with a role in the project, and raises one Kubernetes cluster. In the vars.tf file, you can see the default values, such as the number of nodes, their characteristics, version of Kubernetes, and more.
To create resources, similarly to the first example, the first thing we’ll do is initialize the modules and create the project_with_user module resources , and then create the rest:
$ terraform init
$ env \
TF_VAR_sel_account=SEL_ACCOUNT \
TF_VAR_sel_token=SEL_TOKEN \
TF_VAR_user_password=USER_PASSWORD \
terraform apply -target=module.project_with_user
$ env \
TF_VAR_sel_account=SEL_ACCOUNT \
TF_VAR_sel_token=SEL_TOKEN \
TF_VAR_user_password=USER_PASSWORD \
terraform apply
We pass on the creation and management of Kubernetes clusters through the OpenStack Magnum component. You can learn more about how to work with a cluster in one of our previous articles , as well as in the knowledge base .
During cluster preparation, disks, virtual machines will be created and all necessary components will be installed. Preparation takes about 4 minutes, at which time Terraform will display messages of the form:
module.kubernetes_cluster.openstack_containerinfra_cluster_v1.cluster_1: Still creating... (3m0s elapsed)
After installation is complete, Terraform will inform you that the cluster is ready and display its identifier:
module.kubernetes_cluster.openstack_containerinfra_cluster_v1.cluster_1: Creation complete after 4m20s (ID: 3c8...)
Apply complete! Resources: 6 added, 0 changed, 0 destroyed.
To manage the created Kubernetes cluster through the kubectl utility, you must obtain the cluster access file. To do this, go to the project created through Terraform in the list of projects in your account:

Next, click on the link of the form xxxxxx.selvpc.ru , which is displayed below the project name:

Use the user name and password that were created through Terraform as login information. If you did not change vars.tf or main.tf for our example, then the user will have the name tf_user . As a password, use the value of the variable TF_VAR_user_password , which was specified when terraform apply was run earlier.
Inside the project you need to go to the Kubernetes tab :
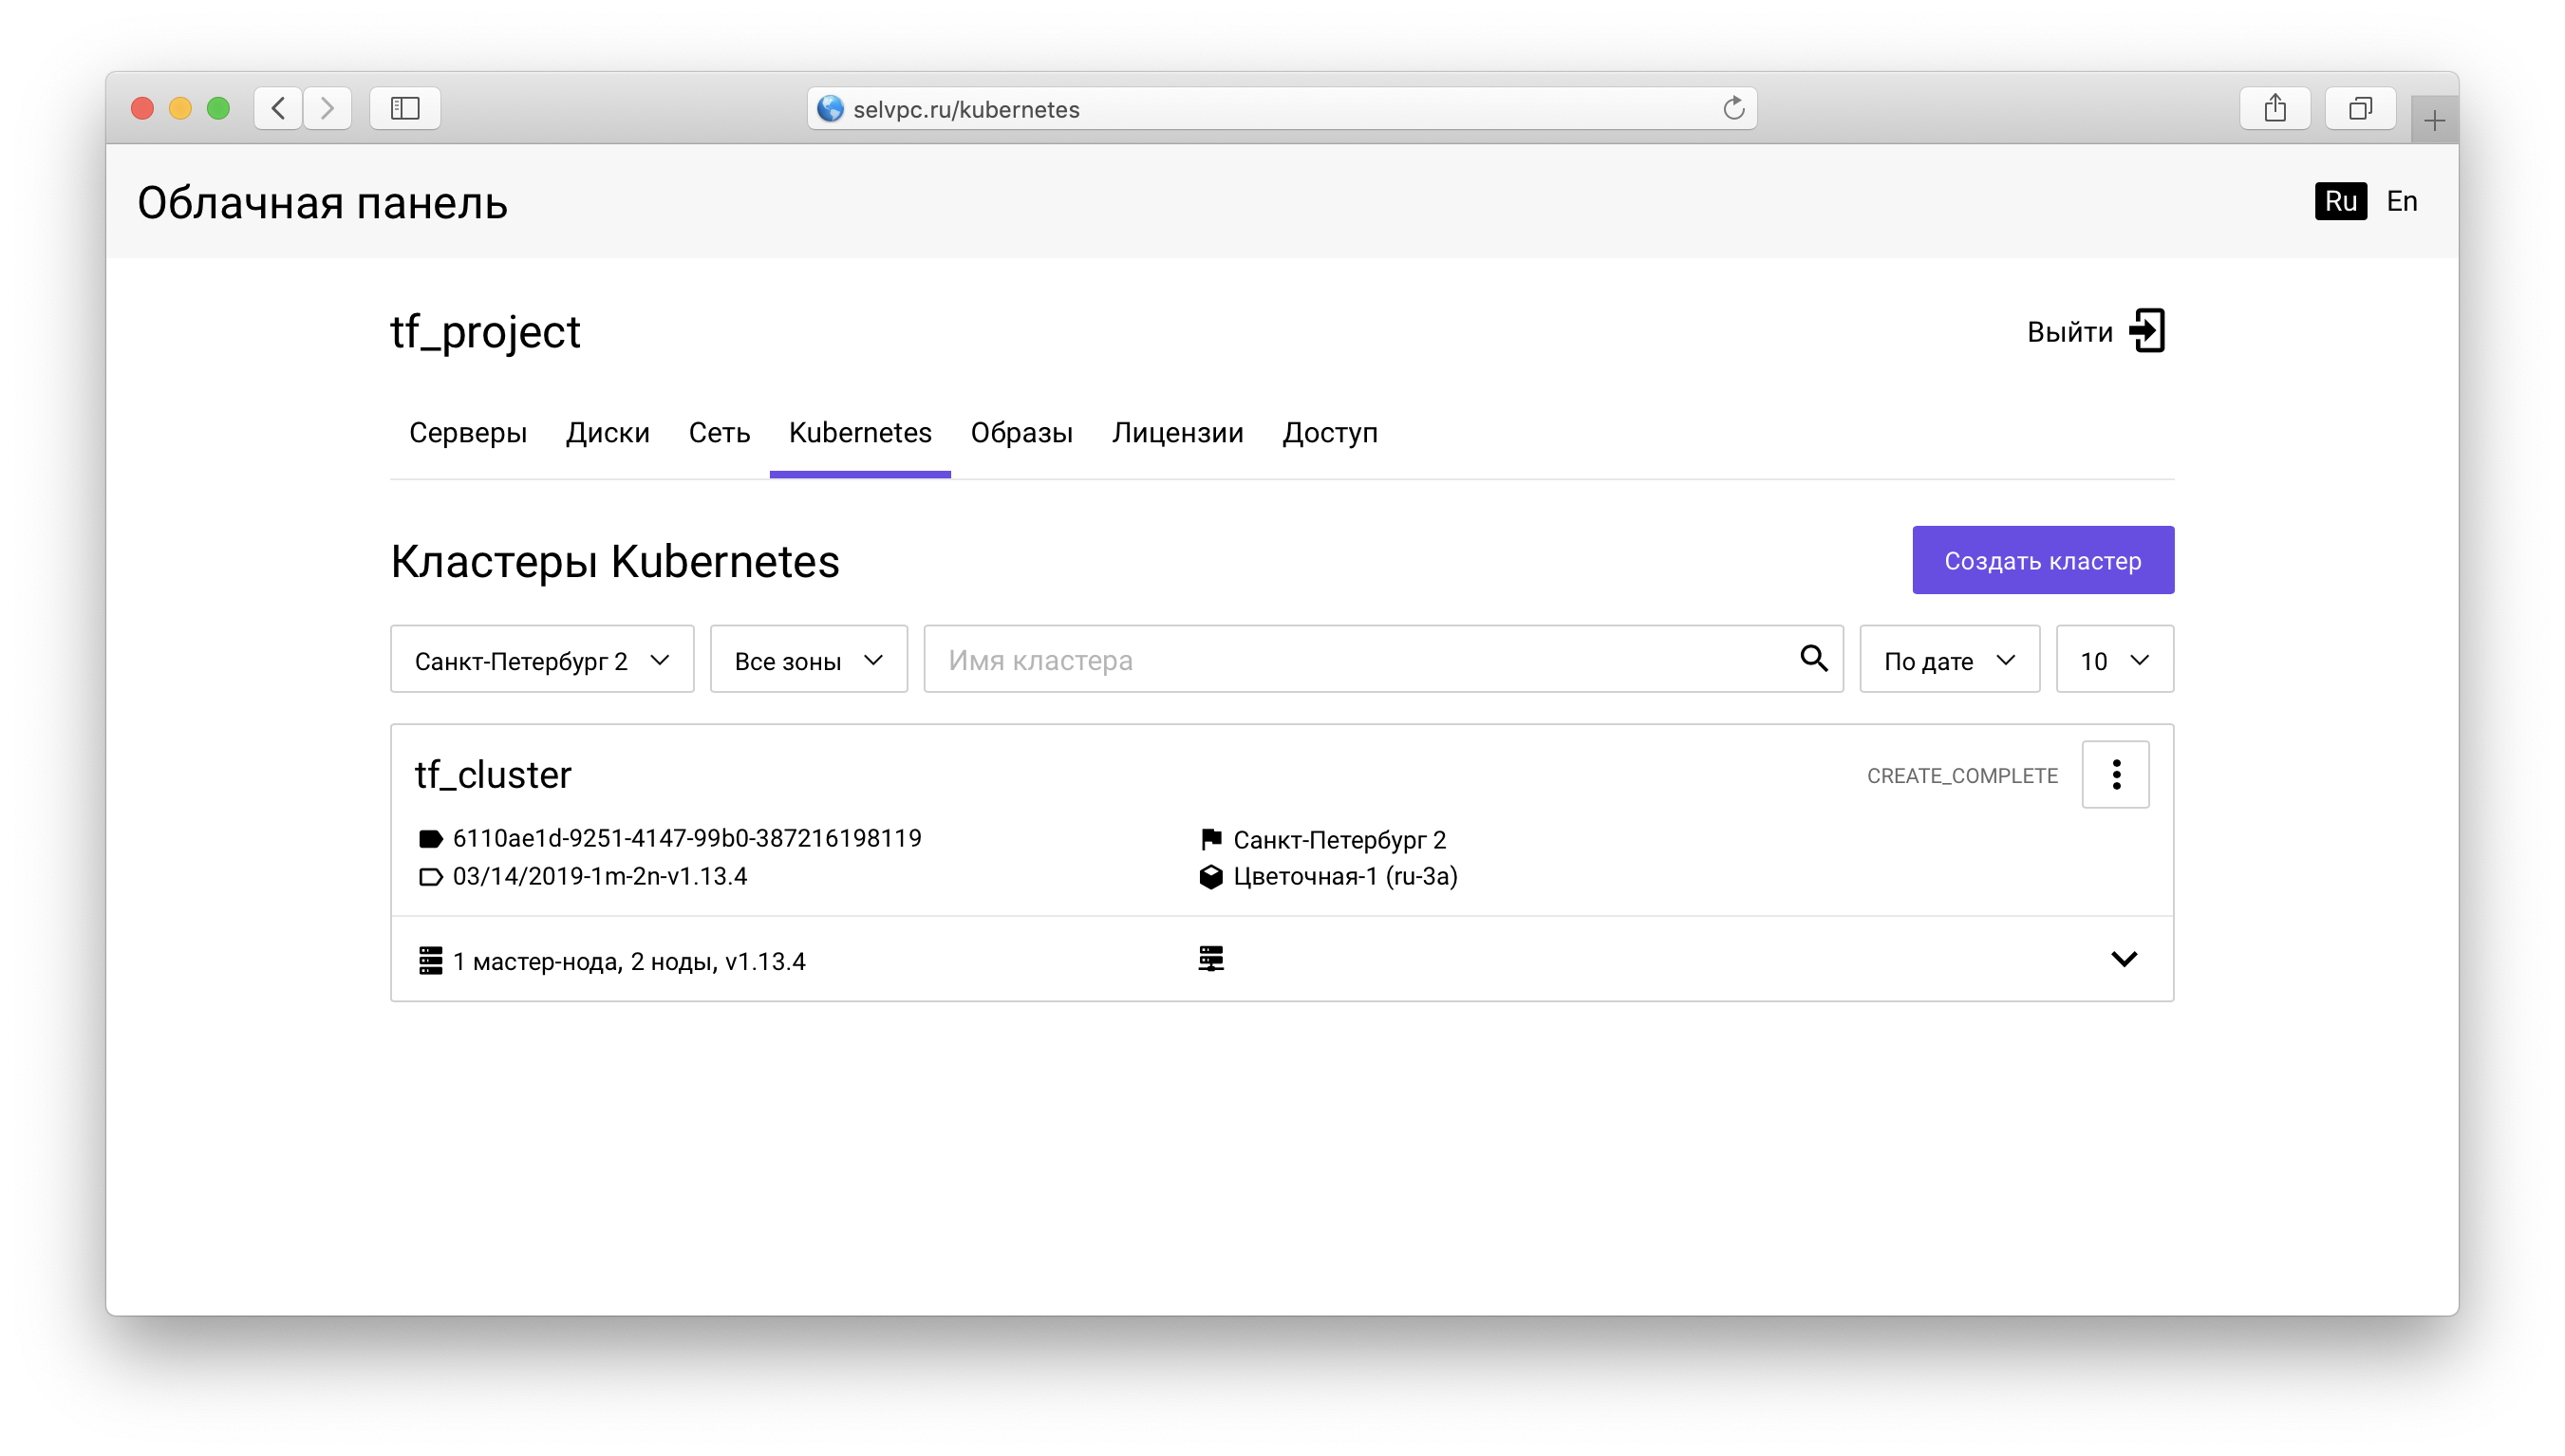
Here is the cluster created through Terraform. You can download the file for kubectl on the “Access” tab:

This tab also contains instructions for installing kubectl and using the downloaded config.yaml .
After starting kubectl and setting the environment variable KUBECONFIG, you can use Kubernetes:
$ kubectl get pods --all-namespaces
NAMESPACE        NAME                                    READY  STATUS  RESTARTS AGE
kube-system   coredns-9578f5c87-g6bjf                      1/1   Running   0 8m
kube-system   coredns-9578f5c87-rvkgd                     1/1   Running   0 6m
kube-system   heapster-866fcbc879-b6998                 1/1   Running   0 8m
kube-system   kube-dns-autoscaler-689688988f-8cxhf             1/1   Running   0 8m
kube-system   kubernetes-dashboard-7bdb5d4cd7-jcjq9          1/1   Running   0 8m
kube-system   monitoring-grafana-84c97bb64d-tc64b               1/1   Running   0 8m
kube-system   monitoring-influxdb-7c8ccc75c6-dzk5f                1/1   Running   0 8m
kube-system   node-exporter-tf-cluster-rz6nggvs4va7-minion-0 1/1   Running   0 8m
kube-system   node-exporter-tf-cluster-rz6nggvs4va7-minion-1 1/1   Running   0 8m
kube-system   openstack-cloud-controller-manager-8vrmp        1/1   Running   3 8m
prometeus-monitoring   grafana-76bcb7ffb8-4tm7t       1/1   Running   0 8m
prometeus-monitoring   prometheus-75cdd77c5c-w29gb           1/1   Running   0 8m
The number of cluster nodes is easily changed via Terraform.
The following value is specified in the main.tf file :
cluster_node_count = "${var.cluster_node_count}"
This value is substituted from vars.tf :
variable "cluster_node_count" {
default = 2
}
You can either change the default value in vars.tf , or specify the required value directly in main.tf :
-  cluster_node_count = "${var.cluster_node_count}"
+  cluster_node_count = 3
To apply the changes, as in the case of the first example, use the terraform apply command :
$ env \
TF_VAR_sel_account=SEL_ACCOUNT \
TF_VAR_sel_token=SEL_TOKEN \
TF_VAR_user_password=USER_PASSWORD \
terraform apply
When the number of nodes changes, the cluster will remain available. After adding a node via Terraform, you can use it without additional configuration:
$ kubectl get nodes
NAME                               STATUS                     ROLES     AGE   VERSION
tf-cluster-rz6nggvs4va7-master-0   Ready,SchedulingDisabled   master    8m    v1.12.4
tf-cluster-rz6nggvs4va7-minion-0   Ready                          8m    v1.12.4
tf-cluster-rz6nggvs4va7-minion-1   Ready                          8m    v1.12.4
tf-cluster-rz6nggvs4va7-minion-2   Ready                          3m    v1.12.4
Conclusion
In this article, we learned about the basic ways to work with the "Virtual Private Cloud" through Terraform. We will be glad if you use the official Terraform provider Selectel and provide feedback.
All found bugs of the Terraform provider Selectel can be reported through Github Issues .