3D Facebook Photos Inside: Parallax Shaders
- Transfer
In the past few months, Facebook has flooded 3D photos . If you haven’t been able to see them, then I’ll explain: 3D photos are images inside the post that smoothly change the angle when scrolling the page or when you move the mouse over them.
A few months before the appearance of this feature, Facebook tested a similar feature with 3D models. Although you can easily understand how Facebook can render 3D models and rotate them according to the position of the mouse, with 3D photos the situation may not be so intuitive.
The technique Facebook uses to create three-dimensionality of two-dimensional images is sometimes called an elevation map offset . It uses an optical phenomenon called parallax .
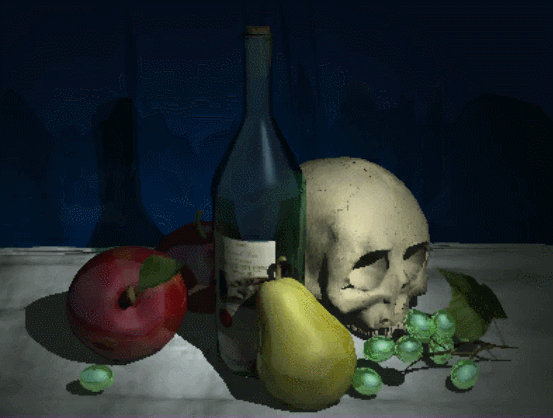
Example of a 3D Facebook photo (GIF)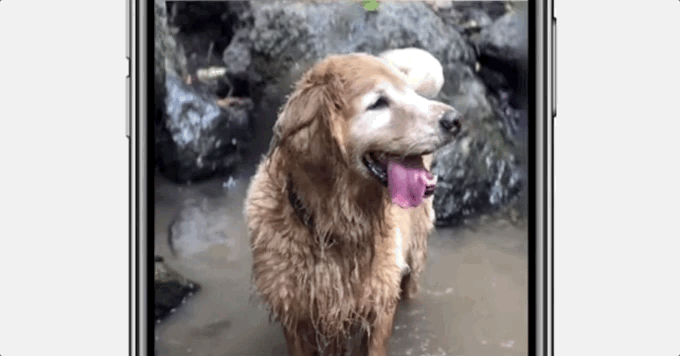
What is parallax
If you played Super Mario, then you know exactly what parallax is. Although Mario runs at the same speed, it seems that distant objects in the background move slower (see below).

This effect creates the illusion that some elements, such as mountains and clouds, are located farther. It is effective because our brain uses parallax (along with other visual cues) to estimate the distance to distant objects.
How does the brain evaluate distance?
It is assumed that the human brain uses several mechanisms to estimate distance. At short and medium ranges, distances are calculated by comparing differences in the position of an object visible with the right and left eye. This is called stereoscopic vision and is widespread in nature.
However, for sufficiently distant objects, one stereoscopic vision is not enough. Mountains, clouds and stars differ too little for different eyes to notice a significant difference. Therefore, relative parallax comes into play. Objects in the background move less than objects in the foreground. It is their relative motion that allows you to set the relative distance.
In the perception of distance, many other mechanisms are used. The most famous of them is atmospheric haze, which gives distant objects a blue tint. In other worlds, most of these atmospheric clues do not exist, so it is so difficult to assess the scale of objects on other planets and the moon. YouTube user Alex McCulgan explains this on his Astrum channel , showing how difficult it is to determine the size of the lunar objects shown in the video.
Parallax as a shift
If you are familiar with linear algebra, then you probably know how complicated and non-trivial the mathematics of 3D turns can be. Therefore, there is a much simpler way to understand parallax, which requires nothing but shifts.
Let's imagine that we are looking at a cube (see below). If we are precisely aligned with its center, then the front and back faces will look like two squares of different sizes for our eyes. This is the prospect .
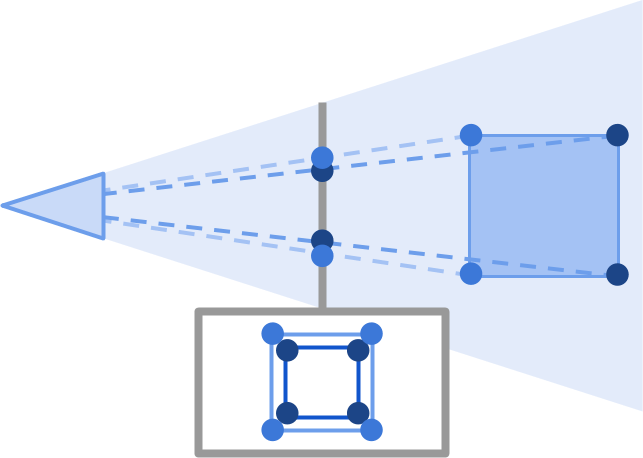
However, what happens if we move the camera down, or raise the cube up? Applying the same principles, we can see that the front and back faces have shifted relative to their previous position. Even more interesting is that they have moved relative to each other. The back face, which is further away from us, as if moved less.
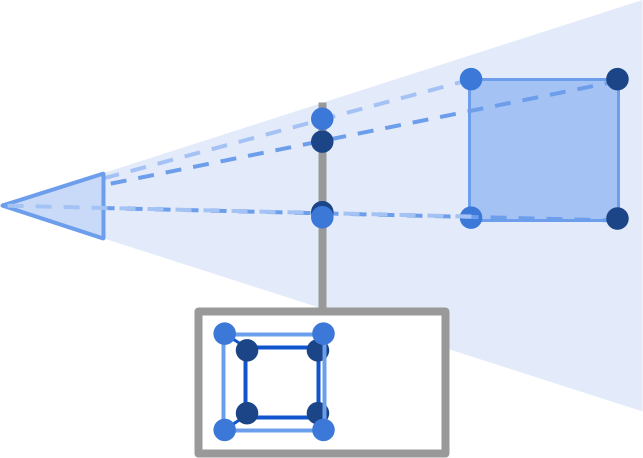
If we want to calculate the true positions of these vertices of the cube in our projected scope, then we will have to seriously take on trigonometry. However, this is not really necessary. If the camera’s movement is small enough, then we can approximate the displacement of the vertices, moving them in proportion to their distance.
The only thing we need to determine is scale. If we move X meters to the right, then it should seem that the object Y meters away has moved Z meters. If X remains small, parallax becomes the task of linear interpolation rather than trigonometry. In essence, this means that we can simulate small 3D rotations by shifting pixels depending on their distance from the camera.
Generate depth maps
In principle, what Facebook does is not too different from what is happening in Super Mario. For a given picture, certain pixels are shifted in the direction of motion based on the distance to the camera. To create a 3D photo of Facebook, you only need the photo itself and a map telling how far each pixel is from the camera. Such a map has the expected name - “depth map” . It is also called a height map, depending on the context .
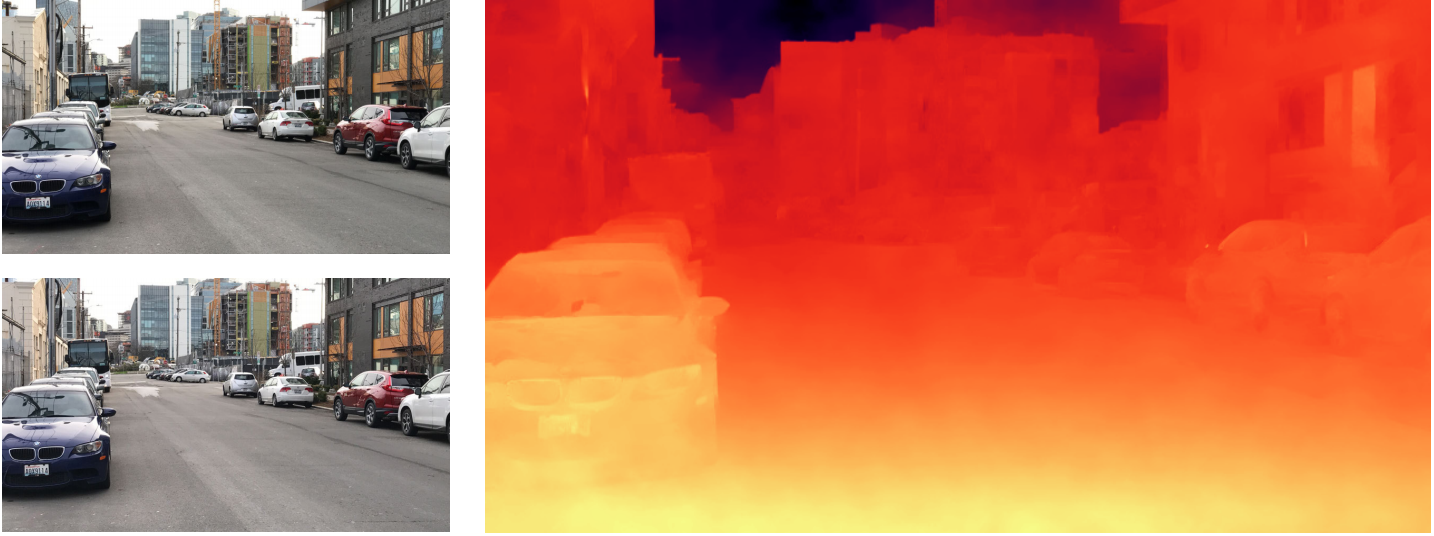
Taking a photo is pretty simple, but generating the right depth map is a much more difficult task. Modern devices use various techniques. Most often use two cameras; each takes a picture of the same subject, but with a slightly different perspective. The same principle is used instereoscopic vision , which people use to assess depth at short and medium distances. The image below shows how the iPhone 7 can create depth maps from two very close images.
Details of the implementation of this reconstruction are described in the article Instant 3D Photography , presented by Peter Hedman and Johannes Kopf at SIGGRAPH2018.
After creating a quality depth map, simulating three-dimensionality becomes an almost trivial task. The real limitation of this technique is that even if you can recreate a rough 3D model, it lacks information on how to render parts that are invisible in the original photo. At the moment, this problem cannot be solved, and therefore, all movements visible in 3D photographs are rather insignificant.
We got acquainted with the concept of 3D photographs and briefly talked about how modern smartphones can create them. In the second part, we will learn how the same techniques can be used to implement 3D photos in Unity using shaders.
Part 2. Parallax shaders and depth maps
Shader template
If we want to recreate 3D-photos of Facebook using a shader, then we must first decide what exactly we will do. Since this effect works best with 2D-images, it would be logical to implement a solution that is compatible with sprites ( the Sprite ) the Unity. We will create a shader that can be used with Sprite Renderer .
Although such a shader can be created from scratch, it is often preferable to start with a ready-made template. It’s best to start moving forward by copying the existing diffuse shader of sprites, which Unity uses by default for all sprites. Unfortunately, the engine does not come with a shader file that you can edit yourself.
To get it, you need to go to the Unity download archiveand download the Built in shaders package (see below) for the version of the engine you are using.

After extracting the package, you can view the source code of all the shaders that come with Unity. We are interested in the file Sprites-Diffuse.shader , which by default is used for all created sprites.
Images
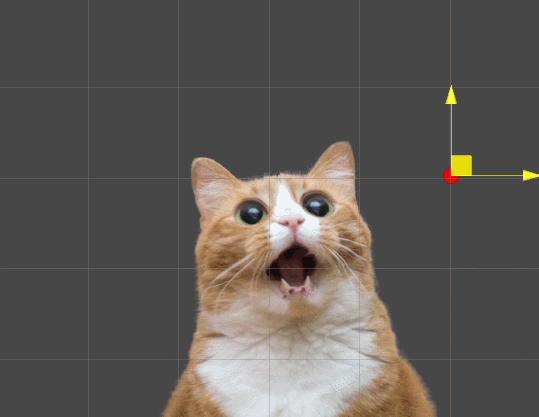
The second aspect that needs to be formalized is the data we have. Imagine that we have both the image we want to animate and its depth map. The latter will be a black and white image, in which black and white pixels indicate how far or close they are from the camera.
The images used in this tutorial are taken from Dennis Hotson's Pickle cat project , and this is without a doubt the best you'll see today.

The altitude map associated with this image reflects the distance of the cat's muzzle from the camera.
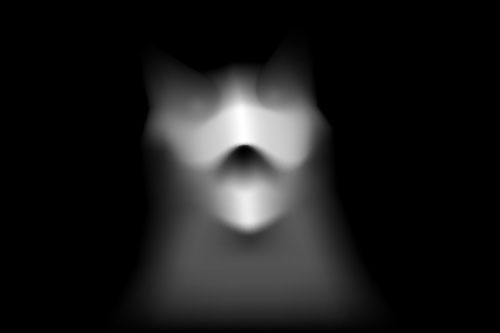
It is easy to see how good results can be achieved with such a simple depth map. This means that it’s easy to create your own depth maps for existing images.
Properties
Now that we have all the resources, we can start writing the parallax shader code. If we import the main image as a sprite, then Unity will automatically pass it to the shader through the property
_MainTex. However, we need to make the depth map available to the shader. This can be implemented using a new shader property called _HeightTex. I intentionally decided not to name it _DepthTexso as not to confuse it with the depth texture (this is a similar Unity concept used to render the scene depth map). To change the strength of the effect, we will also add a property
_Scale.Properties
{
...
_HeightTex ("Heightmap (R)", 2D) = "gray" {}
_Scale ("Scale", Vector) = (0,0,0,0)
}These two new properties should also correspond to two variables with the same name that need to be added to the
CGPROGRAM/ section ENDCG:sampler2D _HeightTex;
fixed2 _Scale;Now everything is ready, and we can start writing code that will perform the offset.
The first step is to sample the value from the depth map, which can be performed using the function
tex2D. Since _HeightTexthis is a black and white texture, we can just take its red channel and discard the rest. The resulting value measures the distance in some arbitrary units from the current pixel to the camera. Depth value is between
 before
  but we will stretch it to the interval from
  before
  . This allows you to provide both positive (white color) and negative (black color) parallax.
Theory
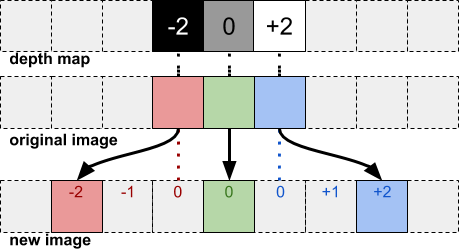
To simulate the parallax effect at this stage, we need to use the depth information to shift the pixels of the image. The closer the pixel, the stronger it needs to be shifted. This process is explained in the diagram below. The red pixel from the original image, in accordance with the information from the depth map, should shift two pixels to the left. Similarly, the blue pixel should shift two pixels to the right.
Although theoretically this should work, there are no easy ways to implement this in the shader. The thing is that a shader by its principle can only change the color of the current pixel. When executing the shader code, it must draw a specific pixel on the screen; we cannot just move this pixel to another place or change the color of the neighboring one. This restriction of locality provides a very efficient parallel operation of shaders, but does not allow us to implement all kinds of effects that would be trivial provided that there is random access for recording to each pixel in the image.
If we want to be accurate, then we need to sample the depth map of all neighboring pixels in order to find out which one should (if should) move to the current position. If several pixels should be in the same place, then we can average their influence. Although such a system works and provides the best possible result, it is extremely inefficient and potentially hundreds of times slower than the original diffuse shader we started with.
The best alternative would be the following solution: we get the depth of the current pixel from the depth map; then, if we need to shift it to the right , then replace the current color with a pixel on the left(see image below). Here we assume that if you want to move the pixel to the right, then the neighboring pixels on the left should also supposedly shift in the same way.
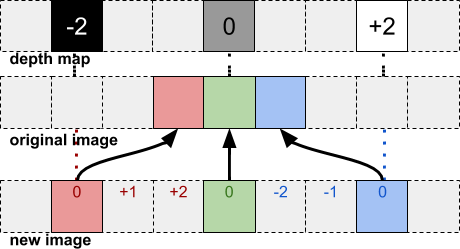
It is easy to see that this is just a low-cost approximation of what we really wanted to achieve. However, it is very effective because depth maps usually turn out to be smooth.
The code
Following the algorithm described in the previous section, we can implement the parallax shader with a simple shift of the UV coordinates .
This leads to the following code:
void surf (Input IN, inout SurfaceOutput o)
{
 // Displacement
 fixed height = tex2D(_HeightTex, IN.uv_MainTex).r;
 fixed2 displacement = _Scale * ((height - 0.5) * 2);
 fixed4 c = SampleSpriteTexture (IN.uv_MainTex - displacement) * IN.color;
        ...
}
This technique works well with almost flat objects, as seen in the animation below.

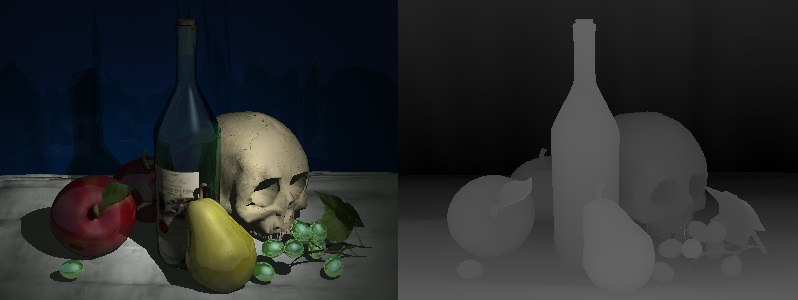
But it really shows itself perfectly with 3D models, because for a 3D scene it is very easy to render the depth texture. Below is a 3D rendered image and its depth map.
Finished results are shown here: