We are developing a Telegram bot for tracking movies on NodeJS and TypeScript

It happened to you that you come to the cinema and watch trailers before the start of the film, while some of them cling to you quite strongly and you give yourself a promise to watch this film if not in the cinema, then at least later, when it becomes available for download ? I dare to suggest that yes. But often it ends up with the fact that you successfully forget about it and, in the best case, accidentally find this film by scrolling through the list of already released films.
I often encountered such a problem and decided to create it with Eve - Telegram-bot, which helps me not to forget about the releases of my favorite films. What is it, how it works and how it was developed, you can read under the cut!
- Foreword
- What for?
- Technology selection
- Telegraf.js
- Project structure
- Initialization and Launch
- Handle user input
- Localization
- Conclusion
Foreword
This article is not a detailed guide on creating Telegram bots. And although in the course of the article I will often refer to my project, the purpose of this material is a story about development in general, namely the choice of technologies, key points and pitfalls that I encountered.
What for?
So, as I wrote above, I often forget to watch those films whose trailer I liked. I have been thinking about a solution to this problem for a long time. The first thing that occurred to me was the creation of a native application for smartphones, but since I have never done this before, it would take a lot of time and not the fact that the end result would satisfy my needs, as well as the needs of potential users.
The next idea was to create a PWA. It’s quite an interesting option in order to get acquainted with the technology, but I decided to leave it for the future. At the same time, I have been using Telegram for a long time and during all this time I have accumulated a sufficient number of bots that periodically make my life a little easier. Ultimately, after weighing all the pros and cons, I decided that this platform is perfect for this idea.
Technology selection
If you go through Github for Telegram bots, you can see that most of them are written in Python. Python is really a great language and great for this idea, but I wanted to implement this project specifically on NodeJS + TypeScript. Applying the appropriate filters, I came across 2 quite popular tools: node-telegram-bot-api and Telegraf.js .
Before this experience in developing bots I did not have, so when choosing from these two it was not clear what parameters should be looked at. As a result, after looking at the documentation and looking through issues for each of the libraries, I settled on Telegraf.js. The decisive factor was the availability of middlewares, which is designed in the same way as in the popular Express.js framework. Telegraf.js also has a more frequent update history and well-structured documentation, which suggests that the developers are putting enough effort into improving the tool. Moreover, it contains tippings for TypeScript, which is definitely a plus for the selected stack.
Telegraf.js
Telegraf.js is the main library on which the project was written. It uses several interesting approaches that allow you to create complex bots while maintaining the simplicity of the code. Below are the most interesting mechanisms:
- Middlewares - yes, these are the same middlewares that are available in Express.js. When the user sends something to the bot, the message first goes through all the registered middlewares, and after that it gets to the controller. Middlewares can modify the context, as well as suspend the execution of the request, for example, if a regular user tries to get into the area for administrators. Telegraf.js provides some extremely useful middlewares out of the box, but you can also use them yourself. Namely middlewares are considered killer features of Telegraf.js
- Sessions - sessions that can store information that is not tied to the controller. You can give an analogy with global variables that are accessible from anywhere in the bot. A very convenient thing, which is used, for example, for localization. It is possible to store sessions in different modes - DB, redis, local files, etc.
- Webooks - the bot can work in two modes - long polling or Webhooks . And although they work equally fast, it is better to use the second option in a production environment. Thus, the bot will not need to knock on the Telegram server, instead, he will receive all updates himself.
Important: A prerequisite for Webhooks is support for the SSL / TLS server. Also make sure that the port on which Webhook is running is open and accessible from the outside. - Markup - with this class you can teach the bot to respond in markup / markdown markup. This is important if, for example, you are making an HTML game. However, in my project, I used it only for bold / italic text.
- Stage is an extremely interesting module that helped me keep my nerves and some hours of development. Here I will tell in more detail.
The bot can listen to messages from the user and, depending on the type or content of the message, redirect it to one or another controller, which will perform its function and send a response to the user. It looks like this:bot.hears('hello', async ctx => { await ctx.reply('Hello!'); });
It works simply: if you write hello to the bot, it will simply reply Hello! Knowing this aspect of the work, let's try to imagine how the bot can work for searching for films:- The user writes that he wants to go to the search for films;
- The user drives the name of the movie;
- The bot returns a list of films and prompts the user to save the selected film to his library;
- ...
Attention, a question! How can a bot distinguish when a user writes to him that he wants to start looking for a movie, and when he writes the name of the movie to search for?
Yes, you can take any sent text as the name of the movie, but we want to make the bot withblackjack and hookers agood interface.
And here the scenes (Stages) come into play! It will be easiest to tell by the example above. When the user says that he wants to go to the search for films, we launch the scene. Inside this scene there are separate text handlers - bot.hears (...). Thus, all subsequent messages will relate directly to the search for films until the user writes a message to exit and leaves the scene. After that, the handlers inside this scene are deactivated until the user returns there again. Next I will describe how I used scenes to make event handling as simple as possible.
Project structure
There is a suspicion that the article will turn out to be quite voluminous, and therefore, in order not to stretch it even further, I will omit some points. For example, for the bot to start working, you need to start by getting the Telegram Bot API token. You can read about how to do this in the official Telegram documentation or in the documentation for Telegraf.js.
The file structure of the project is as follows:
Project structure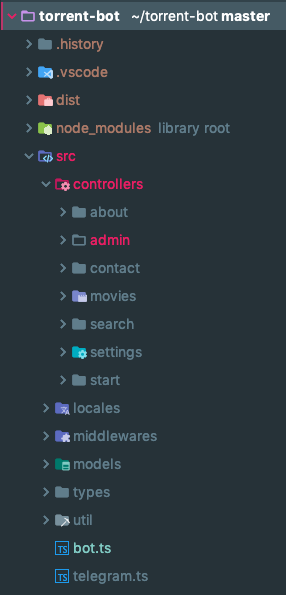
It works as follows:
- src / controllers - these are the very scenes about which it was written above. In this project, each scene is a separate controller that processes the corresponding requests.
- src / locales - translations for different languages. Telegraf.js makes it relatively easy to add localization to the bot using middlewares.
- src / models - models for MongoDB.
- src / types - tippings for TypeScript. Unfortunately, not all libraries used in the project have default timings.
- src / util - various helper functions that are used in different parts of the project. Here you can see how the availability of the movie for downloading, session management, creating keyboards, error handlers, and much more works.
- src / bot.ts - the main file where all the preparation and launch of the bot is done.
- src / telegram.ts - in this case, we create an object of the Telegram class from the Telegraf.js library. Using this object, we can send messages to users first, using their ID, and not wait until they write something. For example, in this project, we send the user a message stating that the movie he was following can already be downloaded. Of course, this object provides much more features.
- Everything else is configurations for different parts of the project that will not be discussed in this article.
Initialization and Launch
When we figured out the structure of the project, let's see how the bot actually starts. Again, in order to shorten the article, I will not insert the entire code here, but will only talk about the main, in my opinion, moments. You can see the full code in the repository, a link to which is available at the end of the article.
It all starts with connecting to the database, which stores information about users and the movies they track. After a successful connection, we register all the scenes used in the project, set parameters for localization and add several middlewares - processing sessions, localization, setting up scenes, as well as several of our own. One of them, for example, receives all the information about the user in accordance with his ID and adds it to the context that is used in the controllers. Finally, after all the basic preparations, we launch the bot in either development (long polling) or production (Webhooks) mode.
Important: if you use different methods for receiving updates (long polling and Webhooks), then when starting the bot in long polling mode, first remove the listening Webhook using a GET request toapi.telegram.org/botYOUR_TOKEN/deleteWebhook . Otherwise, the bot may not work properly.
Handle user input
Hurrah! The bot works, is connected to the database and is ready to receive messages from users. But how to do it right?
First of all, it will be convenient for users to use the built-in Telegram-keyboard. In fact, when you click on the buttons on this keyboard, messages are sent with the contents of these buttons. Next, we simply add handlers for this text and perform certain actions.
The bot.ts file contains such handlers. Since the bot supports two languages, the buttons may also contain different text - in Russian and English. Telegraf-i18n has a match function that can handle clicking the same button with different languages.
Most of the handlers in bot.ts perform a single function - they launch the user into the corresponding scene. So, we have several sections - search for films, my collection, settings and contacts. Each section has its own scene and its own button, when clicked, the user moves to the corresponding scene.
Important: be sure to add a handler that will release the user from the scene, otherwise they risk staying there forever! It will also be useful to make one general command (/ saveme is used in the bot), which will be added to each scene and to the main file. This command will serve as an exit from any scene, as well as reset user settings.
And now, the user wants to go to the search for films. By clicking on the appropriate button, we move it to the search scene. For convenience, each scene has its own folder with files, each of which performs a specific function.
Inside the scene, you can use your middlewares, which are in the middlewares.ts file. For example, using middleware in the search scene, we can simply forward all the information about the movie into the appropriate methods, rather than perform the same function each time inside them.
Telegram also has an inline keyboard. Perhaps you have come across messages with votes, under which there are several translucent buttons, and when you click on one of them the number of votes changes. These buttons are the inline keyboard
That's how it looks at Eve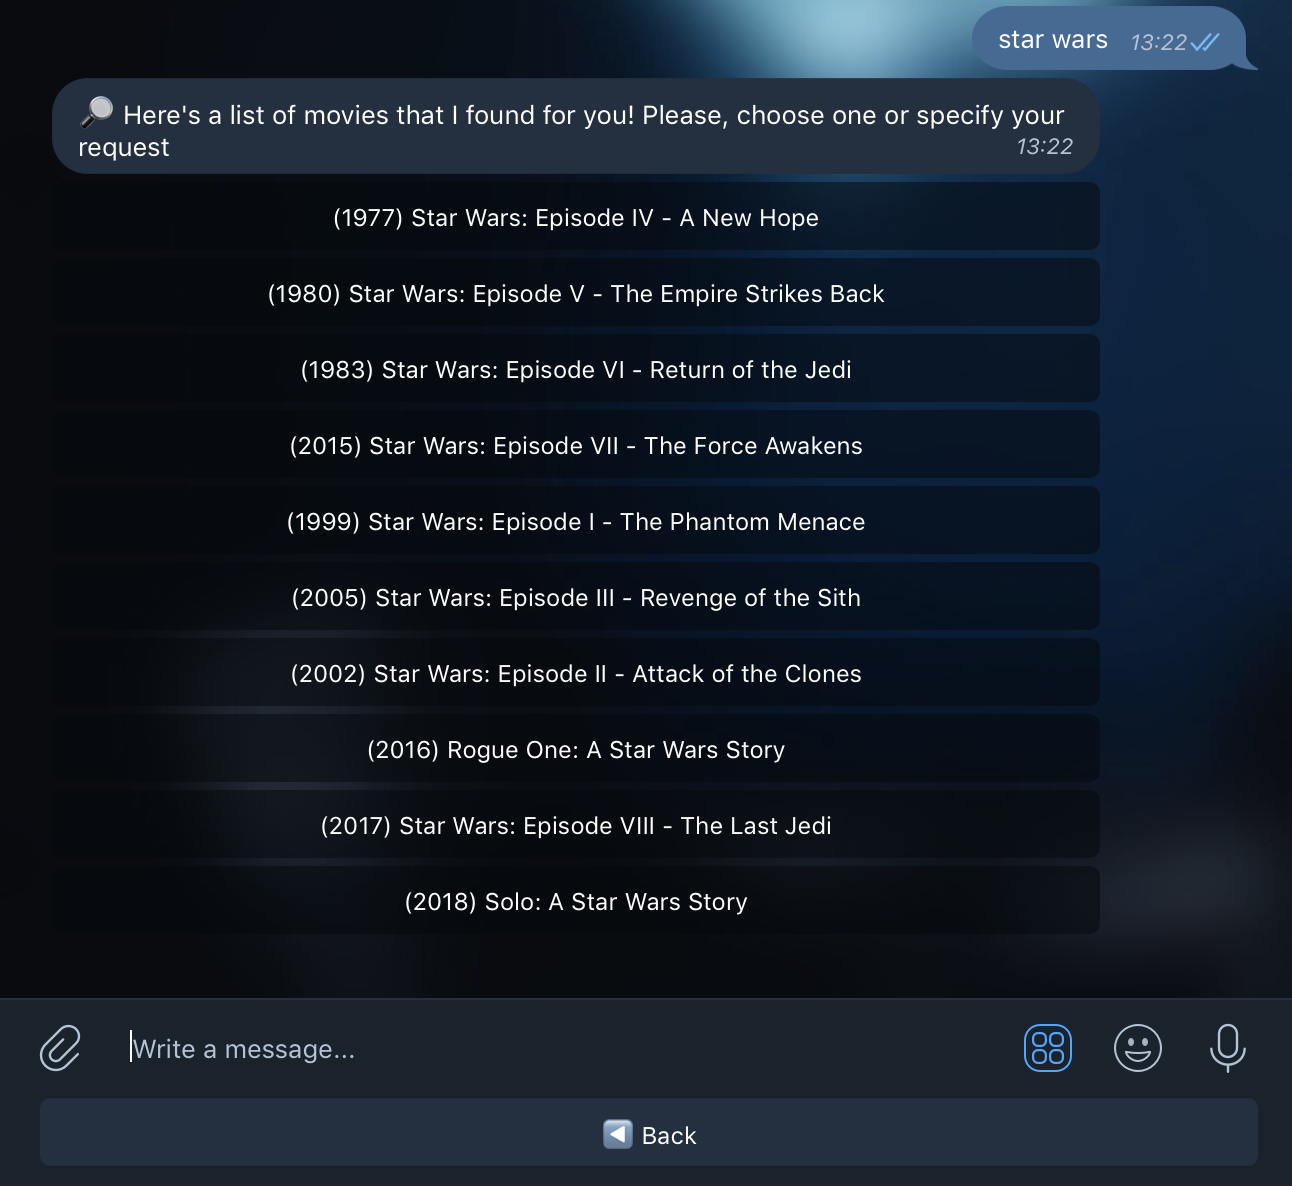
Each button contains information, when you click on the button, it will be transmitted to the corresponding handler. The size of the transmitted information should not exceed 64 bytes! To teach the bot to listen for button clicks, we need to register them using bot.action (/ trigger /, callback). The first parameter contains all the data that was bound to the button. I decided to use something like Actions from Redux, where an object of the form {a: actionName, p: payload} is attached to each button. When registering listeners, we can use a simple RegExp, for example: bot.action (/ actionName /, callBack). All handlers for the inline keyboard are in the actions.ts files.
In addition, in some scenes are the helpers.ts files, which contain small functions taken out there in order to unload the rest of the files. For the most part, there are keyboard generators for various actions by the user.
Localization
Since this is an important topic, I think it is worth mentioning separately. As I said earlier, Telegraf.js contains a fairly large number of middlewares, one of which is telegraf-i18n . The repository contains detailed instructions and I didn’t have any special problems with this, but nevertheless I’ll add a few words about how this works in this project.
There is a locales folder where the files for localization are located, which are a JSON object of the form {"key": "translation"}. Further, wherever we need to use different languages, we use the method from this library, where we transfer the translation we need by key, and at the output we get the corresponding translation. A session can be used to store information about the language selected by the user. Also worth mentioning about the buttons again. There is a match function in the same library, so if the text on the button changes depending on the language, this function will help you hang the correct listener.
Important: if you are going to use localization and write a bot in TypeScript, do not forget to add the translation folder to tsconfig.json, otherwise the code will not compile. For instance:
"include": ["src/locales/*.json"]Conclusion
Thank you for reading to the end! In this article, I tried to describe the process of creating a Telegram bot as a whole as detailed as possible, without a strong attachment to my project. I hope that after reading this article, as well as studying the source code for Eve, you can easily create a bot that can help you.
As promised, you can look at the source code on GitHub , and try Eve in action here . I will be immensely grateful for any criticism and suggestions for improvement.
I would also like to note the section in the Telegraf.js documentation with interesting open source projects that you can look at and be inspired by architecture and solutions. I, in turn, want to mention one of them - The Guard Bot. A truly large and well-made bot, from where I borrowed some of the solutions for my development.
And at the moment I told everything I wanted, I will be glad to answer your questions, suggestions and comments!