Encyclopedia of Lighting by Naughty Dog
- Transfer
Joey Lenz of Naughty Dog told us in detail about lighting in UE4 : about the values, sources, light temperature, lighting in PBR, the resources by which lighting can be studied, and much more. Joey's official polyplant.co website has many useful lighting tips.

Physically-based PBR (Physically-Based Rendering) using real-world measured data provides convenient tools for creating materials / lighting with predictable, consistent results under different lighting conditions. For game development studios, this means that their artists can spend less time on iterating over content creation and processing to create a “correct” look at different levels. In turn, this saves the studios money. It will take some time for artists accustomed to old methodologies to learn PBR. Sometimes it’s most difficult for them to get rid of the habit of adding lighting / shading information to the albedo texture. However, as soon as they get comfortable with this workflow, they quickly realize that it is much easier to manage than traditional means of rendering textures.

Here is my last personal PBR project I worked on with Phil Liu : The Iron Throne from Game of Thrones. Phil modeled / textured this whole scene in Substance Designer , and I was responsible for the lighting / post-processing in the Marmoset Toolbag 3 . You can learn more about this project on my portfolio website .

I am firmly convinced that PBR should be taken as a guide, and not as the only right solution for any circumstances and any game. This is one part of the artist’s tool palette, and it cannot be a substitute for creativity. In the end, we must tell the story visually, that is, sometimes we have to go on artistic liberties and evoke a certain emotional response from the audience and players.
Using a PBR workflow creates a consistent and predictable standard for work on lighting and materials. For example, if you limit albedo textures to the recommended range of brightness, they will not appear too dark or lit compared to other elements of the environment. The main role in this part of the process is reflected lighting. If the base colors are too dark, then textures can absorb more light energy than reflect, making the space more flat. On the other hand, too bright albedo values can reflect too much indirect illumination, creating too bright areas. The same concept holds true for saturation levels. For example, if the textures of an object are too saturated, it can be baked with lighting results that are less than necessary and too saturated. While limiting the values to specific intervals allows you to achieve photorealistic results, it also maintains the overall balance of the scene, the objects correspond to each other and are felt to be in the same universe. However, if you want to give a specific look or create a focal point, then sometimes to achieve the desired effect it is best to neglect the manuals for working with PBR.
Below is an example of albedo brightness intervals for UE4, taken from the PBR Guide section on my website.

From top to bottom: charcoal, freshly fallen snow, metal surface.
Below is another example, but for percentages of albedo saturation in UE4, taken from the PBR Guide section on my website.
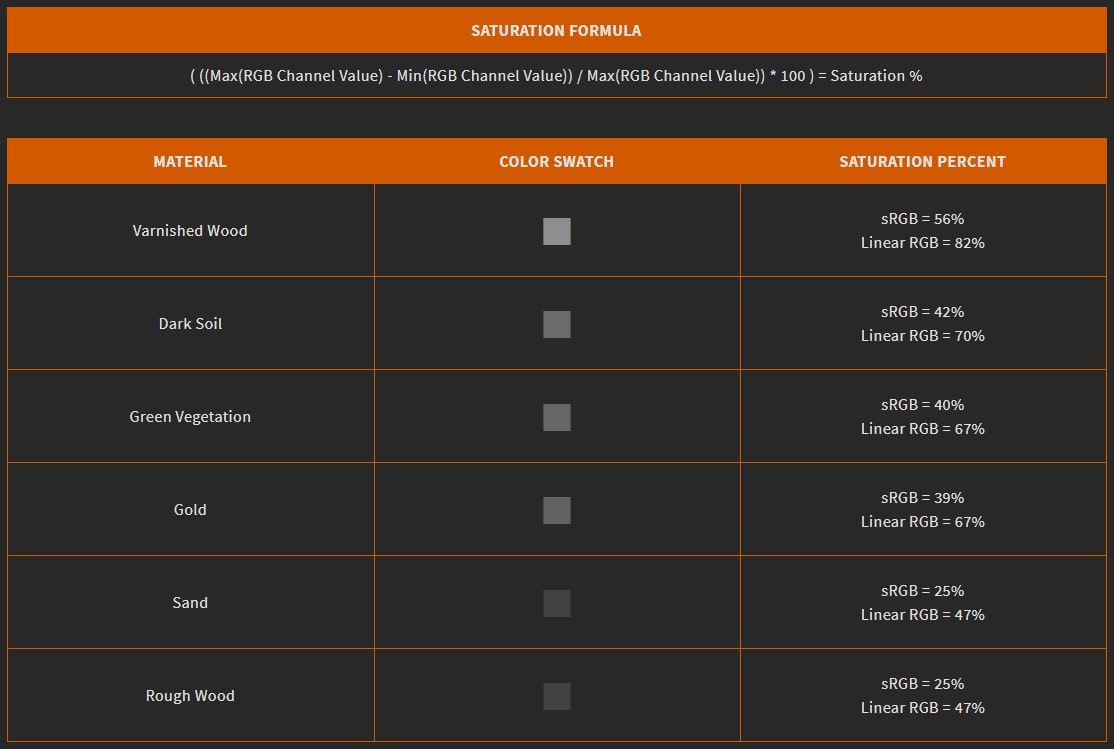
From top to bottom: lacquered wood, dark soil, green vegetation, gold, sand, rough wood
Many artists are accustomed to using RGB values when working with color, but when using Kelvin, color temperature requires a completely different approach. This process is mainly used to describe the colors of natural light sources. One example is the sun, which, depending on the time of day, has a different color temperature. It is warmer at sunrise / sunset and more neutral at noon. Therefore, if artists need physically accurate color values for lighting, it is convenient to use color temperature for this. In addition, some artificial light bulbs intentionally use color temperature, and it is useful to know if you want to simulate certain values in your scene.
The following is an example of color temperature values.

The use of physical units and lighting values allows you to quickly get photorealistic results. However, even when using PBR standards, I like to add an artwork pass after it. In particular, in UE4 I use PBR values as the foundation, but sometimes I create something new on their basis to improve the appearance and aesthetics of my projects. For example, for the brightness of the sun, I use values in lux, for the sky / light-emitting textures - cd / m², and for artificial lighting sources lumens / candela. Sometimes I even research real-world values to apply them in UE4 lighting, but then I can adjust their brightness / color if this improves the visual effect. Or I can strictly follow the values of the real world, and then change the appearance only when I start color grading (or directly in UE4,Nuke , Photoshop, or Davinci Resolve ) and setting up post effects. There are countless processing options available and it all depends on your preference.

You can use Lookup tables (LUT) for color grading the scene. There are other ways of color grading: color circles / curves that give more accurate results when rendering.
Some artists rely only on the sun / sky parameters, but the lighting can be made much richer. In an outdoor scene, I use the sun and sky as the basis (this can also very much depend on the time of day, weather, etc.). For example, when working on games of a certain type, this may be the only thing that is available to us, due to technical performance limitations. If there are no such restrictions, then I personally am a fan of using fill / auxiliary lighting, which allows you to create focus points, areas of interest, build layers of elements from the background to the foreground, increase visibility / reflection in local spaces, direct the player in the right direction, create the necessary mood / atmosphere, gradients / color contrasts to express form, and so on. This does not end there: Lighting can also be used for cookies (in UE4 they are called “light functions”), spotted / reflected lighting, visual effects and much more. Although some of these methods are not physics based, they are designed to improve the look and feel of the game.
Here are the lighting options for the light functions of the UE4 engine:

On the other hand, interior lighting may require a slightly different approach. I am a fan of using portal light sources in windows and other openings leading from interiors to the outside world. This provides an improved directivity of heavenly lighting to fill the interior compared to, for example, using a spotlight / rectangular light source. Not to mention the fact that portal lighting sources can provide an increase in the quality of baking and reduce visual noise in lighting maps (in UE4, Lightmass Importance Volumes can also help with this). Moreover, I can even add additional fill / auxiliary light sources with softer attenuation so that additional lighting penetrates even deeper into the interior. These light sources may be more saturated and, perhaps a color shift simulating a change in color temperature based on attenuation distances compared to portal lighting sources. This, it seems to me, creates a better shape and enriches the space.
Here is the UE4 portal lighting, which can be accessed in the Modes section:
Outside the screen is a window allowing light to enter the room. The only difference between the two images is that in one I use a portal light source next to the window, and in the other there are no sources.

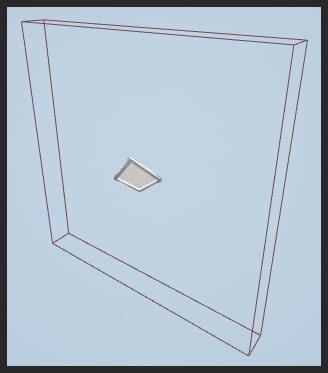
Many small details, such as buttons, use radiant textures called emissive maps. They can be used in the baking phase to emit light in the scene. The cool thing about this technique is that the light emitted is based on the texture and the location of these pixels relative to the coordinates of the world’s space. This provides more accurate results than using, for example, a point / spotlight / rectangular light source to simulate the light emitted by a button. For better control over the brightness of the emitted light, I adjust the strength of the emissive texture. In UE4, this can easily be done through the Material Editor (multiplying the emission texture by a value) or by setting the Emissive Boast parameter of the static meshes (to which the light emitting materials are assigned).
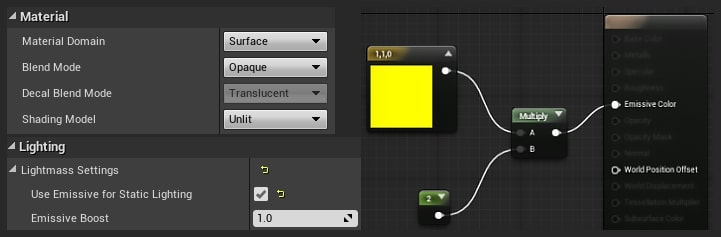
Here is an example of a light-emitting material from UE4 and various ways in which you can adjust the power of emission:
Disabling / enabling the ability of a static mesh to emit static lighting:

When working with more abstract light sources, for example, with magic portals or sci-fi elements, various methodologies can be applied. Sometimes just a visual check is enough. However, you are limited to it, and these light sources / effects are used at several levels, then it will be difficult to maintain the necessary level of integrity. Therefore, I prefer another technique: compare the values of these lighting effects with the values specified by PBR. Even if they do not use the set values of the real world, at least they can be used to balance and compare with convincing worlds in which they harmoniously exist. If you set basic standards, even for more fantastic lighting elements, you can save time on their processing,
Today, there are many resources on the Internet for exploring lighting. My first recommendation is not limited to UE4 only. Explore as many different environments as possible. Learn cinematography, stage lighting, study games, classic paintings, photographs, lighting devices in amusement parks, communicate with professional lighting artists, consider concept art, comics, nature, and so on. (In my opinion, nature is the best teacher for an artist). First, learn the basics of artistic mastery, because although it is important to understand the work of tools, they themselves will not create a beautiful picture, and besides, they are constantly changing.
Quality lighting materials can be found in the Gnomon Workshop tutorials by Jeremy Vickery . And Tilmann MildeYouTube has the excellent Lighting Academy series on UE4 lighting. Finally, if you need tutorials on PBR materials / coverage in UE4, then on my site there is a whole section devoted only to these topics. I strive to constantly update it, start the study by reference .
My name is Joey Lenz . I currently work as the lead level lighting artist at Naughty Dog and am currently involved in the creation of The Last of Us Part II.
I remember very clearly what inspired me in childhood. When I was about five years old, my parents bought SNES for Christmas. Complete with it was delivered Super Mario World. God, with what pleasure I unfolded this cartridge! The moment of “eureka” came when at the first level I jumped up and hit a box with a question mark. Yoshi jumped out of it, and it completely shocked me. I was fascinated by the work of interactive mechanics, despite the fact that then I did not understand anything about it. So in me there was an interest not only in games, but also in their internal work, and Yoshi changed my life.
My career in digital art began with graphic design and visual effects. I participated in small one-time projects and in the creation of independent films, but a real career in the gaming industry began with my best friend Phil Liu. At that time, he studied game design and suggested that I try to learn Unreal Engine 3 . Almost immediately, I fell in love with the real-time graphics of the engine and was fascinated by the level of its interactivity. I found the perfect combination of factors in games: you could take the visual quality of the cinema and optimize it for use in a real-time digital environment. Since then, I have been able to work on various game series, such as Call of Duty, Halo, Forza Motorsport, etc.
Interview conducted by Kirill Tokarev
About PBR
Physically-based PBR (Physically-Based Rendering) using real-world measured data provides convenient tools for creating materials / lighting with predictable, consistent results under different lighting conditions. For game development studios, this means that their artists can spend less time on iterating over content creation and processing to create a “correct” look at different levels. In turn, this saves the studios money. It will take some time for artists accustomed to old methodologies to learn PBR. Sometimes it’s most difficult for them to get rid of the habit of adding lighting / shading information to the albedo texture. However, as soon as they get comfortable with this workflow, they quickly realize that it is much easier to manage than traditional means of rendering textures.
Here is my last personal PBR project I worked on with Phil Liu : The Iron Throne from Game of Thrones. Phil modeled / textured this whole scene in Substance Designer , and I was responsible for the lighting / post-processing in the Marmoset Toolbag 3 . You can learn more about this project on my portfolio website .
I am firmly convinced that PBR should be taken as a guide, and not as the only right solution for any circumstances and any game. This is one part of the artist’s tool palette, and it cannot be a substitute for creativity. In the end, we must tell the story visually, that is, sometimes we have to go on artistic liberties and evoke a certain emotional response from the audience and players.
Stage Lighting with PBR
Using a PBR workflow creates a consistent and predictable standard for work on lighting and materials. For example, if you limit albedo textures to the recommended range of brightness, they will not appear too dark or lit compared to other elements of the environment. The main role in this part of the process is reflected lighting. If the base colors are too dark, then textures can absorb more light energy than reflect, making the space more flat. On the other hand, too bright albedo values can reflect too much indirect illumination, creating too bright areas. The same concept holds true for saturation levels. For example, if the textures of an object are too saturated, it can be baked with lighting results that are less than necessary and too saturated. While limiting the values to specific intervals allows you to achieve photorealistic results, it also maintains the overall balance of the scene, the objects correspond to each other and are felt to be in the same universe. However, if you want to give a specific look or create a focal point, then sometimes to achieve the desired effect it is best to neglect the manuals for working with PBR.
Below is an example of albedo brightness intervals for UE4, taken from the PBR Guide section on my website.
From top to bottom: charcoal, freshly fallen snow, metal surface.
Below is another example, but for percentages of albedo saturation in UE4, taken from the PBR Guide section on my website.
From top to bottom: lacquered wood, dark soil, green vegetation, gold, sand, rough wood
Colour temperature
Many artists are accustomed to using RGB values when working with color, but when using Kelvin, color temperature requires a completely different approach. This process is mainly used to describe the colors of natural light sources. One example is the sun, which, depending on the time of day, has a different color temperature. It is warmer at sunrise / sunset and more neutral at noon. Therefore, if artists need physically accurate color values for lighting, it is convenient to use color temperature for this. In addition, some artificial light bulbs intentionally use color temperature, and it is useful to know if you want to simulate certain values in your scene.
The following is an example of color temperature values.
Light values
The use of physical units and lighting values allows you to quickly get photorealistic results. However, even when using PBR standards, I like to add an artwork pass after it. In particular, in UE4 I use PBR values as the foundation, but sometimes I create something new on their basis to improve the appearance and aesthetics of my projects. For example, for the brightness of the sun, I use values in lux, for the sky / light-emitting textures - cd / m², and for artificial lighting sources lumens / candela. Sometimes I even research real-world values to apply them in UE4 lighting, but then I can adjust their brightness / color if this improves the visual effect. Or I can strictly follow the values of the real world, and then change the appearance only when I start color grading (or directly in UE4,Nuke , Photoshop, or Davinci Resolve ) and setting up post effects. There are countless processing options available and it all depends on your preference.
You can use Lookup tables (LUT) for color grading the scene. There are other ways of color grading: color circles / curves that give more accurate results when rendering.
Lighting sources
Some artists rely only on the sun / sky parameters, but the lighting can be made much richer. In an outdoor scene, I use the sun and sky as the basis (this can also very much depend on the time of day, weather, etc.). For example, when working on games of a certain type, this may be the only thing that is available to us, due to technical performance limitations. If there are no such restrictions, then I personally am a fan of using fill / auxiliary lighting, which allows you to create focus points, areas of interest, build layers of elements from the background to the foreground, increase visibility / reflection in local spaces, direct the player in the right direction, create the necessary mood / atmosphere, gradients / color contrasts to express form, and so on. This does not end there: Lighting can also be used for cookies (in UE4 they are called “light functions”), spotted / reflected lighting, visual effects and much more. Although some of these methods are not physics based, they are designed to improve the look and feel of the game.
Here are the lighting options for the light functions of the UE4 engine:
On the other hand, interior lighting may require a slightly different approach. I am a fan of using portal light sources in windows and other openings leading from interiors to the outside world. This provides an improved directivity of heavenly lighting to fill the interior compared to, for example, using a spotlight / rectangular light source. Not to mention the fact that portal lighting sources can provide an increase in the quality of baking and reduce visual noise in lighting maps (in UE4, Lightmass Importance Volumes can also help with this). Moreover, I can even add additional fill / auxiliary light sources with softer attenuation so that additional lighting penetrates even deeper into the interior. These light sources may be more saturated and, perhaps a color shift simulating a change in color temperature based on attenuation distances compared to portal lighting sources. This, it seems to me, creates a better shape and enriches the space.
Here is the UE4 portal lighting, which can be accessed in the Modes section:
Outside the screen is a window allowing light to enter the room. The only difference between the two images is that in one I use a portal light source next to the window, and in the other there are no sources.
Artificial lighting for buttons and other elements
Many small details, such as buttons, use radiant textures called emissive maps. They can be used in the baking phase to emit light in the scene. The cool thing about this technique is that the light emitted is based on the texture and the location of these pixels relative to the coordinates of the world’s space. This provides more accurate results than using, for example, a point / spotlight / rectangular light source to simulate the light emitted by a button. For better control over the brightness of the emitted light, I adjust the strength of the emissive texture. In UE4, this can easily be done through the Material Editor (multiplying the emission texture by a value) or by setting the Emissive Boast parameter of the static meshes (to which the light emitting materials are assigned).
Here is an example of a light-emitting material from UE4 and various ways in which you can adjust the power of emission:
Disabling / enabling the ability of a static mesh to emit static lighting:
When working with more abstract light sources, for example, with magic portals or sci-fi elements, various methodologies can be applied. Sometimes just a visual check is enough. However, you are limited to it, and these light sources / effects are used at several levels, then it will be difficult to maintain the necessary level of integrity. Therefore, I prefer another technique: compare the values of these lighting effects with the values specified by PBR. Even if they do not use the set values of the real world, at least they can be used to balance and compare with convincing worlds in which they harmoniously exist. If you set basic standards, even for more fantastic lighting elements, you can save time on their processing,
Tips for Beginners
Today, there are many resources on the Internet for exploring lighting. My first recommendation is not limited to UE4 only. Explore as many different environments as possible. Learn cinematography, stage lighting, study games, classic paintings, photographs, lighting devices in amusement parks, communicate with professional lighting artists, consider concept art, comics, nature, and so on. (In my opinion, nature is the best teacher for an artist). First, learn the basics of artistic mastery, because although it is important to understand the work of tools, they themselves will not create a beautiful picture, and besides, they are constantly changing.
Quality lighting materials can be found in the Gnomon Workshop tutorials by Jeremy Vickery . And Tilmann MildeYouTube has the excellent Lighting Academy series on UE4 lighting. Finally, if you need tutorials on PBR materials / coverage in UE4, then on my site there is a whole section devoted only to these topics. I strive to constantly update it, start the study by reference .
about the author
My name is Joey Lenz . I currently work as the lead level lighting artist at Naughty Dog and am currently involved in the creation of The Last of Us Part II.
I remember very clearly what inspired me in childhood. When I was about five years old, my parents bought SNES for Christmas. Complete with it was delivered Super Mario World. God, with what pleasure I unfolded this cartridge! The moment of “eureka” came when at the first level I jumped up and hit a box with a question mark. Yoshi jumped out of it, and it completely shocked me. I was fascinated by the work of interactive mechanics, despite the fact that then I did not understand anything about it. So in me there was an interest not only in games, but also in their internal work, and Yoshi changed my life.
My career in digital art began with graphic design and visual effects. I participated in small one-time projects and in the creation of independent films, but a real career in the gaming industry began with my best friend Phil Liu. At that time, he studied game design and suggested that I try to learn Unreal Engine 3 . Almost immediately, I fell in love with the real-time graphics of the engine and was fascinated by the level of its interactivity. I found the perfect combination of factors in games: you could take the visual quality of the cinema and optimize it for use in a real-time digital environment. Since then, I have been able to work on various game series, such as Call of Duty, Halo, Forza Motorsport, etc.
Interview conducted by Kirill Tokarev