Coroutines :: practical experience
In this article I will talk about how coroutines work and how to create them. Consider the application in sequential, parallel execution. Let's talk about error handling, debugging, and ways to test coroutine. In the end, I will summarize and talk about the impressions that remained after applying this approach.
The article was prepared based on the materials of my report on MBLT DEV 2018 , at the end of the post - a link to the video.

Fig. 2.1
What was the purpose of the Corutin developers? They wanted asynchronous programming to be as simple as possible. There is nothing easier than executing the code “line by line” using the syntactic constructions of the language: try-catch-finally, loops, conditional statements, and so on.
Let's consider two functions. Each is executed on its own thread (Fig. 2.1). First performed on the stream B , and returns a result of datab , then we need to transfer the result of the second function that takes datab as an argument and have already performed on the stream A . With coroutine, we can write our code as shown in fig. 2.1. Consider how to achieve this.
FunctionslongOpOnB, longOpOnA - the so-called suspend -functions, before the execution of which the thread is freed, and after the completion of their work it becomes busy again.
In order for these two functions to actually be performed in a different thread relative to the called one, while maintaining a “consistent” style of writing code, we must immerse them in the context of the coroutine.
This is done by creating coroutines using the so-called Coroutine Builder. In the figure, this is launch , but there are others, for example, async , runBlocking . I’ll talk about them later.
The last argument is a block of code executed in the context of the coroutine: calling suspend functions, which means that all the above behavior is possible only in the context of coroutine or in another suspend function.
There are other parameters in the Coroutine Builder method, for example, the type of launch, the thread in which the block will be executed, and others.
Coroutine Builder gives us the return value as a return value - a subclass of the Job class (Fig.2.2). With it, we can manage the life cycle of corutin.
Start with the start () method, cancel with the cancel () method , wait for the job to complete using the join ( ) method , subscribe to the job completion event and more.

Fig. 2.2
You can change the flow of coroutine execution by changing the context element of the coroutine that is responsible for scheduling. (Fig. 2.3)
For example, corutin 1 will execute in a UI thread, while corutin 2 in a thread taken from the Dispatchers.IO pool .

Fig.2.3
The coroutine library also provides a suspend function withContext (CoroutineContext) , with which you can switch between threads in the context of a coroutine. Thus, jumping between threads can be quite simple:

Fig. 2.4.
We start our coroutine on UI thread 1 → show the load indicator → switch to work thread 2, freeing up the main one → perform a long operation there that cannot be performed in the UI thread → return the result back to UI thread 3 → and already work there with it, rendering the received data and hiding the loading indicator.
It looks pretty comfortable so far, move on.
Let us examine the work of coroutine using the most common case as an example: working with network requests using the Retrofit 2 library.
The first thing we need to do is convert the callback call to a suspend function in order to take advantage of the possibility of coroutine:

Fig. 2.5
To manage the state of coroutine, the library provides functions of the form suspendXXXXCoroutine , which provide an argument that implements the Continuation interface , using the resumeWithException and resume methods of which we can resume the coroutine in case of error and success, respectively.
Next, we will figure out what happens when the resumeWithException method is called, and first, make sure that we need to somehow cancel the network request call.
To cancel the call and other actions related to the release of unused resources, when implementing the suspend function, you can use the suspendCancellableCoroutine method that comes out of the box (Fig. 2.6). Here, the block argument already implements the CancellableContinuation interface , one of the additional methods of which - invokeOnCancellation - allows you to sign up for an error or a successful coroutine cancellation event. Therefore, here it is also necessary to cancel the method call.

Fig. 2.6
Now that the suspend function has been prepared for network requests, you can use its call in the UI thread of the coroutine as sequential, while during the execution of the request the stream will be free, and the retrofit stream will be used to run the request.
Thus, we implement the behavior asynchronous with respect to the UI stream, but we write it in a consistent style (Fig. 2.6).
If after receiving the answer you need to do the hard work, for example, writing the received data to the database, then this function, as has already been shown, can be easily performed using withContext on the pool of back-stream flows and continue execution on the UI without a single line of code.

Fig. 2.7
Unfortunately, this is not all we need for application development. Consider error handling.
An exception that was not caught inside the coroutine is considered unhandled and may lead to application crash. In addition to normal situations, an exception is thrown by resuming the coroutine using the resumeWithException method on the corresponding line of the call to the suspend function. In this case, the exception passed as an argument is thrown unchanged. (Fig. 2.8)

Fig. 2.8
For exception handling, the standard try catch finally language construct becomes available. Now the code that can display the error in the UI takes the following form:

Fig. 2.9
In case of cancellation of the coroutine, which can be achieved by calling the Job # cancel method, a CancellationException is thrown. This exception is handled by default and does not lead to crashes or other negative consequences.
However, when using the try / catch construct, it will be caught in the catch block , and you need to reckon with it in cases if you want to handle only really “erroneous” situations. For example, error handling in the UI when it is possible to “cancel” requests or error logging is provided. In the first case, the error will be displayed to the user, although it actually does not exist, and in the second, a useless exception will be logged and clutter up the reports.
To ignore the situation of canceling coroutines, you need to slightly modify the code:

Fig. 2.10
Consider the exception exception stack trace.
If you throw an exception directly in the coroutine code block (Fig. 2.11), then the stack trace looks neat, with only a few calls from coroutine, it correctly indicates the line and information about the exception. In this case, you can easily understand from the stack trace where exactly, in which class and in which function the exception was thrown.

Fig. 2.11
However, exceptions that are passed to the resumeWithException method of suspend functions, as a rule, do not contain information about the coroutine in which it occurred. For example (Fig. 2.12), if you resume coroutine from the previously implemented suspend function with the same exception as in the previous example, then the stack trace will not give information on where to specifically look for the error.

Fig. 2.12
To understand which coroutine resumed with an exception, you can use the CoroutineName context element . (Fig. 2.13)
The CoroutineName element is used for debugging, passing the name of the coroutine into it, you can extract it in suspend functions and, for example, supplement the exception message. That is, at least it will be clear where to look for an error.
This approach will only work if the suspend function is excluded from this:

Fig. 2.13
To change the exception logging for a particular coroutine, you can set your own ExceptionHandler, which is one of the elements of the coroutine context. (Fig. 2.14)
The handler must implement the CoroutineExceptionHandler interface . Using the overridden + operator for coroutine context, you can replace the standard exception handler with your own. The unhandled exception will fall into the handleException method , where you can do whatever you need with it. For example, completely ignore. This will happen if you leave the handler empty or add your own information:

Fig. 2.14
Let's see what the logging of our exception might look like:
Now, for the case of throwing an exception, a stack trace printout will come to the logcat with the additional information:

Fig. 2.15
Consider the parallel operation of suspend functions. Async
is best suited for organizing parallel results from multiple functions . Async, like launch - Coroutine Builder. Its convenience is that, using the await () method , it returns data if successful or throws an exception that has occurred during the execution of the coroutine. The await method will wait for the coroutine to complete, if it is not already completed, otherwise it will immediately return the result of the work. Note that await is a suspend function, and therefore cannot be executed outside the context of a coroutine or other suspend function. Using async, parallel data acquisition of the two functions will look like this: Fig. 2.16

Imagine that we are faced with the task of obtaining data from two functions in parallel. Then, you need to combine them and display. In case of an error, it is necessary to draw the UI, canceling all current requests. Such a case is often found in practice.
In this case, the error must be handled as follows:
With all of this in mind, implementing parental coroutine is becoming a bit more complicated. The implementation of async-corutin is also complicated:

Fig. 2.17
This approach is not the only possible one. For example, you can implement parallel execution with error handling using ExceptionHandler or SupervisorJob .
Let's look at the work of nested coroutine.
By default, nested coroutine is created using an external scope and inherits its context. As a result, the nested coroutine becomes a daughter, and the external - parent.
If we cancel the external coroutine, the nested coroutines created in this way, which were used in the example earlier, will also be canceled. It will also be useful when leaving the screen when you need to cancel current requests. In addition, the parent corutin will always wait for the completion of the daughter.
You can create a coroutine that is independent of the external using a global scope. In this case, when the external coroutine is canceled, the nested one will continue to work as if nothing had happened:

Fig. 2.18
You can make a child of the global nested coroutine by replacing the context element with the Job key with the parent job, or you can fully use the context of the parent coroutine. But in this case, it is worth remembering that all elements of the parent coroutine are taken over: the thread pool, exception handler, and so on:

Fig. 2.19
It is now clear that in the case of using corutin from the outside, they must be given the opportunity to install either an instance of the job or the context of the parent. And library developers need to consider the possibility of installing it as a child, which causes inconvenience.
Coroutines affect the viewing of object values in debug mode. If you put a breakpoint inside the next coroutine on the logData function , then when it fires, we see that everything is fine here and the values are displayed correctly:

Fig. 2.20
Now we get dataA using the nested coroutine, leaving a breakpoint on logData :

Fig. 2.21
An attempt to expand the this block in order to try to find the desired values fails. Thus, debugging in the presence of suspend-functions becomes difficult.
Unit testing is pretty straightforward. You can use the Coroutine Builder runBlocking for this . runBlocking blocks a thread until all its nested coroutines finish, which is exactly what you need for testing.
For example, if it is known that somewhere inside the method coroutine is used to implement it, then to test the method you only need to wrap it in runBlocking .
runBlocking can be used to test a suspend function:
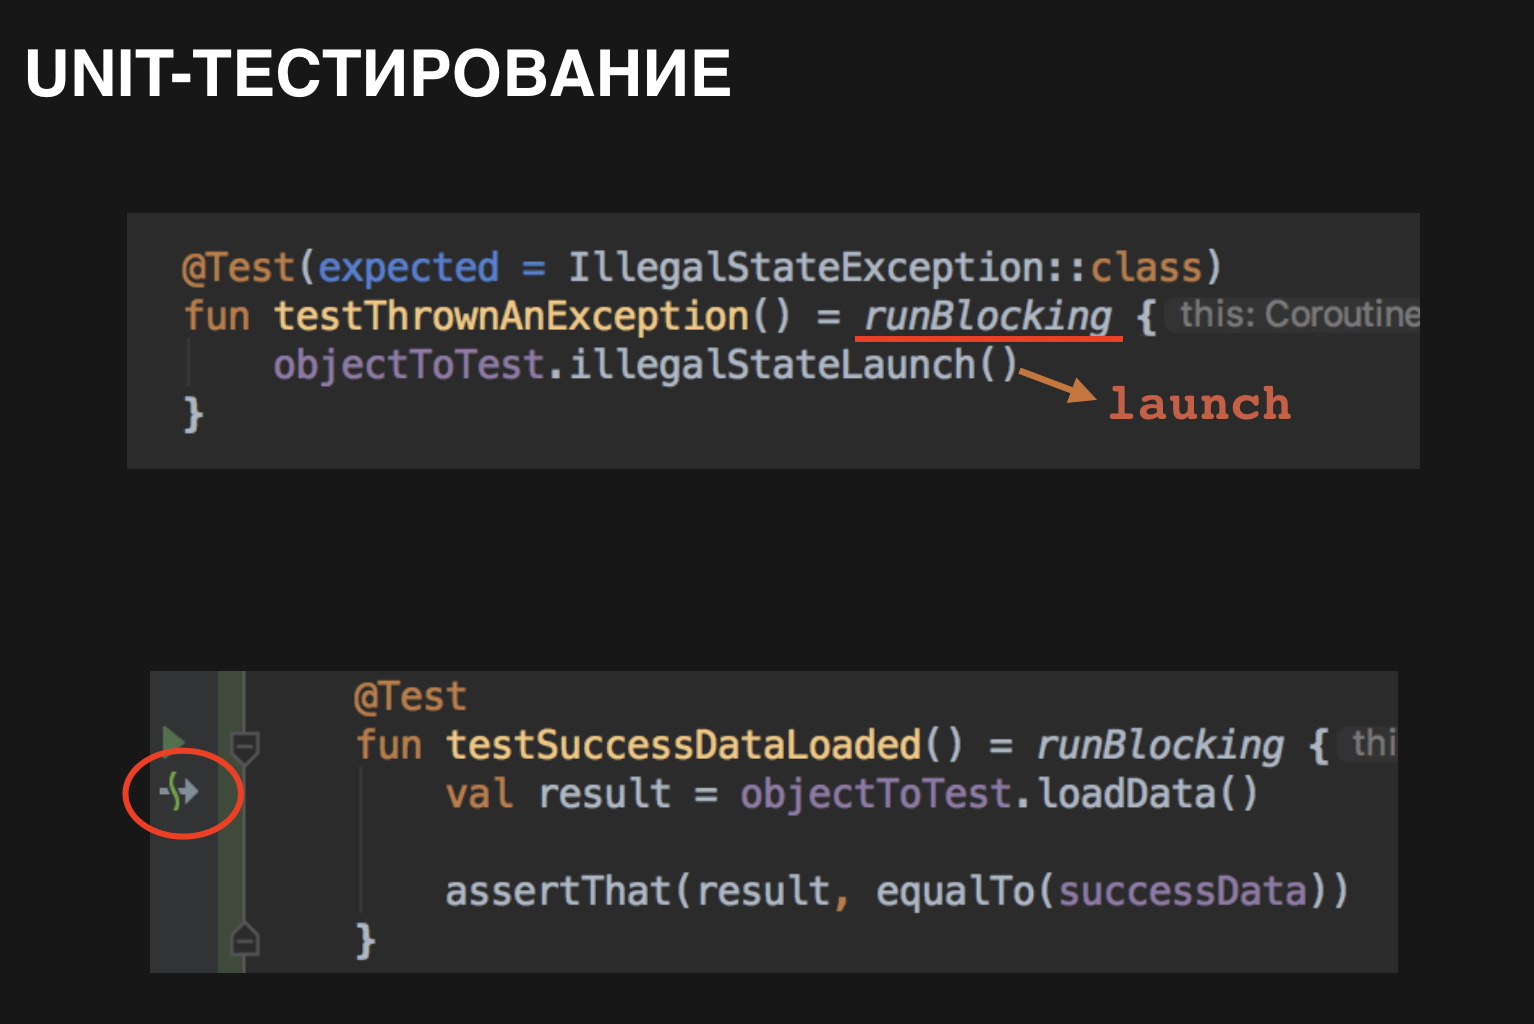
Fig. 2.22
Finally, I would like to show some examples of the use of corutin.
Imagine that we need to execute three requests A, B and C in parallel, show their completion and reflect the moment of completion of requests A and B.
To do this, you can simply wrap the coroutines of requests A and B in one common one and work with it as a single whole:

Fig. 2.23
The following example demonstrates how using the normal cycle for periodic searches can be performed with an interval of 5 seconds:

Fig. 2.24
Of the minuses, I note that coroutines are a relatively young tool, so if you want to use them on the prod, you should do this with caution. There are difficulties debugging, a small boilerplate in the implementation of obvious things.
In general, coroutines are quite easy to use, especially for implementing not complicated asynchronous tasks. In particular, due to the fact that standard language constructs can be used. Coroutines are easily amenable to unit testing and all this comes out of the box from the same company that develops the language.
It turned out a lot of letters. For those who like to listen more - video from my report on MBLT DEV 2018 :
The article was prepared based on the materials of my report on MBLT DEV 2018 , at the end of the post - a link to the video.
Consistent style
Fig. 2.1
What was the purpose of the Corutin developers? They wanted asynchronous programming to be as simple as possible. There is nothing easier than executing the code “line by line” using the syntactic constructions of the language: try-catch-finally, loops, conditional statements, and so on.
Let's consider two functions. Each is executed on its own thread (Fig. 2.1). First performed on the stream B , and returns a result of datab , then we need to transfer the result of the second function that takes datab as an argument and have already performed on the stream A . With coroutine, we can write our code as shown in fig. 2.1. Consider how to achieve this.
FunctionslongOpOnB, longOpOnA - the so-called suspend -functions, before the execution of which the thread is freed, and after the completion of their work it becomes busy again.
In order for these two functions to actually be performed in a different thread relative to the called one, while maintaining a “consistent” style of writing code, we must immerse them in the context of the coroutine.
This is done by creating coroutines using the so-called Coroutine Builder. In the figure, this is launch , but there are others, for example, async , runBlocking . I’ll talk about them later.
The last argument is a block of code executed in the context of the coroutine: calling suspend functions, which means that all the above behavior is possible only in the context of coroutine or in another suspend function.
There are other parameters in the Coroutine Builder method, for example, the type of launch, the thread in which the block will be executed, and others.
Life cycle management
Coroutine Builder gives us the return value as a return value - a subclass of the Job class (Fig.2.2). With it, we can manage the life cycle of corutin.
Start with the start () method, cancel with the cancel () method , wait for the job to complete using the join ( ) method , subscribe to the job completion event and more.
Fig. 2.2
Flow change
You can change the flow of coroutine execution by changing the context element of the coroutine that is responsible for scheduling. (Fig. 2.3)
For example, corutin 1 will execute in a UI thread, while corutin 2 in a thread taken from the Dispatchers.IO pool .
Fig.2.3
The coroutine library also provides a suspend function withContext (CoroutineContext) , with which you can switch between threads in the context of a coroutine. Thus, jumping between threads can be quite simple:
Fig. 2.4.
We start our coroutine on UI thread 1 → show the load indicator → switch to work thread 2, freeing up the main one → perform a long operation there that cannot be performed in the UI thread → return the result back to UI thread 3 → and already work there with it, rendering the received data and hiding the loading indicator.
It looks pretty comfortable so far, move on.
Suspend Function
Let us examine the work of coroutine using the most common case as an example: working with network requests using the Retrofit 2 library.
The first thing we need to do is convert the callback call to a suspend function in order to take advantage of the possibility of coroutine:
Fig. 2.5
To manage the state of coroutine, the library provides functions of the form suspendXXXXCoroutine , which provide an argument that implements the Continuation interface , using the resumeWithException and resume methods of which we can resume the coroutine in case of error and success, respectively.
Next, we will figure out what happens when the resumeWithException method is called, and first, make sure that we need to somehow cancel the network request call.
Suspend function. Call cancellation
To cancel the call and other actions related to the release of unused resources, when implementing the suspend function, you can use the suspendCancellableCoroutine method that comes out of the box (Fig. 2.6). Here, the block argument already implements the CancellableContinuation interface , one of the additional methods of which - invokeOnCancellation - allows you to sign up for an error or a successful coroutine cancellation event. Therefore, here it is also necessary to cancel the method call.
Fig. 2.6
Display changes in UI
Now that the suspend function has been prepared for network requests, you can use its call in the UI thread of the coroutine as sequential, while during the execution of the request the stream will be free, and the retrofit stream will be used to run the request.
Thus, we implement the behavior asynchronous with respect to the UI stream, but we write it in a consistent style (Fig. 2.6).
If after receiving the answer you need to do the hard work, for example, writing the received data to the database, then this function, as has already been shown, can be easily performed using withContext on the pool of back-stream flows and continue execution on the UI without a single line of code.
Fig. 2.7
Unfortunately, this is not all we need for application development. Consider error handling.
Error handling: try-catch-finally. Cancel Coroutine: CancellationException
An exception that was not caught inside the coroutine is considered unhandled and may lead to application crash. In addition to normal situations, an exception is thrown by resuming the coroutine using the resumeWithException method on the corresponding line of the call to the suspend function. In this case, the exception passed as an argument is thrown unchanged. (Fig. 2.8)
Fig. 2.8
For exception handling, the standard try catch finally language construct becomes available. Now the code that can display the error in the UI takes the following form:
Fig. 2.9
In case of cancellation of the coroutine, which can be achieved by calling the Job # cancel method, a CancellationException is thrown. This exception is handled by default and does not lead to crashes or other negative consequences.
However, when using the try / catch construct, it will be caught in the catch block , and you need to reckon with it in cases if you want to handle only really “erroneous” situations. For example, error handling in the UI when it is possible to “cancel” requests or error logging is provided. In the first case, the error will be displayed to the user, although it actually does not exist, and in the second, a useless exception will be logged and clutter up the reports.
To ignore the situation of canceling coroutines, you need to slightly modify the code:
Fig. 2.10
Error logging
Consider the exception exception stack trace.
If you throw an exception directly in the coroutine code block (Fig. 2.11), then the stack trace looks neat, with only a few calls from coroutine, it correctly indicates the line and information about the exception. In this case, you can easily understand from the stack trace where exactly, in which class and in which function the exception was thrown.
Fig. 2.11
However, exceptions that are passed to the resumeWithException method of suspend functions, as a rule, do not contain information about the coroutine in which it occurred. For example (Fig. 2.12), if you resume coroutine from the previously implemented suspend function with the same exception as in the previous example, then the stack trace will not give information on where to specifically look for the error.
Fig. 2.12
To understand which coroutine resumed with an exception, you can use the CoroutineName context element . (Fig. 2.13)
The CoroutineName element is used for debugging, passing the name of the coroutine into it, you can extract it in suspend functions and, for example, supplement the exception message. That is, at least it will be clear where to look for an error.
This approach will only work if the suspend function is excluded from this:
Fig. 2.13
Error logging. ExceptionHandler
To change the exception logging for a particular coroutine, you can set your own ExceptionHandler, which is one of the elements of the coroutine context. (Fig. 2.14)
The handler must implement the CoroutineExceptionHandler interface . Using the overridden + operator for coroutine context, you can replace the standard exception handler with your own. The unhandled exception will fall into the handleException method , where you can do whatever you need with it. For example, completely ignore. This will happen if you leave the handler empty or add your own information:
Fig. 2.14
Let's see what the logging of our exception might look like:
- You need to remember about the CancellationException , which we want to ignore.
- Add your own logs.
- Remember about the default behavior, which includes logging and terminating the application, otherwise the exception will simply “disappear” and it will not be clear what happened.
Now, for the case of throwing an exception, a stack trace printout will come to the logcat with the additional information:
Fig. 2.15
Parallel execution. async
Consider the parallel operation of suspend functions. Async
is best suited for organizing parallel results from multiple functions . Async, like launch - Coroutine Builder. Its convenience is that, using the await () method , it returns data if successful or throws an exception that has occurred during the execution of the coroutine. The await method will wait for the coroutine to complete, if it is not already completed, otherwise it will immediately return the result of the work. Note that await is a suspend function, and therefore cannot be executed outside the context of a coroutine or other suspend function. Using async, parallel data acquisition of the two functions will look like this: Fig. 2.16
Imagine that we are faced with the task of obtaining data from two functions in parallel. Then, you need to combine them and display. In case of an error, it is necessary to draw the UI, canceling all current requests. Such a case is often found in practice.
In this case, the error must be handled as follows:
- Bring error handling inside each of async-corutin.
- In case of an error, cancel all coroutines. Fortunately, for this it is possible to specify a parent job, upon cancellation of which all its children are canceled.
- We come up with an additional implementation to understand whether all the data has successfully loaded. For example, we assume that if await returned null, an error occurred while receiving data.
With all of this in mind, implementing parental coroutine is becoming a bit more complicated. The implementation of async-corutin is also complicated:
Fig. 2.17
This approach is not the only possible one. For example, you can implement parallel execution with error handling using ExceptionHandler or SupervisorJob .
Nested Coroutines
Let's look at the work of nested coroutine.
By default, nested coroutine is created using an external scope and inherits its context. As a result, the nested coroutine becomes a daughter, and the external - parent.
If we cancel the external coroutine, the nested coroutines created in this way, which were used in the example earlier, will also be canceled. It will also be useful when leaving the screen when you need to cancel current requests. In addition, the parent corutin will always wait for the completion of the daughter.
You can create a coroutine that is independent of the external using a global scope. In this case, when the external coroutine is canceled, the nested one will continue to work as if nothing had happened:
Fig. 2.18
You can make a child of the global nested coroutine by replacing the context element with the Job key with the parent job, or you can fully use the context of the parent coroutine. But in this case, it is worth remembering that all elements of the parent coroutine are taken over: the thread pool, exception handler, and so on:
Fig. 2.19
It is now clear that in the case of using corutin from the outside, they must be given the opportunity to install either an instance of the job or the context of the parent. And library developers need to consider the possibility of installing it as a child, which causes inconvenience.
Breakpoints
Coroutines affect the viewing of object values in debug mode. If you put a breakpoint inside the next coroutine on the logData function , then when it fires, we see that everything is fine here and the values are displayed correctly:
Fig. 2.20
Now we get dataA using the nested coroutine, leaving a breakpoint on logData :
Fig. 2.21
An attempt to expand the this block in order to try to find the desired values fails. Thus, debugging in the presence of suspend-functions becomes difficult.
Unit testing
Unit testing is pretty straightforward. You can use the Coroutine Builder runBlocking for this . runBlocking blocks a thread until all its nested coroutines finish, which is exactly what you need for testing.
For example, if it is known that somewhere inside the method coroutine is used to implement it, then to test the method you only need to wrap it in runBlocking .
runBlocking can be used to test a suspend function:
Fig. 2.22
Examples
Finally, I would like to show some examples of the use of corutin.
Imagine that we need to execute three requests A, B and C in parallel, show their completion and reflect the moment of completion of requests A and B.
To do this, you can simply wrap the coroutines of requests A and B in one common one and work with it as a single whole:
Fig. 2.23
The following example demonstrates how using the normal cycle for periodic searches can be performed with an interval of 5 seconds:
Fig. 2.24
conclusions
Of the minuses, I note that coroutines are a relatively young tool, so if you want to use them on the prod, you should do this with caution. There are difficulties debugging, a small boilerplate in the implementation of obvious things.
In general, coroutines are quite easy to use, especially for implementing not complicated asynchronous tasks. In particular, due to the fact that standard language constructs can be used. Coroutines are easily amenable to unit testing and all this comes out of the box from the same company that develops the language.
Report video
It turned out a lot of letters. For those who like to listen more - video from my report on MBLT DEV 2018 :