Veeam solution for backup and recovery of virtual machines on the Nutanix AHV platform. Part 2
- Tutorial
Greetings to all in the new, 2019 year!
First, let's take a look back, that is, the first part of the review of the integrated solution Veeam Availability for Nutanix AHV - there was a story about how to deploy and configure the components. Now you can proceed to setting up a backup, as well as get acquainted with the recovery options.
In today's article I will tell about:
So, welcome under cat.
To work with the Veeam backup repository, the user must provide the appropriate permissions. To do this, you can use security principals - user accounts or Active Directory groups. Users with access rights can both save backups in the repository, and perform recovery from these backups.
Therefore we do the following:

More information about setting permissions can be found in the documentation section (in English).
After login (see Part 1 ) in the web console proxy let's go through the main interface elements.
The Dashboard tab shows the status of virtual machines, the status of backup jobs, the status of the repository, the Veeam backup server, and the latest data from the event logs.
Statistics on protected VM shows the Protection Status widget , which displays:
Statistics on the repository shows the Repository Status widget , which uses the following notation:
The backup job data shows the Backup Jobs widget : green indicates the number of jobs currently running, black indicates jobs in the ' Idle ' status (“doing nothing”).
Server status data Veeam backup shows the Backup Server Status widget .
Here you can manage backup jobs:

It displays the virtual machines from the Nutanix AHV cluster, for which there is a backup in the repository. You can select the desired machine from the list and then restore it by clicking Restore , or restore a virtual disk by clicking Disk Restore .

Well, the Events tab displays events from the logs. If you have eliminated the cause of an error, you can select the appropriate entry and click Reslove .
Finally, you can learn how to set up VM backup jobs on Nutanix AHV. So let's get started.
We will customize it using the wizard:
Useful: The policies and backups created by Veeam Availability for Nutanix AHV are displayed in the Veeam Backup & Replication console. You can also customize the task of transferring backups and archiving to magnetic tape.
During the recovery process, the proxy takes the VM disk data from the backup, copies it to the original datastore, and then registers the restored machine on the node of the Nutanix AHV cluster.
Note: When planning a recovery, you should consider the current limitations (see below).
For this we need a recovery wizard:
For this type of recovery, the same restrictions apply as for VM recovery, and also this: if you want to restore a disk that was marked as bootable in the VM settings, keep in mind that this setting will be reset and you will have to tag it after recovery.
The recovery procedure is identical to the one described above: on the Protected VM s tab, click Disk Restore and then go through the wizard steps.
You will need to select the machine whose disks you will be restoring, then specify the desired recovery point.
Then, at the Disk Mapping step, select the machine to which the recovered disks will be attached. Here you can change the mapping settings by clicking the Remap disk and specifying the container, type of connection and address.

You can use the various recovery options available in the Veeam Backup & Replication console:
For more information about these operations, you can read, for example, here .
First, let's take a look back, that is, the first part of the review of the integrated solution Veeam Availability for Nutanix AHV - there was a story about how to deploy and configure the components. Now you can proceed to setting up a backup, as well as get acquainted with the recovery options.
In today's article I will tell about:
- Backup Repository Access Settings
- Introduction to the web console solution
- Backup
- Data recovery
- Restrictions of operations
So, welcome under cat.
We provide access to the repository Veeam Backup
To work with the Veeam backup repository, the user must provide the appropriate permissions. To do this, you can use security principals - user accounts or Active Directory groups. Users with access rights can both save backups in the repository, and perform recovery from these backups.
Therefore we do the following:
- In the Veeam Backup & Replication console, open the Backup Infrastructure view .
- In the Inventory panel (left) click on the Backup Repositories node .
- In the right pane, right-click on the repository and select Access Permissions from the menu that opens . (If this command is not available when you try to call it in this way, then try pressing and holding the [CTRL] key when you right-click.)
- In the Access Permissions dialog, let us indicate who will have access rights to the repository.
- Allow to everyone - any user can save backups to this repository. The effect is the same as from the issuance of rights to the Everyone group in Windows ( Anonymous - anonymous users are excluded).
- Allow to the following accounts or groups only — only specified users or groups will have access to the repository. Click Add and add the necessary accounts.
- If you want backups to be protected by encryption while saving to the repository, you can check the Encrypt backups stored on this repository checkbox and specify the type of password.
More information about setting permissions can be found in the documentation section (in English).
Introduction to the web console solution
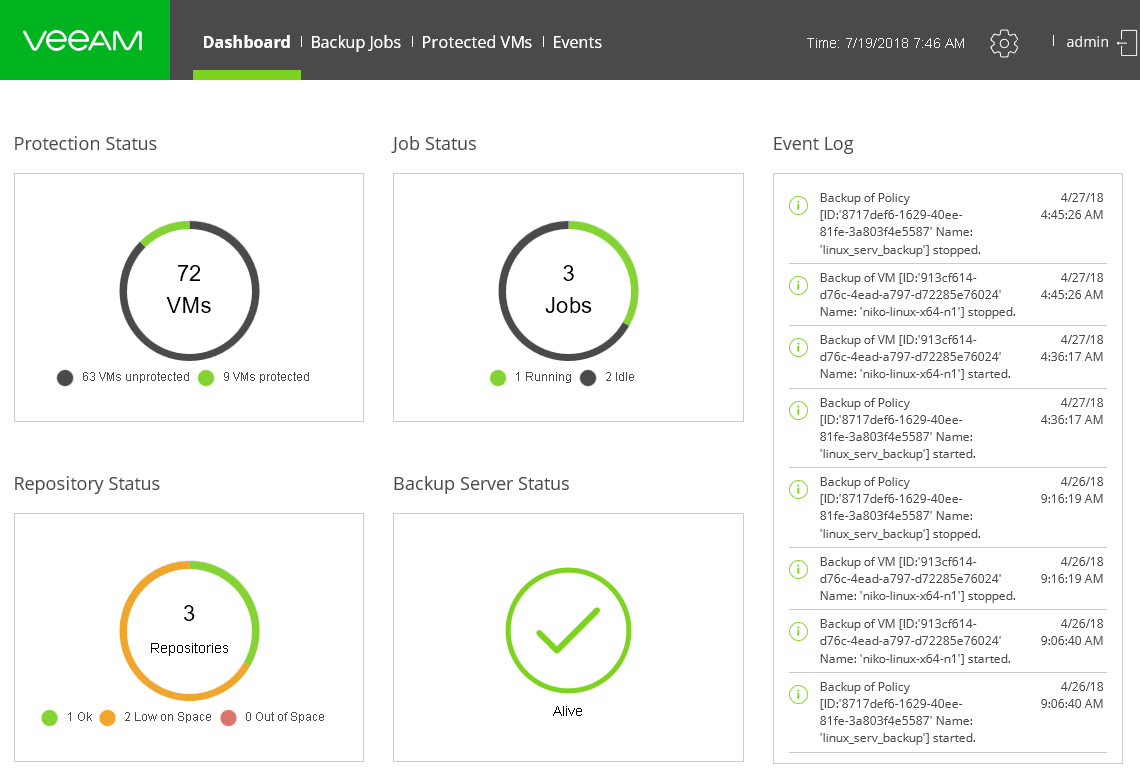
After login (see Part 1 ) in the web console proxy let's go through the main interface elements.
Dashboard Tab
The Dashboard tab shows the status of virtual machines, the status of backup jobs, the status of the repository, the Veeam backup server, and the latest data from the event logs.
Statistics on protected VM shows the Protection Status widget , which displays:
- The total number of VMs in the Nutanix AHV cluster added to our proxy infrastructure.
- The number of protected VMs (those that are backed up with Veeam) is green, and black is the number of unprotected VMs (not included in the backup tasks)
Statistics on the repository shows the Repository Status widget , which uses the following notation:
- Low on space - runs out of free space.
- Out of space - no free space
- Ok - enough space
The backup job data shows the Backup Jobs widget : green indicates the number of jobs currently running, black indicates jobs in the ' Idle ' status (“doing nothing”).
Server status data Veeam backup shows the Backup Server Status widget .
Backup Jobs tab
Here you can manage backup jobs:
- Using the Add command, you can start the wizard to create a new task. More about him talk a little below.
- To edit, of course, select the task and click Edit , and to delete - Delete .
- To start the job, click Start .
Note: If this is the first run, a full backup will be created, and if not the first, an increment will be created. - If you need to force a full backup and save it to an existing chain, then click Active Full .
- You can filter the list of tasks by status (click Status ).
Protected VMs Tab
It displays the virtual machines from the Nutanix AHV cluster, for which there is a backup in the repository. You can select the desired machine from the list and then restore it by clicking Restore , or restore a virtual disk by clicking Disk Restore .
Events tab
Well, the Events tab displays events from the logs. If you have eliminated the cause of an error, you can select the appropriate entry and click Reslove .
Finally, you can learn how to set up VM backup jobs on Nutanix AHV. So let's get started.
Backup job
We will customize it using the wizard:
- In the console of our solution, go to the Backup Jobs tab and click Add in the toolbar.
- On the step of the General Settings wizard we specify the name and description for the new task.
- In the Assign VMs step, we select the virtual machines for backup: first, click Add , then in the Add new dialog we check the checkboxes near the necessary VMs. Click Add again .
- If you want to add not individual VMs, but the protected domain, then in the dialog you should check out the Dynamic mode checkbox . Then you need to select a domain and click Add .
- (optional) To work with the domain to exclude individual VMs from processing, click Exclusions and in the VM name contains field enter the required filter.
Note: You can use the * and? Characters. Several filters in a row can not be specified.

- Click Confirm and go ahead.
- At the Backup Destination step, we specify the repository where the backups will be saved - we select it from the Backup repository list .
Note: Only repositories added to the backup infrastructure are visible in the list. - If necessary, we will additionally indicate how many days to save backups of those VMs that are no longer included in the backup tasks. To do this, click Advanced , mark the checkmark Remove deleted VMs data after (delete the data of such VM after expiration) and specify how many days you can delete backups. Click Add again .

- At the Configure Schedule step, we set the schedule for launching the task. For the launch to be automatic, you need to check the Run the job automatically checkbox . Next, choose how often to run the task - here everything is similar to Veeam Backup & Replication: daily start, once a month or at a different interval. We also indicate the number of recovery points that should be stored in the repository. When this number is exceeded, the oldest point will be deleted.
- In the Review Summary step, we check the settings. If necessary, we enable the launch option immediately after the completion of the wizard steps - Run backup job when I click Finish . Click Finish - the task is ready to go.
Useful: The policies and backups created by Veeam Availability for Nutanix AHV are displayed in the Veeam Backup & Replication console. You can also customize the task of transferring backups and archiving to magnetic tape.
Virtual Machine Recovery
During the recovery process, the proxy takes the VM disk data from the backup, copies it to the original datastore, and then registers the restored machine on the node of the Nutanix AHV cluster.
Note: When planning a recovery, you should consider the current limitations (see below).
We restore the whole car
For this we need a recovery wizard:
- Go to the tab Protected VMs and click Restore there . Then go through the steps of the wizard.
- At the Virtual Machines step, click Add and select the machine you want to restore. By default, the process will take the last created restore point. You can select another point or snapshot - to do this, click on Point , select the one you need from the list, then click OK .

Useful: Recovery from snapshot is faster than from backup. However, you can recover from snapshot only if the machine has at least one successfully created backup. - At the Restore Mode step, select the recovery mode - to the original location or to a new one.
Note: If you want to restore the VM to the original cluster, and the original machine still works there, then you will need to confirm whether you intend to replace it with the version from the backup. - In the VM name step, you can give a new name to the machine being restored - to do this, click on the Rename VM and enter the new name, optionally adding a prefix or suffix. And you can leave with the same name.
- (if you restore it to its original location) in the Select Containe r step, select the container where the VM will be saved - for this, first select the disk, then press the Container button . Select the desired container and click Add .
- Then, in the Reason step, you can enter a comment (specify the reason for the recovery, etc.).
- Finish working with the wizard at the Summary step , checking the settings and clicking the Finish button .
Recover VM Disk
For this type of recovery, the same restrictions apply as for VM recovery, and also this: if you want to restore a disk that was marked as bootable in the VM settings, keep in mind that this setting will be reset and you will have to tag it after recovery.
The recovery procedure is identical to the one described above: on the Protected VM s tab, click Disk Restore and then go through the wizard steps.
You will need to select the machine whose disks you will be restoring, then specify the desired recovery point.
Then, at the Disk Mapping step, select the machine to which the recovered disks will be attached. Here you can change the mapping settings by clicking the Remap disk and specifying the container, type of connection and address.
Other recovery options
You can use the various recovery options available in the Veeam Backup & Replication console:
- Export to virtual disk format
- Restore guest OS files
- Application object recovery
- Microsoft Azure Cloud Restore
- Restore to VM on Hyper-V platform
For more information about these operations, you can read, for example, here .
Restrictions of operations
Working with Nutanix AHV Clusters
- Some of the calls to the Nutanix API may not work due to an AHV 5.5.x API error. If this happens, then, as a rule, with a large number of simultaneously running backup tasks.
The manufacturer is preparing an update that should deal with this problem. - Nutanix CVM Restrictions:
- Backup for Nutanix CVM is not supported.
- If you increase the number of tasks being processed in parallel, the backup tasks may fail with an error due to CVM resource constraints, since CVM requires additional resources on each node of the cluster.
Backup
- Creating backups based on application performance is possible only for those machines that meet the conditions described in the documentation . Otherwise, only a crash-friendly backup will be created.
Note that the proxy does not participate in the processing of the guest OS. Creating snapshots in view of the work of applications occurs on the side of Nutanix AHV.
In addition, Nutanix AHV does not perform data trunking. For this operation, you can use pre-freeze and post-thaw scripts or use Veeam Agent for Linux or Veeam Agent for Windows. For them, you can activate the license issued to you (see Part 1 ). - For machines with NearSync enabled, snapshots will not be created due to the limitations of Nutanix NearSync. See the documentation for details .
- When backing up, an infinite-incremental backup chain will be created for each VM. If the backup task processes several VMs, then the corresponding backup chains will be stored in the repository, one for each VM.
- Compression, deduplication, and block size settings are built-in for backup jobs and cannot be changed. Their meanings are:
- block size - 1 MB;
- compression method - LZ4;
- deduplication is enabled.
- Fast cloning technology on repositories with the ReFS file system is not supported.
- Encryption settings on the repository can be set in the Veeam Backup & Replication console.
- Location settings according to GDPR in backup jobs will not be supported.
- Also, the health check of backup files will not be performed.
Restrictions for protected domains
- In the backup job settings, you can add only 1 protected domain. If you need to add multiple domains, create multiple tasks.
- Inactive protected domains are not displayed in the backup task.
- If the protected domain was specified as the source for the backup task, then this task will process only VMs from this domain. Separate volume groups added to such a domain will not be backed up by the backup task.
Restrictions for the chain of backups
- One chain is created for one virtual machine. If the task includes several VMs, then a separate chain will be created for each VM.
- Compression and deduplication will always be applied.
- The chain is infinitely incremental, but you can create an active full backup at any time. For more information about the methods of building chains, see here .
Recovery of virtual machines and disks
- The current version of the solution does not support recovery from one Nutanix cluster to another.
- Changing the network settings of the VM during the recovery will not work. This can be done only after recovery, through the “native” Prism Element or Prism Central.
- When attempting to restore from AOS 5.6 to AOS 5.1, the error “Cannot construct a map key of type com.nutanix.prism.dto.uhura.VmConfigDTO $ VmFeature from String" VGA_CONSOLE "” occurs because of a known compatibility issue in AHV 5.6.
- Parallel recovery of multiple VM / disks is not supported.
- If the source VM has a preferred host (affinity), a situation may arise when this host is not available during recovery (or the original VM was in a different cluster during backup). In this case, you need to manually configure your preferred host after you restore the VM before you start it.