Upgrade a debug board with a Baikal-T1 processor: add an SD card
- Tutorial
Since April last year, BFK3.1 debug boards with a Baikal-T1 processor on board are available for sale. Everything would be fine, but this debugging does not have the regular ability to connect an SD card.
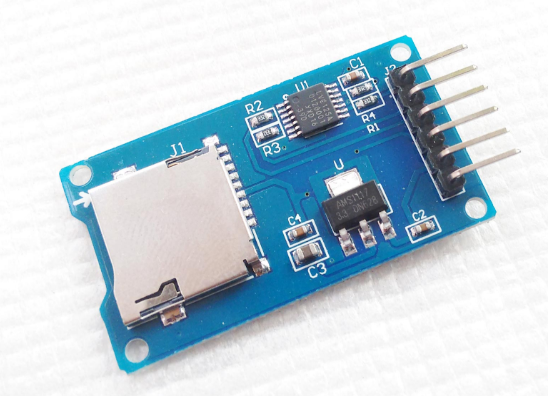
We need 30 minutes of time, a soldering iron, and an external Catalex-Micro-SD-Card-Module worth 5 pieces for 300 rubles - and the question is removed.
Here is a step-by-step guide on how to add an SD card reader to the BFK3.1. Everything described is tested in practice. We used the latest SDK 4.16 currently available on the official website of Baikal. In the SDK version 4.14 and earlier this will not work.
Step One
Take the Catalex MicroSD-Card module.

In order for the detection of the presence of a card in the slot (Card Detection) to work, you need to do the following: pull the first pin (CD / DAT3) of the card slot to the 3V3 plus through the 4K3 resistor. Here is the diagram.
The principle of operation is as follows: a high level on the first pin of the card slot means that there is no card in the slot, a low level indicates that the card is inserted.

Step two
Next, we connect the external module to the XP25 connector on the BFK3.1 board.

Step three
Add mmc to the device tree in a text editor in the file
baikal / src / kernel / arch / mips / boot / dts / baikal / baikal_bfk3.dts
Here is an example of a device description in the dts file:
Step Four.
Weassemble thekernel and the image with the command.

Step Five.
We flash the board with the team

Voila, everything works.
Here's how it goes. The service working with sd / mmc is turned on, it parses parameters from dts, configures spi, connects interrupts to Card Detection.

If an SD card is detected in the slot, this service connects it.

Then a new device appears in dev.

If you remove the card, the driver will fix this and remove the device.

We need 30 minutes of time, a soldering iron, and an external Catalex-Micro-SD-Card-Module worth 5 pieces for 300 rubles - and the question is removed.
Here is a step-by-step guide on how to add an SD card reader to the BFK3.1. Everything described is tested in practice. We used the latest SDK 4.16 currently available on the official website of Baikal. In the SDK version 4.14 and earlier this will not work.
Step One
Take the Catalex MicroSD-Card module.

In order for the detection of the presence of a card in the slot (Card Detection) to work, you need to do the following: pull the first pin (CD / DAT3) of the card slot to the 3V3 plus through the 4K3 resistor. Here is the diagram.
The principle of operation is as follows: a high level on the first pin of the card slot means that there is no card in the slot, a low level indicates that the card is inserted.

Step two
Next, we connect the external module to the XP25 connector on the BFK3.1 board.

Step three
Add mmc to the device tree in a text editor in the file
baikal / src / kernel / arch / mips / boot / dts / baikal / baikal_bfk3.dts
Here is an example of a device description in the dts file:
&spi1 {
	num-cs = <1>;
	cs-gpios = <&portb 2 GPIO_ACTIVE_LOW>; /*<&porta 17 GPIO_ACTIVE_HIGH>;*/
	status = "okay";
	  mmc@0 {
    		status = "okay";
    		compatible = "mmc-spi-slot";
    		spi-max-frequency = <10000000>;
    		reg = <0>;
    		voltage-ranges = <3200 3400>;
    		/*gpios = , ;*/
    		gpios = <&porta 17 GPIO_ACTIVE_LOW>;
		/*non-removable;*/
		disable-wp;
		};
Step Four.
Weassemble thekernel and the image with the command.
./usr/scripts/build-boot-img.sh bfk3 -a
Step Five.
We flash the board with the team
sudo dfu-util -a 0 -D, indicating the path along which the assembled image is located. In our case, this is sdk_4.16 / img / bfk3.rom
Voila, everything works.
Here's how it goes. The service working with sd / mmc is turned on, it parses parameters from dts, configures spi, connects interrupts to Card Detection.

If an SD card is detected in the slot, this service connects it.

Then a new device appears in dev.

If you remove the card, the driver will fix this and remove the device.

