ML.NET tutorial - the first application in 10 minutes
- Transfer
Last year, we introduced ML.NET, a cross-platform and open machine learning system for .NET developers. During this time, she has developed very much and has gone through many versions. Today we are sharing a guide on how to create your first ml.net application in 10 minutes.

* This is an English manual .
** Below is a tutorial for Windows. But exactly the same can be done on MacOS / Linux .
To start creating .NET applications, you just need to download and install the .NET SDK (Software Development Kit).

Open a command prompt and run the following commands:
The team
To use ML.NET, you need to install the Microsoft.ML package. At the command prompt, run the following command:
Our exponential machine learning application will predict the type of iris flower (setosa, versicolor or virginica) based on four characteristics: petal length, petal width, sepal length, and sepal width.
Open the UCI machine learning repository : Iris dataset, copy and paste the data into a text editor (for example, Notepad) and save it as
When you add data, it will look like this: each row represents a different pattern of an iris flower. From left to right, the columns represent: sepal length, sepal width, petal length, petal width, and iris flower type.
If you are using Visual Studio, you need to configure
Open
At the command prompt, run the following command:
The last line of output is the predicted type of iris flower. You can change the values passed to the function
Congratulations, you created your first machine learning model with ML.NET!
Now that you have the basics, you can continue learning with our ML.NET tutorials.
* This is an English manual .
** Below is a tutorial for Windows. But exactly the same can be done on MacOS / Linux .
Install .NET SDK
To start creating .NET applications, you just need to download and install the .NET SDK (Software Development Kit).
Create your application
Open a command prompt and run the following commands:
dotnet new console -o myApp
cd myApp
The team
dotnet will create an newapplication for you console. The parameter -ocreates a directory with the name myAppin which your application is stored, and fills it with the necessary files. The cd myApp command will return you to the created application directory.Install ML.NET package
To use ML.NET, you need to install the Microsoft.ML package. At the command prompt, run the following command:
dotnet add package Microsoft.ML --version 0.9.0Download DB
Our exponential machine learning application will predict the type of iris flower (setosa, versicolor or virginica) based on four characteristics: petal length, petal width, sepal length, and sepal width.
Open the UCI machine learning repository : Iris dataset, copy and paste the data into a text editor (for example, Notepad) and save it as
iris-data.txtin a directory myApp. When you add data, it will look like this: each row represents a different pattern of an iris flower. From left to right, the columns represent: sepal length, sepal width, petal length, petal width, and iris flower type.
5.1,3.5,1.4,0.2,Iris-setosa
4.9,3.0,1.4,0.2,Iris-setosa
4.7,3.2,1.3,0.2,Iris-setosa
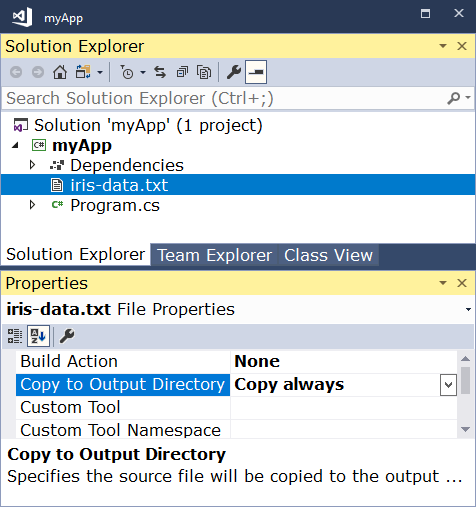
...Using Visual Studio?
If you are using Visual Studio, you need to configure
iris-data.txtto copy to output directories.A little bit of cod
Open
Program.csin any text editor and replace all code with the following:using Microsoft.ML;
using Microsoft.ML.Data;
using System;
namespace myApp
{
classProgram
{// Шаг 1: Определите ваши структуры данных// IrisData используется для предоставления обучающих данных, а также// как введение для предиктивных операций// - Первые 4 свойства -- это входные данные / функции, используемые для прогнозирования метки label// - Label -- это то, что вы предсказываете, и устанавливается только при обученииpublicclassIrisData
{
[LoadColumn(0)]
publicfloat SepalLength;
[LoadColumn(1)]
publicfloat SepalWidth;
[LoadColumn(2)]
publicfloat PetalLength;
[LoadColumn(3)]
publicfloat PetalWidth;
[LoadColumn(4)]
publicstring Label;
}
// IrisPrediction является результатом, возвращенным из операций прогнозированияpublicclassIrisPrediction
{
[ColumnName("PredictedLabel")]
publicstring PredictedLabels;
}
staticvoidMain(string[] args){
// Шаг 2: создание среды ML.NET
var mlContext = new MLContext();
// Если работаете в Visual Studio, убедитесь, что параметр 'Copy to Output Directory'// iris-data.txt установлен как 'Copy always'
var reader = mlContext.Data.CreateTextReader<IrisData>(separatorChar: ',', hasHeader: true);
IDataView trainingDataView = reader.Read("iris-data.txt");
// Шаг 3: Преобразуйте свои данные и добавьте learner// Присвойте числовые значения тексту в столбце «label», потому что только// числа могут быть обработаны во время обучения модели.// Добавьте обучающий алгоритм в pipeline. Например (What type of iris is this?)// Преобразовать label обратно в исходный текст (после преобразования в число на шаге 3)
var pipeline = mlContext.Transforms.Conversion.MapValueToKey("Label")
.Append(mlContext.Transforms.Concatenate("Features", "SepalLength", "SepalWidth", "PetalLength", "PetalWidth"))
.Append(mlContext.MulticlassClassification.Trainers.StochasticDualCoordinateAscent(labelColumn: "Label", featureColumn: "Features"))
.Append(mlContext.Transforms.Conversion.MapKeyToValue("PredictedLabel"));
// Шаг 4: обучите модель на этом дата-сете
var model = pipeline.Fit(trainingDataView);
// Шаг 5: используйте модель для предсказания// Вы можете изменить эти цифры, чтобы проверить разные прогнозы
var prediction = model.CreatePredictionEngine<IrisData, IrisPrediction>(mlContext).Predict(
new IrisData()
{
SepalLength = 3.3f,
SepalWidth = 1.6f,
PetalLength = 0.2f,
PetalWidth = 5.1f,
});
Console.WriteLine($"Predicted flower type is: {prediction.PredictedLabels}");
}
}
}Run your application
At the command prompt, run the following command:
dotnet runThe last line of output is the predicted type of iris flower. You can change the values passed to the function
Predictto see the predictions based on various dimensions. Congratulations, you created your first machine learning model with ML.NET!
Do not stop there
Now that you have the basics, you can continue learning with our ML.NET tutorials.