DIY do-it-yourself spacecraft control panel
- Tutorial
Hello dear readers!
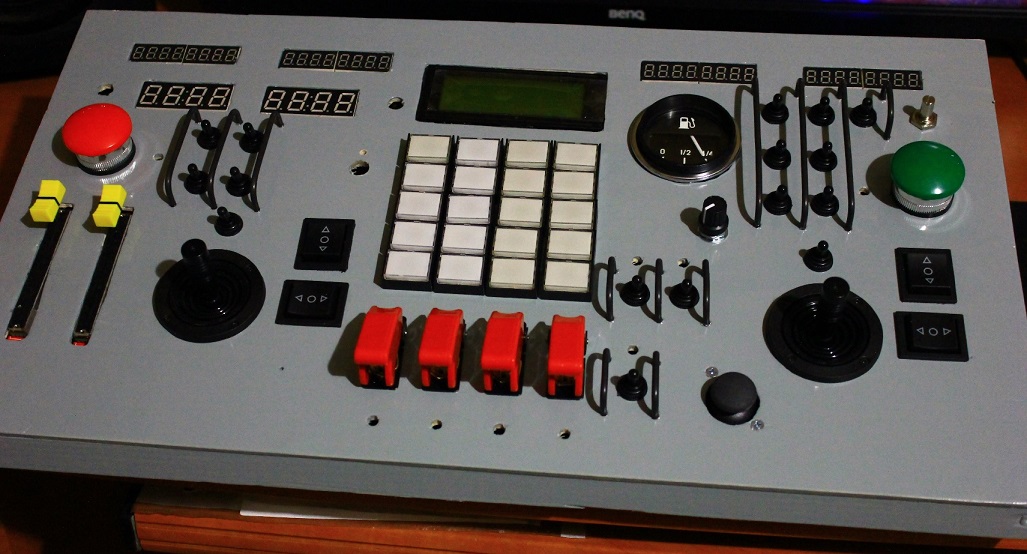
One idea came to me here, but not to assemble a control panel for a spaceship. To USB. With native driver support. Custom HID. To stick and everything works, without any dances and tambourines. As a result, we got a kind of monstrous “gamepad” for space simulators. In general, judge for yourself.
At first, I had little idea what would happen in the end. I wanted two main joysticks, like on Soyuz-MS, a few switches, buttons and several displays.
Having estimated the working surface of my table, I chose the dimensions of the console in width and depth 500 * 300 mm. And having rummaged through construction warehouses and shops in search of building materials, he chose a height of 125mm. As a result, I acquired a sheet of 4 mm plywood, slats 20 * 12 mm and a board 120 * 20 mm.
In the cad, a sketch of the remote control was quickly sketched. And I did it in a tree for a very long time. Three months. on weekends. And not because he worked so imposingly as a saw, but because of lack of time. The panel was puttied, sanded and painted with enamel paint, similar in color to real panels of spaceships or aircraft.

But for now, leave painting work aside and I will talk about electronic stuffing.
Radio parts were purchased on Ali. As joysticks, I found these. In general, the situation with such joysticks is a complete seam. Industrial solutions are too expensive, but cheap, come as toys and therefore bad. These are quite high-quality, but they will not be aware of how long they will be.

The rest of the little thing did not cause problems. The controller selected STM32. As an ADC for joysticks, 16-bit ADS1118. A 12 V power supply was also purchased. Actually, this voltage is due to the fact that I got a fuel gauge from the “shah”, which I also wanted to attach here.
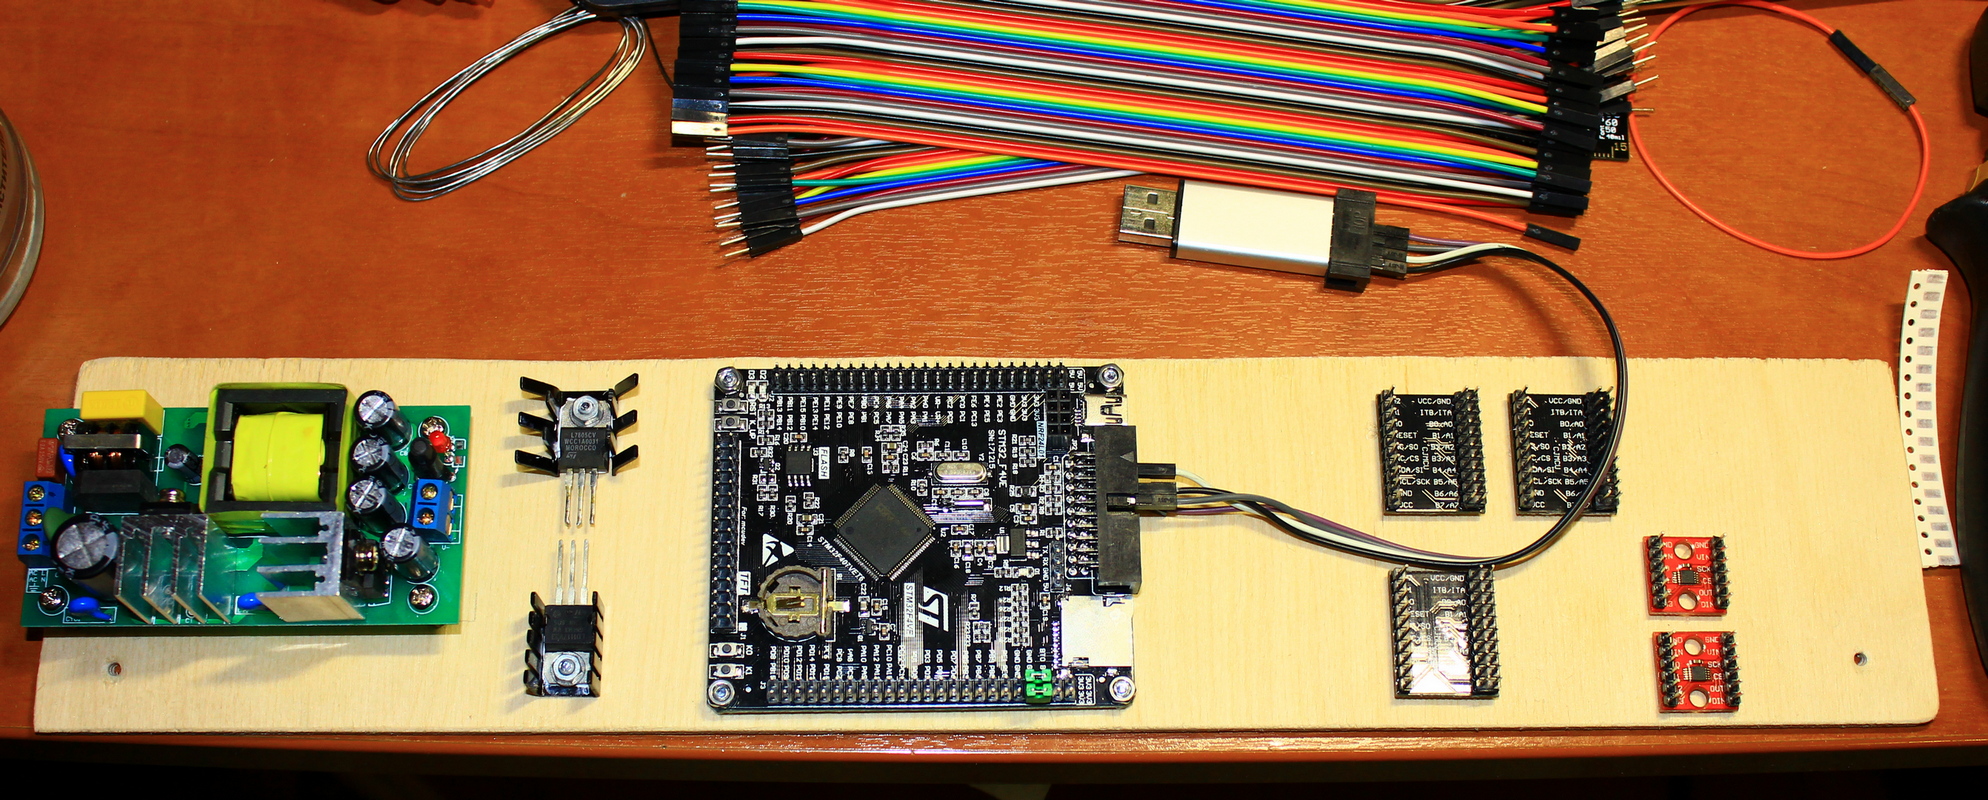
In the photo, the power supply, stabilizers for 5 and 3.3 V, STM32, MCP23017, ADS1118
100-pin controller STM32F407VET6, it is connected to:
2 selectors at 4 positions
1 variable resistor
2 axis switches
4 main axes
2 auxiliary axes
2 control axles
4 key switches 2 buttons each
20 buttons with LEDs
4 main switches with LEDs
2 fungus buttons with LEDs
2 timer buttons
3 switches with LEDs
13 switches
2 ADS1118 (ADC)
4 MAX7219 (8-digit LED displays)
2 TM1637 (clock display)
1 PCF8574 (I / O expander, plugged into the character-synthesizing display)
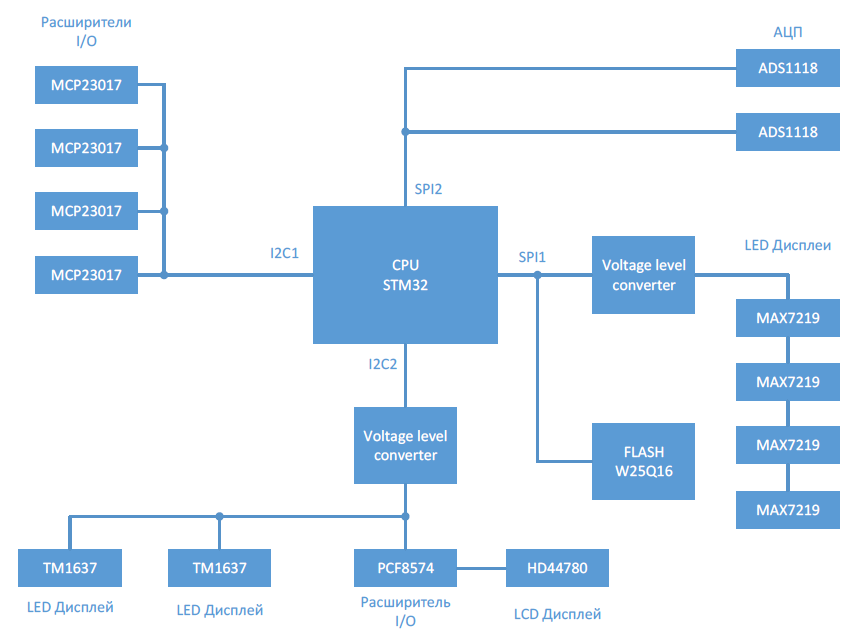
The result was such a structure
. Something will be a bit much for hundreds of MK legs, I decided, and I added here the I / O expanders: four pieces of MCP23017, for 16 inputs or outputs each. Looking ahead, I will say that the delay in polling the inputs of the expander turned out to be about 0.13 ms per chip, at an I2C bus speed of 400 kHz. That is, it with a margin covers the minimum USB polling time of 1 ms.
In order not to drive the I2C bus with useless requests, the MCP23017 has interrupt outputs that are set when the state of the inputs changes. I also applied them in my project. As it turned out further, due to the rattling of contacts, these interruptions were useless.
The ADS1118 ADC does not keep up somewhat with the USB speed, its declared performance is at most 820 samples per second, which is 1.2 ms, while it has several inputs that are already connected to the ADC through the multiplexer. I used 2 inputs on one chip, so the update time of the values is 2.4 ms. Bad, but what can you do? Unfortunately, there are no other 16-bit fast ADCs on Ali.
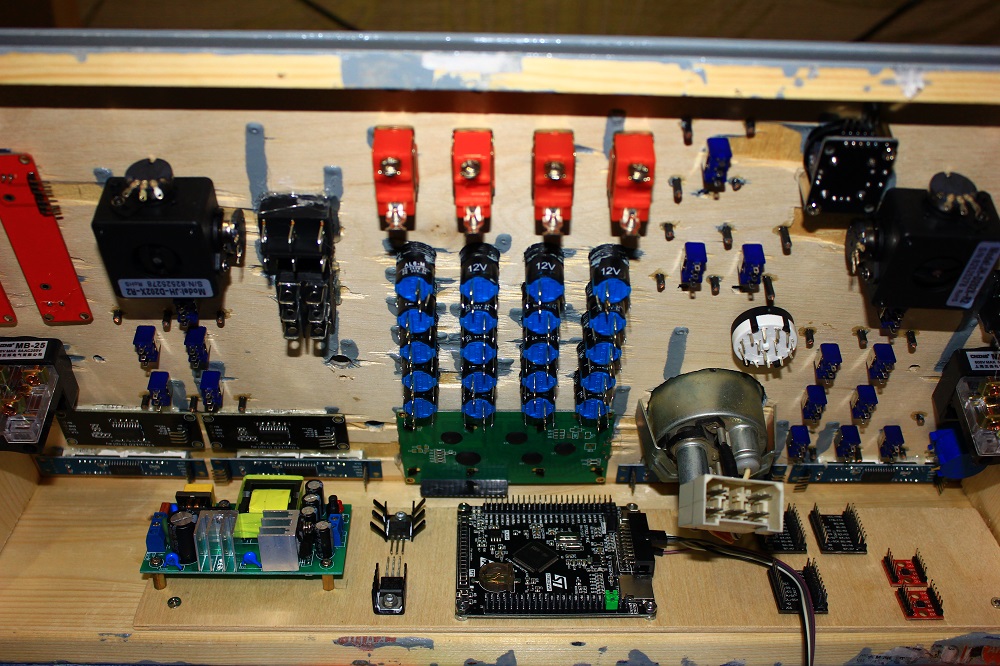
Inside it looks like this, but after installing the wires it is much worse
The CPU program is written in the style of a PLC program. No blocking requests. The core does not wait for the periphery, has not had time and to hell with it, at the next cycle will interrogate. There are no RTOS in the project either, I tried it, I ran into a minimum task wait time of 1 ms - it turns out slowly if we need to send data via USB with a frequency of 1 ms. As a result, I realized that I would use the OS without osDelay (), and then why RTOS? Just as in a PLC, placing the program instructions one by one inside an infinite loop is quite enough.
Used, of course, CubeMX and HAL libraries. By the way, I recently switched to HAL and wondered about convenience. I don’t know why it’s still not very popular, the main thing there is to figure it out at first, and then it will go very simply. It feels like you're programming arduino.
The device we will have USB custom HID. HID is mouse, keyboard, gamepad, joystick, some more. And there is custom. All this does not require drivers from the operating system. More precisely, they are already written by the developer. A custom device is good in that we ourselves combine the capabilities of all the above devices at our discretion.
In general, the USB thing is very complicated, it has a manual of almost a thousand pages and you can’t take it from a snap. Who does not want to read heavy manuals, there is a great article USB in a NutShell, google. She also has a translation. I’ll try to explain some points “on the fingers”.
USB - packetized data transfer with a bunch of levels and abstractions. The device is with us - it cannot request any data, the host initiates the entire transfer. The host writes and requests data to the so-called endpoints, physically these are some buffers in the MK memory. In order for the host to understand by which endpoints it is possible to write, which endpoints to read and what data it can interpret as buttons and axes of our device and, in general, what kind of device we have here, at the beginning of the connection it requests device descriptors. There are many of these descriptors and it is difficult to compose them and you can as you like, and also make mistakes anywhere. Physically, they are an array of bytes.
In fact, CubeMX will generate Custom HID initialization code better than us.

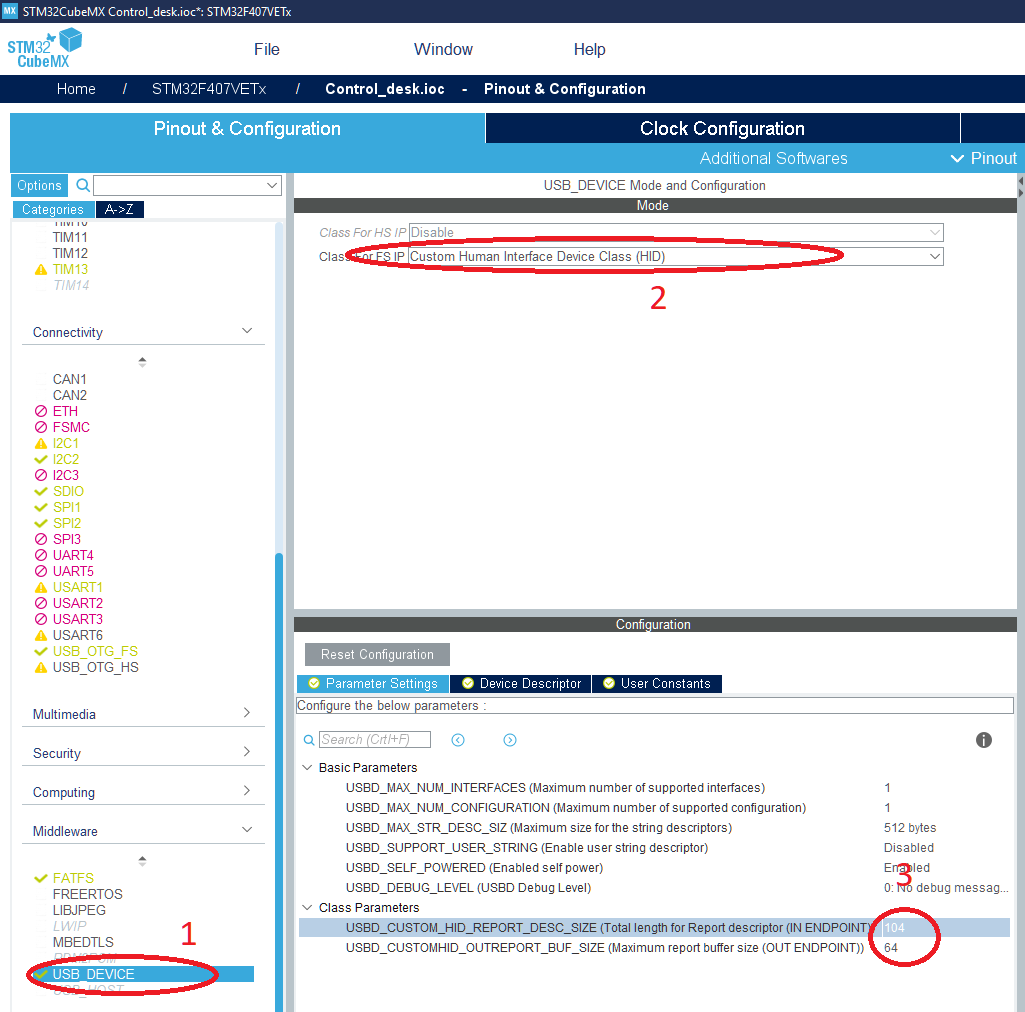
Please pay attention to the last picture under the number 3. This is the size of the descriptor in bytes, which determines which axes and buttons are on our device. This descriptor is generated in the HID Descriptor Tool . There are several examples for self-study. Generally, here is my descriptor. There is no data for displays yet, for ease of understanding, but all the buttons and axes of the joysticks are present. It needs to be placed in the usbd_custom_hid_if.c file. By default, this handle makes the cube empty.
HID Descriptor (size 104 bytes)
__ALIGN_BEGIN static uint8_t CUSTOM_HID_ReportDesc_FS[USBD_CUSTOM_HID_REPORT_DESC_SIZE] __ALIGN_END =
{
  /* USER CODE BEGIN 0 */
	0x05, 0x01,                    // USAGE_PAGE (Generic Desktop)
	0x15, 0x00,                    // LOGICAL_MINIMUM (0)
	0x09, 0x04,                    // USAGE (Joystick)
	0xa1, 0x01,                    // COLLECTION (Application)
	0x05, 0x02,                    //   USAGE_PAGE (Simulation Controls)
	0x09, 0xbb,                    //   USAGE (Throttle)
	0x15, 0x00,                    //   LOGICAL_MINIMUM (0)
	0x27, 0xff, 0xff, 0x00, 0x00,  //   LOGICAL_MAXIMUM (65535)
	0x75, 0x10,                    //   REPORT_SIZE (16)
	0x95, 0x01,                    //   REPORT_COUNT (1)
	0x81, 0x02,                    //   INPUT (Data,Var,Abs)
	0x05, 0x01,                    //   USAGE_PAGE (Generic Desktop)
	0x09, 0x01,                    //   USAGE (Pointer)
	0xa1, 0x00,                    //   COLLECTION (Physical)
	0x09, 0x30,                    //     USAGE (X)
	0x09, 0x31,                    //     USAGE (Y)
	0x95, 0x02,                    //     REPORT_COUNT (2)
	0x81, 0x02,                    //     INPUT (Data,Var,Abs)
	0xc0,                          //   END_COLLECTION
	0x05, 0x01,                    //   USAGE_PAGE (Generic Desktop)
	0x09, 0x32,                    //   USAGE (Z)
	0x95, 0x01,                    //   REPORT_COUNT (1)
	0x81, 0x02,                    //   INPUT (Data,Var,Abs)
	0x09, 0x33,                    //   USAGE (Rx)
	0x81, 0x02,                    //   INPUT (Data,Var,Abs)
	0x09, 0x34,                    //   USAGE (Ry)
	0x81, 0x02,                    //   INPUT (Data,Var,Abs)
	0x09, 0x35,                    //   USAGE (Rz)
	0x81, 0x02,                    //   INPUT (Data,Var,Abs)
	0x09, 0x36,                    //   USAGE (Slider)
	0x81, 0x02,                    //   INPUT (Data,Var,Abs)
	0x09, 0x39,                    //   USAGE (Hat switch)
	0x15, 0x01,                    //   LOGICAL_MINIMUM (1)
	0x25, 0x08,                    //   LOGICAL_MAXIMUM (8)
	0x35, 0x00,                    //   PHYSICAL_MINIMUM (0)
	0x46, 0x0e, 0x01,              //   PHYSICAL_MAXIMUM (270)
	0x65, 0x14,                    //   UNIT (Eng Rot:Angular Pos)
	0x75, 0x08,                    //   REPORT_SIZE (8)
	0x95, 0x01,                    //   REPORT_COUNT (1)
	0x81, 0x02,                    //   INPUT (Data,Var,Abs)
	0x05, 0x09,                    //   USAGE_PAGE (Button)
	0x19, 0x01,                    //   USAGE_MINIMUM (Button 1)
	0x29, 0x40,                    //   USAGE_MAXIMUM (Button 64)
	0x15, 0x00,                    //   LOGICAL_MINIMUM (0)
	0x25, 0x01,                    //   LOGICAL_MAXIMUM (1)
	0x75, 0x01,                    //   REPORT_SIZE (1)
	0x95, 0x40,                    //   REPORT_COUNT (64)
	0x55, 0x00,                    //   UNIT_EXPONENT (0)
	0x65, 0x00,                    //   UNIT (None)
	0x81, 0x02,                    //   INPUT (Data,Var,Abs)
  /* USER CODE END 0 */
  0xC0    /*     END_COLLECTION	             */
};
In fact, it can be composed as you like, first you set the USAGE PAGE parameters and the required USAGE, for example, the USAGE (Throttle) axis, and then after the word INPUT (Data, Var, Abs), the system will assume that we have the “Gas” axis. The dimension of the variable axis and their number are set by the parameters LOGICAL_MAXIMUM, MINIMUM, REPORT_SIZE, REPORT_COUNT, which must be before INPUT.
More details about these parameters, as well as what (Data, Var, Abs) can be found in Device Class Definition for Human Interface Devices (HID) v1.11 .
The following is an example of initializing the Throttle axis from my descriptor. In this example, Throttle has a value range of 0-65535, which corresponds to one uint16_t variable.
	0x05, 0x02,                    //   USAGE_PAGE (Simulation Controls)
	0x09, 0xbb,                    //   USAGE (Throttle)
	0x15, 0x00,                    //   LOGICAL_MINIMUM (0)
	0x27, 0xff, 0xff, 0x00, 0x00,  //   LOGICAL_MAXIMUM (65535)
	0x75, 0x10,                    //   REPORT_SIZE (16)
	0x95, 0x01,                    //   REPORT_COUNT (1)
	0x81, 0x02,                    //   INPUT (Data,Var,Abs)
And yes, yet, let's say you can not write LOGICAL_MAXIMUM, MINIMUM, REPORT_SIZE, REPORT_COUNT every time, the host will determine this value by the previous parameter. This is illustrated by the axes that go one after the other, without specifying the size and number:
	0x09, 0x32,                    //   USAGE (Z)
	0x95, 0x01,                    //   REPORT_COUNT (1)
	0x81, 0x02,                    //   INPUT (Data,Var,Abs)
	0x09, 0x33,                    //   USAGE (Rx)
	0x81, 0x02,                    //   INPUT (Data,Var,Abs)
	0x09, 0x34,                    //   USAGE (Ry)
	0x81, 0x02,                    //   INPUT (Data,Var,Abs)
	0x09, 0x35,                    //   USAGE (Rz)
	0x81, 0x02,                    //   INPUT (Data,Var,Abs)
	0x09, 0x36,                    //   USAGE (Slider)
The following structure corresponds to all this descriptor, which is higher under the spoiler. It, in fact, is no longer mandatory, it’s just more convenient to record based on pointers.
#pragma pack(push, 1)
typedef struct _myReportStruct
{
  uint16_t Throttle;
  uint16_t X;
  uint16_t Y;
  uint16_t Z;
  uint16_t Rx;
  uint16_t Ry;
  uint16_t Rz;
  uint16_t Slider;
  uint8_t Hat; // 0 - none, 1 - up, 2 - up-right, 3 - right, 4 - down-right...
  uint32_t Buttons1; // 32 buttons of 1 bit each
  uint32_t Buttons2; // 32 buttons of 1 bit each
}myReportStruct;
#pragma pack(pop)
volatile myReportStruct Desk;
This structure can be sent to the host by the function
USBD_CUSTOM_HID_SendReport(&hUsbDeviceFS, (uint8_t *) &Desk, sizeof(Desk));The first parameter is a USB handle; it is already created in our cube. You may need to include the necessary file with the include where this handle is initialized for the first time and write extern USBD_HandleTypeDef hUsbDeviceFS; so that you can work with him. The second parameter is a pointer to our structure and the third is the size of the structure in bytes.
After filling and flashing the controller, you will notice that something USB is slowly moving. Data from our panel is not updated quickly. To be quick, in the usbd_customhid.h files you need to change #define CUSTOM_HID_EPIN_SIZE to the maximum value 0x40, #define CUSTOM_HID_EPOUT_SIZE also set 0x40. In the usbd_customhid.c file, find comments in the endpoint descriptor "/ * bInterval: Polling Interval (20 ms) * /" and change the descriptor byte to 0x01 for each endpoint, only two times. Which will correspond to 1 ms data exchange.
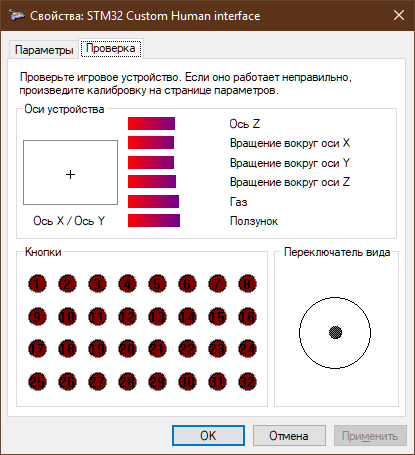
It should be something like this. Standard device without installing any drivers
In general, the management function is a little understood. It is quite easy to do and all buttons and axes are already working. It remains to make the displays work. I did it, about six months, and for half a year the panel has been gathering dust in a long box. No time. Therefore, I decided to lay out the article in this form, otherwise it risks not even coming out.
With displays, everything is the same as with axes. For them, we need to supplement our device HID descriptor, just indicate that these are displays and instead of accepting Input data, the host will send Output data.
The handle of the HID device has grown significantly. Here I have already applied the Report ID parameters so as not to clog the transmit / receive buffer and endpoints with full data and to distinguish what kind of telegram we have received. The Report ID is a uint8_t byte with the value that comes at the beginning of the telegram. The value we set in the device descriptor HID.
CUSTOM_HID_ReportDesc_FS
//AXIS
	0x05, 0x01,                    // USAGE_PAGE (Generic Desktop)
	0x09, 0x04,                    // USAGE (Joystick)
	0xa1, 0x01,                    // COLLECTION (Application)28
	0x05, 0x02,                    //   USAGE_PAGE (Simulation Controls)
	0x09, 0xbb,                    //   USAGE (Throttle)
	0x15, 0x00,                    //   LOGICAL_MINIMUM (0)
	0x27, 0xff, 0xff, 0x00, 0x00,  //   LOGICAL_MAXIMUM (65535)
	0x75, 0x10,                    //   REPORT_SIZE (16)
	0x95, 0x01,                    //   REPORT_COUNT (1)
	0x85, 0x01,					   //   REPORT_ID (1)
	0x81, 0x02,                    //   INPUT (Data,Var,Abs)
	0x05, 0x01,                    //   USAGE_PAGE (Generic Desktop)
	0x09, 0x01,                    //   USAGE (Pointer)
	0xa1, 0x00,                    //   COLLECTION (Physical)
	0x09, 0x30,                    //     USAGE (X)
	0x09, 0x31,                    //     USAGE (Y)
	0x95, 0x02,                    //     REPORT_COUNT (2)
	0x81, 0x02,                    //     INPUT (Data,Var,Abs)
	0xc0,                          //   END_COLLECTION
	0x05, 0x01,                    //   USAGE_PAGE (Generic Desktop)
	0x09, 0x32,                    //   USAGE (Z)
	0x95, 0x01,                    //   REPORT_COUNT (1)
	0x81, 0x02,                    //   INPUT (Data,Var,Abs)
	0x09, 0x33,                    //   USAGE (Rx)
	0x81, 0x02,                    //   INPUT (Data,Var,Abs)
	0x09, 0x34,                    //   USAGE (Ry)
	0x81, 0x02,                    //   INPUT (Data,Var,Abs)
	0x09, 0x35,                    //   USAGE (Rz)
	0x81, 0x02,                    //   INPUT (Data,Var,Abs)
	0x09, 0x36,                    //   USAGE (Slider)
	0x81, 0x02,                    //   INPUT (Data,Var,Abs)
	//HAT
	0x09, 0x39,                    //   USAGE (Hat switch)
	0x15, 0x01,                    //   LOGICAL_MINIMUM (1)
	0x25, 0x08,                    //   LOGICAL_MAXIMUM (8)
	0x35, 0x00,                    //   PHYSICAL_MINIMUM (0)
	0x46, 0x0e, 0x01,              //   PHYSICAL_MAXIMUM (270)
	0x65, 0x14,                    //   UNIT (Eng Rot:Angular Pos)
	0x75, 0x08,                    //   REPORT_SIZE (8)
	0x95, 0x01,                    //   REPORT_COUNT (1)
	0x81, 0x02,                    //   INPUT (Data,Var,Abs)
	//Buttons
	0x05, 0x09,                    //   USAGE_PAGE (Button)
	0x19, 0x01,                    //   USAGE_MINIMUM (Button 1)
	0x29, 0x40,                    //   USAGE_MAXIMUM (Button 64)
	0x15, 0x00,                    //   LOGICAL_MINIMUM (0)
	0x25, 0x01,                    //   LOGICAL_MAXIMUM (1)
	0x75, 0x01,                    //   REPORT_SIZE (1)
	0x95, 0x40,                    //   REPORT_COUNT (64)
	0x55, 0x00,                    //   UNIT_EXPONENT (0)
	0x65, 0x00,                    //   UNIT (None)
	0x81, 0x02,                    //   INPUT (Data,Var,Abs)
	//LEDs
	0x85, 0x02,					   // REPORT_ID (2)
	0x05, 0x08,                    // USAGE_PAGE (LEDs)
	0x09, 0x4B,                    // USAGE (Generic Indicator)
	0x95, 0x40,                    // REPORT_COUNT (16)
	0x91, 0x02,                    // OUTPUT (Data,Var,Abs)
	0xc0,                          // END_COLLECTION
	//LCD Displays
        0x05, 0x14,                    // USAGE_PAGE (Alphnumeric Display)
	0x09, 0x01,                    // USAGE (Alphanumeric Display)
	0x15, 0x00,                    // LOGICAL_MINIMUM (0)
	0xa1, 0x02,                    // COLLECTION (Logical)
	0x09, 0x32,                    //   USAGE (Cursor Position Report)
	0xa1, 0x02,                    //   COLLECTION (Logical)
	0x85, 0x04,                    //     REPORT_ID (4)
	0x75, 0x08,                    //     REPORT_SIZE (8)
	0x95, 0x01,                    //     REPORT_COUNT (1)
	0x25, 0x13,                    //     LOGICAL_MAXIMUM (19)
	0x09, 0x34,                    //     USAGE (Column)
	0xb1, 0x22,                    //     FEATURE (Data,Var,Abs,NPrf)
	0x25, 0x03,                    //     LOGICAL_MAXIMUM (3)
	0x09, 0x33,                    //     USAGE (Row)
	0x91, 0x22,                    //     OUTPUT (Data,Var,Abs,NPrf)
	0xc0,                          //   END_COLLECTION
	0x09, 0x2b,                    //   USAGE (Character Report)
	0xa1, 0x02,                    //   COLLECTION (Logical)
	0x85, 0x05,                    //     REPORT_ID (5)
	0x95, 0x14,                    //     REPORT_COUNT (20)
	0x26, 0xFF, 0x00,              //     LOGICAL_MAXIMUM (255)
	0x09, 0x2c,                    //     USAGE (Display Data)
	0x92, 0x02, 0x01,              //     OUTPUT (Data,Var,Abs,Buf)
	0xc0,                          //   END_COLLECTION
    0x09, 0x24,                    // USAGE (Display Control Report)
    0x85, 0x06,                    // REPORT_ID (6)
    0x95, 0x01,                    // REPORT_COUNT (1)
    0x91, 0x22,                    // OUTPUT (Data,Var,Abs,NPrf)
	0xc0,                          // END_COLLECTION
	//LED Displays
        0x05, 0x14,                    // USAGE_PAGE (Alphnumeric Display)
	0x09, 0x01,                    // USAGE (Alphanumeric Display)
	0x15, 0x00,                    // LOGICAL_MINIMUM (0)
	0xa1, 0x02,                    // COLLECTION (Logical)
	0x09, 0x2b,                    //   USAGE (Character Report)
	0xa1, 0x02,                    //   COLLECTION (Logical)
	0x85, 0x07,                    //     REPORT_ID (7)
	0x75, 0x08,                    //     REPORT_SIZE (8)
	0x95, 0x28,                    //     REPORT_COUNT (40)
	0x26, 0xFF, 0x00,              //     LOGICAL_MAXIMUM (255)
	0x09, 0x2c,                    //     USAGE (Display Data)
	0x92, 0x02, 0x01,              //     OUTPUT (Data,Var,Abs,Buf)
	0xc0,                          //   END_COLLECTION
	//Other DATA
    0x06, 0x00, 0xff,              // USAGE_PAGE (Generic Desktop)
    0x09, 0x01,                    // USAGE (Vendor Usage 1)
    0xa1, 0x01,                    // COLLECTION (Application)
    0x85, 0x08,                    //   REPORT_ID (8)
    0x09, 0x01,                    //   USAGE (Vendor Usage 1)
    0x15, 0x00,                    //   LOGICAL_MINIMUM (0)
    0x27, 0xff, 0xff, 0x00, 0x00,  //   LOGICAL_MAXIMUM (65535)
    0x75, 0x10,                    //   REPORT_SIZE (16)
    0x95, 0x0A,                    //   REPORT_COUNT (10)
    0x91, 0x82,                    //   OUTPUT (Data,Var,Abs,Vol)
Output is processed in the static int8_t function CUSTOM_HID_OutEvent_FS (uint8_t event_idx, uint8_t state) , which, by default, is located in usbd_custom_hid_if.c.
static int8_t CUSTOM_HID_OutEvent_FS ()
static int8_t CUSTOM_HID_OutEvent_FS(uint8_t event_idx, uint8_t state)
{
  /* USER CODE BEGIN 6 */
  uint8_t dataReceiveArray[USBD_CUSTOMHID_OUTREPORT_BUF_SIZE];
  USBD_CUSTOM_HID_HandleTypeDef     *hhid = (USBD_CUSTOM_HID_HandleTypeDef*)hUsbDeviceFS.pClassData;
  for (uint8_t i = 0; i < USBD_CUSTOMHID_OUTREPORT_BUF_SIZE; i++)
  {
	dataReceiveArray[i] = hhid->Report_buf[i];
  }
  if (dataReceiveArray[0] == 2) //report ID 2 leds
  {
       // если Report id == 2, то делаем что-то на основе данных в dataReceiveArray[1 + N], например, зажигаем LED
  }
  if (dataReceiveArray[0] == 4) //report ID 4 cursor position
  {
       // если Report id == 4, то делаем что-то, например устанавливаем курсор на LCD
  }
  if (dataReceiveArray[0] == 5) //report ID 5 display data
  {
     // если Report id == 5, то делаем что-то, например выводим данные с USB на LCD
  }
  // и так далее, смотря сколько ID у нас в дескрипторе
  return (USBD_OK);
  /* USER CODE END 6 */
}
It remains only to write a program on a PC that sends the necessary reports to steer displays. However, to check the MK code, a great program from ST: USB HID Demonstrator is suitable . It allows you to send reports from a PC with any content.

LED Display Test
At this point I have finished. And it is not known whether I will start again.
It is played in simulators more interesting than with a keyboard. But not so much so that there was a direct wow effect. The keyboard, it also looks like a control panel. But controlling joystick axles is, at a minimum, unusual. Feel like an astronaut. True, a spacesuit is needed for complete immersion.
I hope you were interested. Typos, inaccuracies and delusions are present. Those who want to dig deeper into the code can see here .
Sincerely.