React Tutorial, Part 9: Component Properties
- Transfer
- Tutorial
In today's part of the translation of the React course, we’ll talk about the properties of the components. This is one of the most important concepts reflected in this library.
→ Part 1: course overview, reasons for the popularity of React, ReactDOM and JSX
→ Part 2: functional components
→ Part 3: component files, project structure
→ Part 4: parent and child components
→ Part 5: starting work on a TODO application, basics of styling
→ Part 6: about some features of the course, JSX and JavaScript
→ Part 7: inline styles
→ Part 8: continued work on a TODO application, familiarity with the properties of components
→

Part 9: properties of components
→ Part 10: workshop on working with properties of components and styling
→ Part 11: dynamic markup generation and the array method map
→ Part 12: workshop, third stage of working on a TODO application
→ Part 13: class-based components
→ Part 14: a workshop on class-based components, state of components
→ Part 15: workshops on working with the state of components
→ Part 16: fourth stage of working on a TODO application, event processing
→ Part 17: fifth stage of working on a TODO application, modification status Components
→Part 18: the sixth stage of working on a TODO application
→ Part 19: methods of component life cycle
→ Part 20: the first lesson on conditional rendering
→ Part 21: the second lesson and practice on conditional rendering
→ Part 22: the seventh stage of working on a TODO application, loading data from external sources
→ Part 23: first lesson on working with forms
→ Part 24: second lesson on working with forms
→ Part 25: practical work on working with forms
→ Part 26: application architecture, Container / Component pattern
→ Part 27: coursework project
→ Original
Let's create a new project using tools
Here is the file code
Here are the styles that are described in the file
Here is the code in the file
This is how the application will look like in a browser.
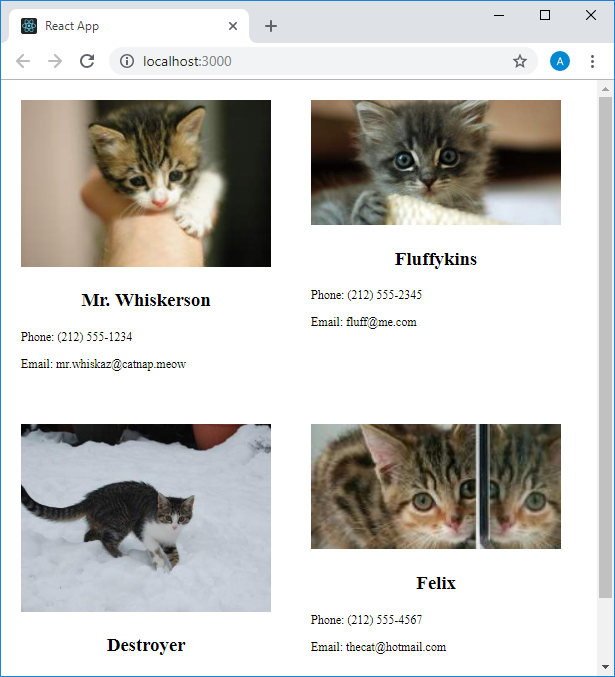
Application page in the browser
After analyzing the code and appearance of the application, you can come to the conclusion that it would be good to use special components to display animal information cards. Now these elements are formed by means of the component
In our application there are cards with images of cats, their names and contact information of their owners (and maybe - themselves) - a telephone and an email address. In order to create a component that will later become the basis for all such cards, you can take one of the markup fragments returned by the component
The App returns four such blocks, each of them could be used to create an independent component, but this approach does not suit us. Therefore, we will create one component that will become the basis of all the cards displayed by the application. To do this, create a
It is clear that if you create several copies of this component, then all of them will contain the same data, since this data is rigidly specified in the code of the component. And we would like that, when creating different instances of this component, we could customize the data it displays. The idea is that the component could be passed certain properties that it can then use.
We work with functional components that are common JS functions in which, using the React library, you can use special constructs. As you know, functions can take arguments, although they can be used without arguments. Analogy of our component
It can be used to find out the sum of the numbers 1 and 1, but, for example, in order to add 1 and 2, using functions that do not accept any input data, we would have to write a new function. It is quite obvious that such an approach will lead to huge inconveniences if you need to add different numbers, so in such a situation it would be reasonable to create a universal function for adding numbers, which takes two numbers and returns their sum:
What this function returns will depend on the arguments passed to it when it is called. Creating React-components, we can go exactly the same way.
We import the
Now let's work on the code used to create component instances
Each of the cards contains four pieces of information that, from card to card, can vary. This is the image of the cat and its name, as well as the phone and email address. Let the cat's name be in the property
We assign these properties to the component instances
True, the mere transfer of properties to a component is not enough for them to be used in it. The page that will be generated by the above component

The data of the cards is rigidly specified in the code, the component does not know how to work with the properties passed to it
Therefore, now it’s time to talk about how the component
We proceed to the solution of this problem, specifying, when declaring the function
In fact, this parameter can be called whatever you like, but in React it is customary to call it exactly
The parameter
This allows you to display the object
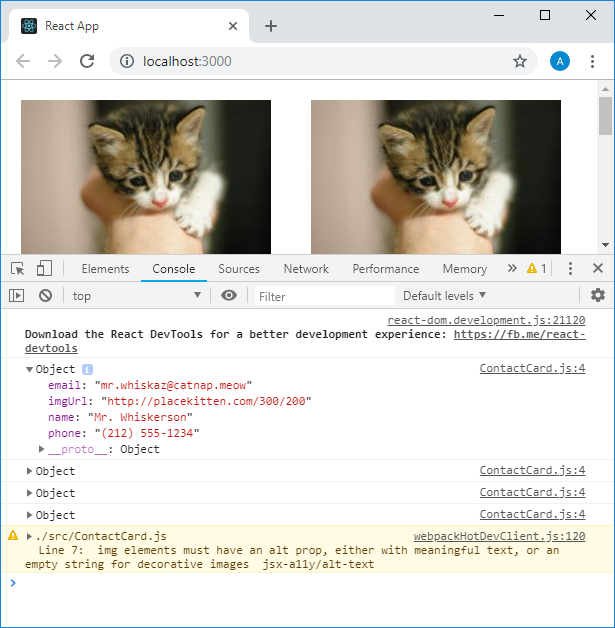
The props object in the console
Here you can see the output of four objects from
All this gives us the opportunity to use in the component code, instead of hard-coded values, what is passed to it when creating its instance, available in the form of object properties
What if we try to use the property
At first glance, such a construction may work, but recall that here we need to use an entity from JavaScript in JSX code. We have talked about how this is done in a previous lesson. Namely, in our case, the property of the object must be enclosed in braces:
We will rework on the same principle the other elements returned by the component, after which its code will look like the following:
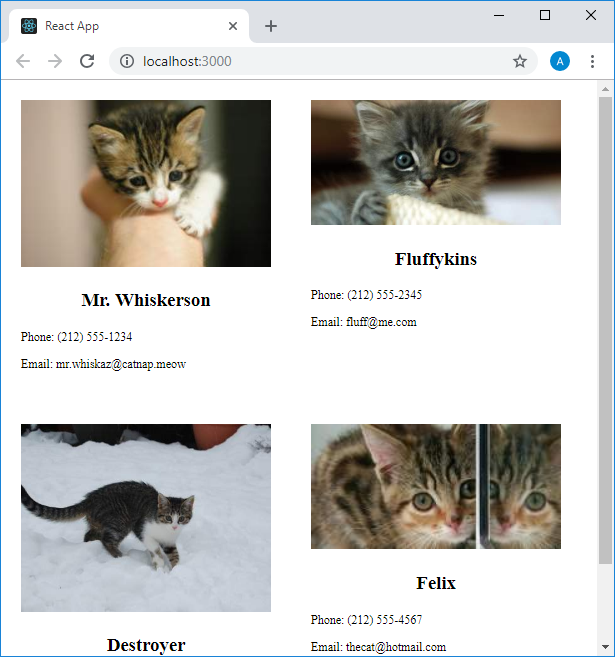
Please note that the fields to display the phone numbers and email addresses, we leave the text
A page formed using the universal component.
Our component accepts only four properties. What if a certain component needs, for example, to pass 50 properties? Perhaps, it
This is not to say that this approach significantly reduced the amount of code used to describe the component instance. The fact is that the properties passed to the component are still rigidly defined in the code, although we pass only one object to the component. The advantages of this approach can be felt in situations where the data for a component are obtained from some external sources. For example, from a JSON file.
During the modification of the component code
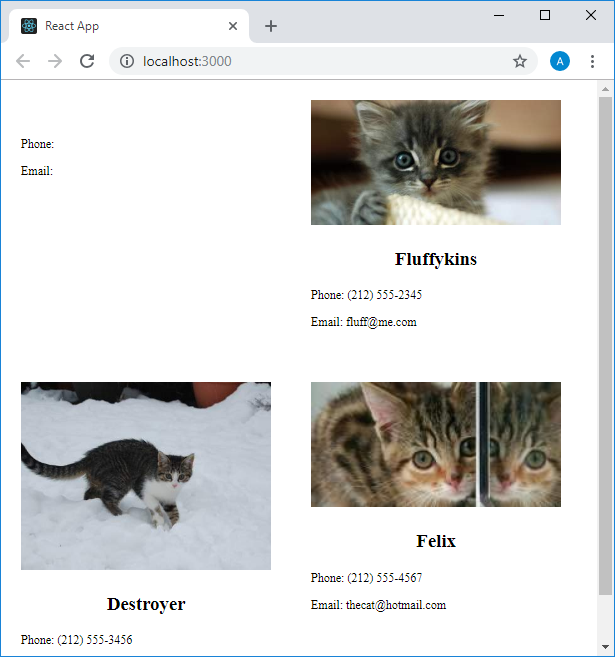
Violation of the correct operation of the application
How can this be fixed? In order to understand this, it will be useful to analyze what is happening with the help of the command
Analysis of the props object
As you can see, the object of the
In the component,
To transfer our component to the model of using only one property-object
We will rework the component code taking into account the transfer to it of the only property-object
The first component will now have to be displayed normally, but we will not see this, at this stage of working on the project, as the system will inform us about a variety of errors related to the fact that several component instances
Now the application page will look the same as before.
As usual, it is recommended to experiment on your own with the concepts studied today in order to better understand them. For example, you can work with the code, add new properties that are passed to the component, and try to use them in the component.
Today we learned about the concept of properties that can be passed to React components in order to control their behavior and appearance. These properties resemble attributes of HTML elements, but using properties in components, the programmer decides for himself what meaning they have and what exactly to do with them in the component. The next time you will be waiting for a practical lesson on working with the properties of components and on styling.
Dear readers! How have you experimented with the code of today's example in order to better understand the properties of React components?
Part 9: properties of components
→ Part 10: workshop on working with properties of components and styling
→ Part 11: dynamic markup generation and the array method map
→ Part 12: workshop, third stage of working on a TODO application
→ Part 13: class-based components
→ Part 14: a workshop on class-based components, state of components
→ Part 15: workshops on working with the state of components
→ Part 16: fourth stage of working on a TODO application, event processing
→ Part 17: fifth stage of working on a TODO application, modification status Components
→Part 18: the sixth stage of working on a TODO application
→ Part 19: methods of component life cycle
→ Part 20: the first lesson on conditional rendering
→ Part 21: the second lesson and practice on conditional rendering
→ Part 22: the seventh stage of working on a TODO application, loading data from external sources
→ Part 23: first lesson on working with forms
→ Part 24: second lesson on working with forms
→ Part 25: practical work on working with forms
→ Part 26: application architecture, Container / Component pattern
→ Part 27: coursework project
Lesson 19: Component Properties in React
→ Original
Let's create a new project using tools
create-react-appand change the code of several standard files from the folder src. Here is the file code
index.js:import React from"react"import ReactDOM from"react-dom"import"./index.css"import App from"./App"
ReactDOM.render(<App />, document.getElementById("root"))Here are the styles that are described in the file
index.css:body {
margin: 0;
}
.contacts {
display: flex;
flex-wrap: wrap;
}
.contact-card {
flex-basis: 250px;
margin: 20px;
}
.contact-card > img {
width: 100%;
height: auto;
}
.contact-card > h3 {
text-align: center;
}
.contact-card > p {
font-size: 12px;
}Here is the code in the file
App.js:import React from"react"functionApp() {
return (
<div className="contacts">
<div className="contact-card">
<img align="center" src="http://placekitten.com/300/200"/>
<h3><font color="#3AC1EF">▍Mr. Whiskerson</font></h3>
<p>Phone: (212) 555-1234</p>
<p>Email: mr.whiskaz@catnap.meow</p>
</div>
<div className="contact-card">
<img align="center" src="http://placekitten.com/400/200"/>
<h3><font color="#3AC1EF">▍Fluffykins</font></h3>
<p>Phone: (212) 555-2345</p>
<p>Email: fluff@me.com</p>
</div>
<div className="contact-card">
<img align="center" src="http://placekitten.com/400/300"/>
<h3><font color="#3AC1EF">▍Destroyer</font></h3>
<p>Phone: (212) 555-3456</p>
<p>Email: ofworlds@yahoo.com</p>
</div>
<div className="contact-card">
<img align="center" src="http://placekitten.com/200/100"/>
<h3><font color="#3AC1EF">▍Felix</font></h3>
<p>Phone: (212) 555-4567</p>
<p>Email: thecat@hotmail.com</p>
</div>
</div>
)
}
export default AppThis is how the application will look like in a browser.
Application page in the browser
After analyzing the code and appearance of the application, you can come to the conclusion that it would be good to use special components to display animal information cards. Now these elements are formed by means of the component
App. Considering what we talked about in previous lessons, you can go further - think about a universal component that can be customized by passing attributes or properties to it. In our application there are cards with images of cats, their names and contact information of their owners (and maybe - themselves) - a telephone and an email address. In order to create a component that will later become the basis for all such cards, you can take one of the markup fragments returned by the component
App. For example - this:<div className="contact-card">
<imgalign="center"src="http://placekitten.com/300/200"/>
<h3><fontcolor="#3AC1EF">▍Mr. Whiskerson</font></h3>
<p>Phone: (212) 555-1234</p>
<p>Email: mr.whiskaz@catnap.meow</p></div>The App returns four such blocks, each of them could be used to create an independent component, but this approach does not suit us. Therefore, we will create one component that will become the basis of all the cards displayed by the application. To do this, create a
srcnew component file in the folder ContactCard.jsand put the code in it that returns the first element <div>returned by the component App, the code of which is given above. Here is the component code ContactCard:import React from"react"functionContactCard() {
return (
<divclassName="contact-card">
<imgalign="center"src="http://placekitten.com/300/200"/>
<h3><fontcolor="#3AC1EF">▍Mr. Whiskerson</font></h3>
<p>Phone: (212) 555-1234</p>
<p>Email: mr.whiskaz@catnap.meow</p>
</div>
)
}
export default ContactCardIt is clear that if you create several copies of this component, then all of them will contain the same data, since this data is rigidly specified in the code of the component. And we would like that, when creating different instances of this component, we could customize the data it displays. The idea is that the component could be passed certain properties that it can then use.
We work with functional components that are common JS functions in which, using the React library, you can use special constructs. As you know, functions can take arguments, although they can be used without arguments. Analogy of our component
ContactCard, in the form in which it now exists, can become such a simple function, which, without taking anything, simply returns the sum of two numbers:functionaddNumbers() {
return1 + 1
}It can be used to find out the sum of the numbers 1 and 1, but, for example, in order to add 1 and 2, using functions that do not accept any input data, we would have to write a new function. It is quite obvious that such an approach will lead to huge inconveniences if you need to add different numbers, so in such a situation it would be reasonable to create a universal function for adding numbers, which takes two numbers and returns their sum:
functionaddNumbers(a, b) {
    return a + b
}
What this function returns will depend on the arguments passed to it when it is called. Creating React-components, we can go exactly the same way.
We import the
App.jscomponents into the file ContactCardand return four copies of it, while not removing the code that forms the cards on the application page:import React from"react"import ContactCard from"./ContactCard"functionApp() {
return (
<div className="contacts">
<ContactCard />
<ContactCard />
<ContactCard />
<ContactCard />
<div className="contact-card">
<img align="center" src="http://placekitten.com/300/200"/>
<h3><font color="#3AC1EF">▍Mr. Whiskerson</font></h3>
<p>Phone: (212) 555-1234</p>
<p>Email: mr.whiskaz@catnap.meow</p>
</div>
<div className="contact-card">
<img align="center" src="http://placekitten.com/400/200"/>
<h3><font color="#3AC1EF">▍Fluffykins</font></h3>
<p>Phone: (212) 555-2345</p>
<p>Email: fluff@me.com</p>
</div>
<div className="contact-card">
<img align="center" src="http://placekitten.com/400/300"/>
<h3><font color="#3AC1EF">▍Destroyer</font></h3>
<p>Phone: (212) 555-3456</p>
<p>Email: ofworlds@yahoo.com</p>
</div>
<div className="contact-card">
<img align="center" src="http://placekitten.com/200/100"/>
<h3><font color="#3AC1EF">▍Felix</font></h3>
<p>Phone: (212) 555-4567</p>
<p>Email: thecat@hotmail.com</p>
</div>
</div>
)
}
export default AppNow let's work on the code used to create component instances
ContactCard. By creating ordinary HTML elements, we can customize their attributes that affect their behavior and appearance. The names of these attributes are rigidly specified by the standard. In the case of components, you can use exactly the same approach, with the only difference that we invent the attribute names ourselves, and decide for ourselves how they will be used in the component code. Each of the cards contains four pieces of information that, from card to card, can vary. This is the image of the cat and its name, as well as the phone and email address. Let the cat's name be in the property
name, the image's address in the property imgURL, the phone in the property phone, and the email address in the property email.We assign these properties to the component instances
ContactCardand, as data is transferred from the code that is already in App, we will delete its corresponding fragments. As a result, the component code Appwill look like this:import React from"react"import ContactCard from"./ContactCard"functionApp() {
return (
<div className="contacts">
<ContactCard
name="Mr. Whiskerson"
imgUrl="http://placekitten.com/300/200"
phone="(212) 555-1234"
email="mr.whiskaz@catnap.meow"
/>
<ContactCard
name="Fluffykins"
imgUrl="http://placekitten.com/400/200"
phone="(212) 555-2345"
email="fluff@me.com"
/>
<ContactCard
name="Destroyer"
imgUrl="http://placekitten.com/400/300"
phone="(212) 555-3456"
email="ofworlds@yahoo.com"
/>
<ContactCard
name="Felix"
imgUrl="http://placekitten.com/200/100"
phone="(212) 555-4567"
email="thecat@hotmail.com"
/>
</div>
)
}
export default AppTrue, the mere transfer of properties to a component is not enough for them to be used in it. The page that will be generated by the above component
Appwill contain four identical cards, the data of which are specified in the component code ContactCard, which does not yet know what to do with the properties transferred to it.The data of the cards is rigidly specified in the code, the component does not know how to work with the properties passed to it
Therefore, now it’s time to talk about how the component
ContactCardcan work with the properties passed to it when creating its copies. We proceed to the solution of this problem, specifying, when declaring the function
ContactCard, that it takes a parameterprops. In this case, the component code will look like this:import React from"react"functionContactCard(props) {
return (
<divclassName="contact-card">
<imgalign="center"src="http://placekitten.com/300/200"/>
<h3><fontcolor="#3AC1EF">▍Mr. Whiskerson</font></h3>
<p>Phone: (212) 555-1234</p>
<p>Email: mr.whiskaz@catnap.meow</p>
</div>
)
}
export default ContactCardIn fact, this parameter can be called whatever you like, but in React it is customary to call it exactly
props, and the properties we are talking about here are often called simply “props”. The parameter
propsis an object. The properties of this object are the properties that were passed to the component during the creation of its instance. That is, for example, in our object there propswill be a property props.namecontaining the name of the cat, passed to the component when creating its instance. In addition, it will have properties props.imgUrl, props.phone, props.email. To see this, add in the beginning of the function ContactCardcommand console.log(props).import React from"react"functionContactCard(props) {
console.log(props)
return (
<divclassName="contact-card">
<imgalign="center"src="http://placekitten.com/300/200"/>
<h3><fontcolor="#3AC1EF">▍Mr. Whiskerson</font></h3>
<p>Phone: (212) 555-1234</p>
<p>Email: mr.whiskaz@catnap.meow</p>
</div>
)
}
export default ContactCardThis allows you to display the object
propsreceived by the component in the console.The props object in the console
Here you can see the output of four objects from
ContactCard.js. There are so many of them because we create four instances of the componentContactCard. All this gives us the opportunity to use in the component code, instead of hard-coded values, what is passed to it when creating its instance, available in the form of object properties
props. What if we try to use the property
props.imgUrllike this:<img align="center" src=props.imgUrl/>At first glance, such a construction may work, but recall that here we need to use an entity from JavaScript in JSX code. We have talked about how this is done in a previous lesson. Namely, in our case, the property of the object must be enclosed in braces:
<img align="center" src={props.imgUrl}/>We will rework on the same principle the other elements returned by the component, after which its code will look like the following:
import React from"react"functionContactCard(props) {
    return (
        <divclassName="contact-card">
            <imgalign="center"src={props.imgUrl}/>
            <h3><fontcolor="#3AC1EF">▍{props.name}</font></h3>
            <p>Phone: {props.phone}</p>
            <p>Email: {props.email}</p>
        </div>
    )
}
export default ContactCard
Please note that the fields to display the phone numbers and email addresses, we leave the text
Phone:and Email:with spaces, follow them, since these texts are used in all components. If you now look at the application page, you can see that it contains four different cards.A page formed using the universal component.
Our component accepts only four properties. What if a certain component needs, for example, to pass 50 properties? Perhaps, it
Appwill be inconvenient totransfer each such property in a separate line, as is done in the component. In such cases, you can use another way of passing properties to components. It lies in the fact that when creating an instance of a component, it is not a property list that is passed to it, but an object with properties. Here is how it might look in the first component:import React from"react"import ContactCard from"./ContactCard"functionApp() {
return (
<div className="contacts">
<ContactCard
contact={{
name: "Mr. Whiskerson",
imgUrl: "http://placekitten.com/300/200",
phone: "(212) 555-1234",
email: "mr.whiskaz@catnap.meow"
}}
/>
<ContactCard
name="Fluffykins"
imgUrl="http://placekitten.com/400/200"
phone="(212) 555-2345"
email="fluff@me.com"
/>
<ContactCard
name="Destroyer"
imgUrl="http://placekitten.com/400/300"
phone="(212) 555-3456"
email="ofworlds@yahoo.com"
/>
<ContactCard
name="Felix"
imgUrl="http://placekitten.com/200/100"
phone="(212) 555-4567"
email="thecat@hotmail.com"
/>
</div>
)
}
export default AppThis is not to say that this approach significantly reduced the amount of code used to describe the component instance. The fact is that the properties passed to the component are still rigidly defined in the code, although we pass only one object to the component. The advantages of this approach can be felt in situations where the data for a component are obtained from some external sources. For example, from a JSON file.
During the modification of the component code
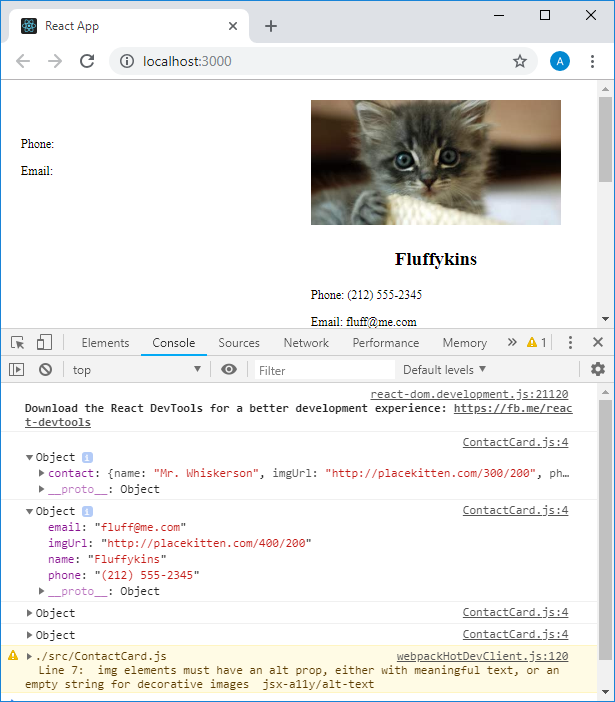
Appused to create the first component instance ContactCard, the correct operation of the application was broken. Here is what his page will now look like.Violation of the correct operation of the application
How can this be fixed? In order to understand this, it will be useful to analyze what is happening with the help of the command
console.log(props).Analysis of the props object
As you can see, the object of the
propsfirst component is different from the same object of the second and the following components. In the component,
ContactCardwe use the objectpropsbased on the assumption that it has propertiesname,imgUrland other similarobjects. Here the first component gets only one property -contact. This leads to the fact that the objectpropshas only one propertycontact, which is an object, and in the component code, working with such a structure is not provided. To transfer our component to the model of using only one property-object
contactcontaining other properties is quite simple. To do this, for example, to access a propertyname, it suffices to use the construction of the formprops.contact.namein the component code. Similar designs allow you to work properly with other properties we need. We will rework the component code taking into account the transfer to it of the only property-object
contactcontaining other properties:import React from"react"functionContactCard(props) {
console.log(props)
return (
<divclassName="contact-card">
<imgalign="center"src={props.contact.imgUrl}/>
<h3><fontcolor="#3AC1EF">▍{props.contact.name}</font></h3>
<p>Phone: {props.contact.phone}</p>
<p>Email: {props.contact.email}</p>
</div>
)
}
export default ContactCardThe first component will now have to be displayed normally, but we will not see this, at this stage of working on the project, as the system will inform us about a variety of errors related to the fact that several component instances
ContactCardcreated in the component Appdo not receive a property-object contact. When executing the code, this property will have a value undefined. As a result, an attempt is made to refer to a certain property of a value undefined, which leads to an error. We fix this by revising the component code Appresponsible for the formation of components ContactCard:import React from"react"import ContactCard from"./ContactCard"functionApp() {
return (
<div className="contacts">
<ContactCard
contact={{
name: "Mr. Whiskerson",
imgUrl: "http://placekitten.com/300/200",
phone: "(212) 555-1234",
email: "mr.whiskaz@catnap.meow"
}}
/>
<ContactCard
contact={{
name: "Fluffykins",
imgUrl: "http://placekitten.com/400/200",
phone: "(212) 555-2345",
email: "fluff@me.com"
}}
/>
<ContactCard
contact={{
name: "Destroyer",
imgUrl: "http://placekitten.com/400/300",
phone: "(212) 555-3456",
email: "ofworlds@yahoo.com"
}}
/>
<ContactCard
contact={{
name: "Felix",
imgUrl: "http://placekitten.com/200/100",
phone: "(212) 555-4567",
email: "thecat@hotmail.com"
}}
/>
</div>
)
}
export default AppNow the application page will look the same as before.
As usual, it is recommended to experiment on your own with the concepts studied today in order to better understand them. For example, you can work with the code, add new properties that are passed to the component, and try to use them in the component.
Results
Today we learned about the concept of properties that can be passed to React components in order to control their behavior and appearance. These properties resemble attributes of HTML elements, but using properties in components, the programmer decides for himself what meaning they have and what exactly to do with them in the component. The next time you will be waiting for a practical lesson on working with the properties of components and on styling.
Dear readers! How have you experimented with the code of today's example in order to better understand the properties of React components?