An introduction to Kubernetes for VMware users. Part 1. Theory
- Transfer
This is the second part of my series of posts “Kubernetes in the Enterprise” . As I mentioned in my last post, it’s very important that everyone goes to the same level of understanding Kubernetes (K8s) when moving to the “Design and Implementation Guides” .
I do not want to use the traditional approach here to explain the architecture and technologies of Kubernetes, but I will explain everything through a comparison with the vSphere platform, which you, as VMware users, are well aware of. This will allow you to overcome the seeming confusion and burden of understanding Kubernetes. I used this approach inside VMware to present Kubernetes to different audiences of listeners, and it proved that it works great and helps people get comfortable with key concepts faster.
Important note before we begin. I do not use this comparison to prove any similarities or differences between vSphere and Kubernetes. And the one and the other, in essence, are distributed systems, and, therefore, should have similarities with any other similar system. So in the end, I try to present such a wonderful technology as Kubernetes to the wider community of its users.

Reading this post assumes familiarity with the containers. I will not describe the basic concepts of containers, as there are many resources telling about it. Talking to customers very often, I see that they cannot understand why containers have captured our industry and have become very popular in record time. To answer this question, I will talk about my practical experience in understanding the changes that are occurring in our industry.
Before I got acquainted with the world of telecommunications, I was a Web developer (2003).
This was my second paid job after I worked as a network engineer / administrator (I know that I was a jack of all trades). I developed in PHP. I developed all sorts of applications, starting with the small ones that my employer used, ending with the professional voting application for television programs, and even telecommunications applications that interact with VSAT hubs and satellite systems. Life was great except for one serious obstacle that every developer knows about, these are dependencies.
At first I developed the application on my laptop, using something like the LAMP stack, when it worked well for me on a laptop, I downloaded the source code on the servers of the hosters (do everyone remember RackShack?) Or on the private servers of customers. You can imagine that as soon as I did this, the application broke and did not work on these servers. The reason for this is dependencies. There were other software versions (Apache, PHP, MySQL, etc.) on the servers that I used on the laptop. So I had to find a way to update the software versions on remote servers (a bad idea) or rewrite the code on my laptop to match the versions on remote servers (the worst idea). It was a nightmare, at times I hated myself and wondered why I earn my living with it.
10 years have passed, Docker appeared. As a VMware consultant at Professional Services (2013), I heard about Docker, and let me say that I could not understand this technology in those days. I kept saying something like: why use containers if there are virtual machines. Why give up important technologies such as vSphere HA, DRS, or vMotion due to strange advantages like instantly launching containers or eliminating hypervisor overhead. After all, everyone works with virtual machines and works fine. In short, I looked at it from an infrastructure point of view.
But then I began to look closely and it dawned on me. Everything related to Docker belongs to the developers. Just starting to think like a developer, I immediately realized that if I had this technology in 2003, I could pack all my dependencies. My Web applications could work regardless of the server used. Moreover, you would not need to download the source code or customize something. You can simply “pack” my application into an image and ask customers to download and run this image. This is the dream of any web developer!
All this is great. Docker solved the huge problem of interaction and packaging, but what next? Will I, as a corporate client, be able to manage these applications when scaling? I still want to use HA, DRS, vMotion and DR. Docker solved the problems of my developers and created a whole bunch of problems for my administrators (DevOps team). They need a platform for running containers, the same as the one for running virtual machines. And we are back to the beginning again.
But then Google appeared, telling the world about the use of containers for many years (actually containers are invented by Google: cgroups) and the correct method of using them, through a platform they called Kubernetes. Then they opened the source codes Kubernetes. Gave Kubernetes community. And that changed everything again.
So what is Kubernetes? Simply put, Kubernetes for containers is the same as vSphere for virtual machines in a modern data center. If you used VMware Workstation in the early 2000s, you know that this solution was seriously considered as a solution for data centers. When VI / vSphere appeared with vCenter and ESXi hosts, the world of virtual machines changed dramatically. Kubernetes does the same thing today with the world of containers, bringing the ability to launch and manage containers in production. And that is why we will begin to compare vSphere with Kubernetes to explain the details of this distributed system in order to understand its functions and technologies.

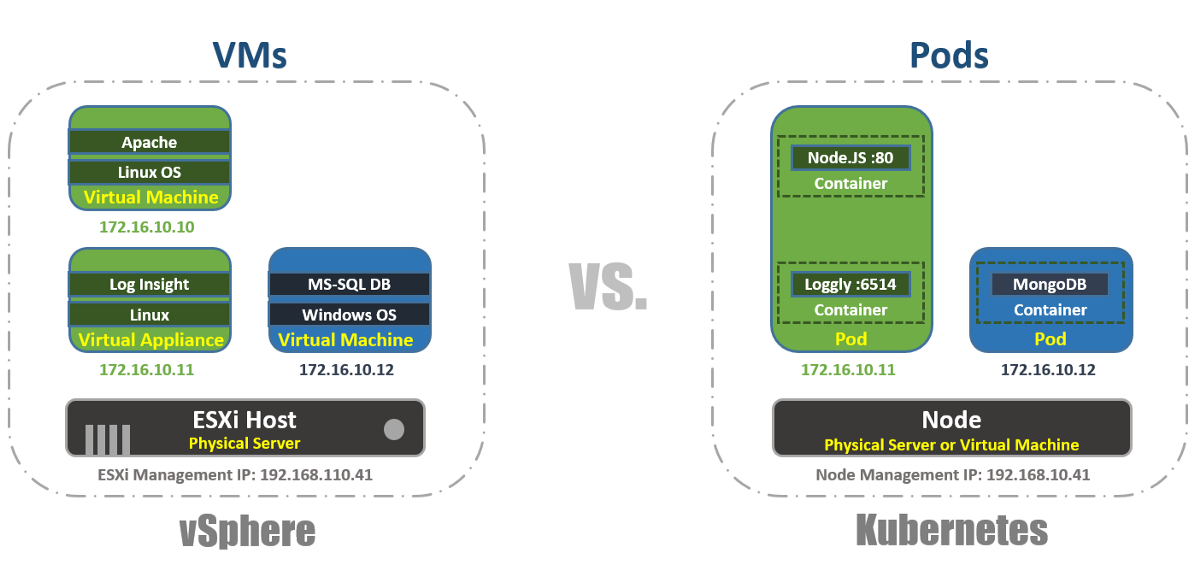
As in vSphere, there are vCenter and ESXi hosts in the Kubernetes concept are Master and Nodes. In this context, the Master in K8s is the equivalent of vCenter, in the sense that it is a level of management (Management Plane) of a distributed system. This is also the entry point for the API that you interact with when managing your workload. Similarly, K8s Nodes work as computational resources, similar to ESXi hosts. It is on them that you run workloads (in the case of K8s, we call them Pods). Nodes can be virtual machines or physical servers. Of course, in the case of vSphere ESXi, the hosts must always be physical.

You can see that K8s has a key-value repository called “etcd”. This storage is similar to the vCenter database, where you save the desired cluster configuration you want to stick with.
As for the differences: you can also run workloads on Master K8s, but not on vCenter. The vCenter is a Virtual Appliance dedicated to management only. In the case of the K8s Master, it is considered a computing resource, but running Enterprise applications on it is not a good idea.
So what will it look like in reality? Basically you will use the CLI to interact with Kubernetes (but the GUI is still a very viable option). The screenshot below shows that I use a Windows machine to connect to my Kubernetes cluster via the command line (I use cmder if you are interested). In the screenshot, I have one Master node and 4 Nodes. They run K8s v1.6.5, and the nodes have an operating system (OS) Ubuntu 16.04. At the time of writing this post, we mostly live in the Linux world, where Master and Node's are always running under the Linux distribution.

K8s cluster management via CLI and GUI.
In vSphere, the virtual machine is the logical boundary of the operating system. In Kubernetes, Pods are boundaries for containers, as is an ESXi host that can run multiple virtual machines simultaneously. On each Node several pods can work. Each Pod gets a routable IP address, like virtual machines, for Pods to communicate with each other.
In vSphere, applications run inside the OS, and in Kubernetes, applications run inside containers. A virtual machine can only work with one OS at a time, and a Pod can run multiple containers.
This is how you can display the list of Pods within the K8s cluster using the kubectl tool via the CLI, check the Pods performance, their age, IP address and Nodes that they are currently working on.

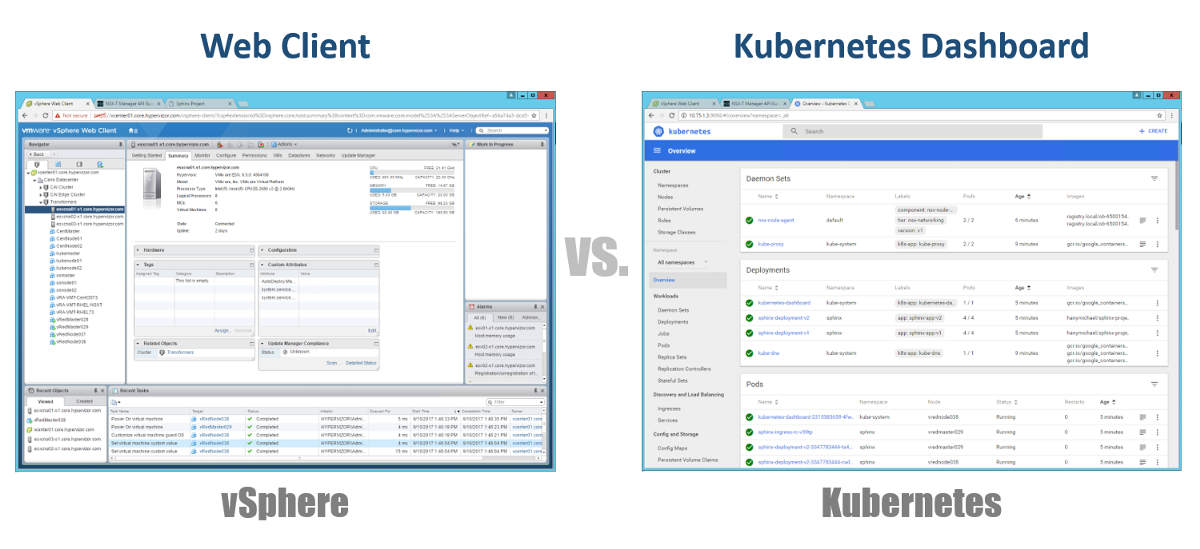
So, how do we manage our Master, Nodes and Pods? In vSphere, we use a Web client to manage most (if not all) components of our virtual infrastructure. For Kubernetes similarly, using the Dashboard. This is a good GUI-based Web portal that you can access via a browser just as you would with a vSphere Web client. The previous sections show that you can manage your K8s cluster using the kubeclt command from the CLI. It is always debatable where you will spend most of your time in the CLI or in the graphical Dashboard. Since the latter is becoming a more and more powerful tool every day (to be sure, you can watch this video). Personally, I think that the Dashboard is very convenient for quickly monitoring the status or displaying the details of the various components of K8s allowing you not to enter long commands in the CLI. You will find a balance between them in a natural way.
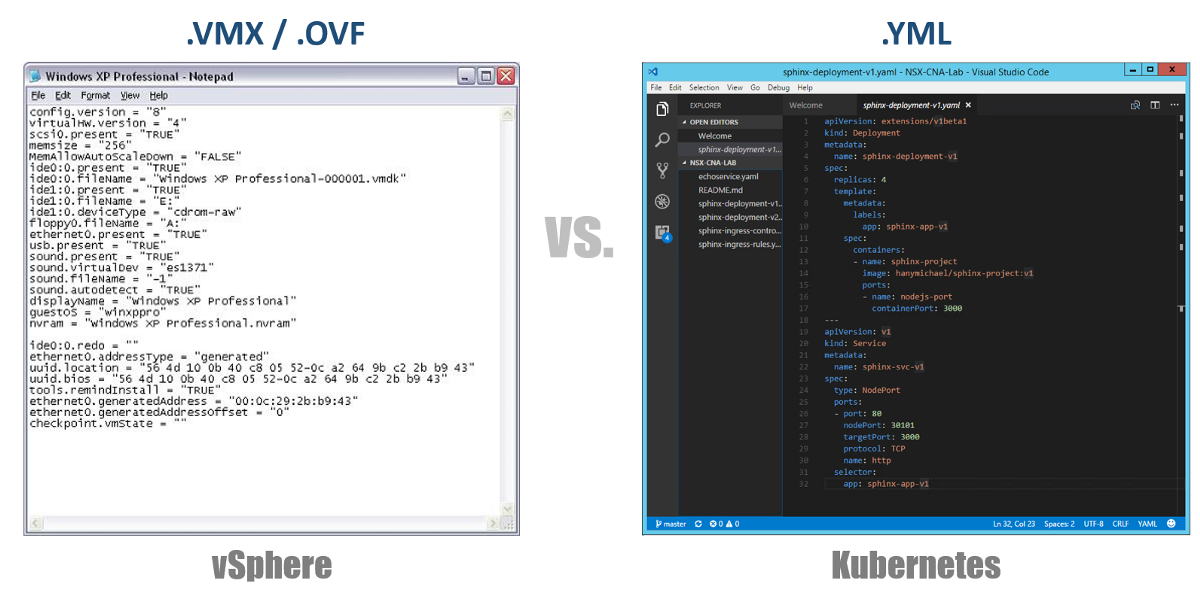
One of the very important concepts in Kubernetes is the desired state of the configurations. You declare what you want for almost any Kubernetes component through a YAML file, and you create it all using kubectl (or through a graphical Dashboard) as your desired state. From now on, Kubernetes will always strive to keep your environment in a given, working condition. For example, if you want to have 4 replicas of one Pod, K8s will continue to monitor these Pods, and if one of them died or the Node on which he worked had problems, K8s would self-repair and automatically create this Pod elsewhere.
Returning to our YAML configuration files, you can view them as a .VMX file for a virtual machine or a .OVF descriptor for a Virtual Appliance that you want to deploy to vSphere. These files define the workload / component configuration that you want to run. Unlike VMX / OVF files, which are exclusive to virtual VMs / Appliances, YAML configuration files are used to define any K8s component, such as ReplicaSets, Services, Deployments, etc. Consider this in the following sections.
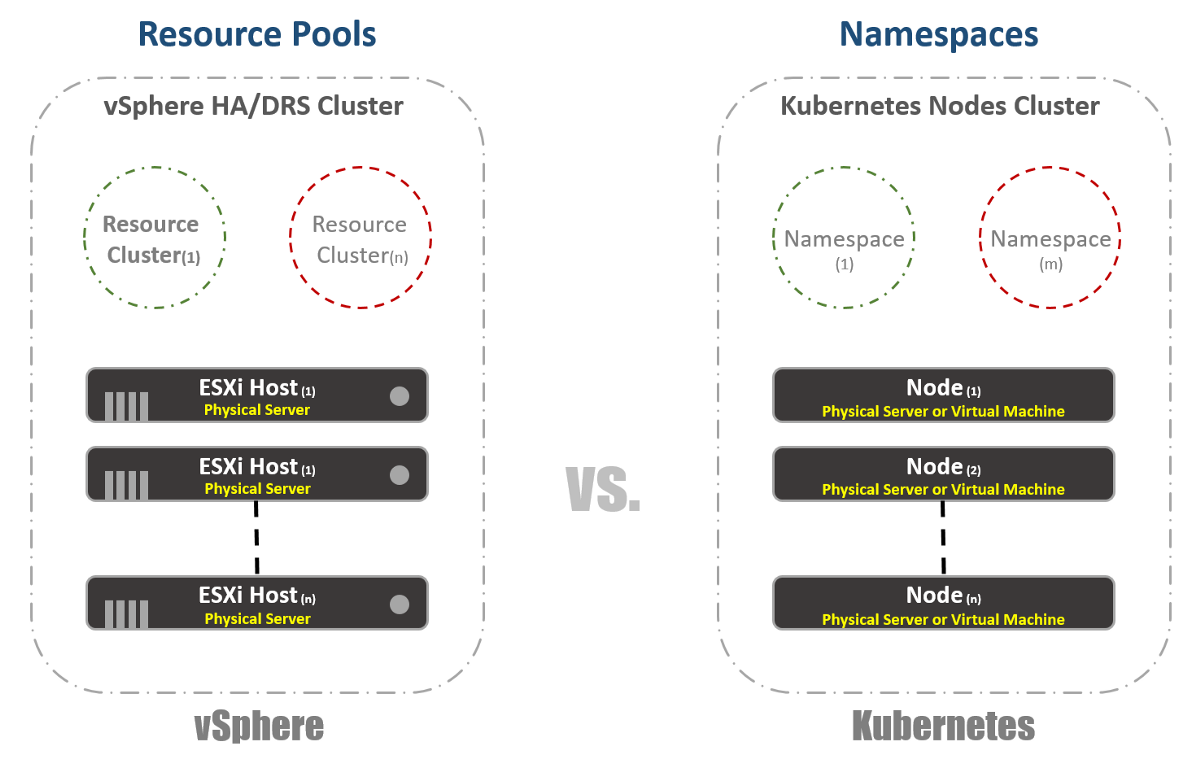
In vSphere, we have physical ESXi hosts logically grouped into clusters. These clusters can be divided into other virtual clusters called “Resource Pools”. These “pools” are mainly used to limit resources. In Kubernetes, we have something very similar. We call them “Namespaces”, they can also be used to provide resource limits, which will be reflected in the next section. However, most often “Namespaces” are used as a multi-tenancy tool for applications (or users if you are using common K8s clusters). It is also one of the options with which you can perform network segmentation using NSX-T. Consider this in the following publications.
As I mentioned in the previous section, Namespaces in Kubernetes are commonly used as a segmentation tool. Another use case for Namespaces is resource allocation. This option is called “Resource Quotas”. As follows from the previous sections, the definition of this occurs in the configuration YAML files in which the desired state is declared. In vSphere, as seen in the screenshot below, we determine this from the Resource Pools settings.

It's pretty simple and almost the same for vSphere and Kubernetes. In the first case, we use the concepts of Tags to define (or group) similar workloads, and in the second we use the term “Labels”. In the case of Kubernetes, identification of workloads is mandatory.

Now for the real fun. If you were or are a big fan of vSphere FT, like me, you will enjoy this feature in Kubernetes, despite some differences in the two technologies. In vSphere, this is a virtual machine with a running shadow instance running on another host. We write instructions on the main virtual machine and play them back on the shadow virtual machine. If the host machine stops working, the shadow virtual machine will turn on immediately. Then vSphere tries to find another ESXi host to create a new shadow instance of the virtual machine to maintain the same redundancy. At Kubernetes, we have something very similar. ReplicaSets is the number you specify to run multiple instances of Pods. If one Pod fails, other instances are available to serve the traffic. At the same time, K8s will attempt to launch a new Pod on any available Node in order to maintain the desired configuration state. The main difference, as you may have noticed, is that in the case of K8s, Pods always operate and serve traffic. They are not shadow workloads.

Although this may not be a built-in function in vSphere, it’s still very often necessary to run load balancers on the platform. In the vSphere world, there are virtual or physical load balancers for distributing network traffic among several virtual machines. There may be many different configuration modes, but let's assume that we mean the One-Armed configuration. In this case, you balance the load on East-West traffic to your virtual machines.
Similarly, Kubernetes has the term “Services”. Service in K8s can also be used in different configuration modes. Let's select the “ClusterIP 'configuration to compare it with the One-Armed Load Balancer. In this case, the Service in K8s will have a virtual IP address (VIP), which is always static and does not change. This VIP will distribute traffic between several Pods. This is especially important in the world of Kubernetes, where by their nature Pods are ephemeral, you lose the IP address of Pod when it dies or is removed. Thus, you should always provide a static VIP.
As I already mentioned, Service has many other configurations, for example, “NodePort”, where you assign a port at the Node level, and then perform a port-address-translation conversion for Pods. There is also a “LoadBalancer” where you launch an instance of the Load Balancer from a third-party or cloud provider.

Kuberentes has another very important load balancing mechanism called the “Ingress Controller”. You can consider it in-line application as a load balancer. The basic idea is that the Ingress Controller (in the form of a Pod) will be launched with an external IP-visible address. This IP address may have something like wildcard DNS records. When traffic arrives at the Ingress Controller using an external IP address, it checks the headers and determines with the help of a set of rules that you previously set to which Pod the name belongs to. For example: sphinx-v1.esxcloud.net will be sent to Service sphinx-svc-1, and sphinx-v2.esxcloud.net will be sent to Service sphinx-svc2, etc.

Storage and networking are very, very broad topics when it comes to Kubernetes. It is almost impossible to talk briefly about these two topics in the introductory post, but I will soon tell you in detail about the various concepts and options for each of these topics. In the meantime, let's quickly consider how the network stack works in Kubernetes, since we will need it in the next section.
Kubernetes has various network “Plugins” that you can use to configure the network of your Nodes and Pods. One of the common plugins is “kubenet”, which is currently used in mega-clouds, such as GCP and AWS. Here I will briefly talk about the implementation of GCP, and then I will show a practical example of implementation in GKE.

At first glance, this may seem too complicated, but I hope you can understand all this by the end of this post. Firstly, it is clear that we have two Kubernetes Nodes: Node 1 and Node (m). Each node has an eth0 interface, like any Linux machine. This interface has an IP address for the outside world, in our case, the subnet 10.140.0.0/24. Upstream L3 device acts as Default Gateway to route our traffic. This could be a L3 switch in your data center or a VPC router in the cloud, such as GCP, as we'll see later. So far, so good?
Further we see that we have the Bridge interface cbr0 inside the node. This interface is the Default Gateway for the IP subnet 10.40.1.0/24 in the case of Node 1. This subnet is assigned to the Kubernetes of each Node. Nodes usually get a / 24 subnet, but you can change this using NSX-T (we’ll look at this in the following posts). At the moment, this subnet is the one from which we will issue IP addresses for Pods. Thus, any Pod inside Node 1 will receive an IP address from this subnet. In our case, Pod 1 has an IP address of 10.40.1.10. However, you noticed that there are two nested containers in this Pod. We have already said that within one Pod, one or more containers can be launched, which are closely related to each other in terms of functionality. This is what we see in the picture. Container 1 listens to port 80, and container 2 listens to port 90. Both containers have the same IP address 10.40.1.10, but they do not belong to the Networking Namespace. Well, then who owns this network stack? In fact, there is a special container called “Pause Container”. The diagram shows that his IP address is the Pod's IP address for communication with the outside world. Thus, Pause Container owns this network stack, including the IP address 10.40.1.10 itself, and, of course, it redirects traffic to container 1 on port 80, and also redirects traffic to container 2 on port 90.
Now you have to ask how traffic is redirected to the outside world? We have included standard Linux IP Forwarding for forwarding traffic from cbr0 to eth0. It's great, but then it is not clear how the L3 device can learn how to send traffic to the destination? In this particular example, we do not have dynamic routing for the announcement of this network. Therefore, we need to have some kind of static routes on the L3 device. To reach the subnet 10.40.1.0/24, you need to send traffic to the IP address Node 1 (10.140.0.11) and to reach the subnet 10.40.2.0/24 next hope - Node (m) with the IP address 10.140.0.12.
Everything is great, but it is a very impractical way to manage your networks. Supporting all these routes when scaling your cluster will be an absolute nightmare for network administrators. That is why some solutions are needed, such as CNI (Container Network Interface) in Kuberentes, to manage network interaction. NSX-T is one of these solutions with very broad functionality for both networking and security.
Remember that we looked at the kubenet plugin, not CNI. The kubenet plugin is what uses the Google Container Engine (GKE), and the way they do it is quite fascinating, because it is fully programmed and automated in their cloud. In this way, GCP will take care of the distribution of subnets and associated routes for you. Consider this in the next section.
It is time to touch Kuberentes with your hands. You can start a hands-on study of all these concepts by reading the next part of this post .
The second part of.
For the translation, thanks to Grigory Prelyukhin. Published with permission.
Link to transfer .
I do not want to use the traditional approach here to explain the architecture and technologies of Kubernetes, but I will explain everything through a comparison with the vSphere platform, which you, as VMware users, are well aware of. This will allow you to overcome the seeming confusion and burden of understanding Kubernetes. I used this approach inside VMware to present Kubernetes to different audiences of listeners, and it proved that it works great and helps people get comfortable with key concepts faster.
Important note before we begin. I do not use this comparison to prove any similarities or differences between vSphere and Kubernetes. And the one and the other, in essence, are distributed systems, and, therefore, should have similarities with any other similar system. So in the end, I try to present such a wonderful technology as Kubernetes to the wider community of its users.
A bit of history
Reading this post assumes familiarity with the containers. I will not describe the basic concepts of containers, as there are many resources telling about it. Talking to customers very often, I see that they cannot understand why containers have captured our industry and have become very popular in record time. To answer this question, I will talk about my practical experience in understanding the changes that are occurring in our industry.
Before I got acquainted with the world of telecommunications, I was a Web developer (2003).
This was my second paid job after I worked as a network engineer / administrator (I know that I was a jack of all trades). I developed in PHP. I developed all sorts of applications, starting with the small ones that my employer used, ending with the professional voting application for television programs, and even telecommunications applications that interact with VSAT hubs and satellite systems. Life was great except for one serious obstacle that every developer knows about, these are dependencies.
At first I developed the application on my laptop, using something like the LAMP stack, when it worked well for me on a laptop, I downloaded the source code on the servers of the hosters (do everyone remember RackShack?) Or on the private servers of customers. You can imagine that as soon as I did this, the application broke and did not work on these servers. The reason for this is dependencies. There were other software versions (Apache, PHP, MySQL, etc.) on the servers that I used on the laptop. So I had to find a way to update the software versions on remote servers (a bad idea) or rewrite the code on my laptop to match the versions on remote servers (the worst idea). It was a nightmare, at times I hated myself and wondered why I earn my living with it.
10 years have passed, Docker appeared. As a VMware consultant at Professional Services (2013), I heard about Docker, and let me say that I could not understand this technology in those days. I kept saying something like: why use containers if there are virtual machines. Why give up important technologies such as vSphere HA, DRS, or vMotion due to strange advantages like instantly launching containers or eliminating hypervisor overhead. After all, everyone works with virtual machines and works fine. In short, I looked at it from an infrastructure point of view.
But then I began to look closely and it dawned on me. Everything related to Docker belongs to the developers. Just starting to think like a developer, I immediately realized that if I had this technology in 2003, I could pack all my dependencies. My Web applications could work regardless of the server used. Moreover, you would not need to download the source code or customize something. You can simply “pack” my application into an image and ask customers to download and run this image. This is the dream of any web developer!
All this is great. Docker solved the huge problem of interaction and packaging, but what next? Will I, as a corporate client, be able to manage these applications when scaling? I still want to use HA, DRS, vMotion and DR. Docker solved the problems of my developers and created a whole bunch of problems for my administrators (DevOps team). They need a platform for running containers, the same as the one for running virtual machines. And we are back to the beginning again.
But then Google appeared, telling the world about the use of containers for many years (actually containers are invented by Google: cgroups) and the correct method of using them, through a platform they called Kubernetes. Then they opened the source codes Kubernetes. Gave Kubernetes community. And that changed everything again.
Understanding Kubernetes versus vSphere
So what is Kubernetes? Simply put, Kubernetes for containers is the same as vSphere for virtual machines in a modern data center. If you used VMware Workstation in the early 2000s, you know that this solution was seriously considered as a solution for data centers. When VI / vSphere appeared with vCenter and ESXi hosts, the world of virtual machines changed dramatically. Kubernetes does the same thing today with the world of containers, bringing the ability to launch and manage containers in production. And that is why we will begin to compare vSphere with Kubernetes to explain the details of this distributed system in order to understand its functions and technologies.
System overview
As in vSphere, there are vCenter and ESXi hosts in the Kubernetes concept are Master and Nodes. In this context, the Master in K8s is the equivalent of vCenter, in the sense that it is a level of management (Management Plane) of a distributed system. This is also the entry point for the API that you interact with when managing your workload. Similarly, K8s Nodes work as computational resources, similar to ESXi hosts. It is on them that you run workloads (in the case of K8s, we call them Pods). Nodes can be virtual machines or physical servers. Of course, in the case of vSphere ESXi, the hosts must always be physical.
You can see that K8s has a key-value repository called “etcd”. This storage is similar to the vCenter database, where you save the desired cluster configuration you want to stick with.
As for the differences: you can also run workloads on Master K8s, but not on vCenter. The vCenter is a Virtual Appliance dedicated to management only. In the case of the K8s Master, it is considered a computing resource, but running Enterprise applications on it is not a good idea.
So what will it look like in reality? Basically you will use the CLI to interact with Kubernetes (but the GUI is still a very viable option). The screenshot below shows that I use a Windows machine to connect to my Kubernetes cluster via the command line (I use cmder if you are interested). In the screenshot, I have one Master node and 4 Nodes. They run K8s v1.6.5, and the nodes have an operating system (OS) Ubuntu 16.04. At the time of writing this post, we mostly live in the Linux world, where Master and Node's are always running under the Linux distribution.
K8s cluster management via CLI and GUI.
Workload Form Factor
In vSphere, the virtual machine is the logical boundary of the operating system. In Kubernetes, Pods are boundaries for containers, as is an ESXi host that can run multiple virtual machines simultaneously. On each Node several pods can work. Each Pod gets a routable IP address, like virtual machines, for Pods to communicate with each other.
In vSphere, applications run inside the OS, and in Kubernetes, applications run inside containers. A virtual machine can only work with one OS at a time, and a Pod can run multiple containers.
This is how you can display the list of Pods within the K8s cluster using the kubectl tool via the CLI, check the Pods performance, their age, IP address and Nodes that they are currently working on.
Control
So, how do we manage our Master, Nodes and Pods? In vSphere, we use a Web client to manage most (if not all) components of our virtual infrastructure. For Kubernetes similarly, using the Dashboard. This is a good GUI-based Web portal that you can access via a browser just as you would with a vSphere Web client. The previous sections show that you can manage your K8s cluster using the kubeclt command from the CLI. It is always debatable where you will spend most of your time in the CLI or in the graphical Dashboard. Since the latter is becoming a more and more powerful tool every day (to be sure, you can watch this video). Personally, I think that the Dashboard is very convenient for quickly monitoring the status or displaying the details of the various components of K8s allowing you not to enter long commands in the CLI. You will find a balance between them in a natural way.
Configurations
One of the very important concepts in Kubernetes is the desired state of the configurations. You declare what you want for almost any Kubernetes component through a YAML file, and you create it all using kubectl (or through a graphical Dashboard) as your desired state. From now on, Kubernetes will always strive to keep your environment in a given, working condition. For example, if you want to have 4 replicas of one Pod, K8s will continue to monitor these Pods, and if one of them died or the Node on which he worked had problems, K8s would self-repair and automatically create this Pod elsewhere.
Returning to our YAML configuration files, you can view them as a .VMX file for a virtual machine or a .OVF descriptor for a Virtual Appliance that you want to deploy to vSphere. These files define the workload / component configuration that you want to run. Unlike VMX / OVF files, which are exclusive to virtual VMs / Appliances, YAML configuration files are used to define any K8s component, such as ReplicaSets, Services, Deployments, etc. Consider this in the following sections.
Virtual clusters
In vSphere, we have physical ESXi hosts logically grouped into clusters. These clusters can be divided into other virtual clusters called “Resource Pools”. These “pools” are mainly used to limit resources. In Kubernetes, we have something very similar. We call them “Namespaces”, they can also be used to provide resource limits, which will be reflected in the next section. However, most often “Namespaces” are used as a multi-tenancy tool for applications (or users if you are using common K8s clusters). It is also one of the options with which you can perform network segmentation using NSX-T. Consider this in the following publications.
Resource management
As I mentioned in the previous section, Namespaces in Kubernetes are commonly used as a segmentation tool. Another use case for Namespaces is resource allocation. This option is called “Resource Quotas”. As follows from the previous sections, the definition of this occurs in the configuration YAML files in which the desired state is declared. In vSphere, as seen in the screenshot below, we determine this from the Resource Pools settings.
Workload Identification
It's pretty simple and almost the same for vSphere and Kubernetes. In the first case, we use the concepts of Tags to define (or group) similar workloads, and in the second we use the term “Labels”. In the case of Kubernetes, identification of workloads is mandatory.
Reservation
Now for the real fun. If you were or are a big fan of vSphere FT, like me, you will enjoy this feature in Kubernetes, despite some differences in the two technologies. In vSphere, this is a virtual machine with a running shadow instance running on another host. We write instructions on the main virtual machine and play them back on the shadow virtual machine. If the host machine stops working, the shadow virtual machine will turn on immediately. Then vSphere tries to find another ESXi host to create a new shadow instance of the virtual machine to maintain the same redundancy. At Kubernetes, we have something very similar. ReplicaSets is the number you specify to run multiple instances of Pods. If one Pod fails, other instances are available to serve the traffic. At the same time, K8s will attempt to launch a new Pod on any available Node in order to maintain the desired configuration state. The main difference, as you may have noticed, is that in the case of K8s, Pods always operate and serve traffic. They are not shadow workloads.
Load balancing
Although this may not be a built-in function in vSphere, it’s still very often necessary to run load balancers on the platform. In the vSphere world, there are virtual or physical load balancers for distributing network traffic among several virtual machines. There may be many different configuration modes, but let's assume that we mean the One-Armed configuration. In this case, you balance the load on East-West traffic to your virtual machines.
Similarly, Kubernetes has the term “Services”. Service in K8s can also be used in different configuration modes. Let's select the “ClusterIP 'configuration to compare it with the One-Armed Load Balancer. In this case, the Service in K8s will have a virtual IP address (VIP), which is always static and does not change. This VIP will distribute traffic between several Pods. This is especially important in the world of Kubernetes, where by their nature Pods are ephemeral, you lose the IP address of Pod when it dies or is removed. Thus, you should always provide a static VIP.
As I already mentioned, Service has many other configurations, for example, “NodePort”, where you assign a port at the Node level, and then perform a port-address-translation conversion for Pods. There is also a “LoadBalancer” where you launch an instance of the Load Balancer from a third-party or cloud provider.
Kuberentes has another very important load balancing mechanism called the “Ingress Controller”. You can consider it in-line application as a load balancer. The basic idea is that the Ingress Controller (in the form of a Pod) will be launched with an external IP-visible address. This IP address may have something like wildcard DNS records. When traffic arrives at the Ingress Controller using an external IP address, it checks the headers and determines with the help of a set of rules that you previously set to which Pod the name belongs to. For example: sphinx-v1.esxcloud.net will be sent to Service sphinx-svc-1, and sphinx-v2.esxcloud.net will be sent to Service sphinx-svc2, etc.
Storage and network
Storage and networking are very, very broad topics when it comes to Kubernetes. It is almost impossible to talk briefly about these two topics in the introductory post, but I will soon tell you in detail about the various concepts and options for each of these topics. In the meantime, let's quickly consider how the network stack works in Kubernetes, since we will need it in the next section.
Kubernetes has various network “Plugins” that you can use to configure the network of your Nodes and Pods. One of the common plugins is “kubenet”, which is currently used in mega-clouds, such as GCP and AWS. Here I will briefly talk about the implementation of GCP, and then I will show a practical example of implementation in GKE.
At first glance, this may seem too complicated, but I hope you can understand all this by the end of this post. Firstly, it is clear that we have two Kubernetes Nodes: Node 1 and Node (m). Each node has an eth0 interface, like any Linux machine. This interface has an IP address for the outside world, in our case, the subnet 10.140.0.0/24. Upstream L3 device acts as Default Gateway to route our traffic. This could be a L3 switch in your data center or a VPC router in the cloud, such as GCP, as we'll see later. So far, so good?
Further we see that we have the Bridge interface cbr0 inside the node. This interface is the Default Gateway for the IP subnet 10.40.1.0/24 in the case of Node 1. This subnet is assigned to the Kubernetes of each Node. Nodes usually get a / 24 subnet, but you can change this using NSX-T (we’ll look at this in the following posts). At the moment, this subnet is the one from which we will issue IP addresses for Pods. Thus, any Pod inside Node 1 will receive an IP address from this subnet. In our case, Pod 1 has an IP address of 10.40.1.10. However, you noticed that there are two nested containers in this Pod. We have already said that within one Pod, one or more containers can be launched, which are closely related to each other in terms of functionality. This is what we see in the picture. Container 1 listens to port 80, and container 2 listens to port 90. Both containers have the same IP address 10.40.1.10, but they do not belong to the Networking Namespace. Well, then who owns this network stack? In fact, there is a special container called “Pause Container”. The diagram shows that his IP address is the Pod's IP address for communication with the outside world. Thus, Pause Container owns this network stack, including the IP address 10.40.1.10 itself, and, of course, it redirects traffic to container 1 on port 80, and also redirects traffic to container 2 on port 90.
Now you have to ask how traffic is redirected to the outside world? We have included standard Linux IP Forwarding for forwarding traffic from cbr0 to eth0. It's great, but then it is not clear how the L3 device can learn how to send traffic to the destination? In this particular example, we do not have dynamic routing for the announcement of this network. Therefore, we need to have some kind of static routes on the L3 device. To reach the subnet 10.40.1.0/24, you need to send traffic to the IP address Node 1 (10.140.0.11) and to reach the subnet 10.40.2.0/24 next hope - Node (m) with the IP address 10.140.0.12.
Everything is great, but it is a very impractical way to manage your networks. Supporting all these routes when scaling your cluster will be an absolute nightmare for network administrators. That is why some solutions are needed, such as CNI (Container Network Interface) in Kuberentes, to manage network interaction. NSX-T is one of these solutions with very broad functionality for both networking and security.
Remember that we looked at the kubenet plugin, not CNI. The kubenet plugin is what uses the Google Container Engine (GKE), and the way they do it is quite fascinating, because it is fully programmed and automated in their cloud. In this way, GCP will take care of the distribution of subnets and associated routes for you. Consider this in the next section.
What's next?
It is time to touch Kuberentes with your hands. You can start a hands-on study of all these concepts by reading the next part of this post .
The second part of.
For the translation, thanks to Grigory Prelyukhin. Published with permission.
Link to transfer .