Java, Spring, Kurento and media services. Part 2
In the previous article, I described my experiment with the “HelloWorld” application from Kurento-tutorial. In this article, I will continue to review Java Spring and Kurento Media Server Web applications.
The following app from the tutorial is called WebRTC Magic Mirror. From the name it follows that the mirror reflects a bit of embellished reality. In this application, in addition to the previous one, the computer vision filter “FaceOverlay filter” is applied. When a person's face is detected in a camera, Kurento Media Server “puts on” a Super Mario cap on his head. If there are several faces in the lens, everyone is wearing a cap.
Launch Kurento Media Server
sudo service kurento-media-server startIf you have already cloned the Kurento Java tutorial, do not run the following command:
git clone https://github.com/Kurento/kurento-tutorial-java.gitGo to the project directory
cd kurento-tutorial-java/kurento-magic-mirrorWe compile the project with the Maven team.
mvn compile exec:javaOr, as in my case, we will launch from Idea.
In the Firefox browser, go to https: // localhost: 8443 /
In the window that opens, click on the “Start” button, you should see a picture:
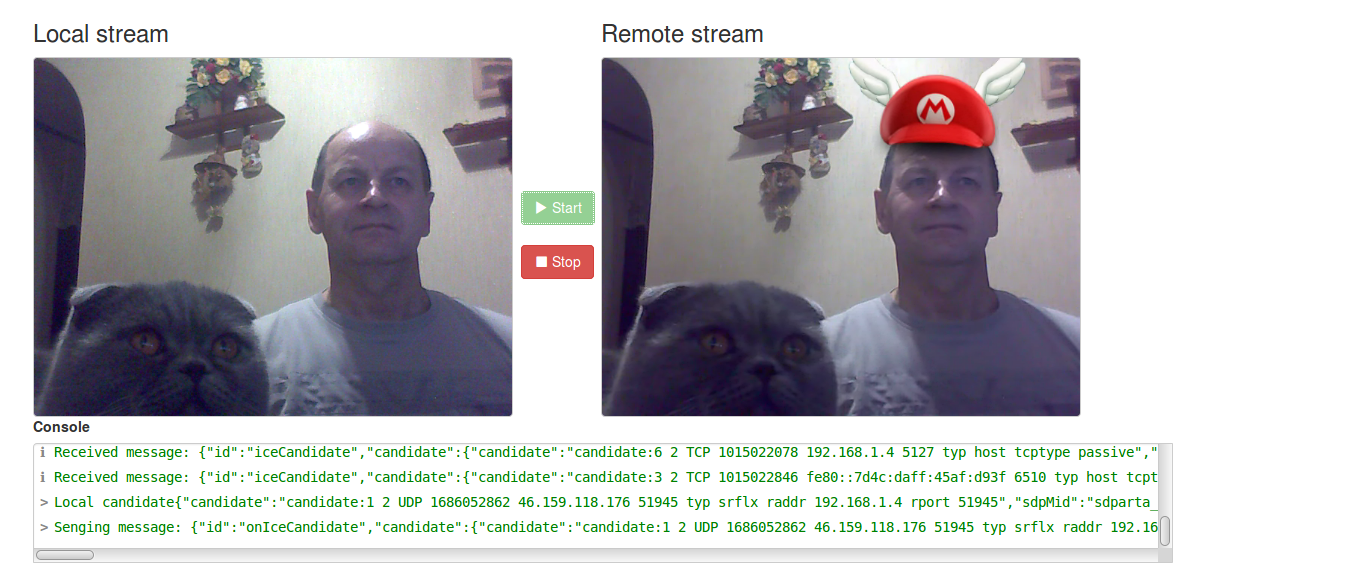
From this experience we conclude: my cat’s muzzle is not at all human, therefore the Super Mario cap isn’t .
We will understand how this example works.
The structure of the application repeats the previous HelloWorld application. Three software blocks interact in the application: on the browser side, the Java Script code, on the server side of the Spring-Boot Web application, which manages the Kurento Media Server. These program blocks exchange messages based on the Json protocol with each other.

The diagram shows that in the KMS the WebRtcEndpoint program block no longer wraps the transmission of the multimedia signal to the reception, but rather passes it through the FaceOverlayFilter, which determines the presence of a face in the picture.
The exchange of signals between software blocks is about the same as in the HelloWorld application.
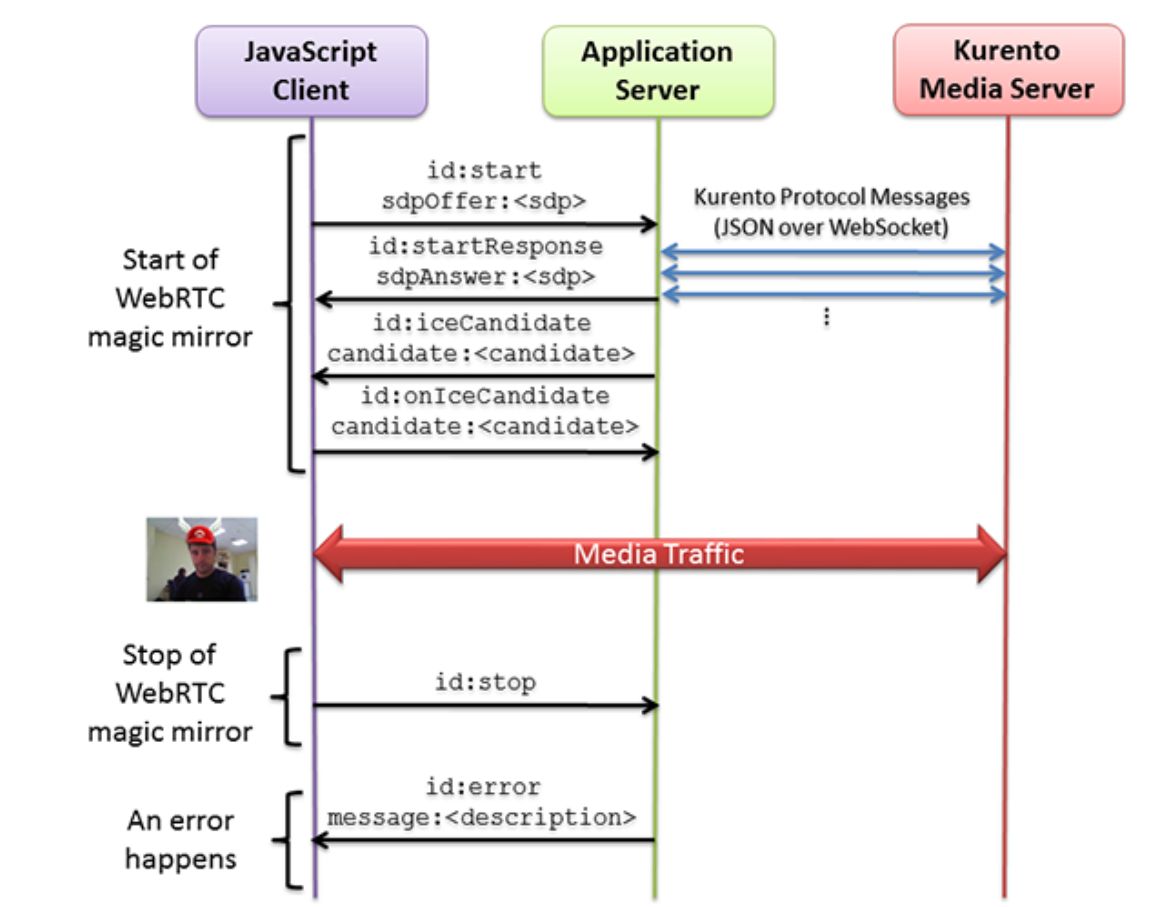
The main actions in the application are performed by clicking on the "Start" button. A MediaPipeline is created, through which the media traffic will be transmitted, the WebRtcEndpoint and FaceOverlayFilter media elements are created, and a connection between them is created.
Here is a simplified sequence of statements that forms a chain of program blocks for a given application.
MediaPipeline pipeline = kurento.createMediaPipeline();
WebRtcEndpoint webRtcEndpoint = new WebRtcEndpoint.Builder(pipeline).build();
FaceOverlayFilter faceOverlayFilter = new FaceOverlayFilter.Builder(pipeline).build();
webRtcEndpoint.connect(faceOverlayFilter);
faceOverlayFilter.connect(webRtcEndpoint);
Consider the following application from Kurento Tutorial called RTP Receiver.
If not running, run Kurento Media Server
sudo service kurento-media-server startIf you have already cloned the Kurento Java tutorial, do not run the following command:
git clone https://github.com/Kurento/kurento-tutorial-java.gitGo to the project directory
cd kurento-tutorial-java/kurento-rtp-receiverWe compile the project with the Maven team.
mvn compile exec:javaor, as in my case, we will launch from Idea.
In the Firefox browser, go to https: // localhost: 8443 /
in the window that opens, click on the “Start” button.
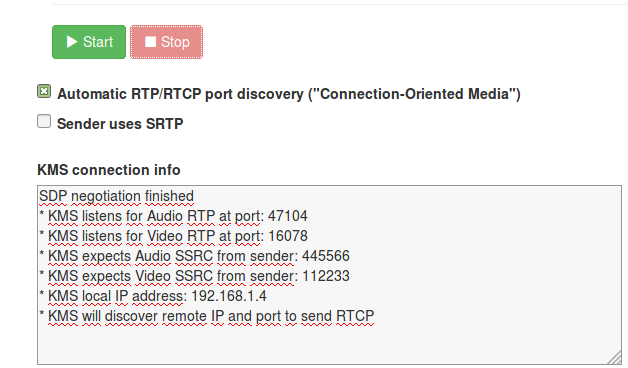
In the KMS connection info window, there is data for configuring the command for Gstreamer: audio, video port, IP address. This data, as well as the file path must be specified in the command.
PEER_A={KMS_AUDIO_PORT} PEER_V={KMS_VIDEO_PORT} PEER_IP={KMS_PUBLIC_IP} \
SELF_PATH="{PATH_TO_VIDEO_FILE}" \
SELF_A=5006 SELF_ASSRC=445566 \
SELF_V=5004 SELF_VSSRC=112233 \
bash -c 'gst-launch-1.0 -e \
        rtpbin name=r sdes="application/x-rtp-source-sdes,cname=(string)\"user\@example.com\"" \
        filesrc location="$SELF_PATH" ! decodebin name=d \
        d. ! queue ! audioconvert ! opusenc \
                ! rtpopuspay ! "application/x-rtp,payload=(int)96,clock-rate=(int)48000,ssrc=(uint)$SELF_ASSRC" \
                ! r.send_rtp_sink_0 \
        d. ! queue ! videoconvert ! x264enc tune=zerolatency \
                ! rtph264pay ! "application/x-rtp,payload=(int)103,clock-rate=(int)90000,ssrc=(uint)$SELF_VSSRC" \
                ! r.send_rtp_sink_1 \
        r.send_rtp_src_0 ! udpsink host=$PEER_IP port=$PEER_A bind-port=$SELF_A \
        r.send_rtcp_src_0 ! udpsink host=$PEER_IP port=$((PEER_A+1)) bind-port=$((SELF_A+1)) sync=false async=false \
        udpsrc port=$((SELF_A+1)) ! r.recv_rtcp_sink_0 \
        r.send_rtp_src_1 ! udpsink host=$PEER_IP port=$PEER_V bind-port=$SELF_V \
        r.send_rtcp_src_1 ! udpsink host=$PEER_IP port=$((PEER_V+1)) bind-port=$((SELF_V+1)) sync=false async=false \
        udpsrc port=$((SELF_V+1)) ! tee name=t \
                t. ! queue ! r.recv_rtcp_sink_1 \
                t. ! queue ! fakesink dump=true async=false'
By the way, check if you have Gstreamer installed
gst-launch-1.0 —gst-versionSubstituted ports and stuff, they started the command Gstreamer-a in the console.
Now, attention play the lottery. I do not know whether or not you will play the file. I started to play files with the extension * .mpg from my poor collection of clips.

Here is the clip of Natalia Mogilevskaya. Clips with a different extension are either not played, or are played with sound distortion.
From this experience we conclude: not all yogurts are equally useful.
We analyze the work of this application. First, Media Pipeline is created for transferring media traffic, as well as RtpEndpoint and WebRtcEndpoint, the latter performs the work of an RTP packet receiver and is used to display a video clip.
Here is a simplified sequence of statements for this part of the Java application:
final MediaPipeline pipeline = kurento.createMediaPipeline();
final RtpEndpoint rtpEp = makeRtpEndpoint(pipeline, useSrtp);
final WebRtcEndpoint webRtcEp =
    new WebRtcEndpoint.Builder(pipeline).build();
rtpEp.connect(webRtcEp);
This concludes the review of this part of the Kurento tutorial. Happy programming!
Kurento
Kurento tutorial
Previous article