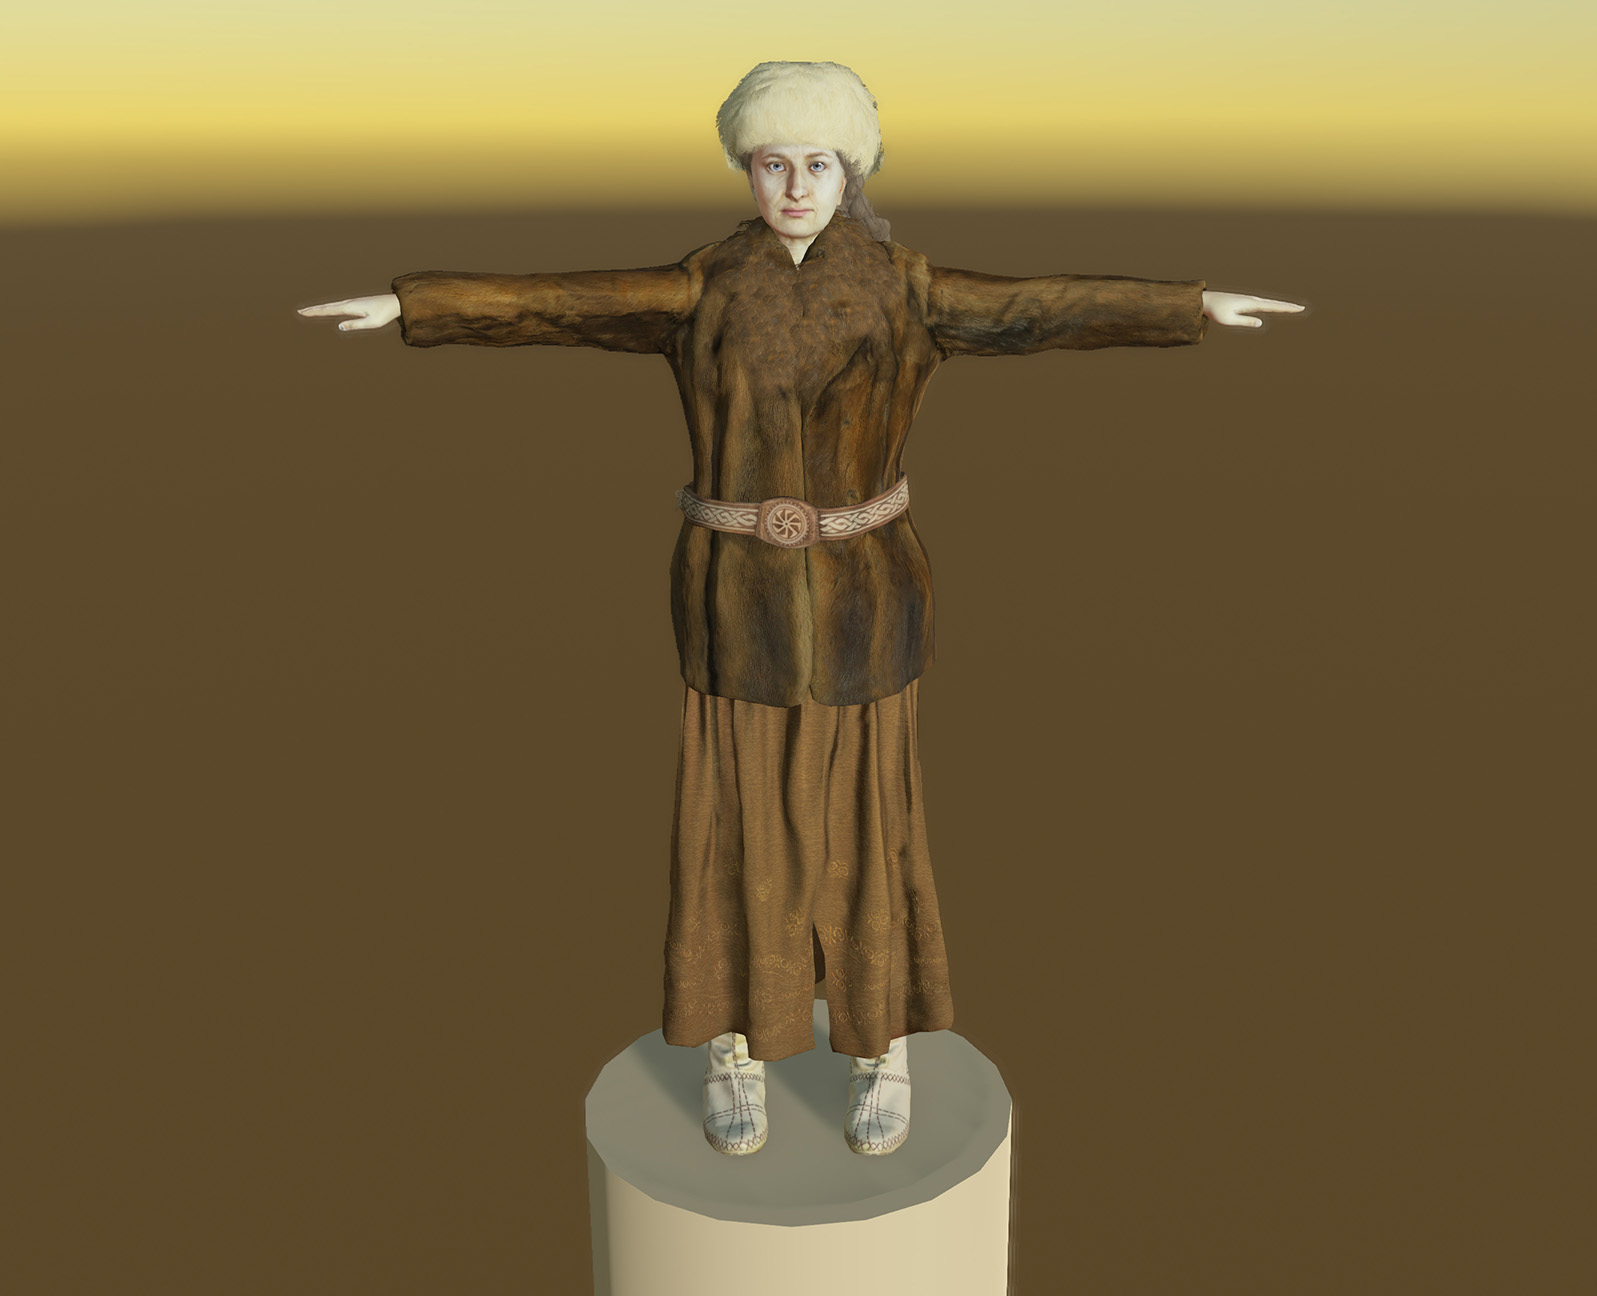
Creating gaming 3D models for the poor: the indie way
- Transfer
Have you ever wondered how a small indie video game studio works?
It is possible to create games with a very small budget, but for this you need sharpness, a lot of work and even more love for your work.
We are a small team from Poland. There are only three of us, but only two people work full time.

Today we will talk about the character creation process for our game The End of the Sun. Keep in mind that the screenshots shown in the article are taken from a project that is still in development.
This text is devoted only to static elements of the characters: we will describe how the character and clothes were scanned, how additional elements were created, and how we configured the Unity engine to get such screenshots:


But let's start from the beginning. Before starting work, we prepared a list of properties required by our characters:

In the article we will tell only about one character in a young and elderly state, because in our game the plot is very important and we don’t want to spoil the pleasure of the players.
So, making a list, you can start working on graphics.

Actress in the process of photogrammetry.
We started by scanning our model's face using photogrammetry . This is a topic for a separate post, but you can learn more about it on our youtube channel .
Turn to Wikipedia:
In other words: photogrammetry is a way to restore the 3D depth over several photos (or multiple images) to create a three-dimensional virtual model that looks like an object in the real world.
A large AAA studio with a large budget for scanning a character uses many cameras. They are located around the actor and take a bunch of pictures at about the same time ...
Yes, there is a problem here, and how did we solve it? Scans created in this way will be worse than when working with multiple cameras, but this is enough for us to create a basic face shape and a baked, high-quality texture. This is an “indie way” of creating photogrammetry.
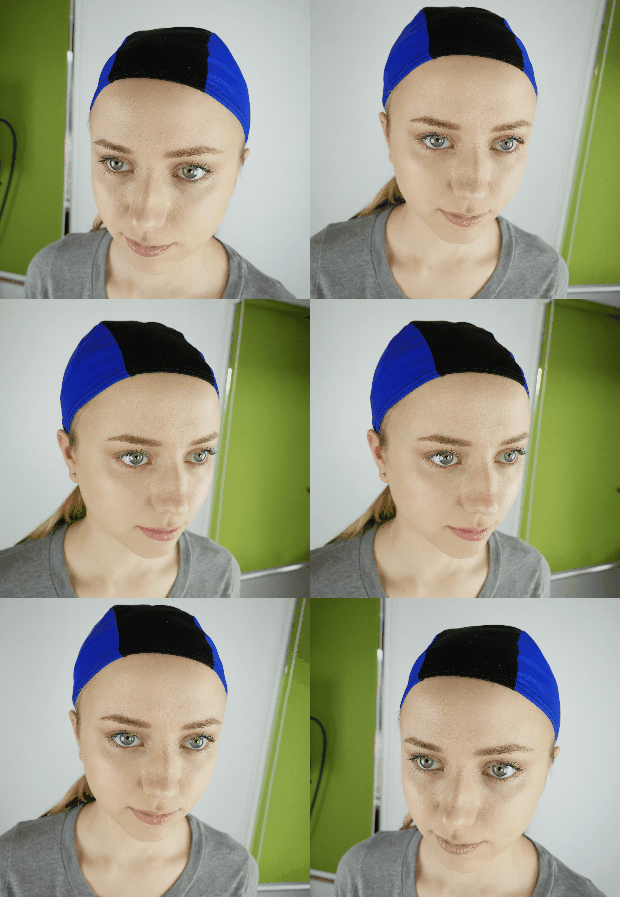
An actor or actress should not move until you finish taking snapshots of your face. They can't even blink and breathe. (Shooting usually takes about 10-20 seconds, but this is still difficult to achieve)
We had to very quickly take pictures from different sides of the actress. For this, we used burst mode. Sometimes there were problems with focusing, but this way to make the pictures the quickest to keep the actress still.
It is better to put the actor on a chair with armrests, it is easier to sit still.
We took pictures only from the front of the actress. In the screenshots you can see the photos and the back, but in the final scan we did not use them. In general, to create a scan you need only 8-10 good photos in front .
It is also good to use a polarizing filter with the camera, because it reduces the light on the skin, which improves the model's shape and texture.
For such a scheme, use at least four softboxes to improve the texture and reduce the amount of post-processing.
Use the shutter speed as high as possible to avoid motion blur, as well as the smallest possible aperture size (I mean f.5 and higher) to get a wide range of focus on photos. That is why we need at least four very powerful softboxes. Of course, the ISO should be as low as possible to avoid noise.
We used Photoscan 3D software to analyze photos and create models . This is what a point cloud looks like after photo processing:

Point cloud and visualization of photo layout.
As you can see, there are photos above and below the character, but now I can say that we do not recommend them. It is much better to make about 8-12 good photos of the front of the face (arc from the left to the right ear). This gives much better results for the texture and model. The only drawback is that the neck of the model must be created manually, but this is a small problem.
After creating a point cloud, we process it into a three-dimensional high-poly model :

Already looks better, right? But on the 3D model you can see a lot of noise:

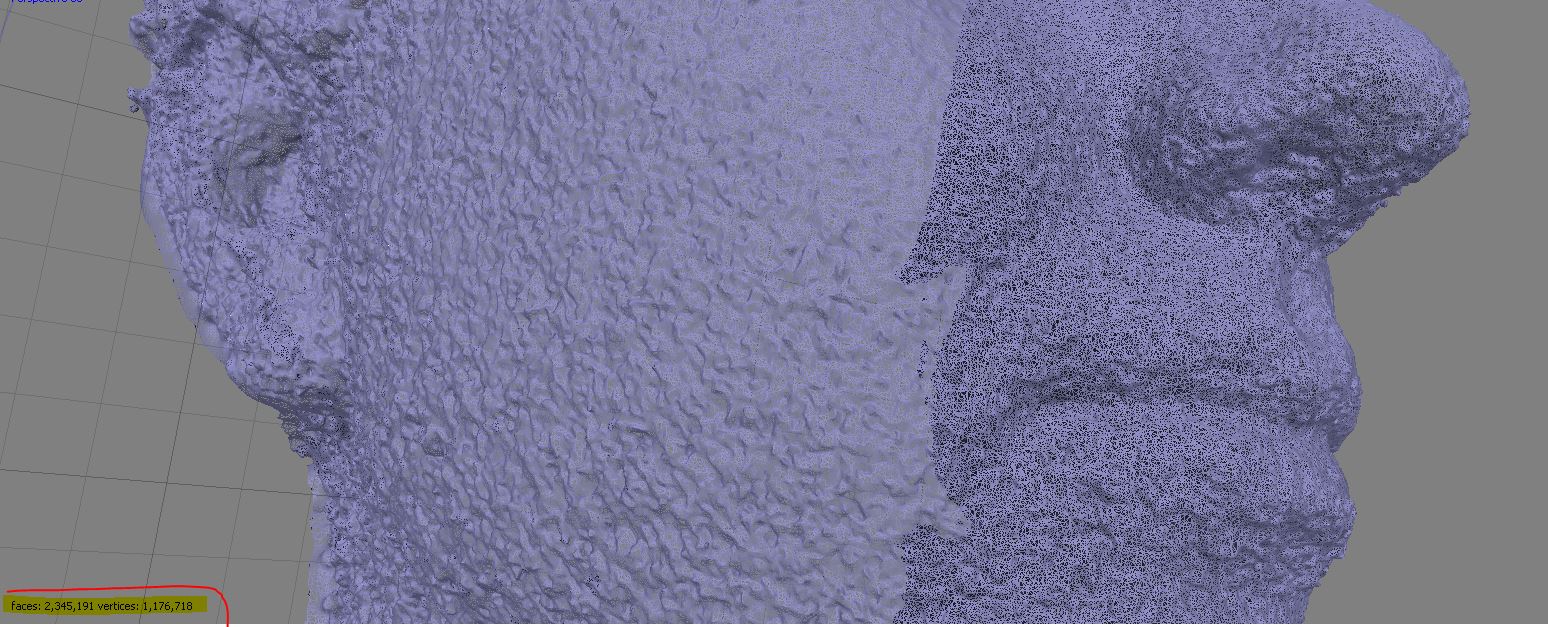
It occurs for the following reasons:
- Motion blur with very quick snapshots
- Our actress's micromovements (yes, even moving a face 1 millimeter leads to a similar noise)
Most of you probably think it looks terrible, and you're right. That is why we took a few more steps.
Now you can do the operation called "retopologiya . " This is a technique for creating a 3D model of a simpler and more optimal shape based on a high-poly model.
Here is how it looks in practice:
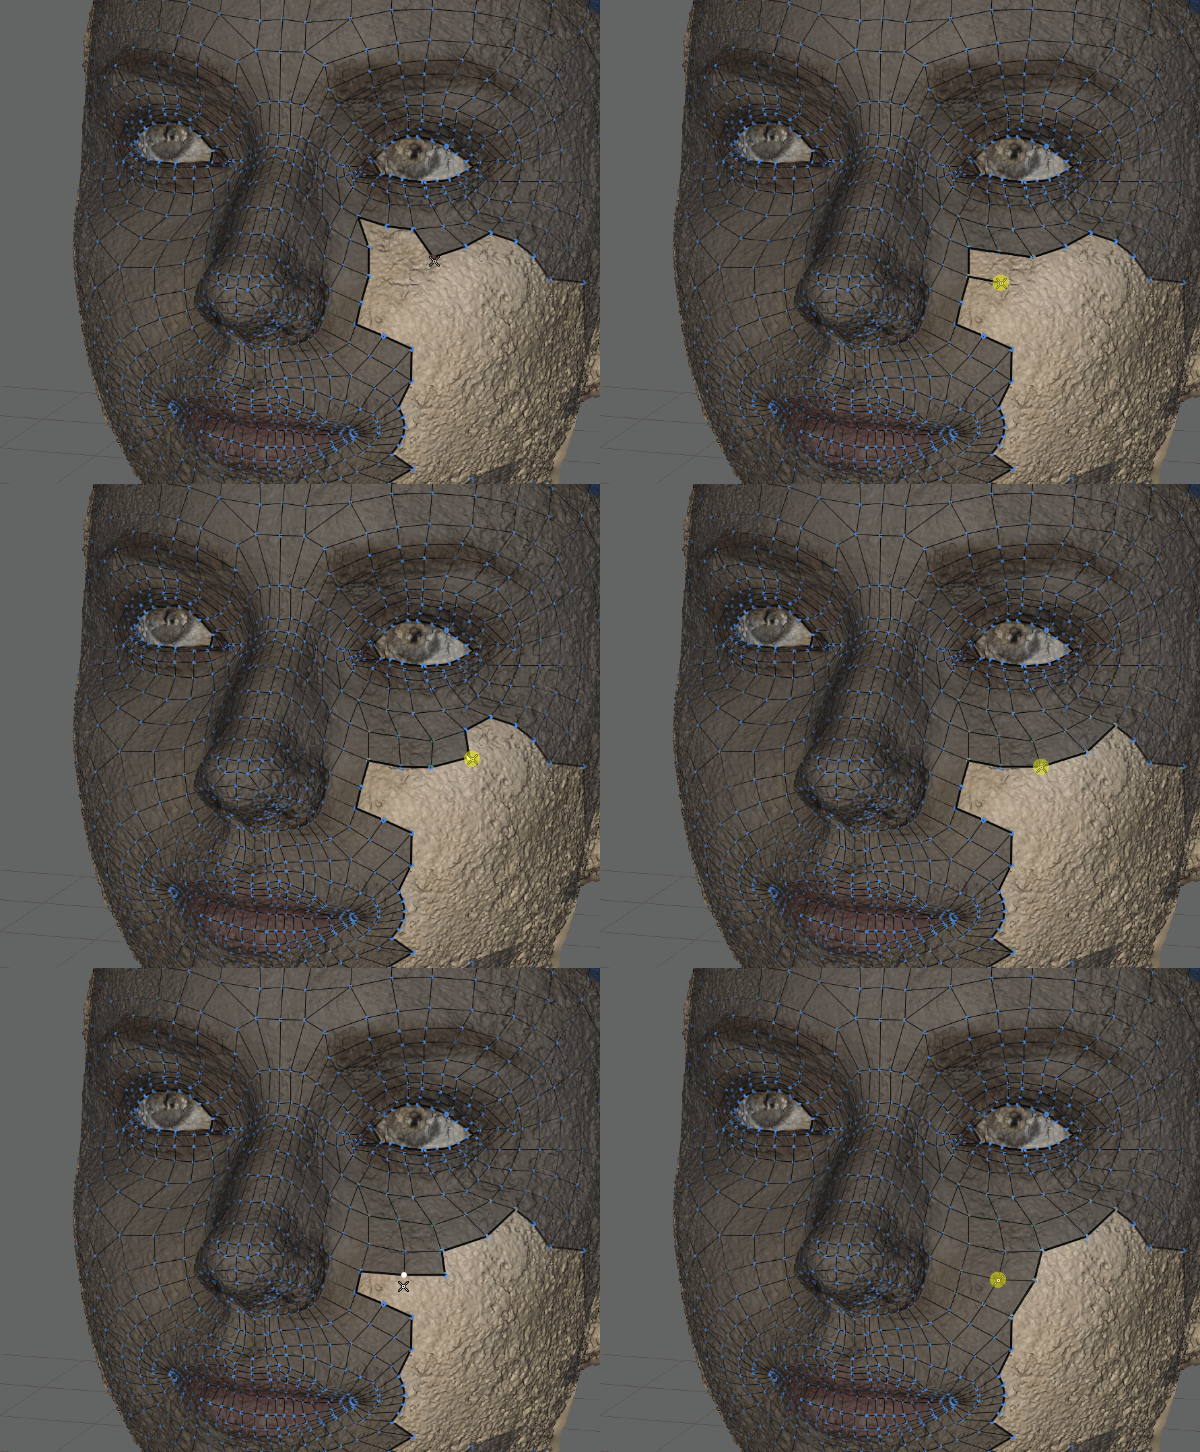
The rotopology of the character.
This is done because the model shown above contains more than a million triangles . A typical computer for work with a frame rate of 30-60 fps is capable of processing 5-6 million. (This information is given simply for a general understanding, in fact, many other aspects affect performance.) That is, only a few models with so many triangles can be displayed in the game.
Another important aspect of retopology is the creation of a smooth face model , ready for facial animation. To perform retopology, we use Topogun 2 software.
Here is our face model after retopology (we will polish it later, after texturing):
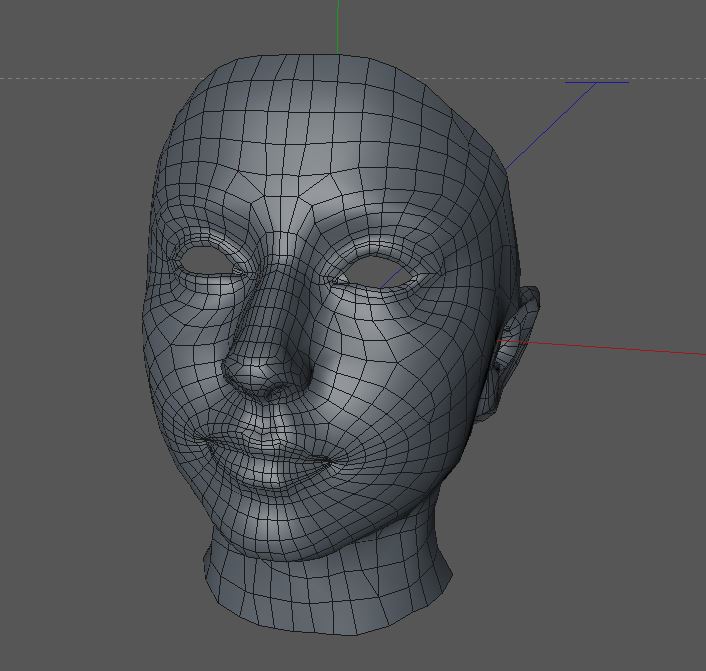
Then we baked (in 3D slang, this means simply preparing / creating) the texture of the face using our photos. This operation is performed almost automatically. That is why we decided to use photogrammetry - the face model and good texture make our character natural.
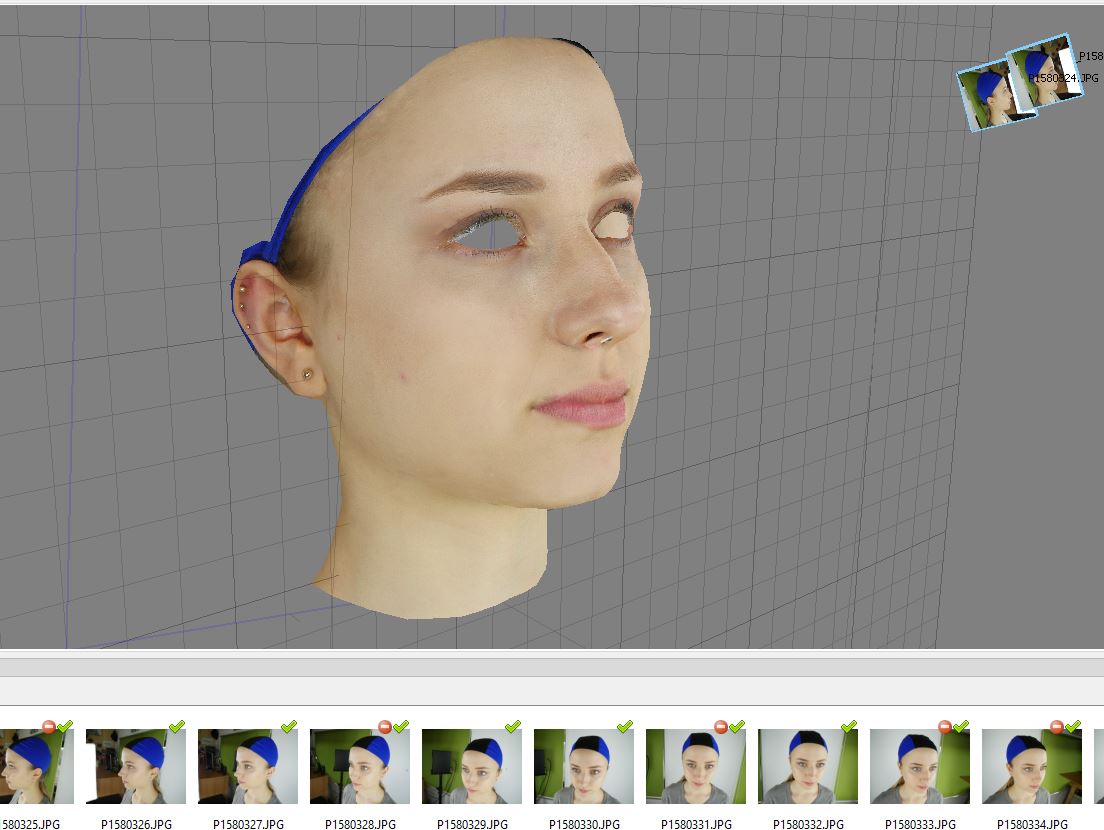
Hmm, there is still much to be done - as you can see, there are small mistakes in the texture. Another small problem is the lack of the back of the head and eyes.
Therefore, the next step will be to create unscanned items and items that cannot be scanned, for example eyelashes, hair, eyes. So let's find out how this is done. We use another software package called Cinema 4D. In this software, we can create the rest of the model and improve its texture.


Great, looks much better. Before we start working on the texture, you need to create a body with bones for animating . (About this in our blog will be a separate post.)
For our first character, we created the whole body manually, but it was completely unnecessary waste of time, especially considering that when we put it on, bare parts of the body were visible only in rare moments of the game .
With a bit of searching, we found a great way to create 3D bodies for our scanned faces. We use for this task free commercial software Make human. With this software, you can create a whole body, even with the face and skeleton. It is enough just to move the sliders until you get the desired result, besides, it will have a skeleton compatible with the Unity 3d engine.
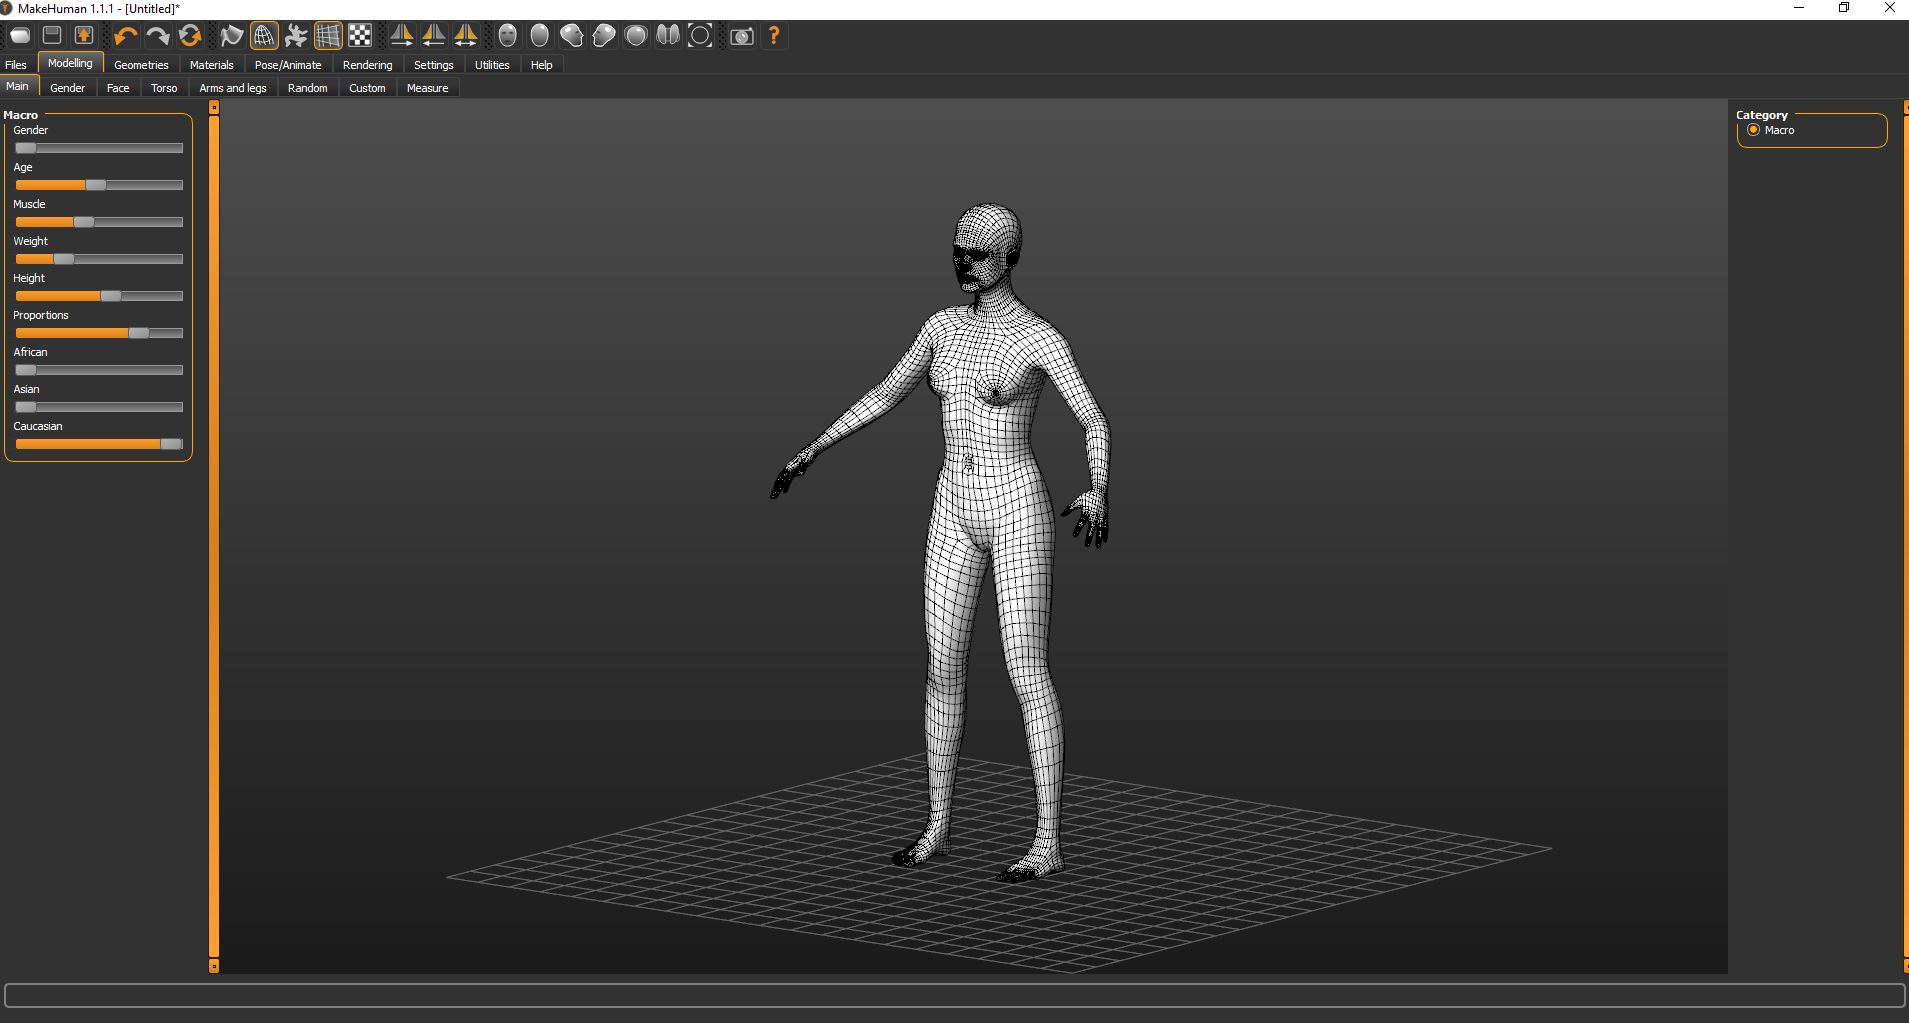
Therefore, in just a few minutes, we got a whole body with excellent topology and even weights, ready to animate! (If you don’t understand what I’m talking about, then read the second post about animating the characters that will be released soon!) This is very useful software.
The only problem is that we need to destroy part of the model , cutting off the head from the body (it sounds scary). We need to do this in order to replace it with a scanned model.
The most important thing here is that, thanks to the Make human software, we have weights on the bones prepared for animating.
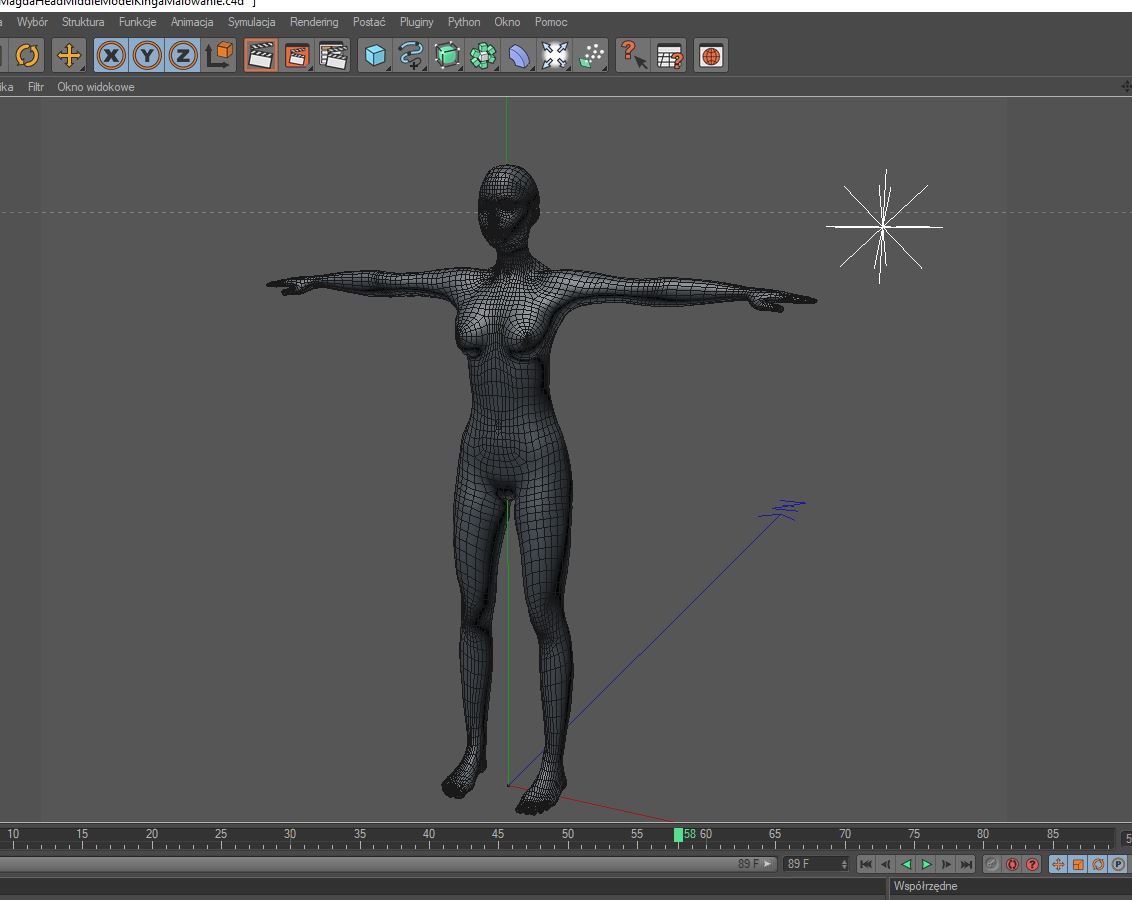
We just need to add the bones of the face to be able to animate facial emotions or to synchronize lip movements with dialogues. But about this will soon be the next post in our blog.
Creating a proper system of facial bones can take a whole day (yes, I know, there are no bones on the face, but muscles, but this is what they are called in 3D graphics).

Of course, to create beautiful textures you also need a lot of work. We use Frequency Separation Technique in Photoshop to eliminate glares and skin retouching. This creates a workflow that is well suited for removing unnecessary lighting from textures (even when it is a scanned model of a stone, not a human face). You should also try this process. (There is a lot of information about Frequency Separation on the Internet.)
The final Albedo texture looks like this : (sorry, but before the release of the game we don’t want to lay out a high-resolution texture)

Albedo-texture
And here is what the model looks like with an already imposed albedo-texture.


Now we add teeth, tongue and eyes:

Here’s what a finished model looks like from a scanned face and body joined together with a ready-made texture (censorship is imposed so that you can share the picture in social networks).

The finished appearance of the 3D body and face.

I wrote this chapter because creating hair that works and looks good in a video game is a pretty broad topic. Probably, you could see some of the most beautiful hair in AAA games. We are indie, so we cannot spend as much time on one aspect of our characters as big companies.
Therefore, we have created hair from polygons with a texture with transparency applied on them.
How it works? First, we model hair-shaped polygons, and then place them on the character’s head and move / distribute them using 3D modeling tools. (In our case, Cinema 4D.) You can also do this in the spline generator - create a spline with a dynamic mesh along it, then the manipulation of the hair is simplified.
So, all the hairstyles were created from such parts:
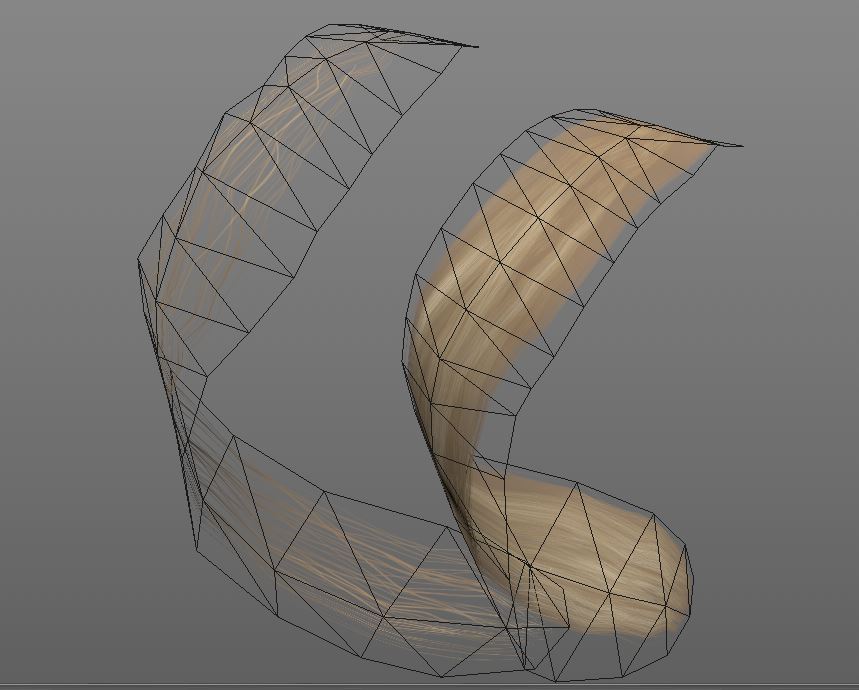
Hair without material look like this:


Here is a hairstyle with a finished texture:
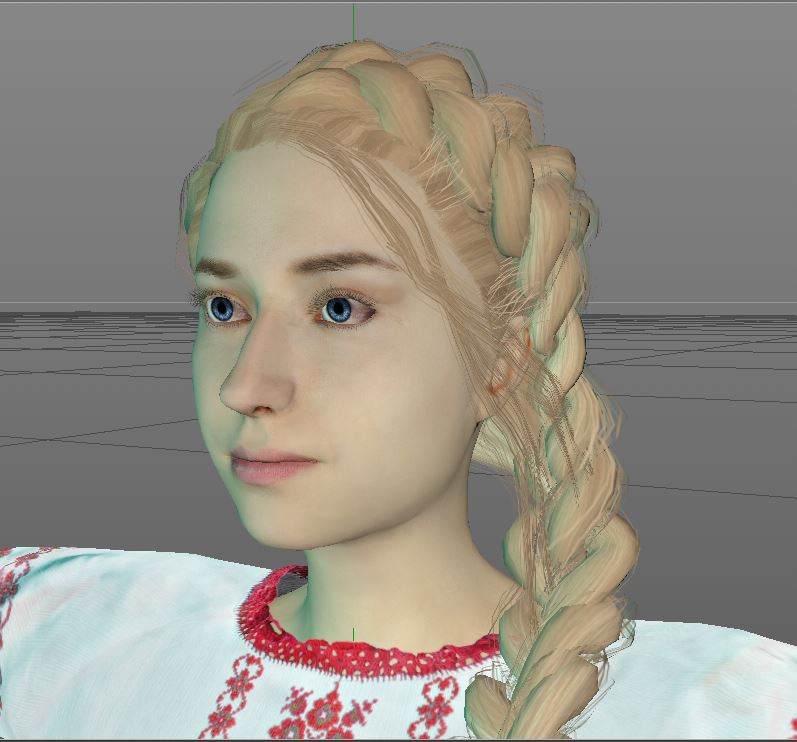
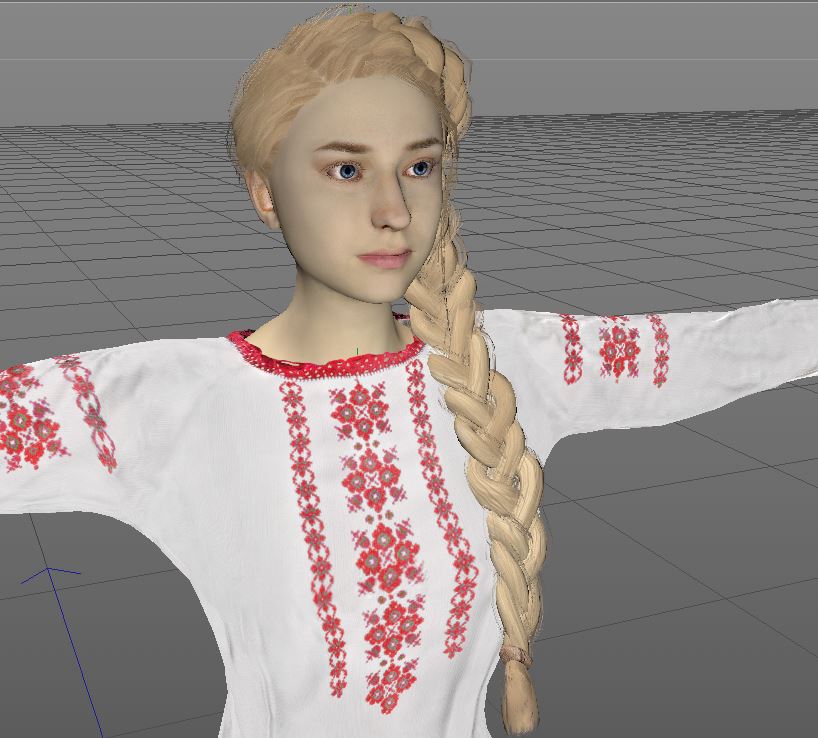
And here is the hairstyle from the screenshots, which is shown at the beginning of the post.
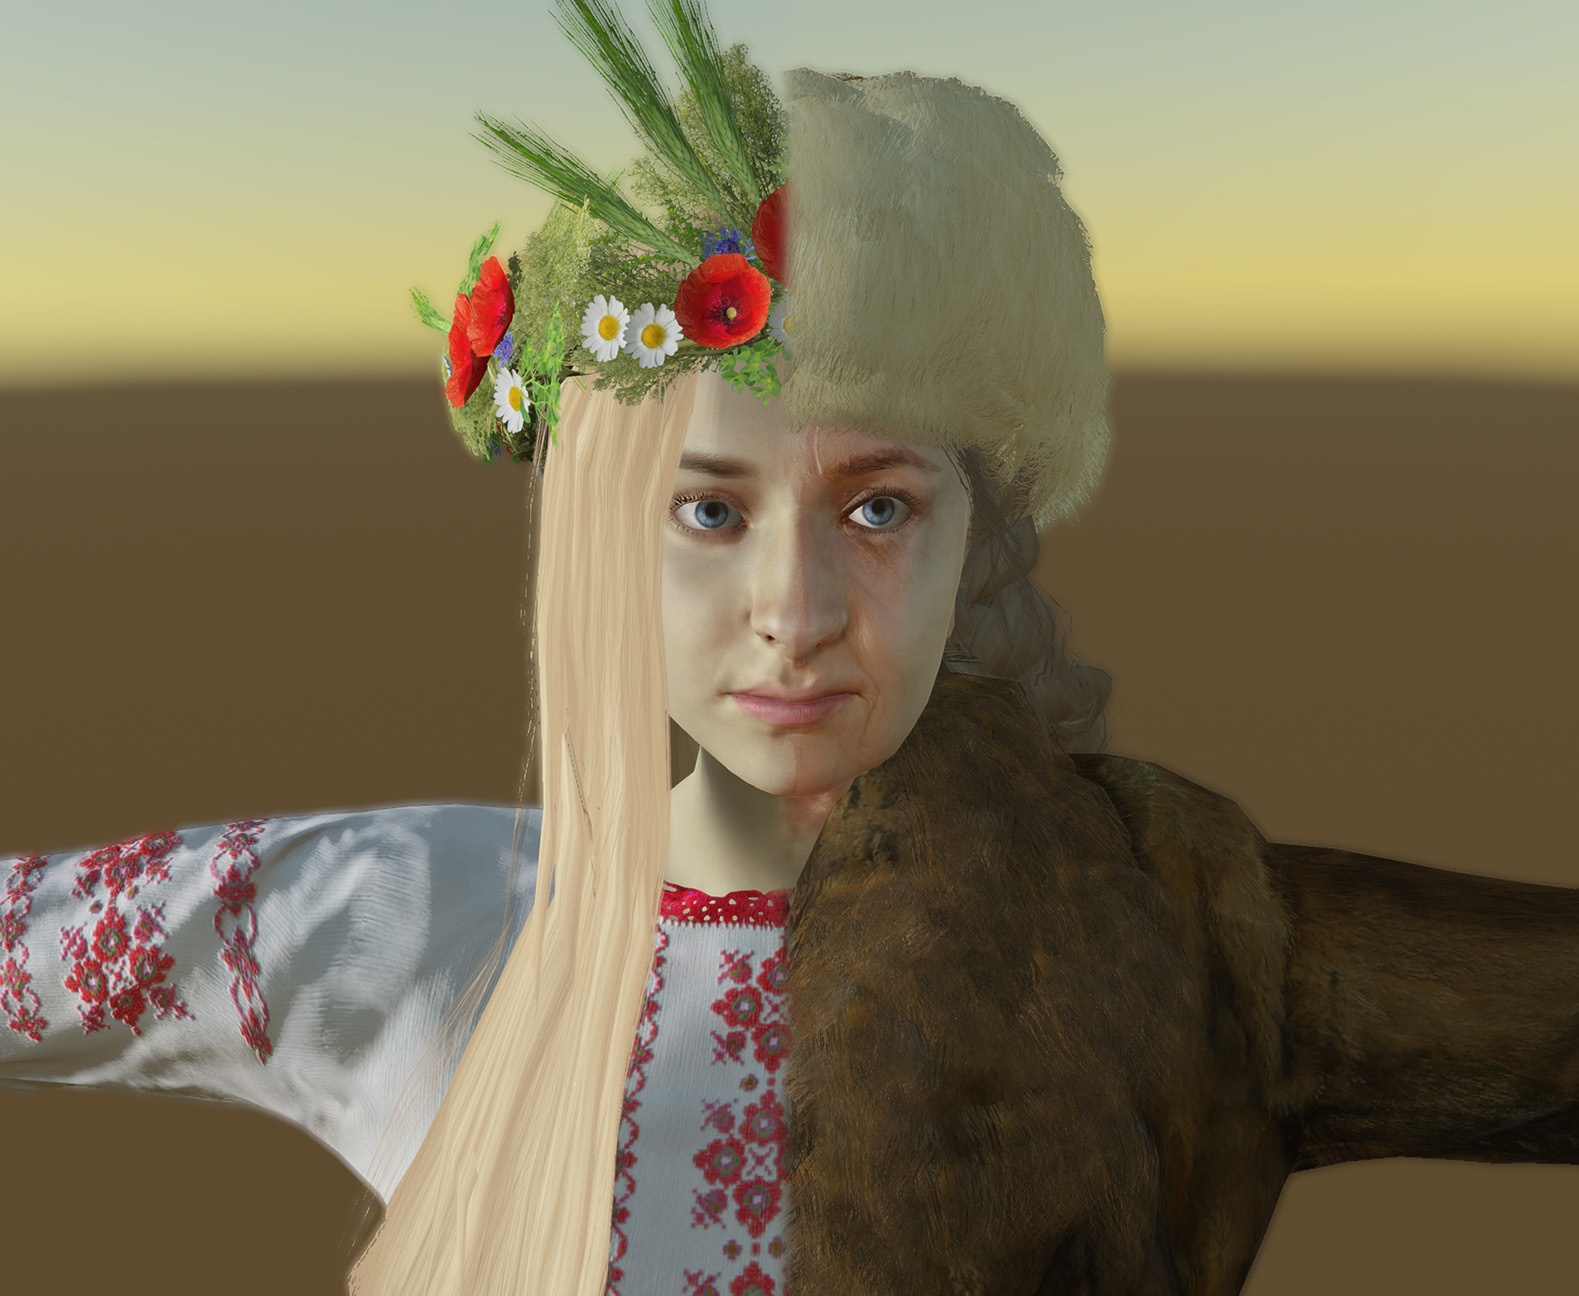
As you can see, we can change hairstyles, so there are no problems , for example, in adding an older character to a young hairstyle.


Of course, when creating hair, we use Photoshop and BodyPaint 3d to draw stripes on hair and elements of different shapes. You can use any other software, but it would be great if it had an alpha transparency mode in real time. Then you will see exactly what you are doing (and not just the gray stripes on the character's head).
The hair texture is as follows:
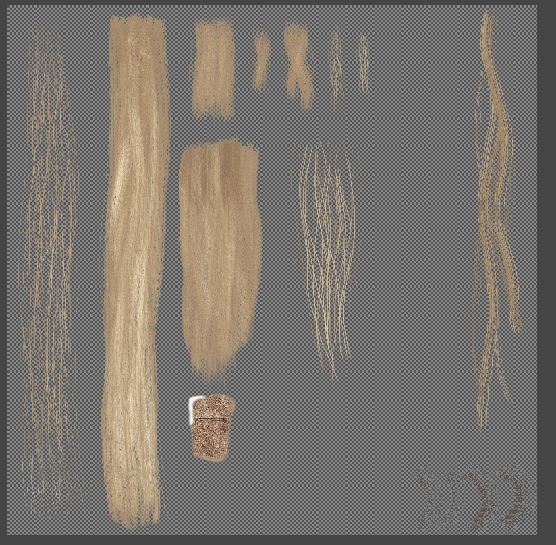
Albedo-hair texture with transparency
To give the hair a natural behavior, we tried to use the Unity 3d fabric component on the hair mesh to add a slight wind or gravity effect, but more about this in another post.


"Girl you will be a woman soon"
As I said above. In our game you can meet characters in different stages of their life. This adds interest to the players, and also forces us to perform additional interesting work.
I will show how we made a beautiful girl much older. We watched a lot of videos, pictures and web pages about how the human body is aging.
It's not just a matter of wrinkles, the whole face of a person changes its shape. Read more about this for example here .
In the article I will talk about the technical side of the issue. So, first we completed the 3D model of the young character with all the bones. This is very important because it takes a very long time to prepare the skeleton and add weights. After that, we just copied it and started working with a copy of the model. Thanks to this workflow, we don’t need to re-engage in rigging the older version of the character, because it uses the same skeleton system. This is much more important in the engine. Such a system speeds up the loading and unloading of resources, because we load / unload only what we need.
So, first we change the base mesh and drop some parts of the face to the ground, as mother-gravity does in aging. Nose, cheeks, eyebrows, ears. But we are not too keen on, because the model has the same facial bones as the model of the young character. (That is, if you change the base mesh too much, you may have problems.)
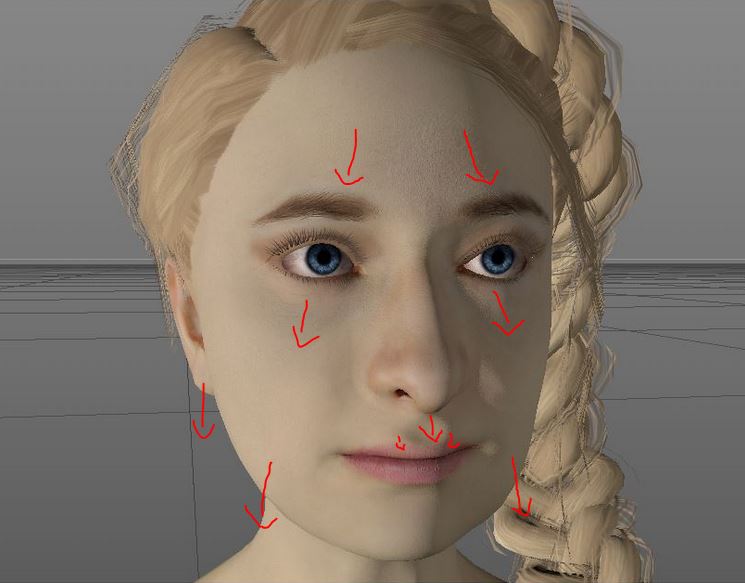
Only the deformation of the mesh.
Then we sculpt large wrinkles and details in some sculpturing software. For example, you can use the free Scupltris. Then we bake them in a texture called the normal map. Why? Because it gives us the result shown below without adding extra triangles to the model. (So that your PC can handle its processing.) We also create a normal map of some parts based on the skin texture, and then mix them together.

Mesh plus normal map
Finally, we add wrinkles to the albedo texture (the texture with the base color). We took pictures of several older people, and then added wrinkles to the model using blending in Photoshop.

Mesh plus the normal map large parts and albedo-texture of old leather
So, as a result, the skin of our model of advanced character using the normal map detail and albedo-texture. We also prepare the subsurface scattering texture, the light translucency effect through the skin) and the specular map, but in what you see on the screen, only albedo and the normal map are used (mixed into one normal map of large parts + normal map of parts) .
Here we can see the following parts:
1. Albedo-map.
2. A normal map of large parts based on the model's molded parts.
3. Normal map of large parts mixed with skin details created from albedo texture.
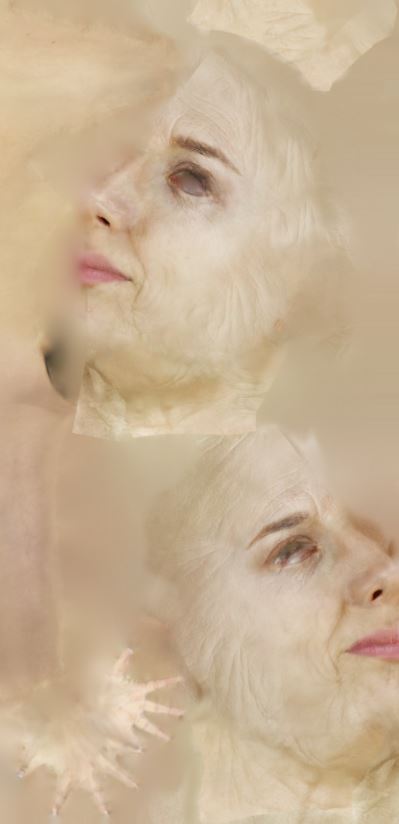

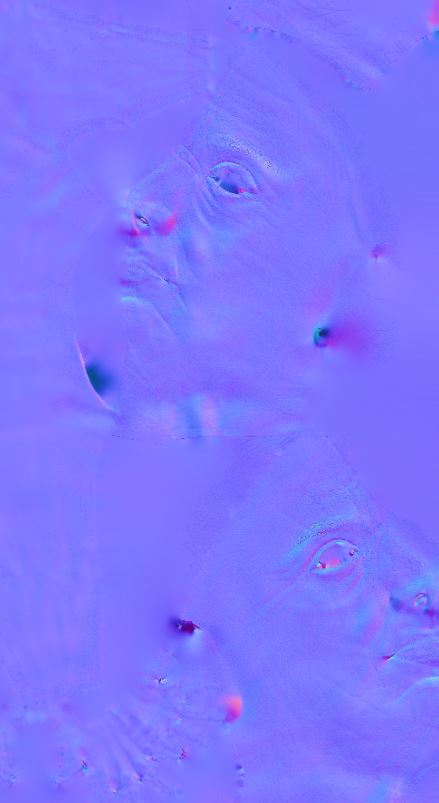
The elderly character looks much better in the Unity 3D engine, where we use suitable shaders:


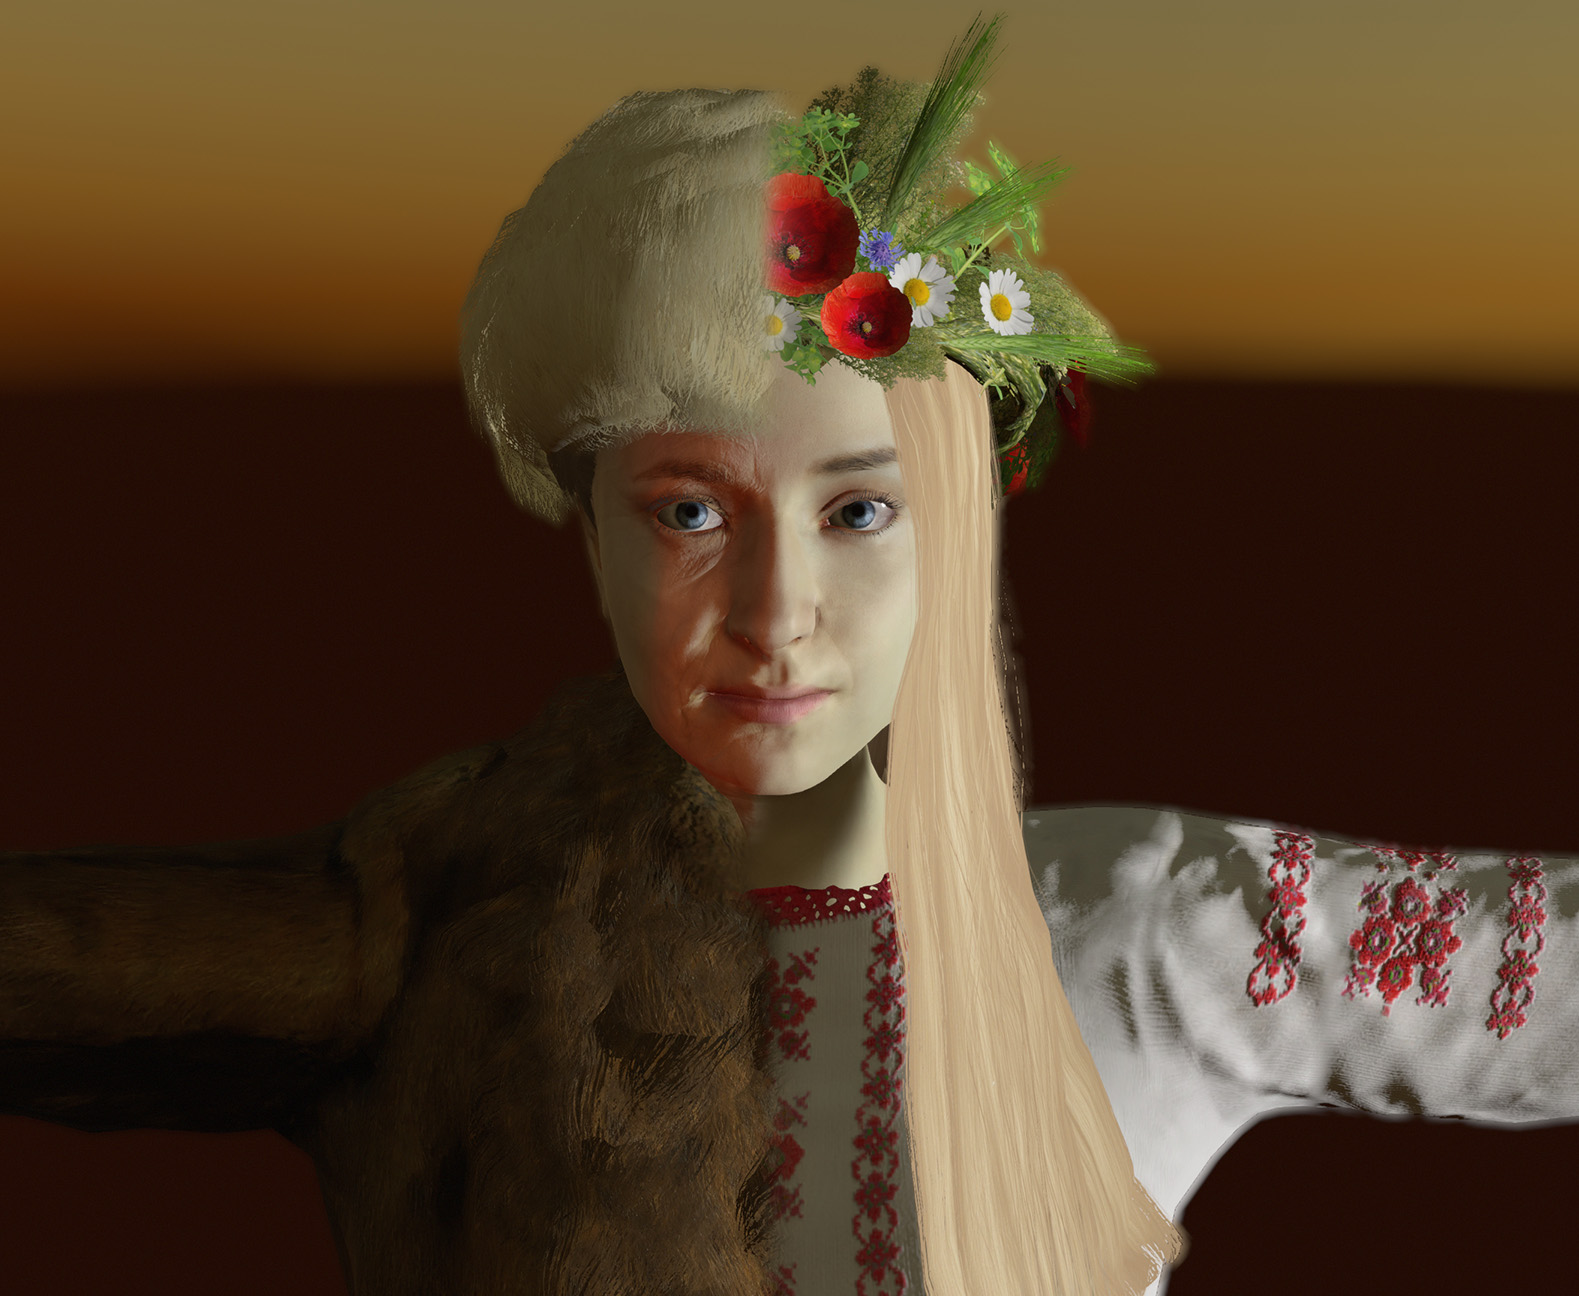
But two versions of the character connected in Photoshop (placed in the engine in one place)


So, we got almost to the end, but to achieve the final appearance of the character, there is still much to be done.
We scanned a lot of different clothes. The scanning technique is similar to scanning a face or other objects, but now it can be done slowly, usually the clothes do not move (the wind or cats running past can be very annoying, especially when even a small movement can ruin the opening hours).
- The most important thing is to fasten the design so that the clothes are motionless; it is even better to arrange the clothes in a stable T-pose. What does it mean? This is a pose with arms wide apart, a standard position for game characters to whom animation is applied. Also in this position is best to scan clothes.
For this, we bought a mannequin. We could not immediately find a mannequin in the T-pose, so shooting at hand was very difficult, and even more work was required to combine the 3D-models of the scanned clothes with the hands lowered along the bodies of the characters. Initially, the system looked like this:
Our first mannequin with his hands down
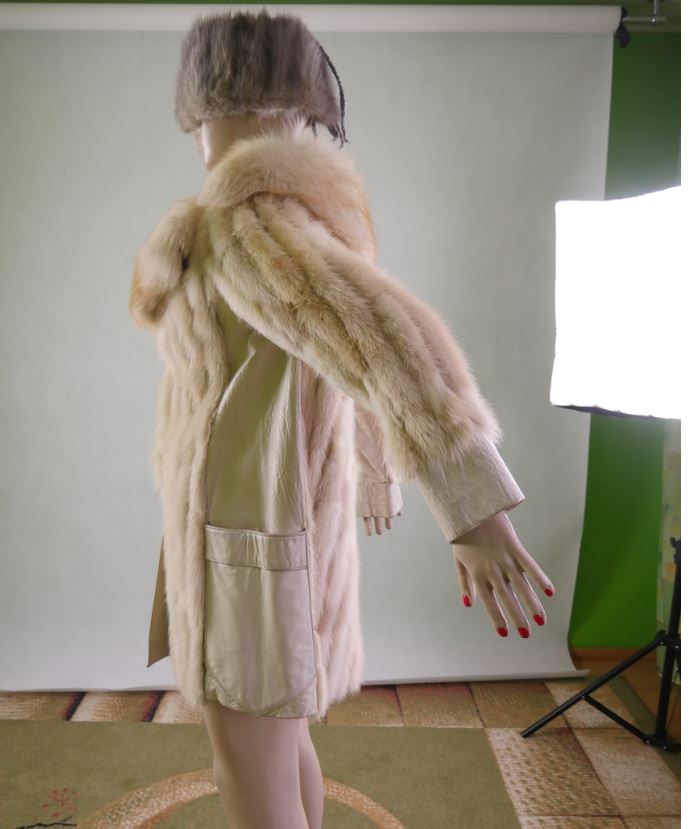
... so we modified him to raise his hands. We made new hands from PVC pipe. Here is what our “truboneken” in the T-pose now looks like:
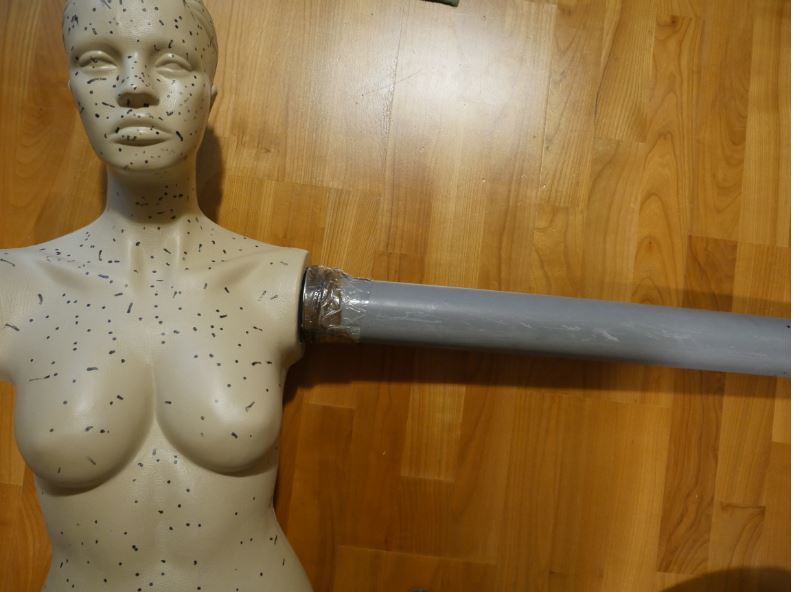
This mannequin has arms made of PVC and is in a T-pose.

We can shoot this tube to simplify the dressing of the dummy.
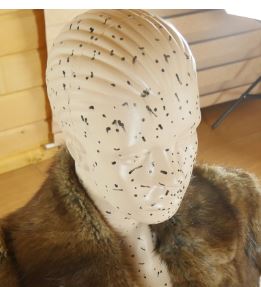
Well, that's fine, but why on our plastic friend these black points?
This is because the surface is very shiny, and the point matching scripts in photogrammetry do not like shiny things very much, but they adore points and characteristic features, therefore we have marked so many points with a marker. This allowed us to better compare the positions of photos in the software in order to get better scans of clothing.
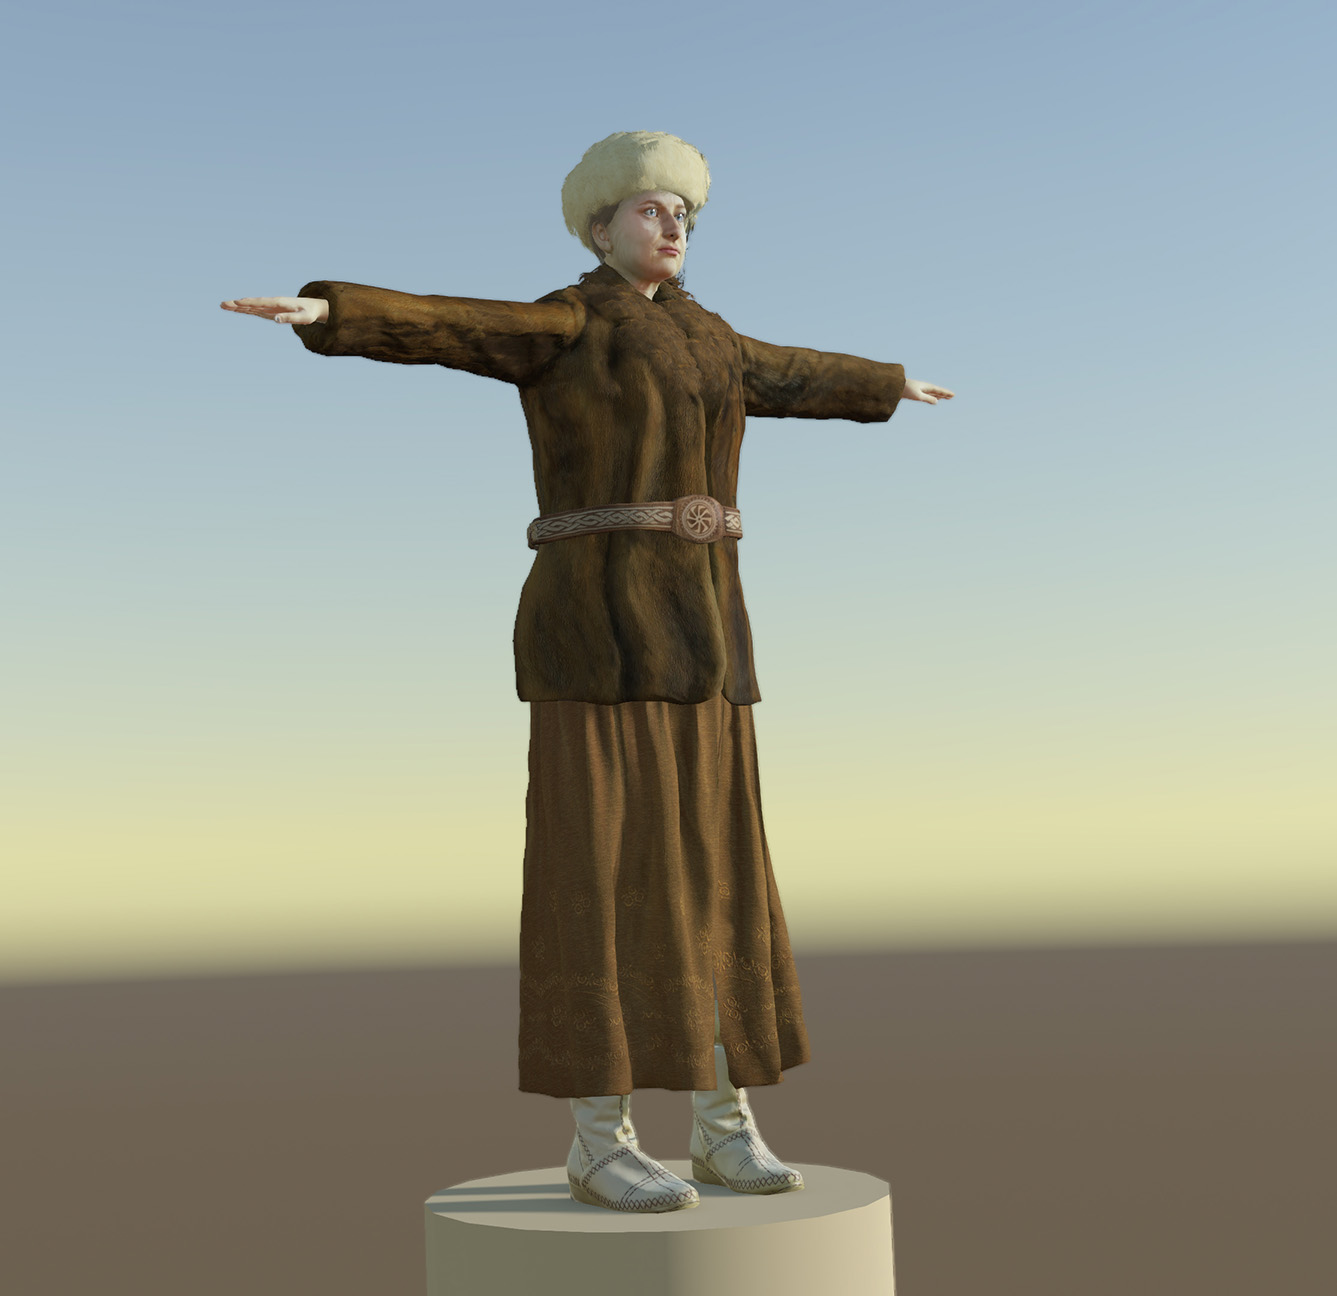
This is how clothes look on it, in this case, fur (in T-pose):

- The second important aspect when creating clothes using photogrammetry is not to forget to take pictures at hand and below the clothes. Here are how many photos we had to take to create a pretty good scan of these clothes:

Here you can see the point cloud scan:

- Some types of clothing are very difficult to scan, for example, with long fur or from very shiny materials, so sometimes it is easier not to scan them, but to create them manually.
For example, to improve the appearance of this fur, we created additional fur elements with alpha transparency channel. This is similar to what we did with the hair of the characters.

The red part is the elements of fur, created manually with an alpha channel.

This is how it looks without texture
- Some types of objects are easier to scan, for example, this matte skirt looks very good because it is made of matte material. Also here we used HDR images to get more information in the shadows and highlights, but hdr photogrammetry takes a lot of time. Why? Because each picture needs to be done with a tripod, otherwise the photos will be blurred. Now imagine the level of irritation, when after an hour of work one of our cats just jumped on this fur. We had to start all over again.

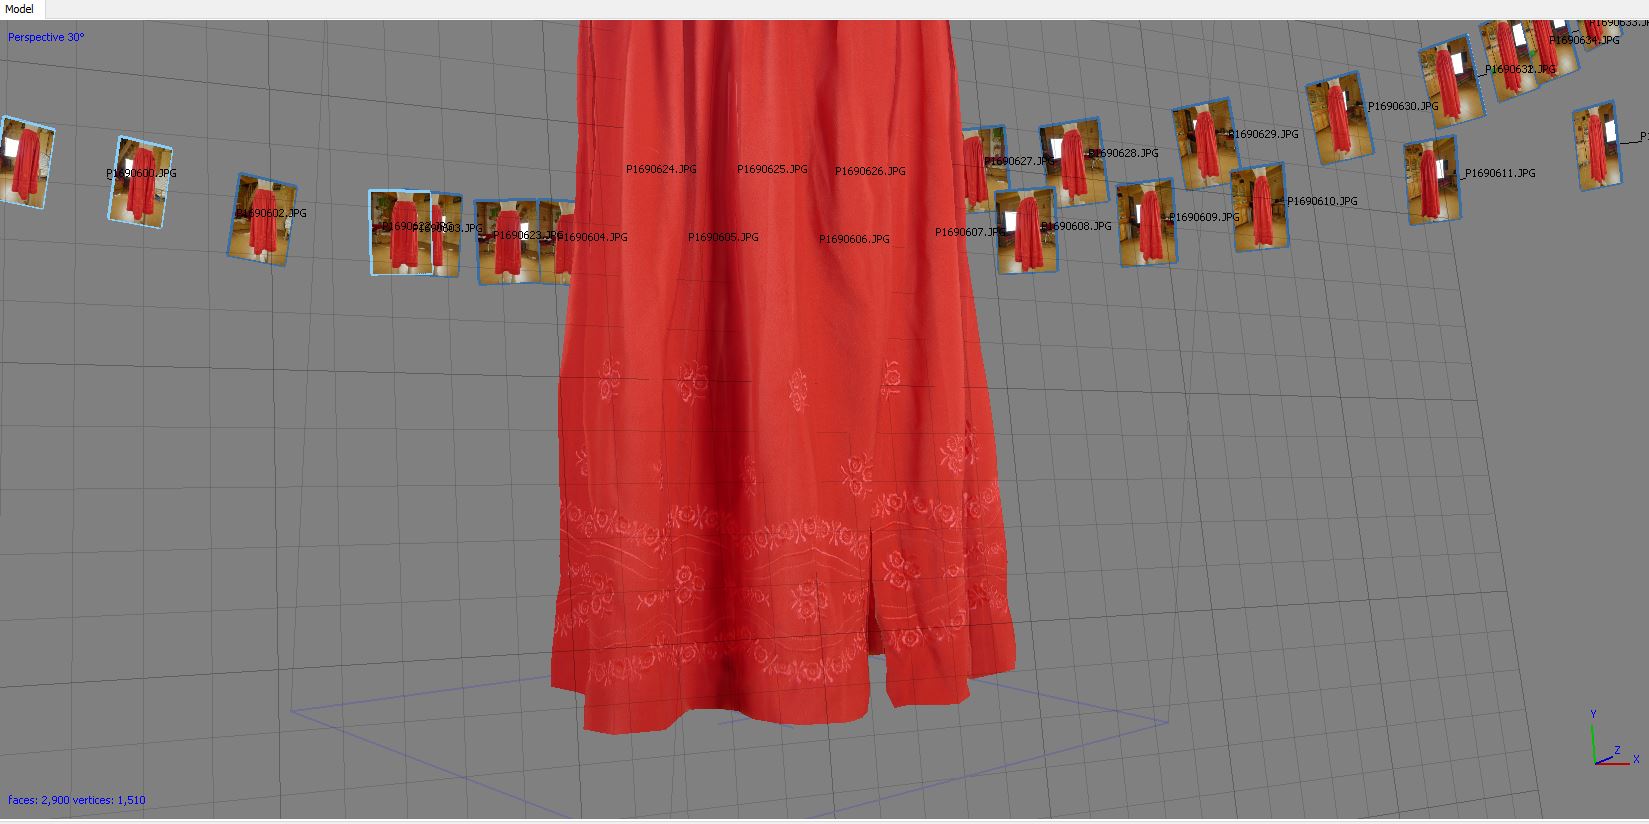
Looks good, right? In general, the more time you spend on the scan, the better the result you get, and less you do post-processing.
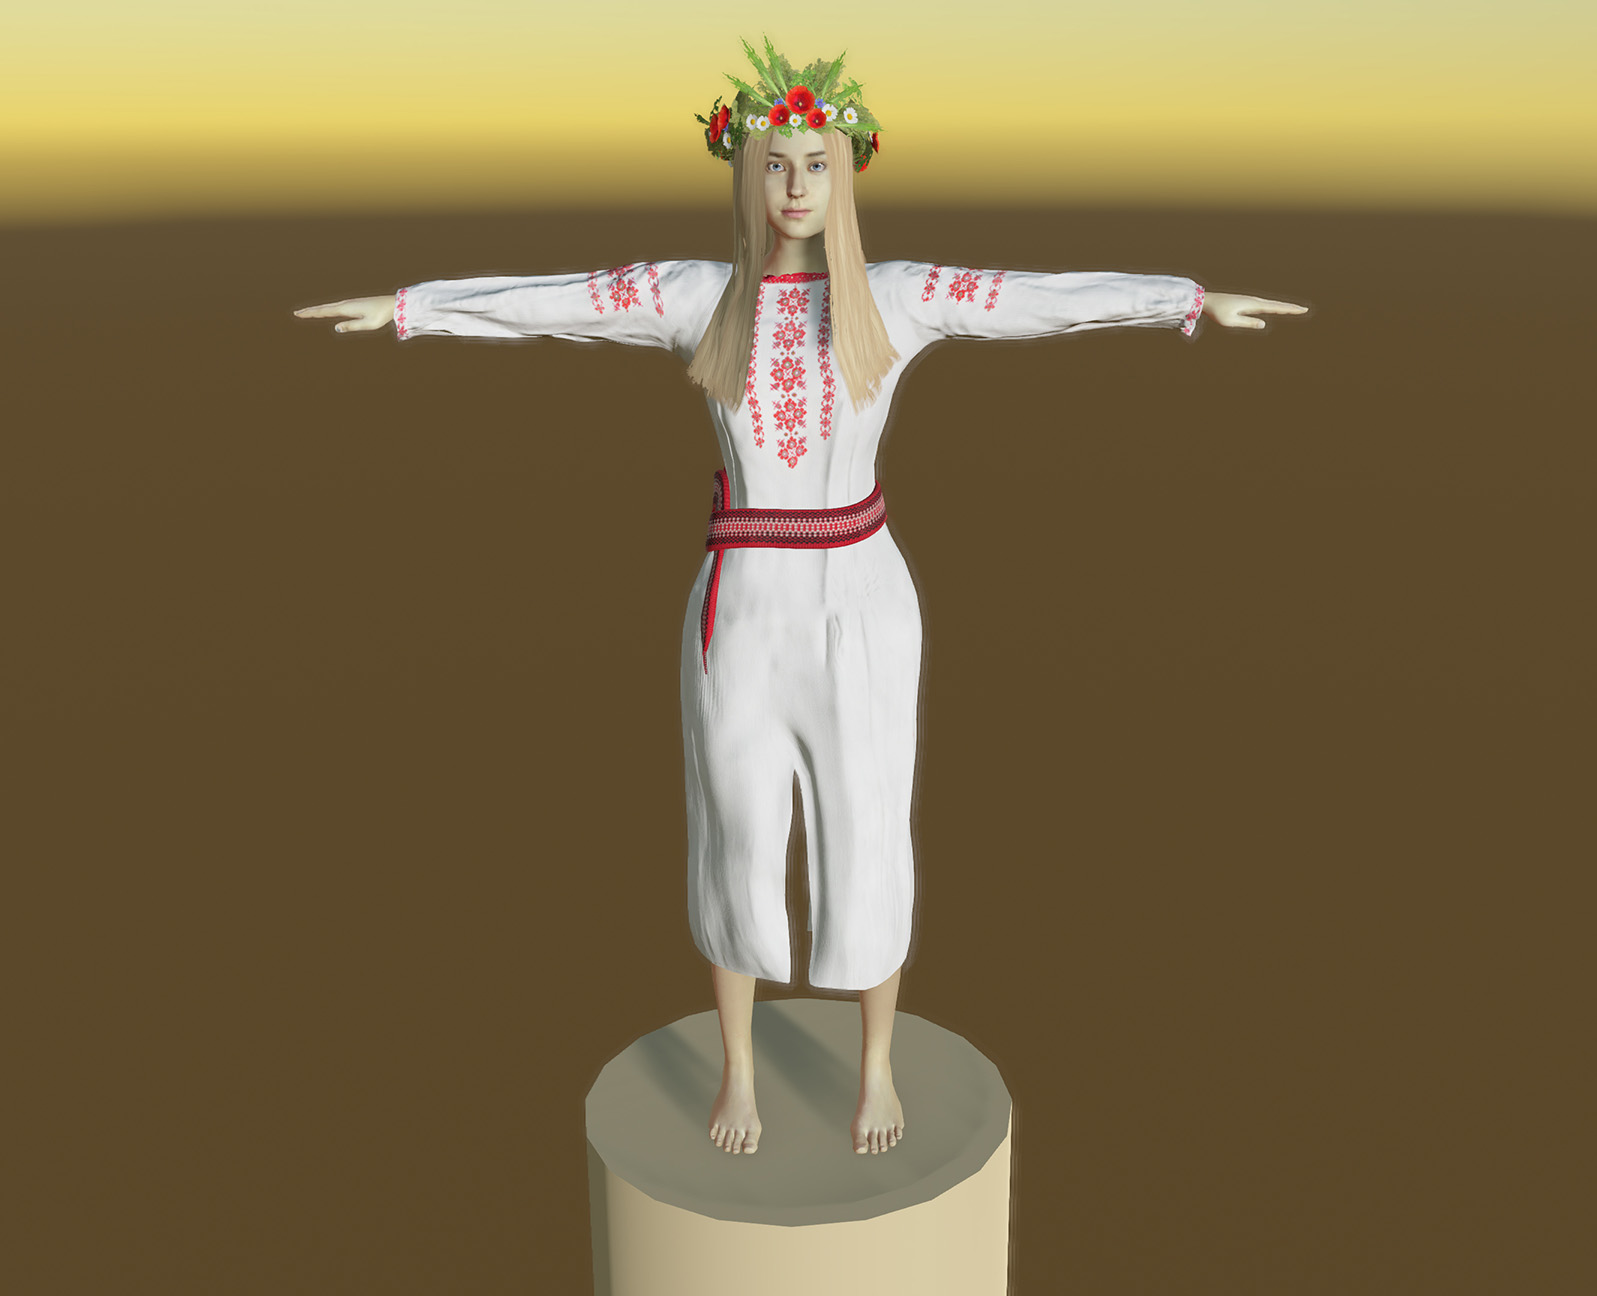
- One more elements that are better done manually, and not scanned - this is a belt. We created them manually. We made the textures go in cycles, so that even with a small resolution of textures, the quality of the game was high.


- The wreath was also made similar to the hair, using transparency. It is not ready yet, but it can be seen in the screenshots:

Well, this is all about clothes.

I said earlier that we use the Unity 3D engine. I'll tell you about the shaders and settings we used to make the model look like in the screenshots.
For all the elements of the characters we now use the free Alloy Shader. We chose it because it has everything we need, especially the dissolve option for each variation of the shader and many other options in the segments. You can use any other shader, but we use Alloy (besides, it is free).

Different position of the light gives interesting effects
- Skin: for this part of the characters we use a skin shader with the effect of subsurface scattering and transmission of light. What is the effect of subsurface scattering? This is a simulation of the light transmission factor through the skin. Look at the pictures we took:
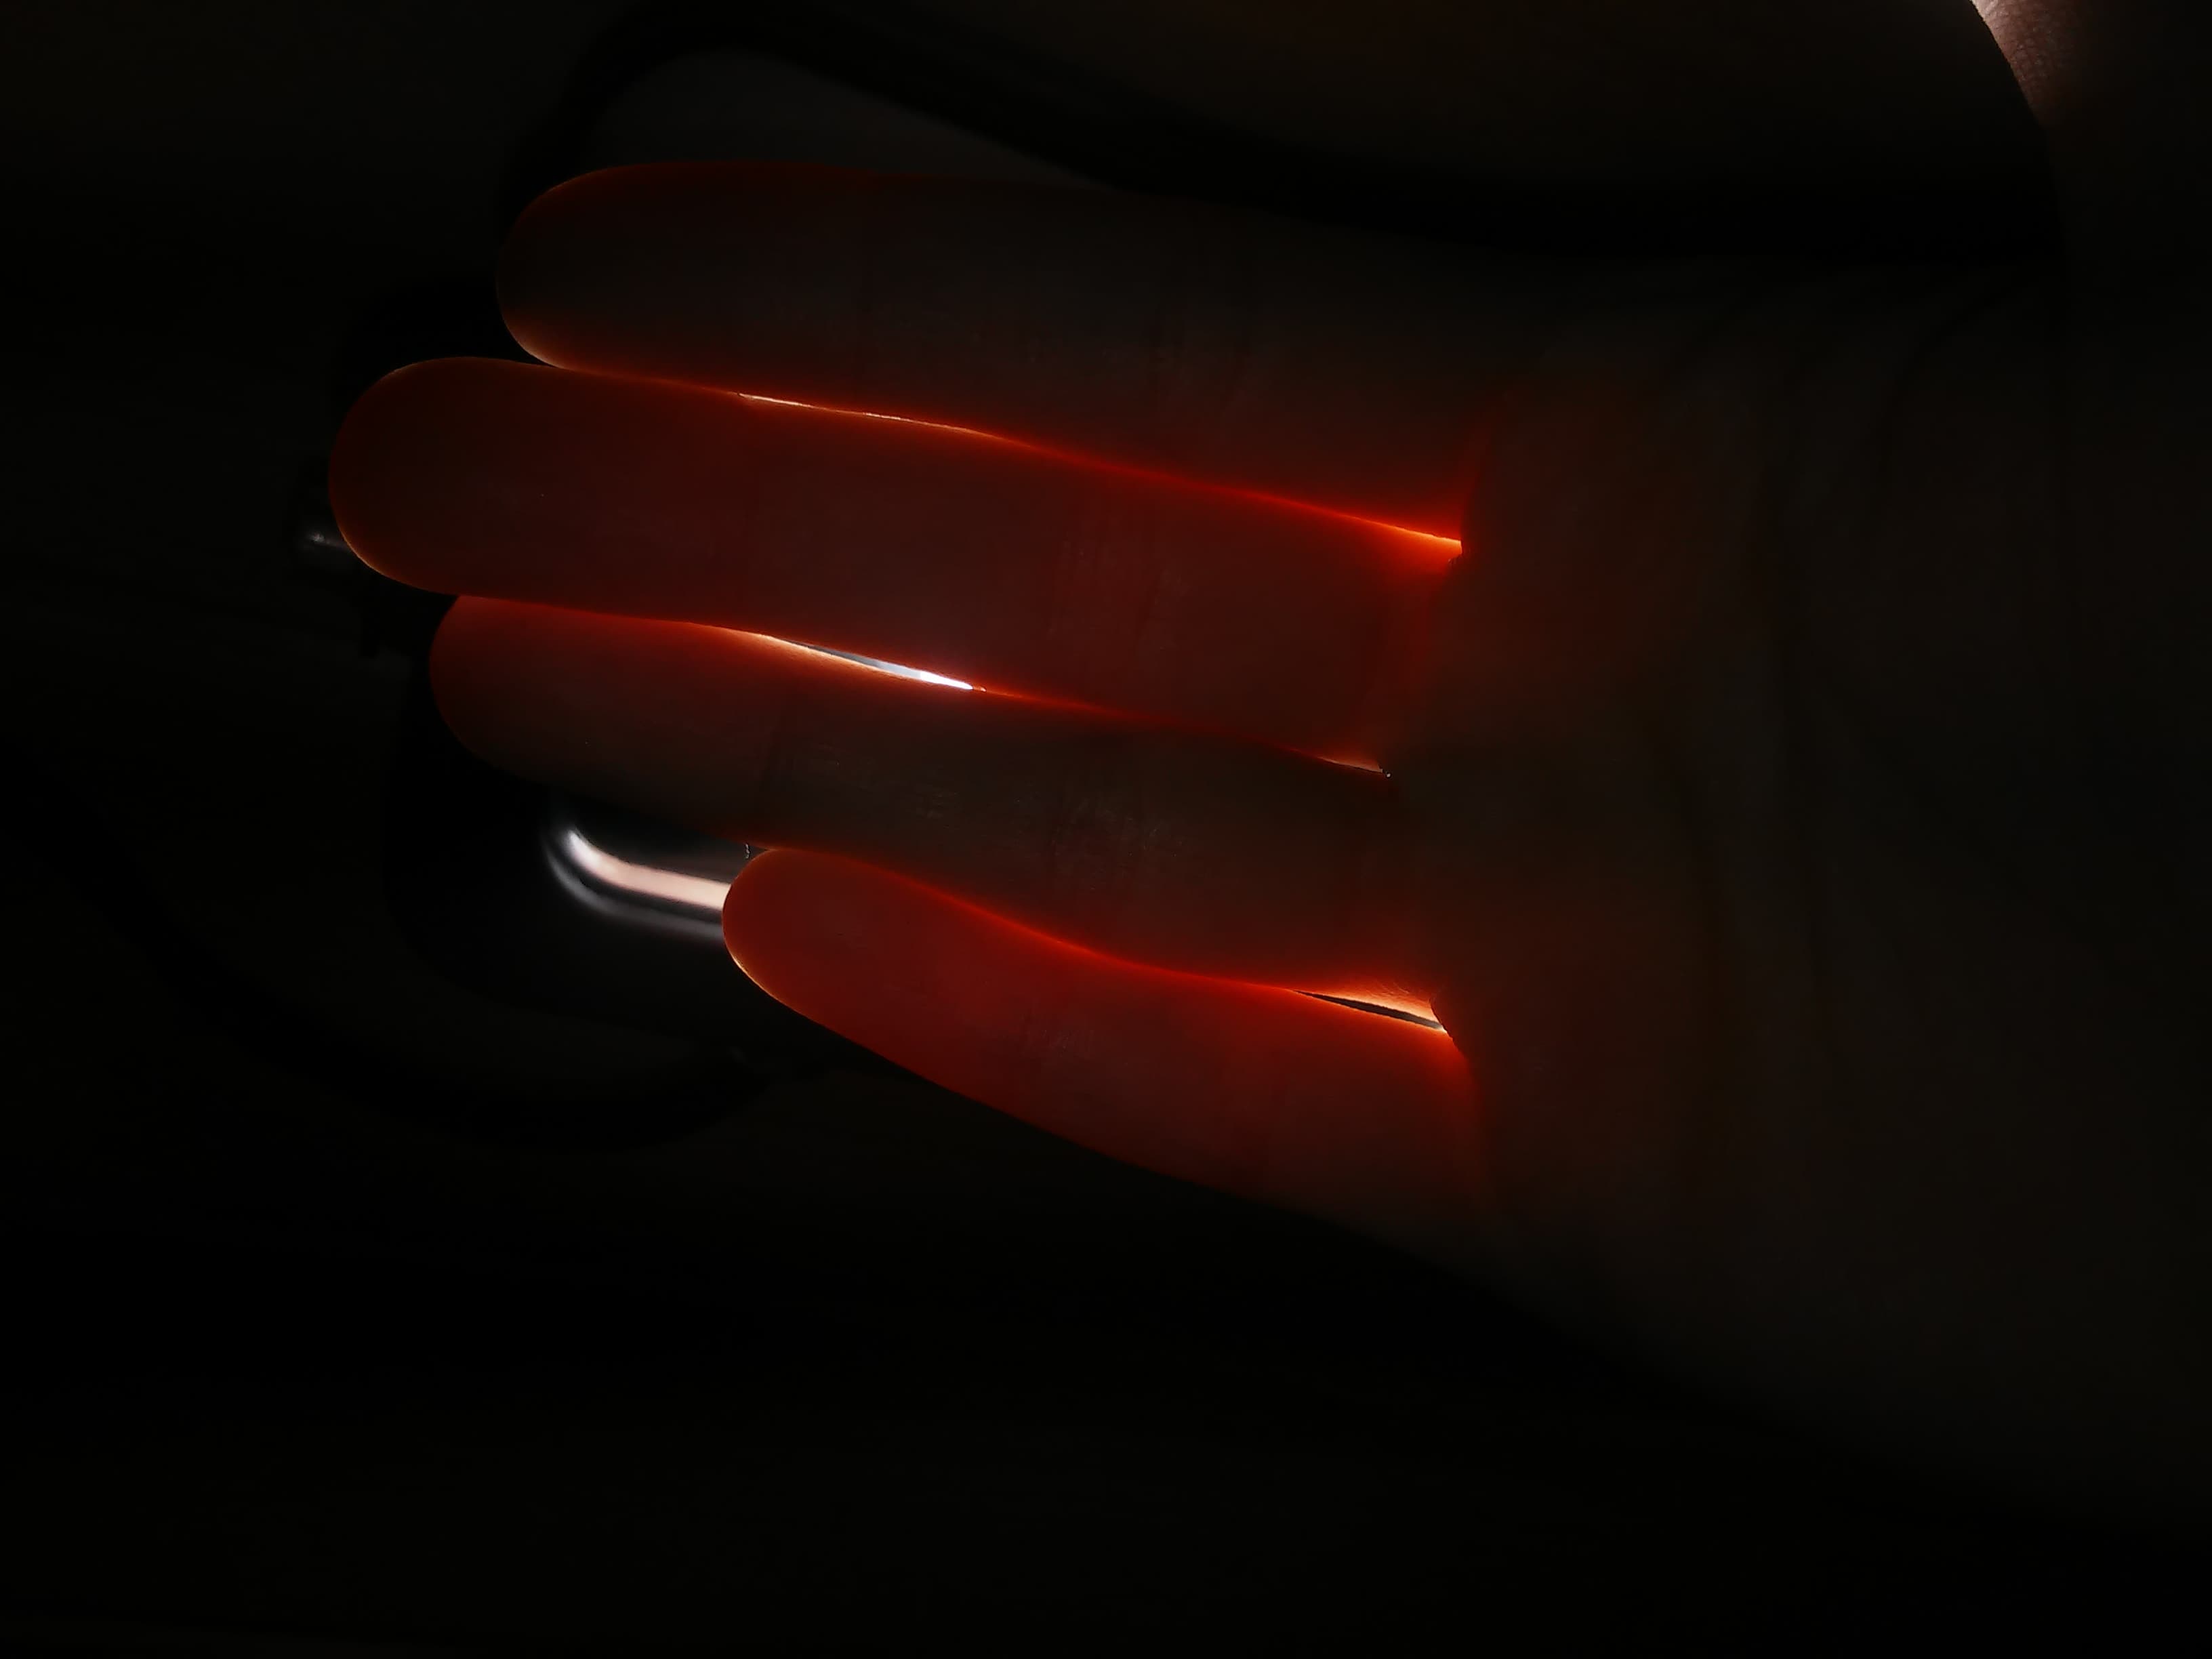
This is what subsurface scattering on a hand looks like in the real world.
As you can see, the lighting (if it is strong enough) passes through the skin.
This gives a very natural appearance, especially in low light. You can see how this effect behaves in The End of the Sun on the example of this gif and the screenshots shown above. (Note that while the model does not even have a specular texture and a subsurface map, it will look a little better at the final stage.)
- Eyes : as you know, eyes are the mirror of the soul. And this is true - it is very difficult to give a character a natural look without making his eyes perfect. The eye is not just a sphere. It is flat where the iris is and the pupil is even lower. That is why we use the Parallax shader. This is the surface that creates the illusion that there is something else deeper, and it gives very good results!
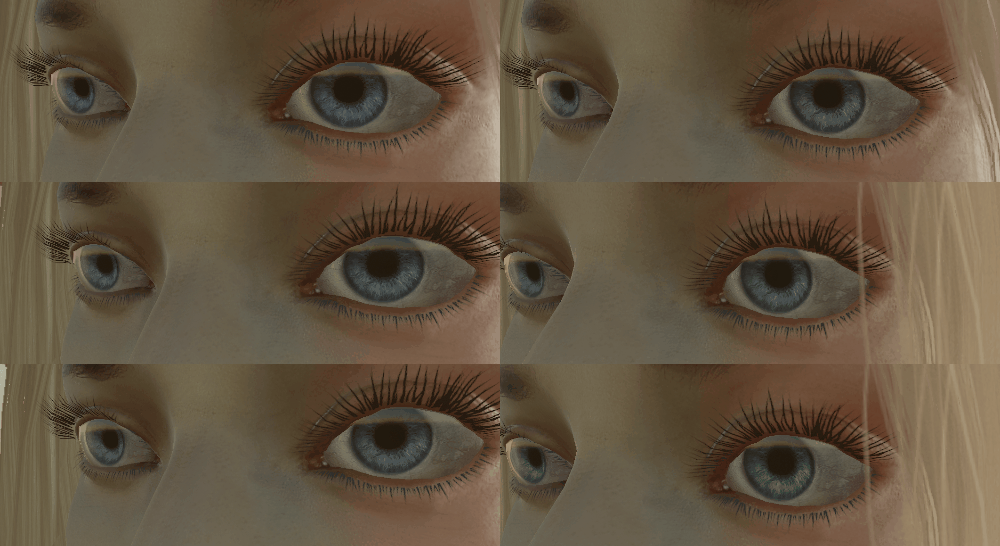

Eyes with an extra large transparent sphere for far-reflection effect

Eyes without this sphere.
Moreover, now we can control the expansion of the pupils, and in the cutscene it creates a very natural look (a little scary when the pupil is maximally expanded, but for fantasy purposes, this effect is still useful).

- And the last thing: since we use one skeleton for all versions of clothes and bodies, we can turn a young character into an elderly person or change his clothes without any problems. This creates excellent opportunities for creating cinematic scenes, as well as perfectly optimizes the game.
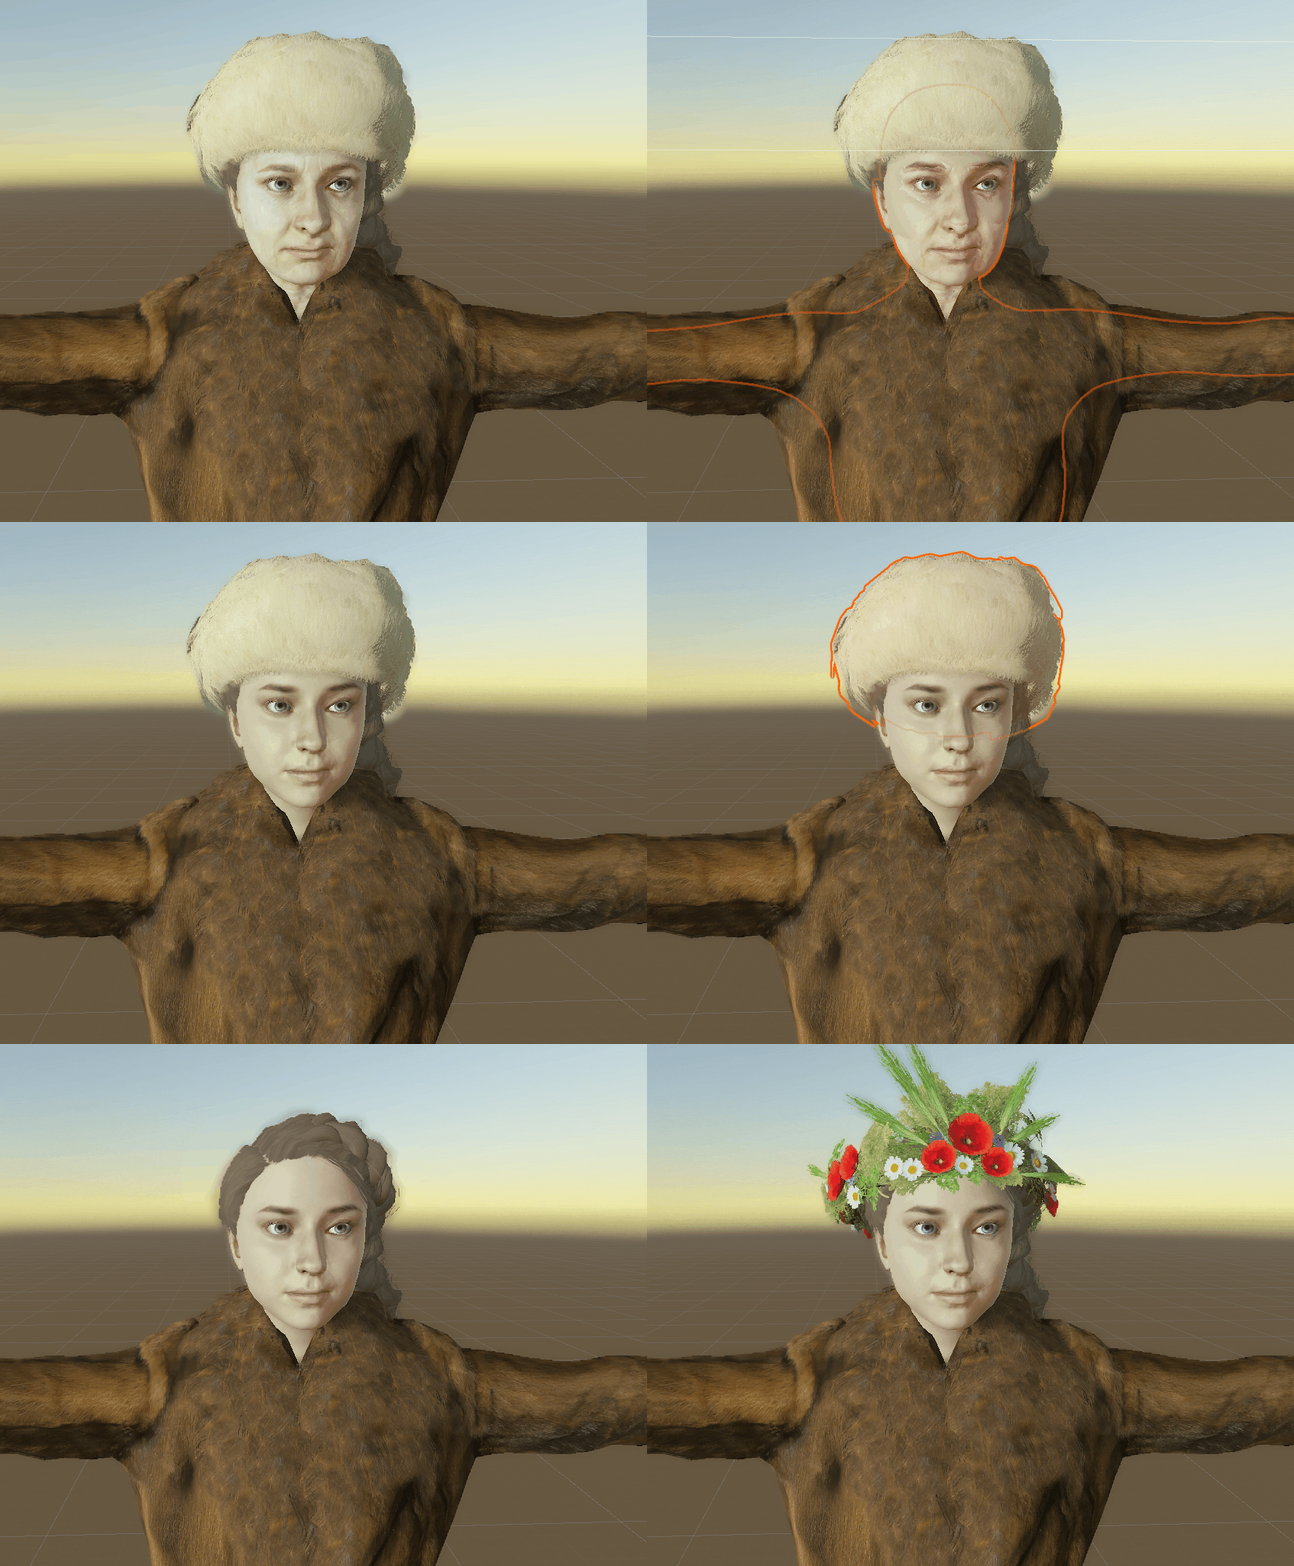
This is how we can mix elements of the character created in this way.
- For clothes, we use a double-sided shader so that you can see it on both sides.

- For hair, we use a special double-sided shader with smooth transparent edges.

Under the cut is a complete gallery of how the final version of the character in the Unity 3D engine looks like: (but it is still in development)
It is possible to create games with a very small budget, but for this you need sharpness, a lot of work and even more love for your work.
We are a small team from Poland. There are only three of us, but only two people work full time.

Today we will talk about the character creation process for our game The End of the Sun. Keep in mind that the screenshots shown in the article are taken from a project that is still in development.
This text is devoted only to static elements of the characters: we will describe how the character and clothes were scanned, how additional elements were created, and how we configured the Unity engine to get such screenshots:


But let's start from the beginning. Before starting work, we prepared a list of properties required by our characters:
- 80% of our game elements are scanned using photogrammetry . In addition, we wanted to give our heroes a human appearance, so we decided to scan people's faces.
- Beautiful hair compatible with Unity game engine.
- In our game it will be possible to meet the same character at different periods of his life . What does it mean? We needed to create as many as four versions of characters for each period (child, teenager, adult, elderly). Therefore, it was important for us to find a way to create older versions of characters as quickly as possible.
- In order to emphasize the characters Slavic appearance, typical of the places where we live, traditional folk clothing was also scanned .
- Some elements that do not exist in the real world or cannot be scanned, we created manually in a standard way (3D modeling).
- Each element of the character can be turned on or off . What does it mean? For example, we can replace the character's skirt, take off the hat if it is not needed. This gives ample opportunities to create a new look - in one cutscene the hero can be shirtless, in the second - fully dressed.
- Our characters are non-interactive, that is, the player cannot control them (at least, directly). But this is a game about their history, so it is very important for us to be able to control the entire character with the movement of the facial muscles (this will be discussed in more detail in another post).

In the article we will tell only about one character in a young and elderly state, because in our game the plot is very important and we don’t want to spoil the pleasure of the players.
So, making a list, you can start working on graphics.
1. Photogrammetry of the face and preparation of a three-dimensional body

Actress in the process of photogrammetry.
Fotogra ... what?
We started by scanning our model's face using photogrammetry . This is a topic for a separate post, but you can learn more about it on our youtube channel .
Turn to Wikipedia:
Photogrammetry is a scientific and technical discipline that determines the shape, size, position and other characteristics of objects from their photographic images.
In other words: photogrammetry is a way to restore the 3D depth over several photos (or multiple images) to create a three-dimensional virtual model that looks like an object in the real world.
A large AAA studio with a large budget for scanning a character uses many cameras. They are located around the actor and take a bunch of pictures at about the same time ...
... But what if we only have one camera?
Yes, there is a problem here, and how did we solve it? Scans created in this way will be worse than when working with multiple cameras, but this is enough for us to create a basic face shape and a baked, high-quality texture. This is an “indie way” of creating photogrammetry.

We made many attempts, so here are tips on taking pictures with just one camera:
An actor or actress should not move until you finish taking snapshots of your face. They can't even blink and breathe. (Shooting usually takes about 10-20 seconds, but this is still difficult to achieve)
We had to very quickly take pictures from different sides of the actress. For this, we used burst mode. Sometimes there were problems with focusing, but this way to make the pictures the quickest to keep the actress still.
It is better to put the actor on a chair with armrests, it is easier to sit still.
We took pictures only from the front of the actress. In the screenshots you can see the photos and the back, but in the final scan we did not use them. In general, to create a scan you need only 8-10 good photos in front .
It is also good to use a polarizing filter with the camera, because it reduces the light on the skin, which improves the model's shape and texture.
For such a scheme, use at least four softboxes to improve the texture and reduce the amount of post-processing.
Use the shutter speed as high as possible to avoid motion blur, as well as the smallest possible aperture size (I mean f.5 and higher) to get a wide range of focus on photos. That is why we need at least four very powerful softboxes. Of course, the ISO should be as low as possible to avoid noise.
We used Photoscan 3D software to analyze photos and create models . This is what a point cloud looks like after photo processing:

Point cloud and visualization of photo layout.
As you can see, there are photos above and below the character, but now I can say that we do not recommend them. It is much better to make about 8-12 good photos of the front of the face (arc from the left to the right ear). This gives much better results for the texture and model. The only drawback is that the neck of the model must be created manually, but this is a small problem.
After creating a point cloud, we process it into a three-dimensional high-poly model :

Already looks better, right? But on the 3D model you can see a lot of noise:


It occurs for the following reasons:
- Motion blur with very quick snapshots
- Our actress's micromovements (yes, even moving a face 1 millimeter leads to a similar noise)
Most of you probably think it looks terrible, and you're right. That is why we took a few more steps.
Now you can do the operation called "retopologiya . " This is a technique for creating a 3D model of a simpler and more optimal shape based on a high-poly model.
Here is how it looks in practice:

The rotopology of the character.
This is done because the model shown above contains more than a million triangles . A typical computer for work with a frame rate of 30-60 fps is capable of processing 5-6 million. (This information is given simply for a general understanding, in fact, many other aspects affect performance.) That is, only a few models with so many triangles can be displayed in the game.
Another important aspect of retopology is the creation of a smooth face model , ready for facial animation. To perform retopology, we use Topogun 2 software.
Here is our face model after retopology (we will polish it later, after texturing):

Then we baked (in 3D slang, this means simply preparing / creating) the texture of the face using our photos. This operation is performed almost automatically. That is why we decided to use photogrammetry - the face model and good texture make our character natural.

Hmm, there is still much to be done - as you can see, there are small mistakes in the texture. Another small problem is the lack of the back of the head and eyes.
Therefore, the next step will be to create unscanned items and items that cannot be scanned, for example eyelashes, hair, eyes. So let's find out how this is done. We use another software package called Cinema 4D. In this software, we can create the rest of the model and improve its texture.


Great, looks much better. Before we start working on the texture, you need to create a body with bones for animating . (About this in our blog will be a separate post.)
For our first character, we created the whole body manually, but it was completely unnecessary waste of time, especially considering that when we put it on, bare parts of the body were visible only in rare moments of the game .
With a bit of searching, we found a great way to create 3D bodies for our scanned faces. We use for this task free commercial software Make human. With this software, you can create a whole body, even with the face and skeleton. It is enough just to move the sliders until you get the desired result, besides, it will have a skeleton compatible with the Unity 3d engine.

Therefore, in just a few minutes, we got a whole body with excellent topology and even weights, ready to animate! (If you don’t understand what I’m talking about, then read the second post about animating the characters that will be released soon!) This is very useful software.
The only problem is that we need to destroy part of the model , cutting off the head from the body (it sounds scary). We need to do this in order to replace it with a scanned model.
The most important thing here is that, thanks to the Make human software, we have weights on the bones prepared for animating.

We just need to add the bones of the face to be able to animate facial emotions or to synchronize lip movements with dialogues. But about this will soon be the next post in our blog.
Creating a proper system of facial bones can take a whole day (yes, I know, there are no bones on the face, but muscles, but this is what they are called in 3D graphics).

Of course, to create beautiful textures you also need a lot of work. We use Frequency Separation Technique in Photoshop to eliminate glares and skin retouching. This creates a workflow that is well suited for removing unnecessary lighting from textures (even when it is a scanned model of a stone, not a human face). You should also try this process. (There is a lot of information about Frequency Separation on the Internet.)
The final Albedo texture looks like this : (sorry, but before the release of the game we don’t want to lay out a high-resolution texture)

Albedo-texture
And here is what the model looks like with an already imposed albedo-texture.


Now we add teeth, tongue and eyes:

Here’s what a finished model looks like from a scanned face and body joined together with a ready-made texture (censorship is imposed so that you can share the picture in social networks).

The finished appearance of the 3D body and face.

2. Creation of hair of a head and eyelashes of real time.
I wrote this chapter because creating hair that works and looks good in a video game is a pretty broad topic. Probably, you could see some of the most beautiful hair in AAA games. We are indie, so we cannot spend as much time on one aspect of our characters as big companies.
Therefore, we have created hair from polygons with a texture with transparency applied on them.
How it works? First, we model hair-shaped polygons, and then place them on the character’s head and move / distribute them using 3D modeling tools. (In our case, Cinema 4D.) You can also do this in the spline generator - create a spline with a dynamic mesh along it, then the manipulation of the hair is simplified.
So, all the hairstyles were created from such parts:

Hair without material look like this:


Here is a hairstyle with a finished texture:


And here is the hairstyle from the screenshots, which is shown at the beginning of the post.
As you can see, we can change hairstyles, so there are no problems , for example, in adding an older character to a young hairstyle.


Of course, when creating hair, we use Photoshop and BodyPaint 3d to draw stripes on hair and elements of different shapes. You can use any other software, but it would be great if it had an alpha transparency mode in real time. Then you will see exactly what you are doing (and not just the gray stripes on the character's head).
The hair texture is as follows:

Albedo-hair texture with transparency
To give the hair a natural behavior, we tried to use the Unity 3d fabric component on the hair mesh to add a slight wind or gravity effect, but more about this in another post.

3. Creation of older versions of characters

"Girl you will be a woman soon"
As I said above. In our game you can meet characters in different stages of their life. This adds interest to the players, and also forces us to perform additional interesting work.
I will show how we made a beautiful girl much older. We watched a lot of videos, pictures and web pages about how the human body is aging.
It's not just a matter of wrinkles, the whole face of a person changes its shape. Read more about this for example here .
In the article I will talk about the technical side of the issue. So, first we completed the 3D model of the young character with all the bones. This is very important because it takes a very long time to prepare the skeleton and add weights. After that, we just copied it and started working with a copy of the model. Thanks to this workflow, we don’t need to re-engage in rigging the older version of the character, because it uses the same skeleton system. This is much more important in the engine. Such a system speeds up the loading and unloading of resources, because we load / unload only what we need.
So, first we change the base mesh and drop some parts of the face to the ground, as mother-gravity does in aging. Nose, cheeks, eyebrows, ears. But we are not too keen on, because the model has the same facial bones as the model of the young character. (That is, if you change the base mesh too much, you may have problems.)

Only the deformation of the mesh.
Then we sculpt large wrinkles and details in some sculpturing software. For example, you can use the free Scupltris. Then we bake them in a texture called the normal map. Why? Because it gives us the result shown below without adding extra triangles to the model. (So that your PC can handle its processing.) We also create a normal map of some parts based on the skin texture, and then mix them together.

Mesh plus normal map
Finally, we add wrinkles to the albedo texture (the texture with the base color). We took pictures of several older people, and then added wrinkles to the model using blending in Photoshop.

Mesh plus the normal map large parts and albedo-texture of old leather
So, as a result, the skin of our model of advanced character using the normal map detail and albedo-texture. We also prepare the subsurface scattering texture, the light translucency effect through the skin) and the specular map, but in what you see on the screen, only albedo and the normal map are used (mixed into one normal map of large parts + normal map of parts) .
Here we can see the following parts:
1. Albedo-map.
2. A normal map of large parts based on the model's molded parts.
3. Normal map of large parts mixed with skin details created from albedo texture.


The elderly character looks much better in the Unity 3D engine, where we use suitable shaders:


But two versions of the character connected in Photoshop (placed in the engine in one place)


4. Scan for characters of real clothes.
So, we got almost to the end, but to achieve the final appearance of the character, there is still much to be done.
We scanned a lot of different clothes. The scanning technique is similar to scanning a face or other objects, but now it can be done slowly, usually the clothes do not move (the wind or cats running past can be very annoying, especially when even a small movement can ruin the opening hours).
We could not pick up tips or ready-made solutions for the correct scanning of clothes, because here are our tips on what you need and what not to do:
- The most important thing is to fasten the design so that the clothes are motionless; it is even better to arrange the clothes in a stable T-pose. What does it mean? This is a pose with arms wide apart, a standard position for game characters to whom animation is applied. Also in this position is best to scan clothes.
For this, we bought a mannequin. We could not immediately find a mannequin in the T-pose, so shooting at hand was very difficult, and even more work was required to combine the 3D-models of the scanned clothes with the hands lowered along the bodies of the characters. Initially, the system looked like this:

Our first mannequin with his hands down
... so we modified him to raise his hands. We made new hands from PVC pipe. Here is what our “truboneken” in the T-pose now looks like:

This mannequin has arms made of PVC and is in a T-pose.

We can shoot this tube to simplify the dressing of the dummy.

Well, that's fine, but why on our plastic friend these black points?
This is because the surface is very shiny, and the point matching scripts in photogrammetry do not like shiny things very much, but they adore points and characteristic features, therefore we have marked so many points with a marker. This allowed us to better compare the positions of photos in the software in order to get better scans of clothing.
This is how clothes look on it, in this case, fur (in T-pose):

- The second important aspect when creating clothes using photogrammetry is not to forget to take pictures at hand and below the clothes. Here are how many photos we had to take to create a pretty good scan of these clothes:

Here you can see the point cloud scan:

- Some types of clothing are very difficult to scan, for example, with long fur or from very shiny materials, so sometimes it is easier not to scan them, but to create them manually.
For example, to improve the appearance of this fur, we created additional fur elements with alpha transparency channel. This is similar to what we did with the hair of the characters.

The red part is the elements of fur, created manually with an alpha channel.

This is how it looks without texture
- Some types of objects are easier to scan, for example, this matte skirt looks very good because it is made of matte material. Also here we used HDR images to get more information in the shadows and highlights, but hdr photogrammetry takes a lot of time. Why? Because each picture needs to be done with a tripod, otherwise the photos will be blurred. Now imagine the level of irritation, when after an hour of work one of our cats just jumped on this fur. We had to start all over again.


Looks good, right? In general, the more time you spend on the scan, the better the result you get, and less you do post-processing.
- One more elements that are better done manually, and not scanned - this is a belt. We created them manually. We made the textures go in cycles, so that even with a small resolution of textures, the quality of the game was high.


- The wreath was also made similar to the hair, using transparency. It is not ready yet, but it can be seen in the screenshots:

Well, this is all about clothes.

5. Connecting everything in the game engine.
I said earlier that we use the Unity 3D engine. I'll tell you about the shaders and settings we used to make the model look like in the screenshots.
For all the elements of the characters we now use the free Alloy Shader. We chose it because it has everything we need, especially the dissolve option for each variation of the shader and many other options in the segments. You can use any other shader, but we use Alloy (besides, it is free).

Different position of the light gives interesting effects
- Skin: for this part of the characters we use a skin shader with the effect of subsurface scattering and transmission of light. What is the effect of subsurface scattering? This is a simulation of the light transmission factor through the skin. Look at the pictures we took:

This is what subsurface scattering on a hand looks like in the real world.
As you can see, the lighting (if it is strong enough) passes through the skin.
This gives a very natural appearance, especially in low light. You can see how this effect behaves in The End of the Sun on the example of this gif and the screenshots shown above. (Note that while the model does not even have a specular texture and a subsurface map, it will look a little better at the final stage.)

- Eyes : as you know, eyes are the mirror of the soul. And this is true - it is very difficult to give a character a natural look without making his eyes perfect. The eye is not just a sphere. It is flat where the iris is and the pupil is even lower. That is why we use the Parallax shader. This is the surface that creates the illusion that there is something else deeper, and it gives very good results!


Eyes with an extra large transparent sphere for far-reflection effect

Eyes without this sphere.
Moreover, now we can control the expansion of the pupils, and in the cutscene it creates a very natural look (a little scary when the pupil is maximally expanded, but for fantasy purposes, this effect is still useful).

- And the last thing: since we use one skeleton for all versions of clothes and bodies, we can turn a young character into an elderly person or change his clothes without any problems. This creates excellent opportunities for creating cinematic scenes, as well as perfectly optimizes the game.

This is how we can mix elements of the character created in this way.
- For clothes, we use a double-sided shader so that you can see it on both sides.

- For hair, we use a special double-sided shader with smooth transparent edges.

6. Final results
Under the cut is a complete gallery of how the final version of the character in the Unity 3D engine looks like: (but it is still in development)
Gallery