NooLite Pushbutton Switches - First Impressions
I greet you!
I want to tell you a little news about nooLite - a radio and lighting control system. I think many are already familiar with it and know that one of its main drawbacks is the touch buttons of the remote controls. To use them, to put it mildly, is unusual (especially for people aged), and even uncomfortable to use in the dark - it’s problematic to find the right touch button.
Those who went to electric exhibitions with the participation of Nootechnics last year and the year before last could see a prototype of a wall-mounted radio remote control with pushed (non-touch) buttons on their stand. Button remotes are devoid of the shortcomings of their touch counterparts, but have a new big drawback - it is not clear when their production will begin.
So ... it seems that this flaw will be fixed soon! A small experimental batch has already been released, and in April, as they said in Nootechnika, their mass production will begin!
It so happened that for a while I got for testing samples from the first batch of remotes. I will try here to share with you my impressions of their use.
I apologize in advance for the quality of the photographs (namely, for the darkness in the corners). Unfortunately, there was no normal camera at hand and the shooting conditions were not very good :(
And now - let's go!
There are only two new remote control models: 1-button PB211 and 2-button PB411. Interestingly, the cost of both models is the same - $ 22.3, as indicated on the manufacturer’s website.


The operation scheme of the new remote controls is exactly the same as that of the old ones: the remote is attached to the power unit that controls the load, and sends him commands by radio. To bind / untie, as before, you need to press the buttons on the body of the unit and the remote control. Just like touch panels, the new models are universal and work with all types of power units.

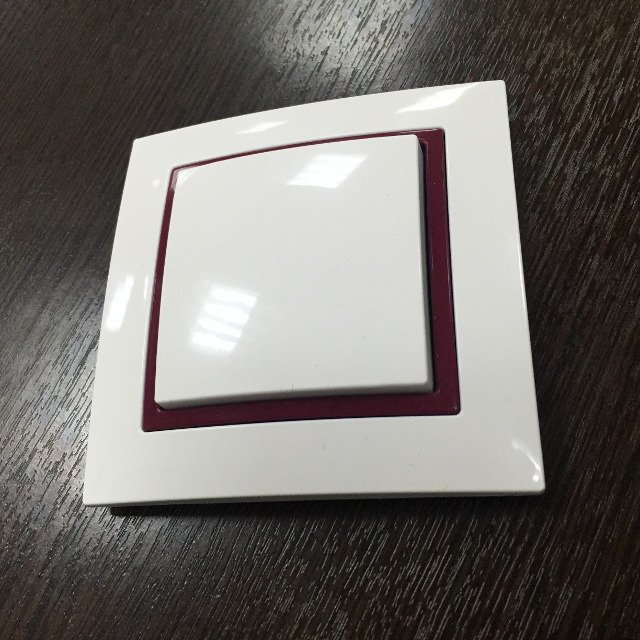
In general, the remotes have a pleasant appearance and feel that they are made of high-quality plastic.

The buttons protrude from the remote control housing by about 4-5 mm and the button travel when pressed about 1 mm.

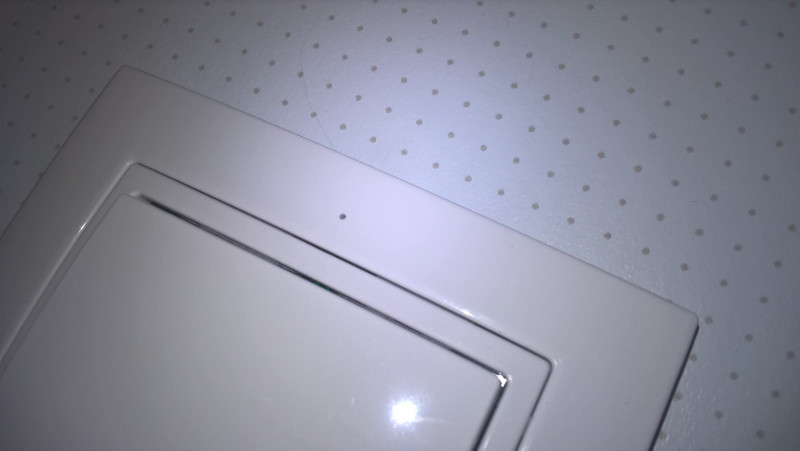
At the top of the frame there is a small hole, behind which an LED is installed.
Each button is pressed in two places (top / bottom) and, depending on the selected mode, can control one or two channels (each channel is an independent group of power units). If the button controls one channel, then the light is adjusted in different directions by pressing on different sides of the button. If the button controls two channels, then on each side of the button you can bind your own group of fixtures.
The operation mode of the remote control, on which the actions performed when the button is pressed, can be selected using the switch on the back of the remote control.

There are 4 modes available:
It is noteworthy that with the PB411 two-button remote control, the selected mode is applied immediately to both buttons. Those. both buttons always work in the same mode and configure, for example, that the first button controls one channel, and the second button cannot control two channels.
If the appearance of touch panels nooLite copied the design of the famous W59 series from Schneider Electric, the design of the new consoles corresponds Series "Comfort" from Bylectrica. In principle, this is good, because it is possible to install sockets and other electrical accessories, which would look the same with the switches.

New remotes will be available in two colors: white and beige (ivory). Beige remotes do not exist yet. Their production should begin a little later, but it seems to be before the end of April this year.
The remote controls have two frames (internal / external) and, which is especially pleasing, they are suitable for the internal color frames from the accessories of the "Comfort" series , which I wrote about above. Using colored frames, you can significantly improve the appearance of the remote control in the interior of your apartment.
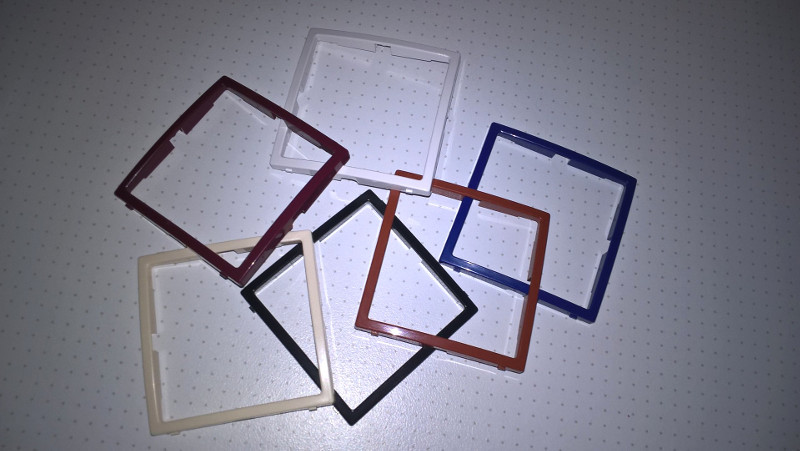
In total, 23 colors are available: white, ivory, light gray, dark gray, orange, terracotta, red, blue, azure, burgundy, lilac, light green, black, light brown, chocolate, yellow, pink, olive, light olive, turquoise, blue, gold, silver. It seems that this is enough to adapt the remotes to wallpapers and furniture of any color :)

Of the minuses - when you see the remote, it is not clear which button does what. It is especially incomprehensible due to the fact that the purpose of the buttons may be different for different remotes and the only option is to remember all this. It would be cool if the buttons had some kind of engraving or stickers indicating the action being performed.
Of course it was very interesting to see what's inside the new remotes and I took them apart. To do this was not at all difficult ...
First of all, remove the back cover. To do this, pry a screwdriver here in this place.

Please note that the mount at the back cover is a bit strange. Below such a slot and the installed cover deforms it and, due to this, keeps in place.

At first, I reached into this slot with a screwdriver and almost broke the mount.
This is how it looks with the back cover removed:
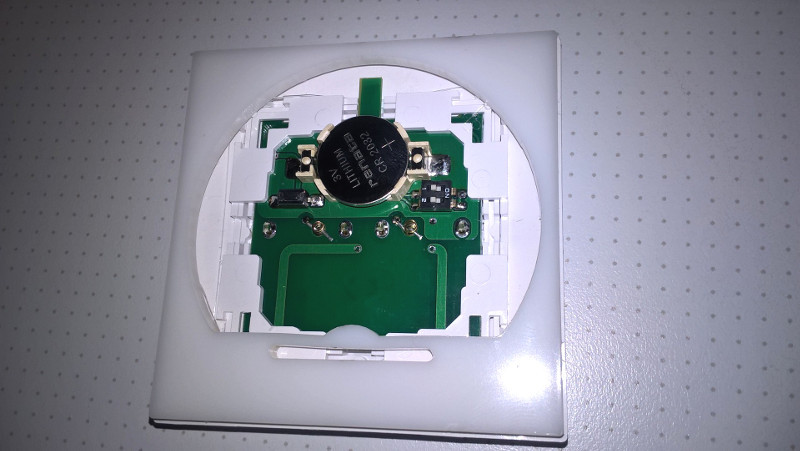
Next, with something sharp, gently pry the latches of the inner frame (from four sides).

After that, we take out the inner frame and the microcircuit with buttons, which the inner frame holds in place.
Front

view: Rear view:

The button itself is glued to the chip. At a minimum, this means that you cannot replace the button on the remote control (for example, put a beige instead of white). I

did not tear the button from the microcircuit, because there wasn’t a glue gun at hand to return everything back later.
Back side


photo : I ’ll post a photo of the front of the chip later.
In general, we can say that Nootehnika once again turned out a thoughtful and functional device, which, moreover, is pleasant to hold in hands. The device is not without drawbacks (a strange fastening of the back cover and a glued button), but all this does not seem important, compared to the ability to change the color of the inner insert and simply with the fact that normal switches with normal push buttons finally appeared . Well, I’m also glad that they did not start to raise the price of new remotes.
Threat. There is information that in the summer the nooLite range will be replenished with power blocks with feedback. It would still be very interesting to look at them!
UPD:
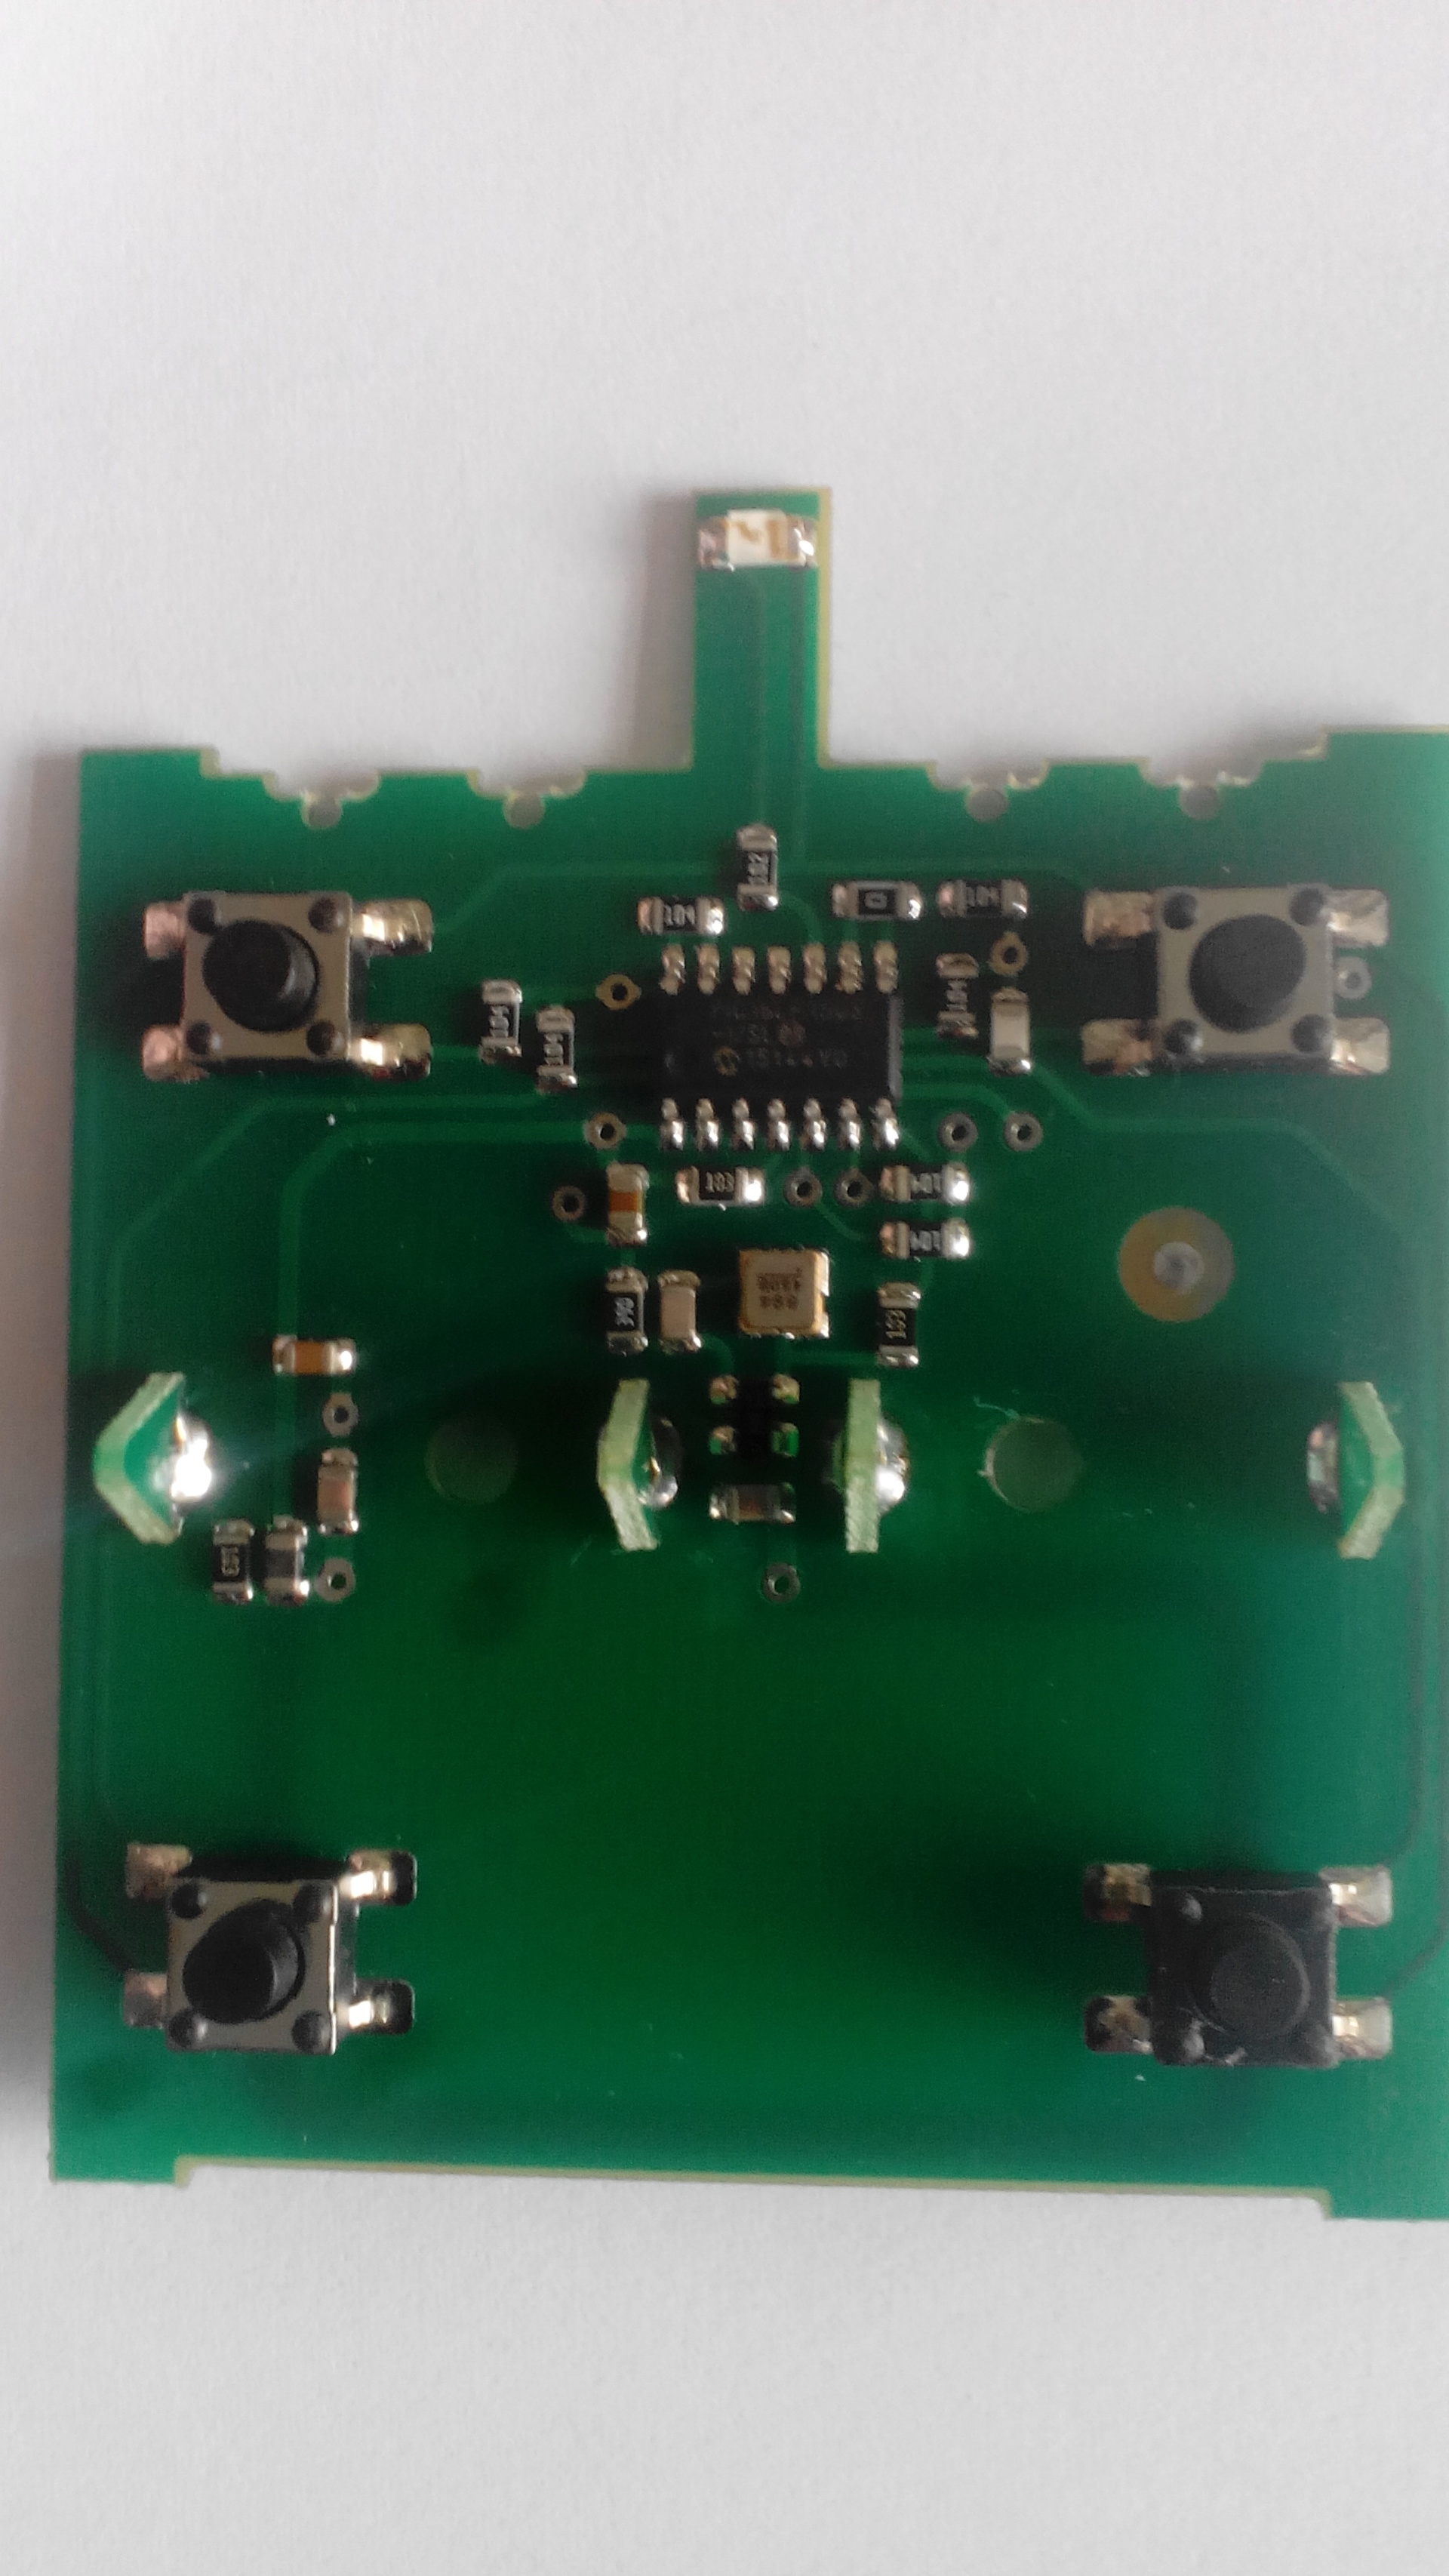
Photo of the front side of the board habrastorage.org/files/0cb/842/785/0cb8427853384b598e4e384936275fcd.jpg (1.4MB)
I want to tell you a little news about nooLite - a radio and lighting control system. I think many are already familiar with it and know that one of its main drawbacks is the touch buttons of the remote controls. To use them, to put it mildly, is unusual (especially for people aged), and even uncomfortable to use in the dark - it’s problematic to find the right touch button.
Those who went to electric exhibitions with the participation of Nootechnics last year and the year before last could see a prototype of a wall-mounted radio remote control with pushed (non-touch) buttons on their stand. Button remotes are devoid of the shortcomings of their touch counterparts, but have a new big drawback - it is not clear when their production will begin.
So ... it seems that this flaw will be fixed soon! A small experimental batch has already been released, and in April, as they said in Nootechnika, their mass production will begin!
It so happened that for a while I got for testing samples from the first batch of remotes. I will try here to share with you my impressions of their use.
I apologize in advance for the quality of the photographs (namely, for the darkness in the corners). Unfortunately, there was no normal camera at hand and the shooting conditions were not very good :(
And now - let's go!
So...
There are only two new remote control models: 1-button PB211 and 2-button PB411. Interestingly, the cost of both models is the same - $ 22.3, as indicated on the manufacturer’s website.
The operation scheme of the new remote controls is exactly the same as that of the old ones: the remote is attached to the power unit that controls the load, and sends him commands by radio. To bind / untie, as before, you need to press the buttons on the body of the unit and the remote control. Just like touch panels, the new models are universal and work with all types of power units.
Buttons!
In general, the remotes have a pleasant appearance and feel that they are made of high-quality plastic.
The buttons protrude from the remote control housing by about 4-5 mm and the button travel when pressed about 1 mm.
At the top of the frame there is a small hole, behind which an LED is installed.
Each button is pressed in two places (top / bottom) and, depending on the selected mode, can control one or two channels (each channel is an independent group of power units). If the button controls one channel, then the light is adjusted in different directions by pressing on different sides of the button. If the button controls two channels, then on each side of the button you can bind your own group of fixtures.
The operation mode of the remote control, on which the actions performed when the button is pressed, can be selected using the switch on the back of the remote control.
There are 4 modes available:
- top — turn on / off the brightness in the channel; bottom — turn off / off the brightness in the same channel;
- top - turn on / off / change the brightness in the first channel, bottom - the same, but for the second channel;
- top - turn on / off / change the brightness in the first channel, bottom - scenario button (second channel);
- top and bottom - two script buttons that control different channels.
It is noteworthy that with the PB411 two-button remote control, the selected mode is applied immediately to both buttons. Those. both buttons always work in the same mode and configure, for example, that the first button controls one channel, and the second button cannot control two channels.
Appearance
If the appearance of touch panels nooLite copied the design of the famous W59 series from Schneider Electric, the design of the new consoles corresponds Series "Comfort" from Bylectrica. In principle, this is good, because it is possible to install sockets and other electrical accessories, which would look the same with the switches.
New remotes will be available in two colors: white and beige (ivory). Beige remotes do not exist yet. Their production should begin a little later, but it seems to be before the end of April this year.
The remote controls have two frames (internal / external) and, which is especially pleasing, they are suitable for the internal color frames from the accessories of the "Comfort" series , which I wrote about above. Using colored frames, you can significantly improve the appearance of the remote control in the interior of your apartment.
In total, 23 colors are available: white, ivory, light gray, dark gray, orange, terracotta, red, blue, azure, burgundy, lilac, light green, black, light brown, chocolate, yellow, pink, olive, light olive, turquoise, blue, gold, silver. It seems that this is enough to adapt the remotes to wallpapers and furniture of any color :)
Of the minuses - when you see the remote, it is not clear which button does what. It is especially incomprehensible due to the fact that the purpose of the buttons may be different for different remotes and the only option is to remember all this. It would be cool if the buttons had some kind of engraving or stickers indicating the action being performed.
What's inside?
Of course it was very interesting to see what's inside the new remotes and I took them apart. To do this was not at all difficult ...
First of all, remove the back cover. To do this, pry a screwdriver here in this place.
Please note that the mount at the back cover is a bit strange. Below such a slot and the installed cover deforms it and, due to this, keeps in place.
At first, I reached into this slot with a screwdriver and almost broke the mount.
This is how it looks with the back cover removed:
Next, with something sharp, gently pry the latches of the inner frame (from four sides).
After that, we take out the inner frame and the microcircuit with buttons, which the inner frame holds in place.
Front
view: Rear view:
The button itself is glued to the chip. At a minimum, this means that you cannot replace the button on the remote control (for example, put a beige instead of white). I
did not tear the button from the microcircuit, because there wasn’t a glue gun at hand to return everything back later.
Back side
photo : I ’ll post a photo of the front of the chip later.
Summary
In general, we can say that Nootehnika once again turned out a thoughtful and functional device, which, moreover, is pleasant to hold in hands. The device is not without drawbacks (a strange fastening of the back cover and a glued button), but all this does not seem important, compared to the ability to change the color of the inner insert and simply with the fact that normal switches with normal push buttons finally appeared . Well, I’m also glad that they did not start to raise the price of new remotes.
Threat. There is information that in the summer the nooLite range will be replenished with power blocks with feedback. It would still be very interesting to look at them!
UPD:
Photo of the front side of the board habrastorage.org/files/0cb/842/785/0cb8427853384b598e4e384936275fcd.jpg (1.4MB)