Orange Pi PC - $ 15 full-featured mini pc on Linux

I have repeatedly noticed interest in the new clone board of the well-known Raspberry Pi from Chinese enthusiasts from Xunlong, under the sonorous name of Orange Pi PC. She became famous mainly for her good hardware ( 4-core Allwinner H3 processor , 1Gb RAM and Mali-400MP2 600MHz GPU), good functionality ( HDMI , AV , Ethernet , 3 USB , microUSB-OTG , infrared port for control from the remote and GPIO comb , according to the developers, supposedly “100% compatible with Raspberry Pi), and most importantly - PRICE. The creators rated their device at only $ 15 , FIFTEEN dollars , Carl! (soon we will see that this is actually a very crafty statement, and the final device is more expensive).
So, let's take a closer look at this board.
In RuNet, there are already reviews on it, but all of them were something like “installed an android and connected it to a TV set in the kitchen”. I suggest looking at the board from the other side, namely, install Linux there, use it like a real PC, and even play a little.
For those who are too lazy to read completely, I will summarize:
An interesting thing, at the moment it is quite usable, but there are a huge number of flaws and jambs that need to be finished with a file. Buy only at your own peril and risk! For a simple user who wants to have a ready-made solution “out of the box”, I would advise you to pay attention to TV boxes based on Android or Windows. An advanced user who is familiar with Linux, who is not afraid of uncharted challenges in a raw product, and who would like to have a nettop for Internet surfing, working with documents, programming and modest games - must have ! Especially considering the price.
0. Background. A bit about Raspberry Pi and its clones
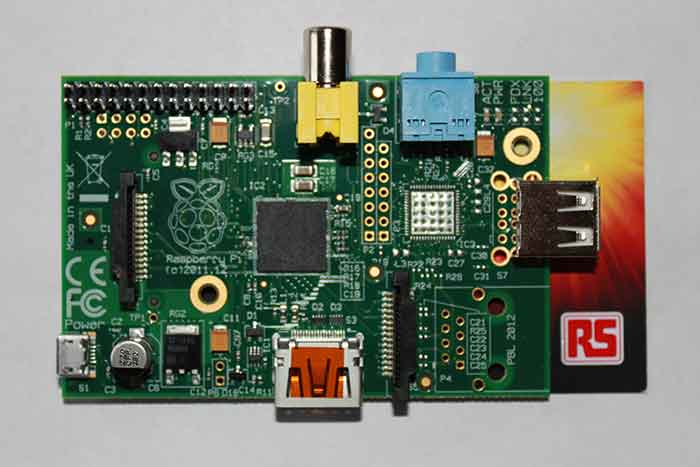
Raspberry Pi Model A, an image from Google
When in 2011, the creators of Raspberry Pi announced to the whole world their plans to make a miniature (about the size of a plastic card) and inexpensive ($ 25) computer, the whole world of computer enthusiasts and geeks was ecstatic. Everyone was just moving away from the revolution in home electronics “for Kuzmichy”, which Arduino accomplished with its concept of affordable and simple debugging boards, and now for almost the same money a full-fledged Linux PC!
Of course, you can’t really get around the RAM on an ARM processor from a 256 MB mobile phone, but despite all the restrictions, amateurs and geeks tried to run games on the “raspberry”, surfed the Internet, made all kinds of home servers from it, and, of course, used them in quality of the “brain” in all kinds of DIY projects thanks to the integrated GPIO.
But time passed. Despite the fact that the original Raspberry Pi was conceived as a modern analogue of the BBC Micro- As a simple, inexpensive and by all means affordable computer for teaching schoolchildren programming and computer science, Malinka nevertheless won the hearts of ordinary people who had more demanding hardware requirements than the Python interpreter and blinking LEDs via GPIO. Geeks wanted their toy to be able to play high-quality videos, launch beautiful 3D toys and playfully draw “heavy” web pages.
Therefore, in February 2015, the creators of “raspberry” released a new model - Raspberry Pi 2. There was already “full mincemeat” - the processor acquired 4 cores for parallelizing “heavy” tasks and 1 gigabyte of RAM to make life easier for users. But it was too late.
While Raspberry Pi manufacturers were slow in releasing the new version, they got a lot of “ideological followers”, including from China, who rushed to release Raspberry Pi clones, generally pursuing the same goal - to satisfy the demand of the mass user for inexpensive and powerful boards.
So a whole host of different alternatives to “raspberry” appeared - ODROID, Banana Pi, PandaBoard, Cubieboard, BeagleBone and many others (a more complete list can be seen here , here and here ). One of these alternatives was the Orange Pi board , a mini-PC based on the Allwinner A20 dual-core SoC. Later, its manufacturer, the Chinese company Xunlong, released its updated version, Orange Pi 2based on the quad-core SoC Allwinner H3, the castrated version of which is the hero of our review - Orange Pi PC .
It cost me $ 18.52 with delivery by mail in Finland. The order was placed on October 26, and on November 17 I already had the order (quite quickly, especially if you take into account the numerous warnings from the seller that shipping may take longer than usual due to high demand).
1. Options and appearance
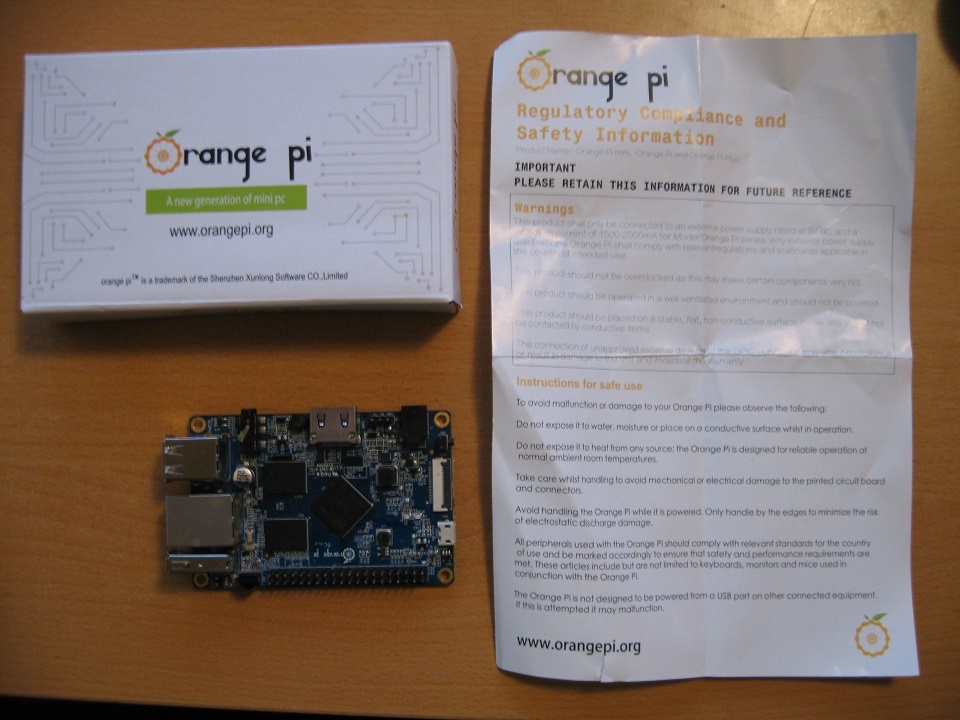
Minimum equipment: the board itself, the box and instructions
So, let's start with the package. She is not. From the word at all. After all, I ordered the cheapest version of the board, without any nishtyakov. The seller also has various sets available - the board itself, the power supply, the body made of organic glass, the radiator, a memory card, etc.
I decided to go the most Spartan way, so in addition to the board I got only a box with a poor print, glued together, it felt like manually, and a crumpled piece of paper with some exhortations on the topic “don’t put your fingers in the socket”, apparently necessary for matching various state requirements of the USA and the EU.
Consider the board from all sides:
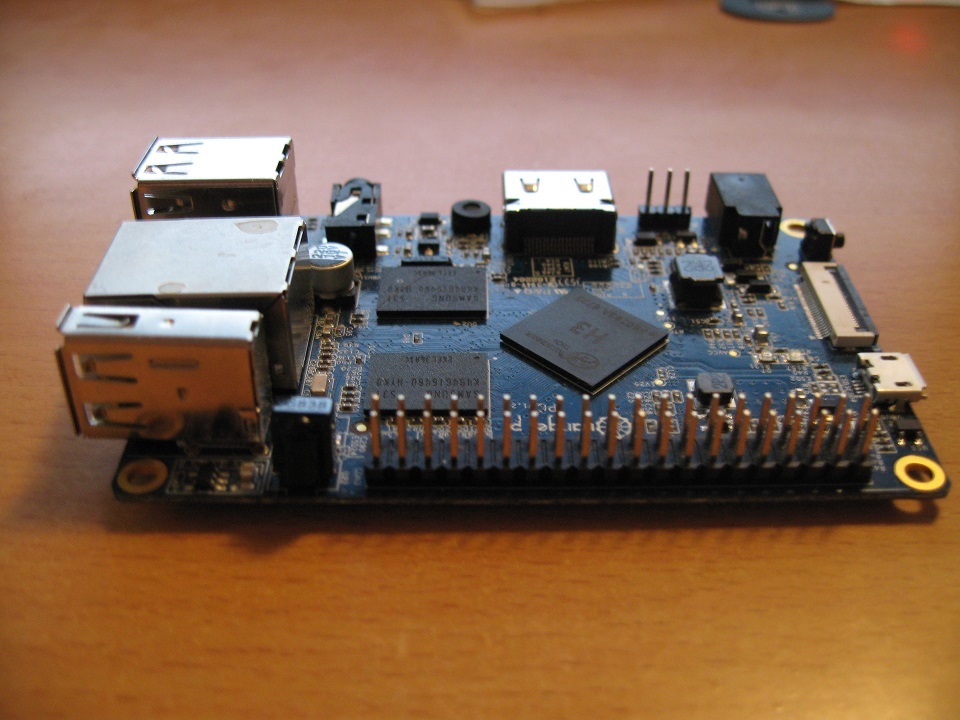
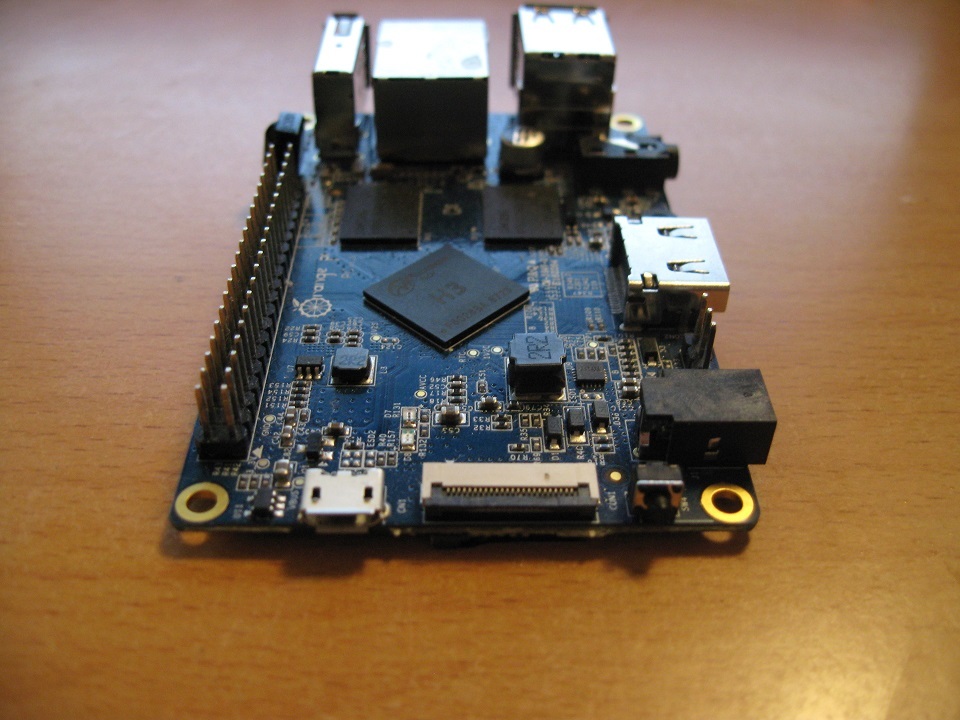
On the board itself stand out clearly:
- Allwinner H3 chip- not the worst, but Allwinner - the office is still quite rotten, already becoming notorious for its violation of open licenses, and its chips - unbearable gluttony of the elephant and heat generation comparable to a small volcano. Their only advantage is the low price, and this creates a huge community around the chips (the fruits of which, by the way, we will use);
- two DDR3L Samsung K4B4G16460-HYKO RAM chips of 512Mb each, giving a total of 1Gb RAM.
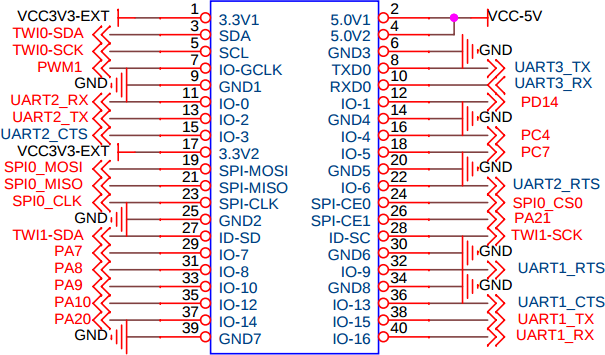
On the upper side of the board we see an IR receiver and a comb GPIO . To whom it is interesting, here is the pinout:
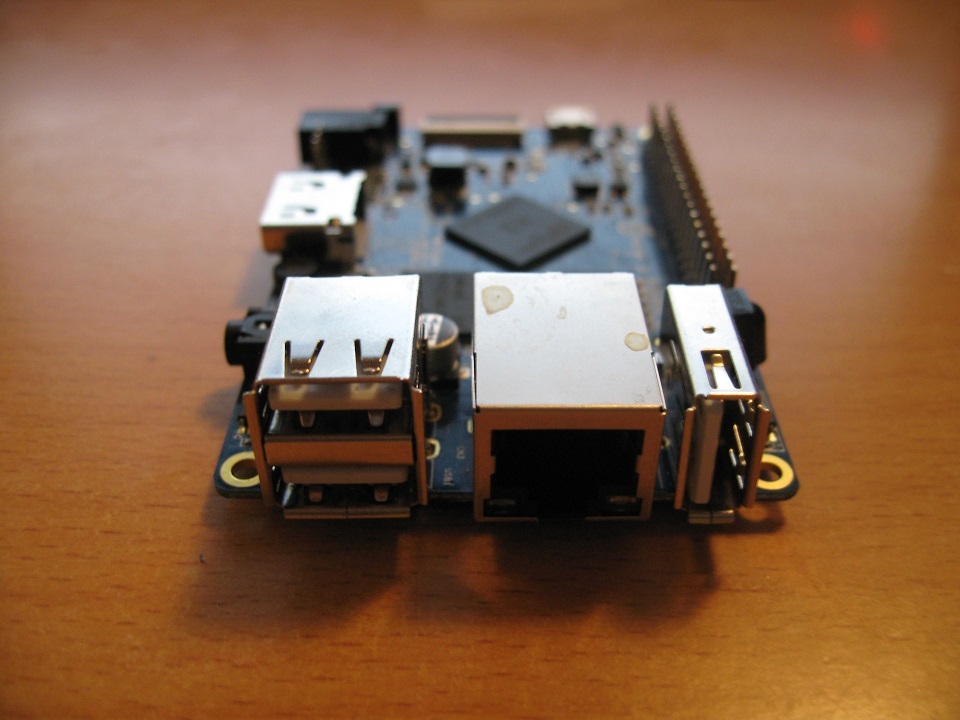
On the right side we see 3 USB 2.0 connectors and an Ethernet 10/100 port .
By the way, about USB ports
According to information from linux-sunxi.org , the USB ports are “clean”, but not separated through the built-in hub, so the connected devices can work in parallel, without dividing the channel between each other. This is not even in the "raspberry"!
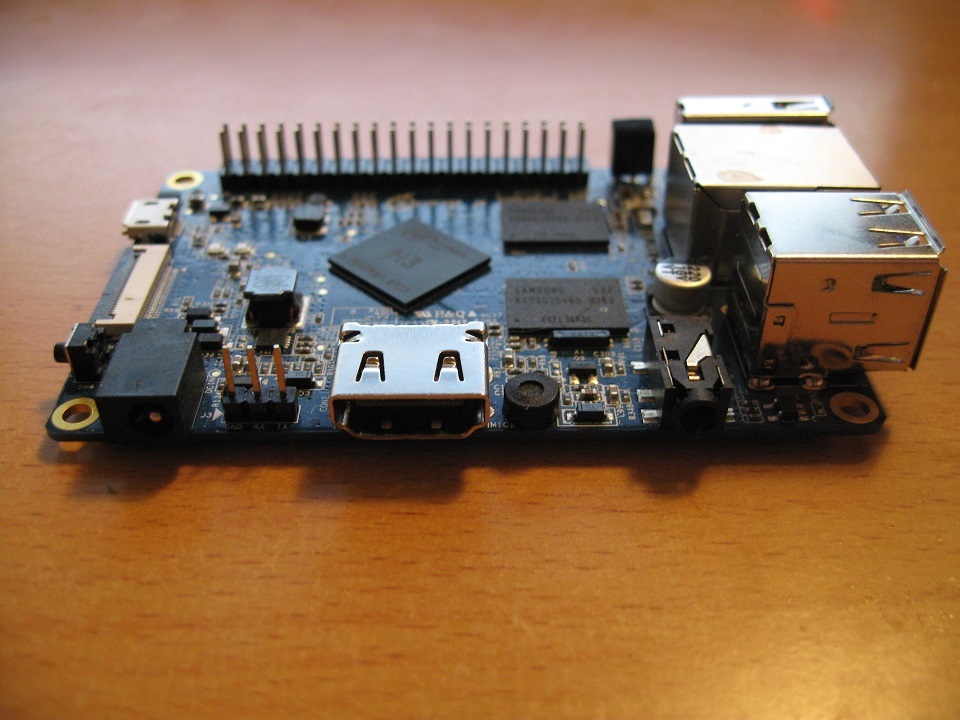
Below we see a stupid non-standard power connector (apparently made in order to increase sales of custom power supplies by the motherboard manufacturer), a comb for connecting UART (GND, RX, TX pinout - all pins are signed), a full-fledged HDMI connector , a microphone and a 3.5 connector for output to “bells”.
I must say a few words about nutrition. The documentation says that the board is very gluttonous and requires solid 5V and 2A from the power supply. The manufacturer of the board sells power supplies for it at 5V and already 3A (!), therefore, I advise you to purchase one just in case the amperes in your power supply turn out to be “Chinese”, otherwise “friezes” are possible. You can simply deal with a non-standard connector - the board can be powered via the GPIO bus: + 5V is connected to 2 or 4 pins, ground to 6 pins.
On the left side we have microUSB-OTG , a connector for connecting the camera (the camera module is sold by the manufacturer for insane $ 8.76 with delivery ), an incomprehensible button (supposedly “ Power Switch ”, but it does not work in Lubuntu). Also under the connector for the camera is a connector for connecting MicroSD memory cards.
Well, so far the board looks good. There are “specific moments”, but as long as they look tolerant, you say ... But in fact, interesting things are yet to come!
What you need to do before turning on the board. It is important!
Even the manufacturer does not recommend working with Orange Pi PC without a radiator ! Without cooling, the chip heats up to hellish 70-80 degrees and above, and in the best case, this will end with a throttling of the processor, one by one disconnection of the processor cores and a freeze, in the worst - the processor will be hopelessly burned! Of course, it is possible to bypass you, but I still would not risk it.
I bought mini-radiators for the Raspberry Pi in advance, they look like this:
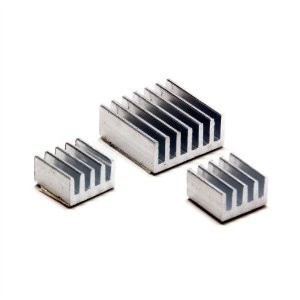
They cost a dollar on aliexpress, have a self-adhesive surface and dissipate heat well for their money. Some users of Orange Pi PC connect active cooling, coolers, etc., but I refused this, I will explain why below.
Then, as they say in all forums, the board is very demanding on the speed of a microSD card ! It is recommended to take a card with a speed of at least Class 10 UHS-1, otherwise no OS will work acceptable, it’s tested on itself.
Last: if you want to use Wi-Fi, then note that there is no built-in wi-fi ! It is necessary to purchase a whistle, moreover, on a specific chip. Craftsmen gagged whistle support on Rtl8188cus, Rtl8192cu, Rtl8188eu / eus / etv, RT5370 chips.
I use a whistle for $ 4 (ebay) based on RTL8188EU:

And of course, it would be nice to prepare some peripherals before work: a mouse, keyboard, and so on.
My set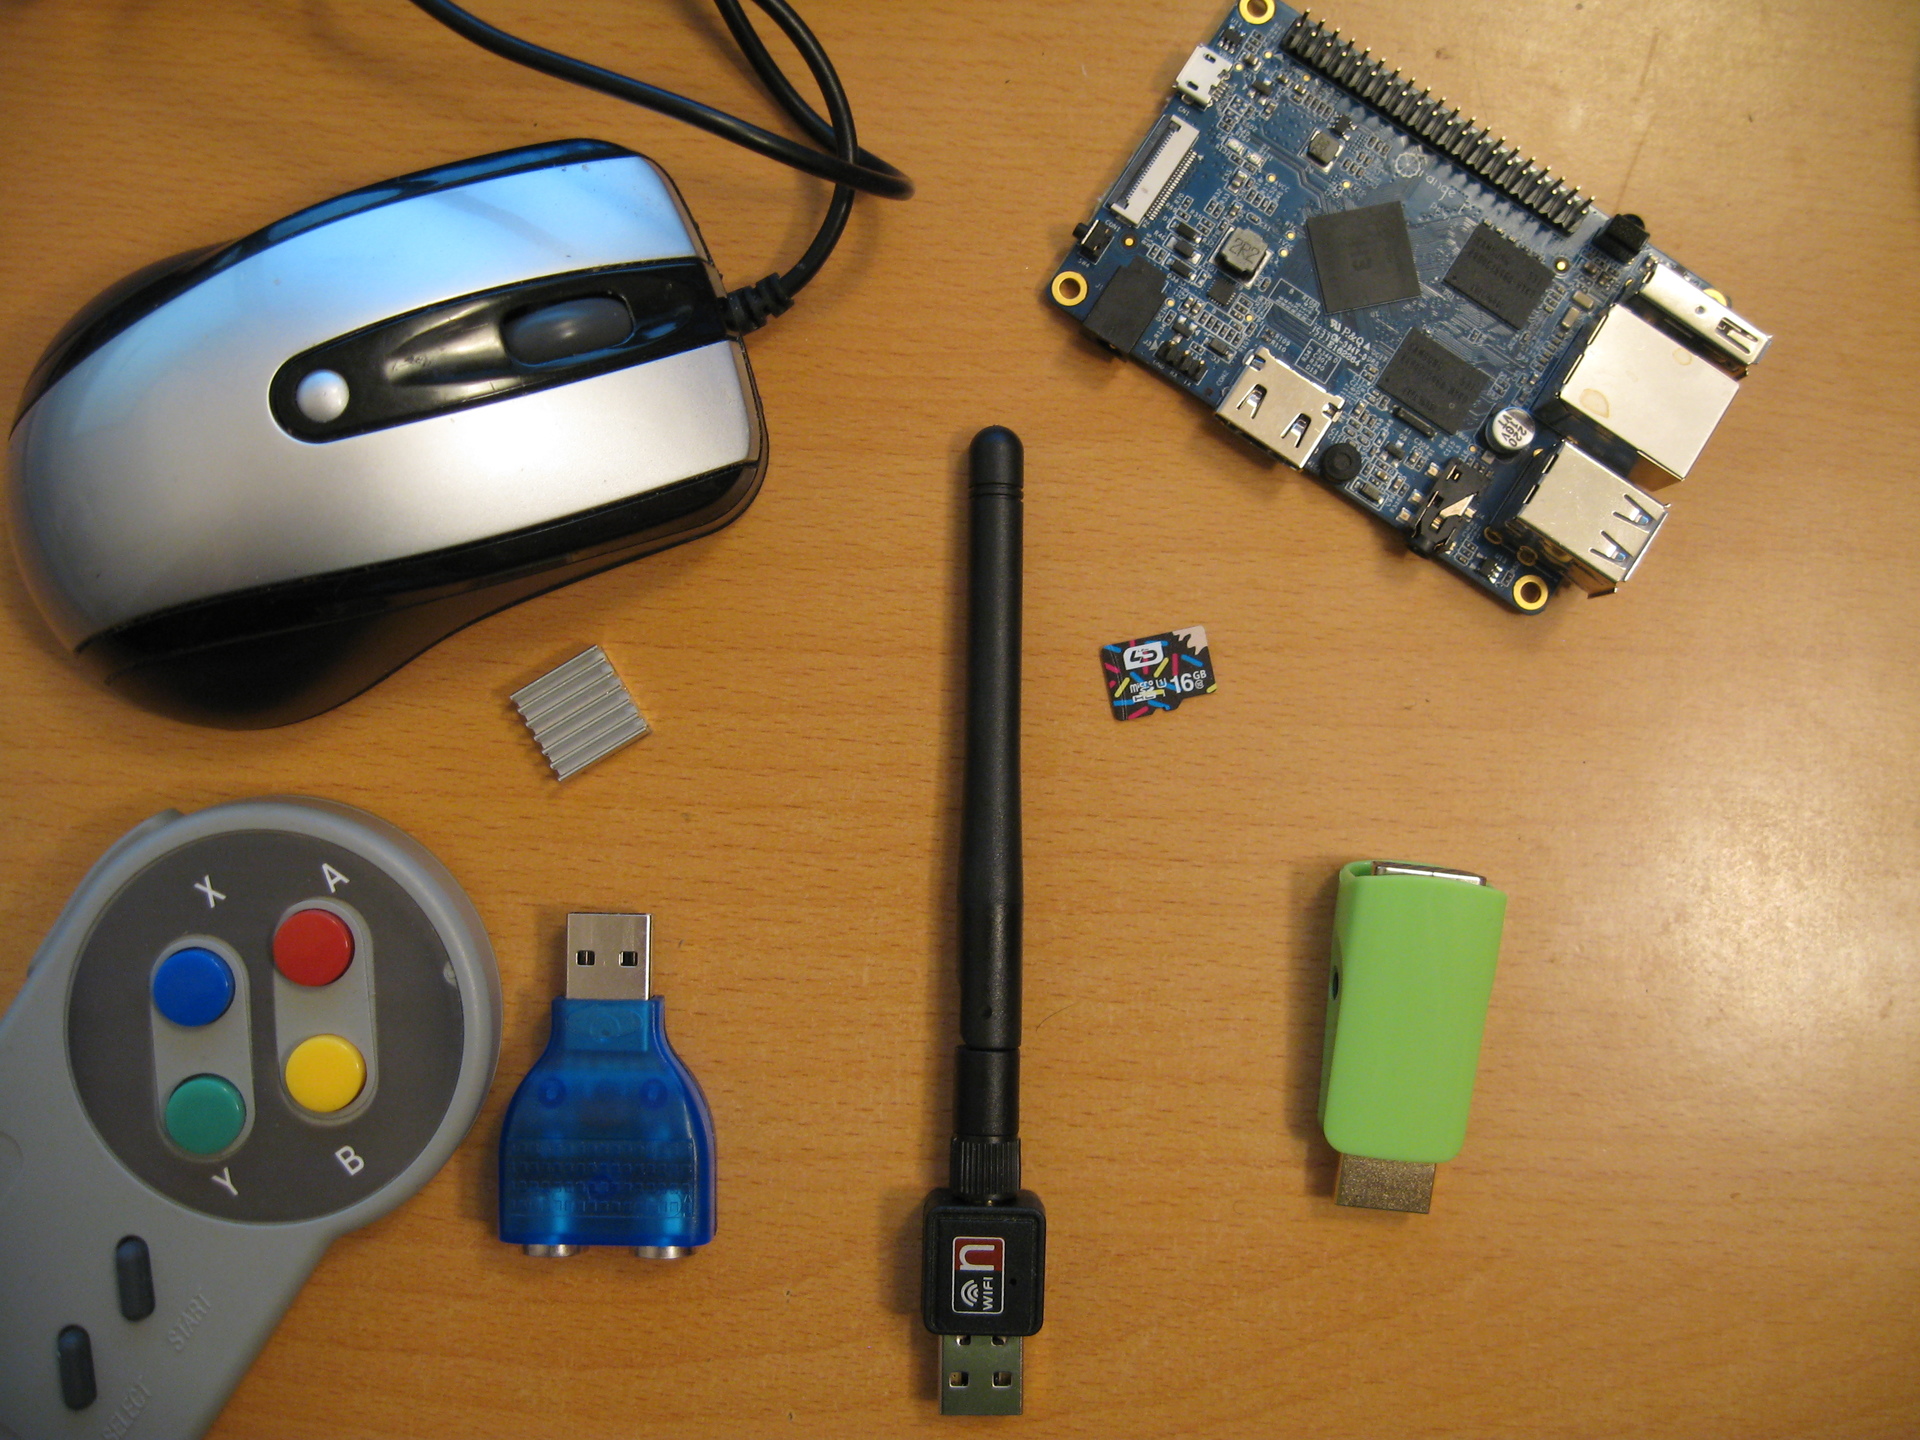
In addition to the indicated whistle and a mini-radiator, I use an HDMI-VGA adapter to connect to a regular computer monitor, a USB-PS / 2 adapter to use an old computer keyboard, a USB gamepad, and a class 10 uhs-1 LD 16Gb microSD card, which came in stock with JD and a miracle mouse with a built-in microSD card reader and a speaker (!) connected to the USB sound engine built in to the mouse (!). Very comfortably.
In addition to the indicated whistle and a mini-radiator, I use an HDMI-VGA adapter to connect to a regular computer monitor, a USB-PS / 2 adapter to use an old computer keyboard, a USB gamepad, and a class 10 uhs-1 LD 16Gb microSD card, which came in stock with JD and a miracle mouse with a built-in microSD card reader and a speaker (!) connected to the USB sound engine built in to the mouse (!). Very comfortably.
As we can see, the very requirement of having a power supply unit ($ 5), a radiator ($ 1), wi-fi ($ 4) and microsd card ($ 5) already makes the board much more expensive than the original $ 15 and brings the cost closer to cheap Android TV boxes. Nevertheless, if you already had all this, then with the purchase of a board you do not have to overpay for unnecessary options (for example, instead of WiFi, you can perfectly use the built-in Ethernet).
2. Install the OS
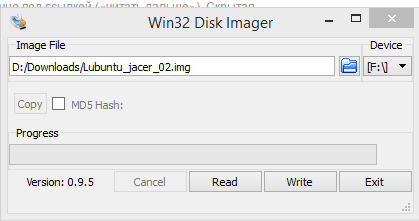
First of all, we need the Win32DiskImager program, you can download it at sourceforge . Then, we need an OS image. I am using a Jacer Lubuntu image in which the Mali-400 GPU and GPIO fully work through the WiringOP library (port with Banana Pi) - link . After installing Win32DiskImager and loading the OS image, open the program, select the file with the image there, make sure that we write it to the desired memory card and click Write:
After successfully writing to the card, you will see only a tiny BOOT section from the card in the system. FAT32. You need to drop the correct script.bin and uImage on it. Download this archive, extract the script.bin and uImage files from it and drop it with overwriting on our map. After that, insert it into our device and connect power to it. If you did everything correctly, then the red LED on the board will light up and the system will start to boot.
After turning on, the system will require you to enter a name and password.
Username - orangepi
Password - orangepi
Remember to open the terminal window (ctrl + alt + T) and enter sudo fs_resize to "fit" the disk layout in the system to the size of your card.
3. Fixime overclocking
Now another “feature” of this board, or rather, a pig, slipped by the manufacturer. The two main problems that users face are overheating of the processor (as well as throttling related to it, disabling of the cores, board hangs ”and voltage drawdowns (which also cause freezes) have common roots:
In order to advertise your board as“ the most powerful, more powerful than Raspberry Pi ", the manufacturer of Xunlong boards charged the default clock coding of the CPU cores at 1536 MHz, which is the nominal" upper ceiling "according to the documentation for the chip, but even the manufacturer did not recommend using it at this frequency, warning about the problem x with overheating.
I personally have enough floating clocking at 480-1200 MHz, depending on the tasks, so I recommend rolling the following script (for it and for all the research work, thanks to the bronco user from the official forum):
Spoiler heading
#! / bin / bash
export PATH = / usr / local / sbin: / usr / local / bin: / usr / sbin: / usr / bin: / sbin: / bin
if ["$ (id -u)"! = "0"]; then
echo "This script must be executed as root. Exiting "> & 2
exit 1
fi
Fex2Bin =" $ (which fex2bin) "
if [" X $ {Fex2Bin} "=" X "]; then
apt-get -f -q -y install sunxi-tools
fi
Path2ScriptBin = "$ (df | awk -F" "'/ ^ \ / dev \ / mmcblk0p1 / {print $ 6}')"
if [! -f "$ {Path2ScriptBin} /script.bin"]; then
echo "Can not find script.bin. Ensure boot partition is mounted »> & 2
exit 1
fi
MyTmpFile =" $ (mktemp /tmp/${0##*/►.XXXXXX) "
trap" rm \ "$ {MyTmpFile} \"; exit 0 "0 1 2 3 15
bin2fex <"$ {Path2ScriptBin} /script.bin" | grep -v "^ LV" | grep -v "^ max_freq" | grep -v "^ min_freq" | grep -v "^ extremity_freq"> "$ {MyTmpFile}"
if [$? -ne 0]; then
echo "Could not convert script.bin to fex. Exiting »> & 2
exit 1
fi
cp -p" $ {Path2ScriptBin} /script.bin "" $ {Path2ScriptBin} /script.bin.bak "
sed -i '
LV5_freq = 960000000 \
LV5_volt = 1080 \
LV6_freq = 816000000 \
LV6_volt = 1020 \
LV7_freq = 480000000 \
LV7_volt = 980 '"$ {MyTmpFile}"
fex2bin "$ {MyTmpFile}" "$ {Path2ScriptBin} / / null
if [$? -ne 0]; then
mv "$ {Path2ScriptBin} /script.bin.bak" "$ {Path2ScriptBin} /script.bin"
echo "Writing script.bin went wrong. Nothing changed "> & 2
exit 1
fi
echo" Successfully repaired broken overvolting / overclocking settings. Reboot necessary for changes to take effect »
Copy and save this script as fix.sh in your home directory, then open the terminal and execute: After rebooting, you will have a stable and cold machine, which will suffice with minimal passive cooling.
chmod +x fix.sh

sudo ./fix.sh

sudo reboot
4. Test drive
I do not know what else can be said effectively at this stage. According to the monthly experience of using a motherboard with normal clocking and GPU support, I can say that the device can very well replace a nettop with a single / dual core atom.
Judge for yourself
LibreOffice works fine and smartly.


Chromium works as a full-fledged desktop browser. The


Youtube plug-in for SMPlayer smartly digests both 720p and 1080p video streaming (there is no hardware decoding support in the pre-installed Chromium)

You can even program it in Eclipse or in Code :: blocks!
I also checked the 4k video, it plays like normal, but not without roughness. I don’t see the point in it yet, 1080p is enough for the eyes.
LibreOffice works fine and smartly.
Chromium works as a full-fledged desktop browser. The
Youtube plug-in for SMPlayer smartly digests both 720p and 1080p video streaming (there is no hardware decoding support in the pre-installed Chromium)
You can even program it in Eclipse or in Code :: blocks!
I also checked the 4k video, it plays like normal, but not without roughness. I don’t see the point in it yet, 1080p is enough for the eyes.
GPIO Check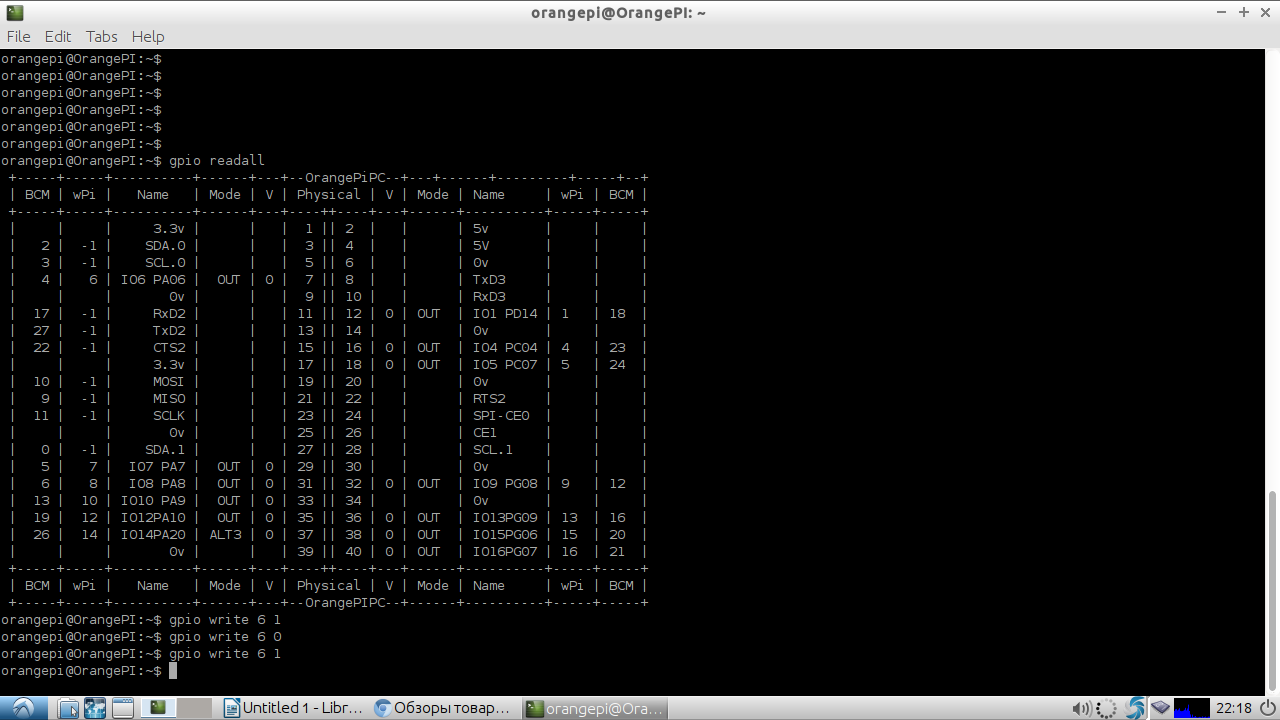
GPIO seems to work, blinked an LED, then did not understand, maybe someday hands will reach it.
GPIO seems to work, blinked an LED, then did not understand, maybe someday hands will reach it.
A separate topic is games, how can one do without them? I propose to evaluate the performance in the classic computer games that is available under Linux - Quake 3 Arena.
Install Quake 3 Arena
The instruction is taken from the ODROID forum .
0. (added by me). We make a symlink and copy the header files so as not to makefile: 1. Clone the source code: 2. Go to the folder: 3. Collect: 4. Transfer the daddy so that it is neat: 5. Put the game files pk * .pk3 (can be found on disk with the original game) to the ~ / .q3a / base3 folder. 6. Run the ioquake3-smp.arm file. And play!
0. (added by me). We make a symlink and copy the header files so as not to makefile: 1. Clone the source code: 2. Go to the folder: 3. Collect: 4. Transfer the daddy so that it is neat: 5. Put the game files pk * .pk3 (can be found on disk with the original game) to the ~ / .q3a / base3 folder. 6. Run the ioquake3-smp.arm file. And play!
ln -s /usr/include/khronos/GLES /usr/include/GLES

cp /usr/include/khronos/EGL/* /usr/include/khronos/GLES
git clone --depth 1 git://github.com/mdrjr/ioquake3-odroid.gitcd ioquake3-odroidmake -j5 ARCH=armmv build/release-linux-arm ~/quake3Result on video:
From myself: it’s going perfectly, at least I didn’t notice any glitches. Well done guys, they did a good job when porting the Mali GPU driver to Linux!
A little more demonstration of graphic / gaming abilities:
Orange Pi PC: Reicast - Dreamcast emulator - Sonic Adventure 2
Orange Pi PC: H-Craft
Orange Pi PC: Jedi Knight 3: Jedi Academy
In general, I am very pleased with the purchase. For relatively little money, I played enough with Linux and got a mini-PC that can emulate old consoles, play games, surf the Internet comfortably on 10+ tabs of a full browser and play YouTube videos. What else is needed for happiness? In the future I plan to use the piece of iron in some DIY project using the OpenCV computer vision library, fortunately, unlike arduins, it will have enough resources for video processing.
To whom I categorically would NOT recommend taking this piece of iron:
- to those who are on "you" with Linux;
- to those who want a ready-made solution "out of the box";
- for those who have little free time and bad English for reading forums;
- those who need the opportunity to install Windows;
- those who need good community support, the level of the Raspberry Pi and Arduino;
- For those who need more cores and RAM, it is not clear why.
I would advise these people to take either a more popular device (raspberries), or a more powerful board (there are already 8-core boards with 2-3GB of RAM on the way), or just a whistle for TV on Android or Windows. It will be better than to take an “orange” in a rage and then be indignant, because this division is far from ideal.
5. Instead of an afterword
In the wake of the new “trend” of mini-pc board manufacturers to produce ultra-cheap products ( CHIP for $ 9 , Raspberry Pi Zero for $ 5 ), the creators of the “orange” Xunlong announced their new product: Orange Pi ONE and Orange Pi Lite (link to the official forum).
First-hand photo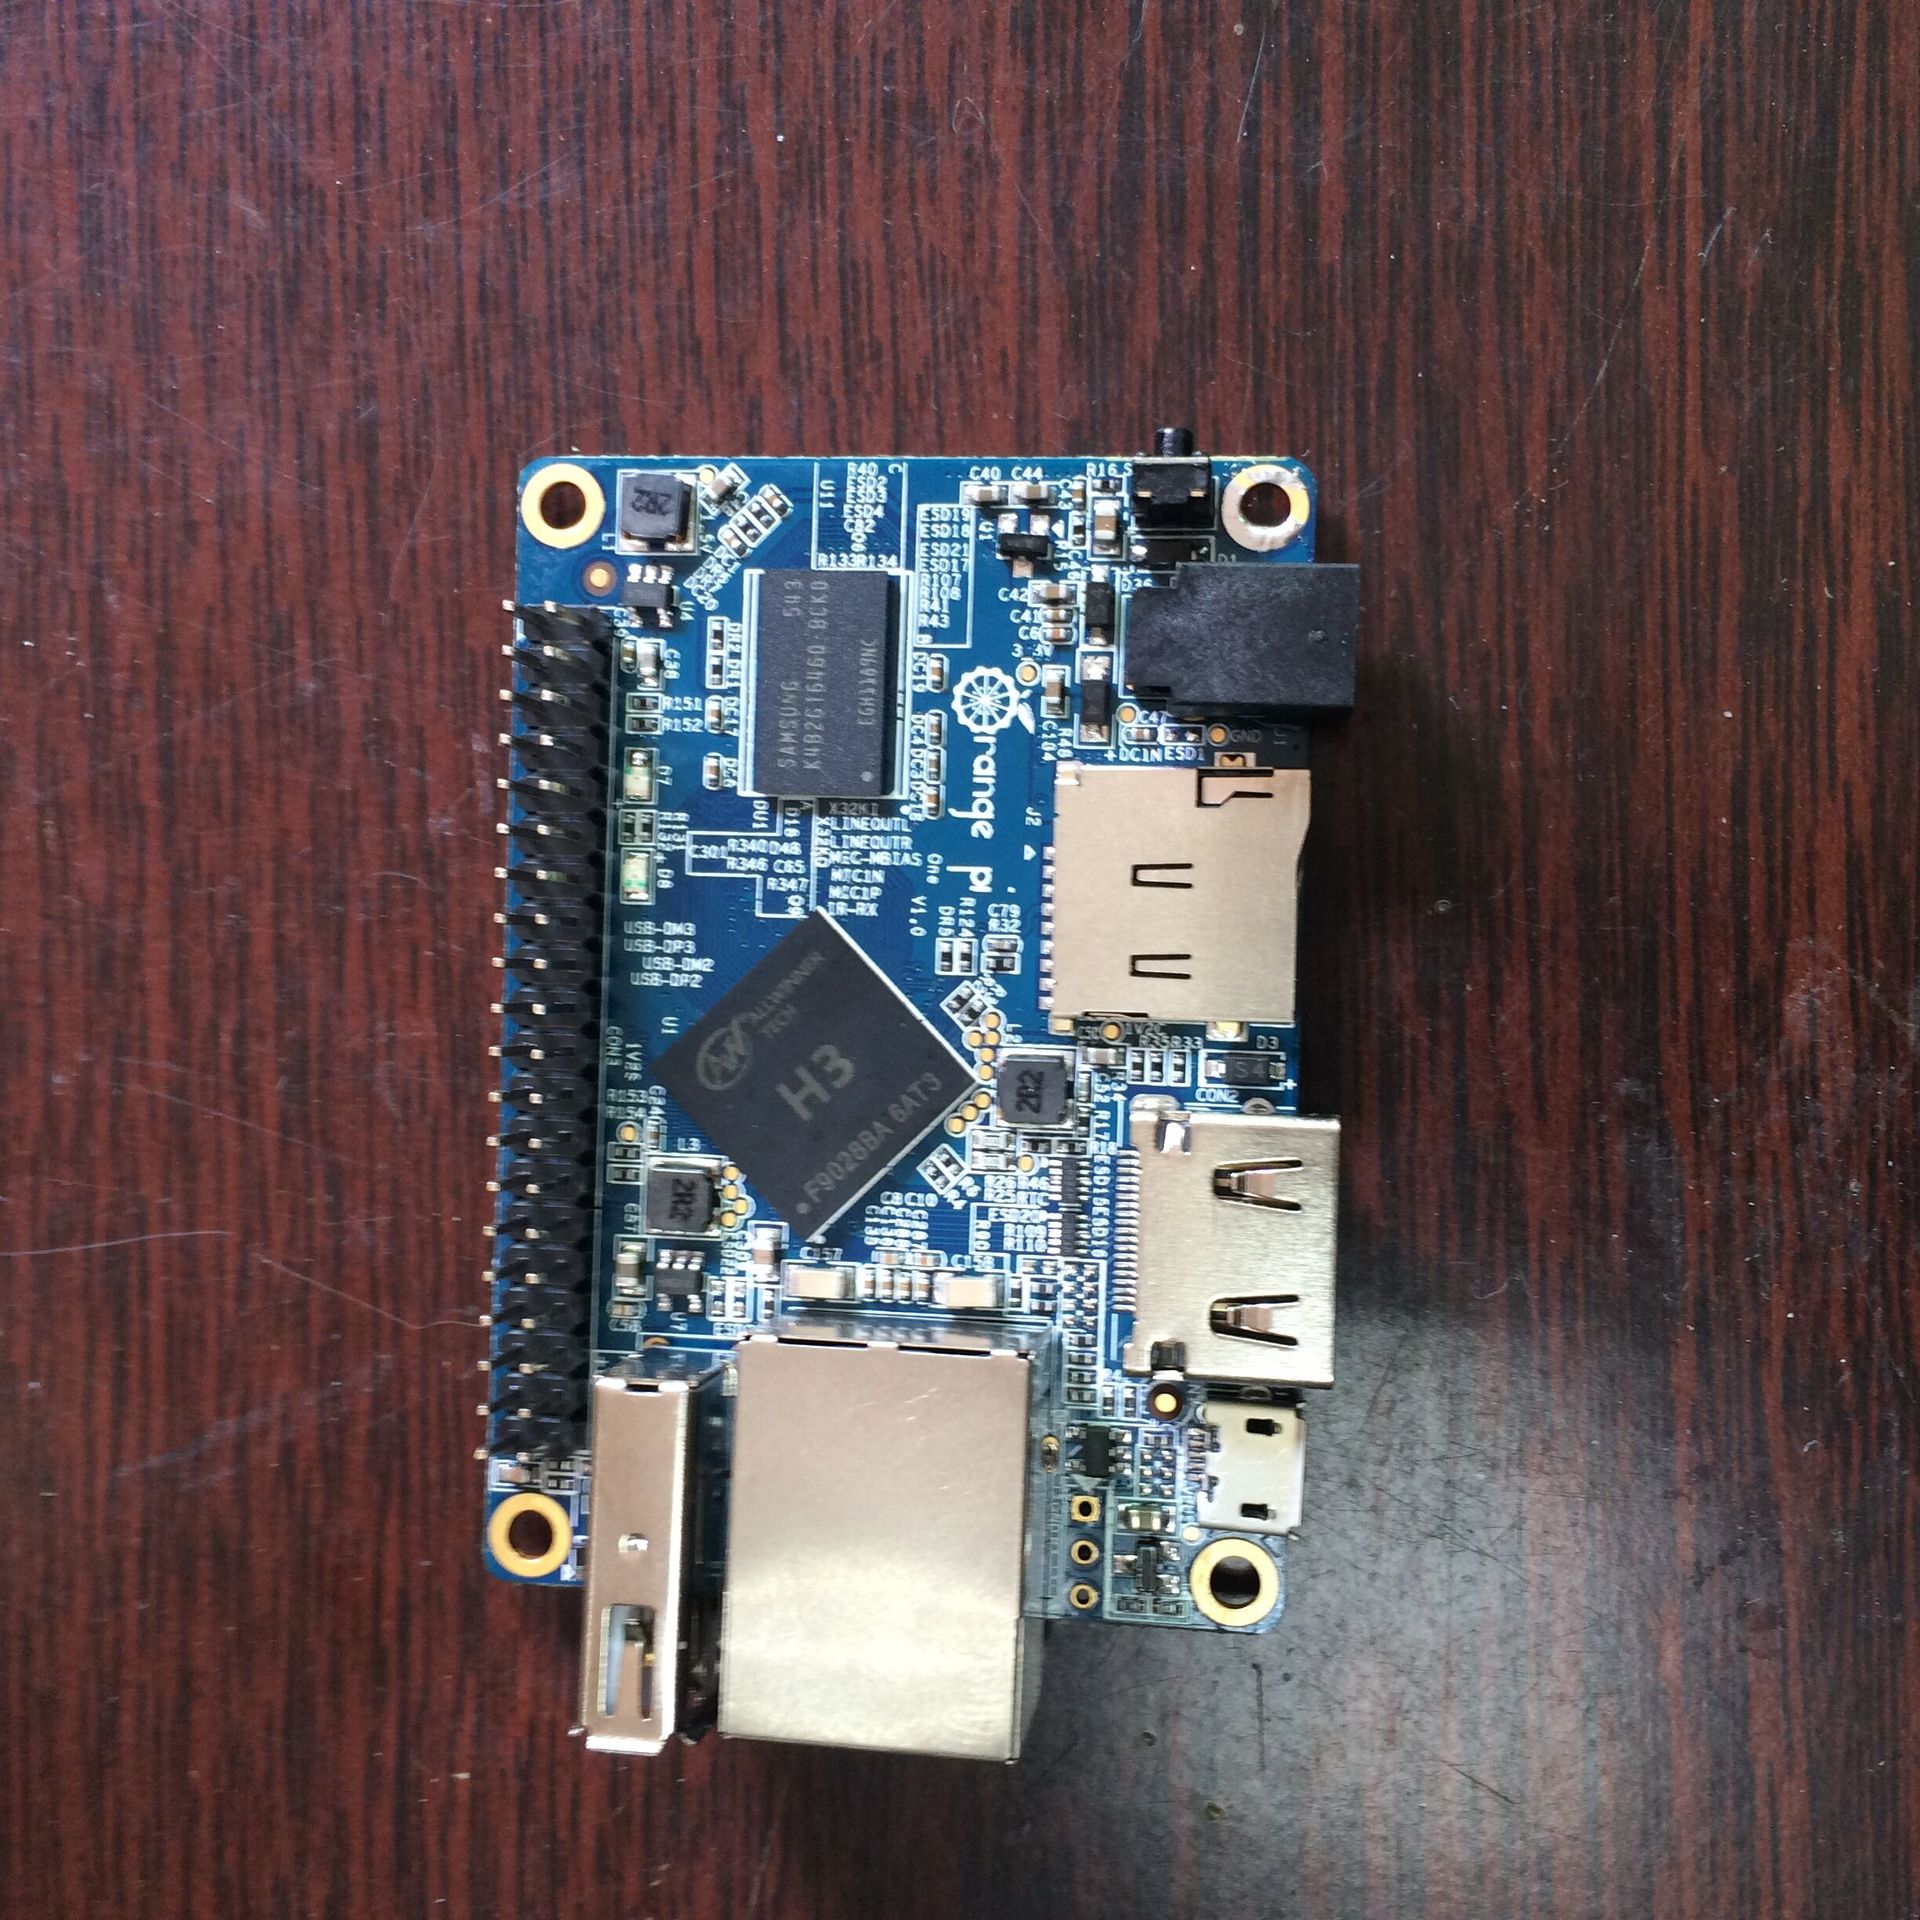
The novelty will cost $ 12 and $ 9.99 and the size will be less than a credit card. The $ 9.99 version, judging by the announcement, will be almost identical to the hero of the review, but will have only 512Mb RAM and 1 USB port (plus one microUSB host). Of course, you can’t walk around, but I must admit that it looks much more intriguing than the old 1-core CHIP and RPi Zero chips.
I only hope that, with the release of the Xunlong boards, it will finally begin to provide normal support to users and the community in terms of adding software.