Case for setting up remote administration and a little more control over the situation

I want to talk about some features of the organization of remote control "desktop" on the example of a case already decided. The article will discuss the features of working with RDP and Hamachi, and the topic of remote control incl. and off PC using a mobile phone.
Under the cut 2550 words and 5.17MB pictures.
Command staff
1) Notebook Toshiba Tecra R10-118 (hereinafter referred to as NB ):
- for today it is already
- survived 3 batteries
- is lightweight (1.9 kg)
- 100 percent load on the CPU holds a maximum of 7 minutes, then happens emergency power off due to overheating
- OS Windows 7 Ultimate
- went through fire and water, so it is not afraid of death
2) Home PC based on i5-3470 (hereinafter - DT ):
- prefers to do than think
- Internet 100 Mbps / c
- 24-inch screen for convenient work
- on board different software for everyday tasks, fully configured for work
- OS Windows 7 Ultimate
- friends with kote
Challenge
On business matters, I often have to be in different areas of the city with NB in my bag. At first, his local resources were enough for all tasks. A little later there was a need for a CRM system, then a technical specification was developed for it and a few months later this system was installed on DT. This helped organize work processes, but at the same time disrupted the usual way of life. The fact is that this is a completely “cyclic” CRM, narrowly targeted, and works only under Windows. Plus, it hung on a DT in a virtual machine, had a large database, which together increased the requirements for hardware. For comfortable work with this CRM, large computing power was also required, and the database grew every day.
Considering that I have little control over myself, when working with slow hardware, it would not be a very reasonable idea to transfer this system to NB. Another reason for my reluctance to carry the entire database with me was the risk of losing it with NB, no one was safe from this, and synchronizing it every day between DT and NB would be an extremely resource-intensive task. On DT, working with CRM was the opposite - very fast and comfortable, in addition to this, backups were automatically created.
I needed to find a solution that would solve the issue simultaneously with both productivity and compactness, at the same time, not forgetting about data protection.
The first decision that came to mind was to buy a new laptop that could potentially replace both NB and DT.
As a result, I abandoned this idea, for the following reasons:
- performance still falls short of DT
- by weight a significant loss before NB: 3.5 kg versus 1.9.
- the loss of such a device would make me very upset (especially with CRM on board)
- the price
All this led me to the fact that it was necessary to configure remote access between NB and DT.
RDP terminal connection
 Remote Desktop Protocol comes with Windows. And despite the bias of some users to Microsoft products, RDP provides excellent quality of the transmitted picture and is able to share files.
I will not dwell on the settings in detail, I will only say about some features of the work. When working in a local network, it is required to specify the computer name or ip-address as the destination, when connecting to a PC located in the external network - the host domain name or ip-address. When connecting between two PCs located on the LAN and connected via cable, you can turn off the password request. If two machines in the same local area network communicate with each other, but already via Wi-Fi, or the host is on an external network, then the password request is not disabled. During a remote session, the computing resources of the host computer are used. True, these possibilities are still somewhat limited. For example, it is impossible to use the resources of the Nvidia video adapter, in particular, the CUDA technology. Windows unloads the Nvidia video driver and uses its own instead.
There is still a nuance that when connected, the host computer goes into the user selection screen mode. On the one hand, this is a plus, since no one sees what kind of actions the remote user performs. There is one drawback associated with the features of connecting from the outside (more on that below).
Solving the issue with a gray ip-address: LogMeIn Hamachi
By default, the home provider does not provide an external IP address, and I am not eager to pay extra for this, since there are alternatives. But still I will say about the pros and cons of external ip as applied to solving my problem. Pros: high speed; It is possible to use Wake-on-Lan technology and control the on / off of DT; the ability to connect to the DT even if it is now on the user selection screen; no need to install additional software. Cons: increased risk of hacking, additional monthly expenses.
 In the end, it was decided to use HamachiThis service allows you to organize a VPN connection between multiple PCs. When installing the Hamachi distribution on the OS, a virtual network adapter is created, which is assigned a virtual ip-address. After installing the distribution kit in your account, you can create a network and invite / add other users there, among those who installed the Hamachi client (up to 5 participants in the free version).
Hamachi operates in two modes of communication between participants. In the first case, this is a “direct tunnel”, when traffic between users goes directly, and the server only helps determine the location of participants. The second mode is “connection through the relay”, when all traffic goes through the Hamachi server, because of this there is a very high ping and speed so that it can be difficult to work. According to my observations, regardless of the program settings, the connection through the repeater always occurs if you use 3G or 4G mobile Internet, for example, Yota. I have home Internet from Beeline, so when you find a Wi-Fi point with Beeline in the city, the connection to DT always goes through a “direct tunnel” and almost always good speed. What connection will be if I connect via Beeline from another city, I have not tested it yet. Nevertheless, I have reason to believe that the connection within the same “fixed” provider and within the same city will always be through a “direct tunnel”. According to rumors, and unverified information, you can get rid of the connection through the repeater by buying a license, but this is not a word on the official website, and I have not tested this option myself yet.
Now a little about sad things. As I mentioned above, when you connect via RDP, the host goes into the user selection screen mode. At the end of the session, this crane remains on. If the connection is over a local network, then there is no problem reconnecting and continuing. It is also not a problem to continue the interrupted session if you are somewhere far away, but the host has an external ip-address. When we are dealing with Hamachi, it is already impossible to reconnect with the active user selection screen, even taking into account that both the OS and Hamachi hang in RAM and continue to work in the background. One solution to this problem is to create an empty shortcut on the DT desktop and paste the code as the address
shutdown -r -t 00. By launching it, DT will go to reboot, the session will also be interrupted, but it will be possible to reconnect.At the same time, there is still the problem of enabling DT at a distance, on demand. I can’t do this with tools like WOL, because I need an external IP, which is not there. It would be possible to use dynamic DNS in the settings of the router, but I could not cope with its settings, in addition, DynDNS has now become completely paid.
An alternative solution is to use the capabilities of GSM networks.
soft hardware solutions
There are already several types of boxed solutions available for free sale that allow you to control turning the computer on and off remotely, although most of them require power supply from the network and are offered at a price of 6,000 rubles or more. I decided that it was useless to me.
I also came across articles by enthusiasts who used the capabilities of a mobile phone to turn on a PC. However, in those articles some complex radio circuits were given, where more than a dozen radio elements were involved. All these radio circuits terrified me, because I absolutely do not know how to read them. For my part, it was a little incomprehensible to me why it was necessary to create such difficulties?
Indeed, in theory, everything is simpler than simple:
- we disassemble a mobile phone,
- we find the contacts to which the tiny motor of the vibrating alert
is connected - we solder to each of them through the wire
- we buy an electromagnetic relay, which is enough for the voltage supplied by the phone to work
- we buy other radio components needed to assemble the “hub”, inside which there will be a relay, outside there will be a connection to the POWER SW connector on the motherboard and a connection to the POWER button on the system unit.
It remains only to personally verify the feasibility of this idea.
Phone selection
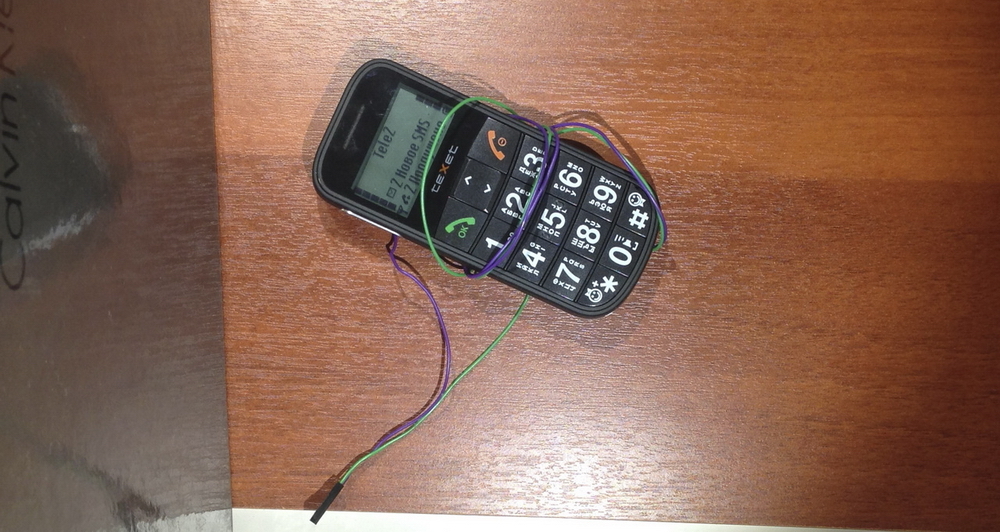
About a dozen devices were found in the pantry, among which were: Nokia 1280, Nokia 1200, Nokia 105, Nokia 1800, Nokia 6500c, Nokia C5-00, Alcatel one touch 112, and finally Texet TM-B110. Just the last one was chosen for the role of the experimental rabbit, because this "grandmother" had such a loud vibrating alert that its rattle on the table could be confused with the sound of a working puncher from the neighbors.
It is not difficult to detect the contacts to which the vibrating alert motor is connected. The motor itself is not soldered to the telephone circuit board of the phone, but is mounted on the opposite side of the case and connected via terminals when the phone is assembled.
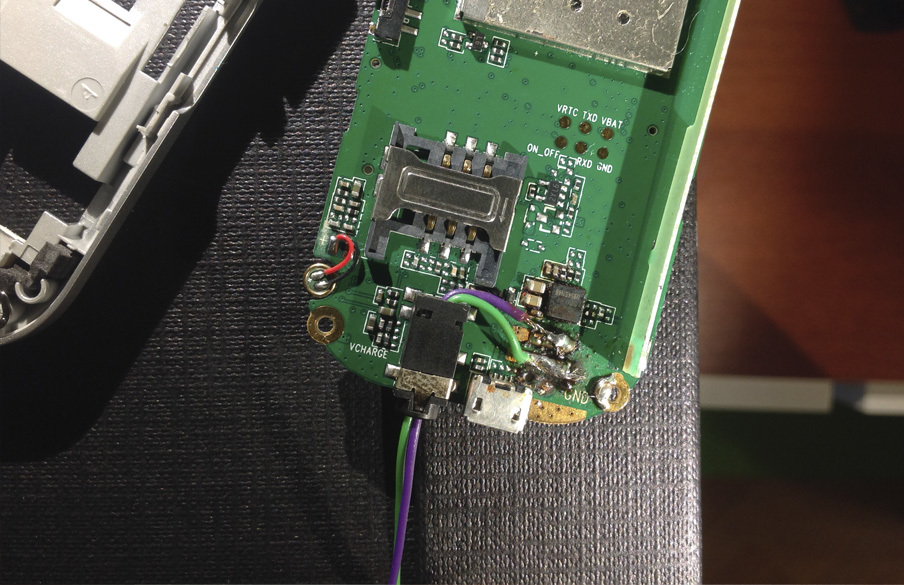
We clean and service the vibrating alert contacts. It is better to use a stranded wire. I used a wire from a telephone cable. The wires are exposed, stripped and tinned. For convenience, it is better to use a soldering iron with a tip diameter of 2-3 mm and a flux (FCC). I brought out the wires through the connector to connect the headset.
Overview.
We measure the output voltage and determine the purchase of the relay
We collect the phone, insert the SIM card, activate the “vibro” mode and initiate an incoming call.
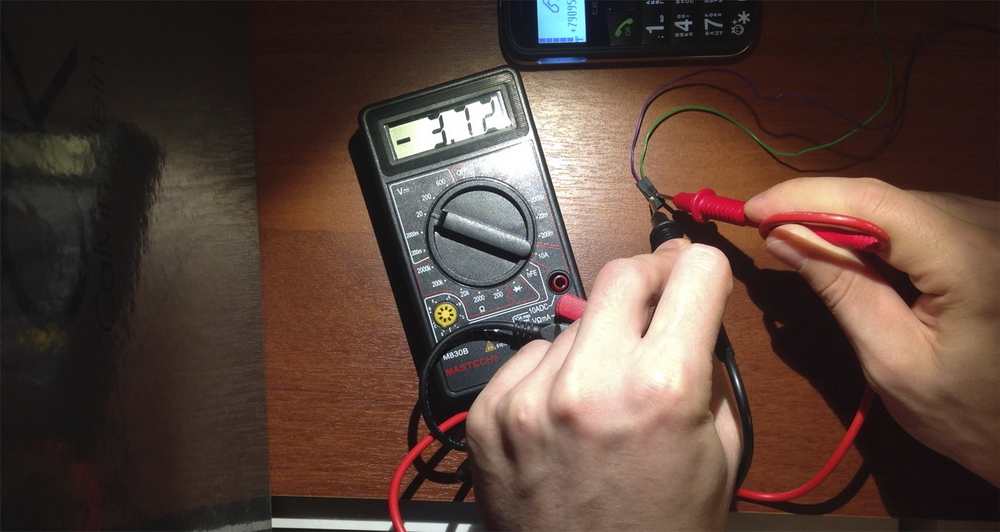
The voltmeter shows 3.72V, this is the maximum voltage output by the battery.
By the way, I was lucky with the phone, since not all devices use the entire battery voltage to operate the vibrating alert.
Google told me suitable electromagnetic relays in terms of parameters and in which stores you can find them. True, before buying, I still had to call several stores and specify the characteristics of sellers: on the sites it is not always possible to find information that this relay will work from 3V.
As a result, it was bought TRG5-5VDC-SA-CL-R, Alarm relay 5VDC / 0.5A 125VAC, 1 change-over contact. Despite the 5VDC marking, the consultant assured me that it would work from 3.7V.
Other components
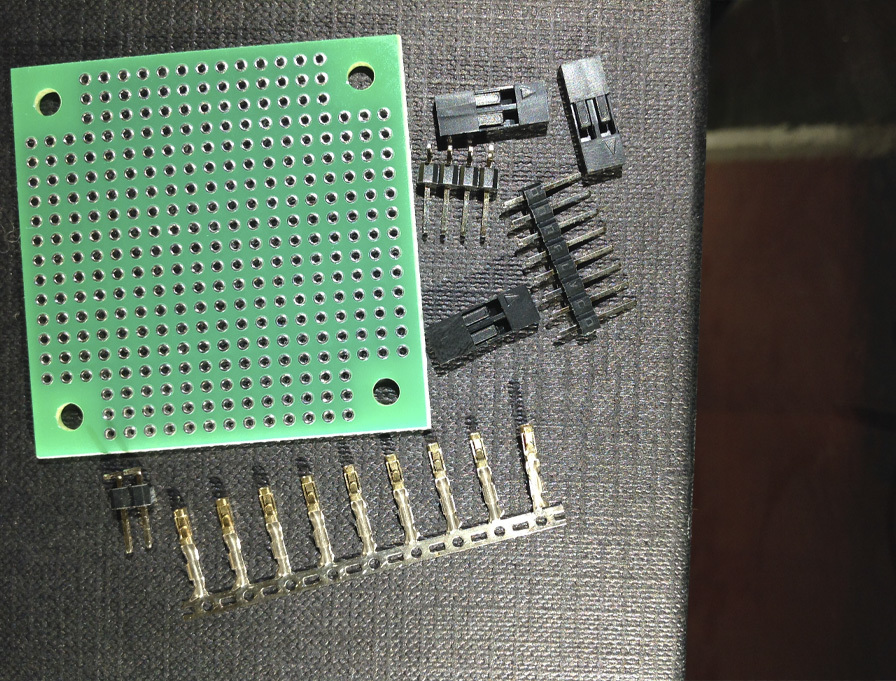
Together with the relay, other components from the list of necessary components were purchased.
Full list of used components:
1) TRG5-5VDC-SA-CL-R, Alarm relay 5VDC / 0.5A 125VAC, 1 change-over contact
2) G1020BF, Housing for REA 108.5x54x30mm, plastic, black with mounting flange
3) BLS-2 ( DS1071-1x2), 1x2 cable socket with 2.54mm contacts
4) PLS-2R (DS-1022-1x2), 2.54mm pin plug, angled 1x2 (type D1)
5) PLS-2 (DS1021-1x2), 2.54 pin plug mm 1x2 straight
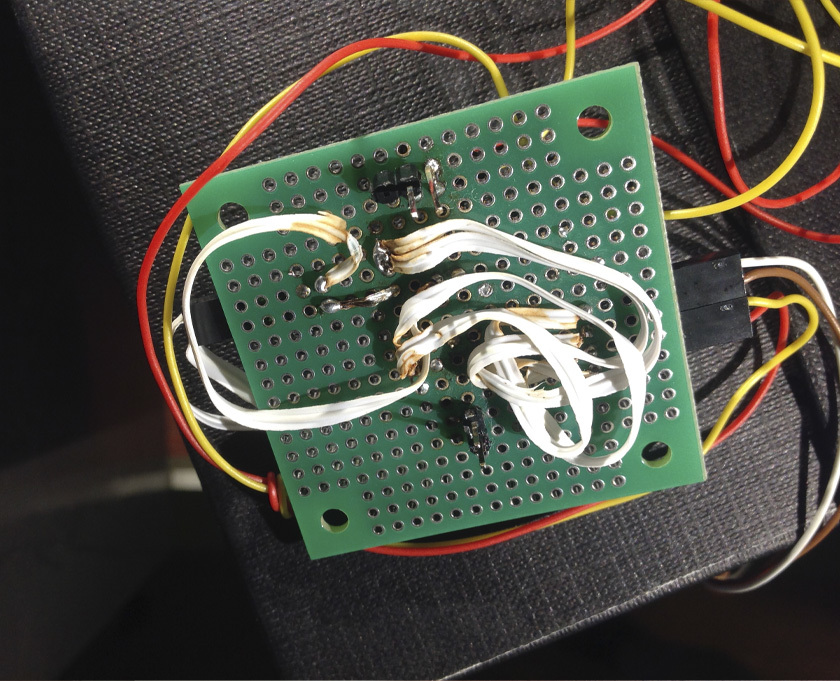
6) DIP-RM 50x50mm, breadboard
7) Stranded wires of different colors
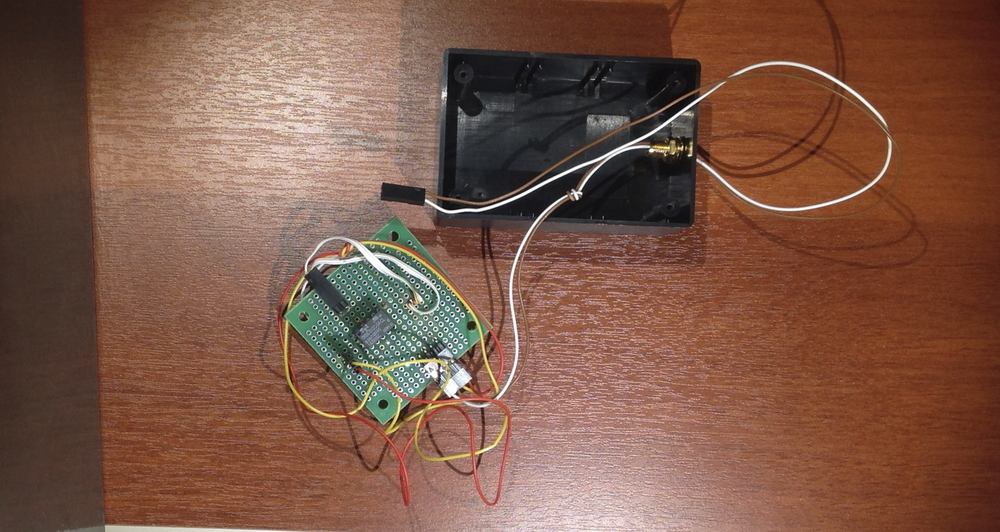
All components cost about 700 rubles, not counting the wires that I already had. The plugs with the sockets were selected according to the principle of compatibility with those used in the “POWER SW” connector on the motherboard and it is advisable to take them with a margin. Well, if after assembly the printed circuit board does not hang in the case, although this is not very critical.
Scheme

Drew in excel. I hope it's clear what's what.
As planned, we and our bike connect to the motherboard in parallel with the POWER button on the system unit. The button continues to ra, as before.
We collect the "hub"
On the relay that I used, there were 6 contacts. The first two were responsible for controlling the relay and connected to the vibrating alert in the phone, two more were normally open, that is, they closed the circuit only when the relay was triggered. The remaining two were normally closed, that is, when the relay was triggered, they on the contrary opened, the main thing was not to mix them up with the previous ones and not to use them.

this side looks into the case.
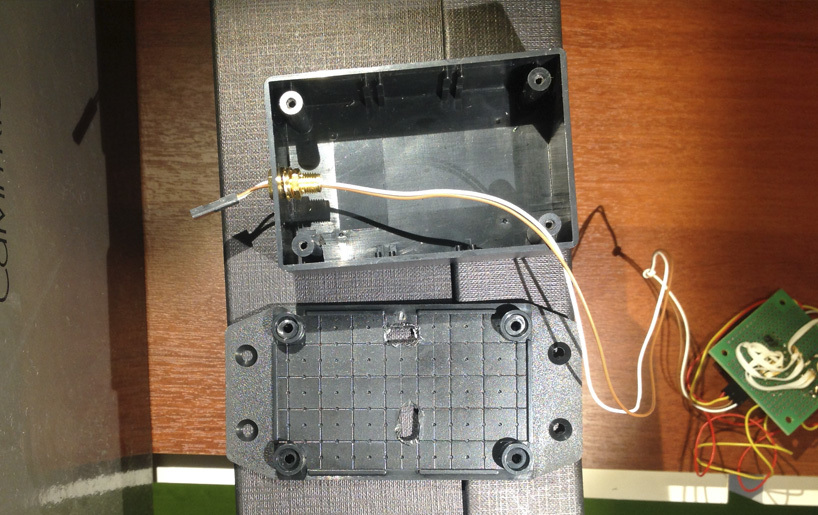
The holes for the connectors in the case cover were made with a soldering iron.
To the outside we bring out the wires that will be connected to the POWER SW on the motherboard.
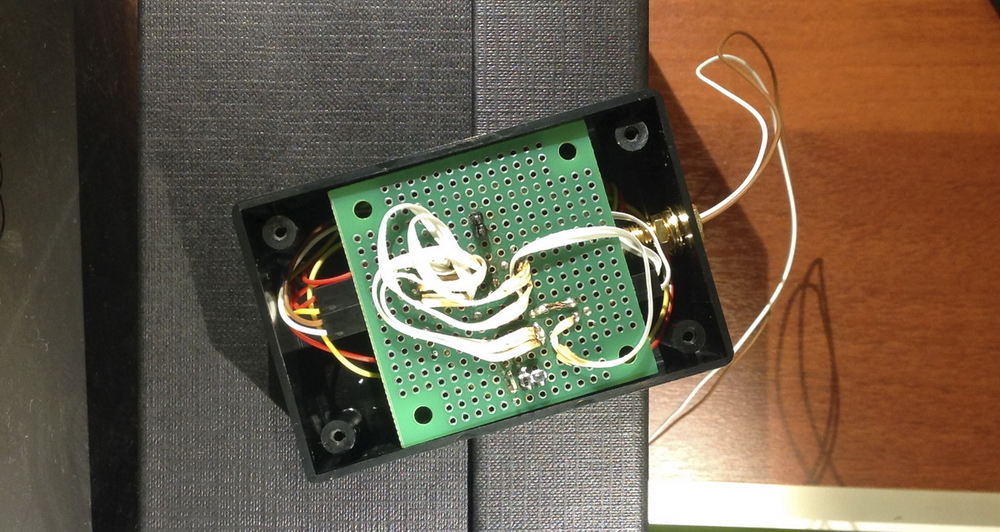
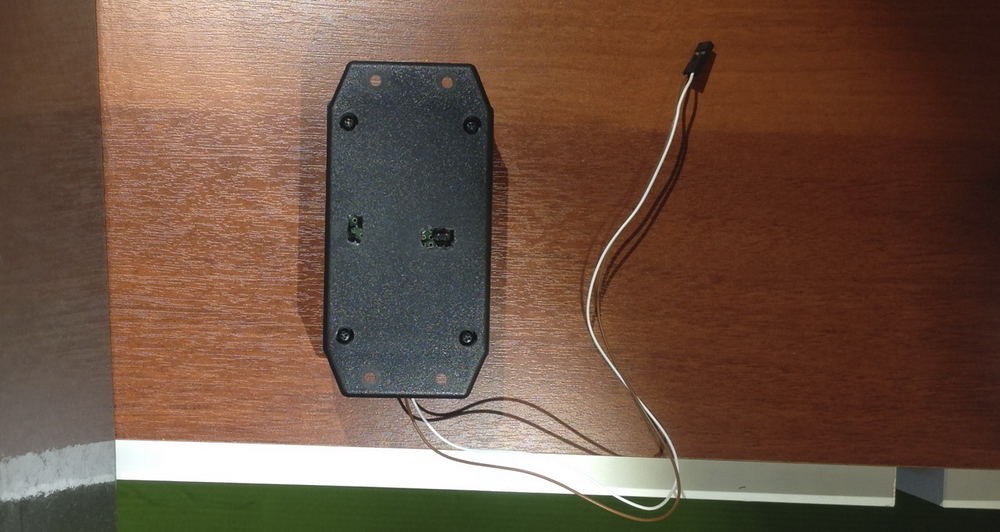
The hub is ready
Measure the pulse
It is time to test the performance of the entire system. At the first start, one unpleasant moment was revealed. When the phone received an incoming call, the circuit closed and the DT power was turned on, but if the call was not dropped, then after a few seconds the DT turned off. The reason was that when you hold down the POWER button for more than 5 seconds, the power is turned off forcibly.
Using improvised tools, a microphone and an audio recording program, a measurement of the "heart rate" of the relay was taken: The
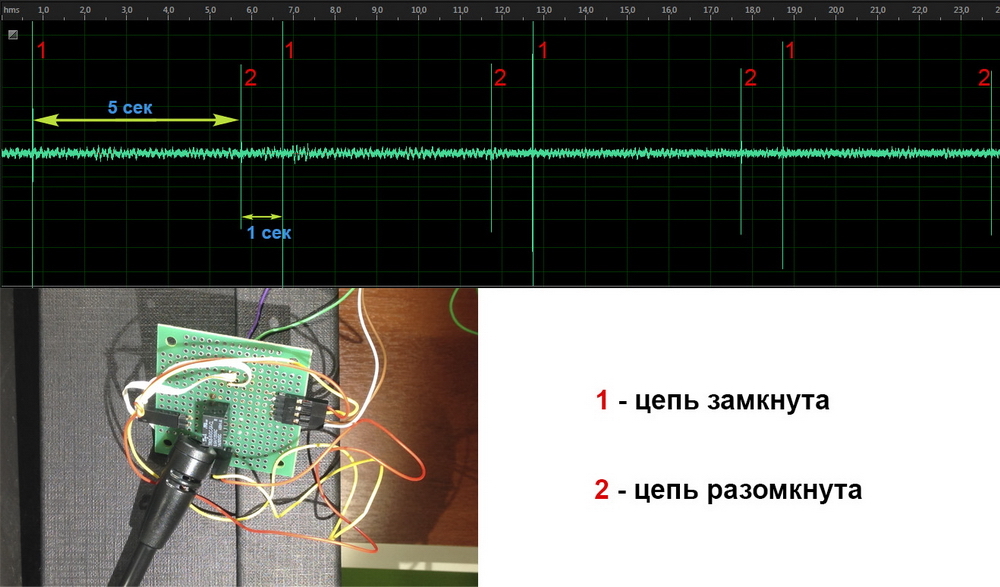
assumptions were confirmed. Exactly 5 seconds, the circuit remains closed, then 1 second of inactivity and the cycle repeats.
The culprit is the phone, but it was impossible to make it vibrate in a different rhythm. Therefore, the only working strategy is to drop the call as soon as you hear the first beep.
Installing a “hub” inside the system unit
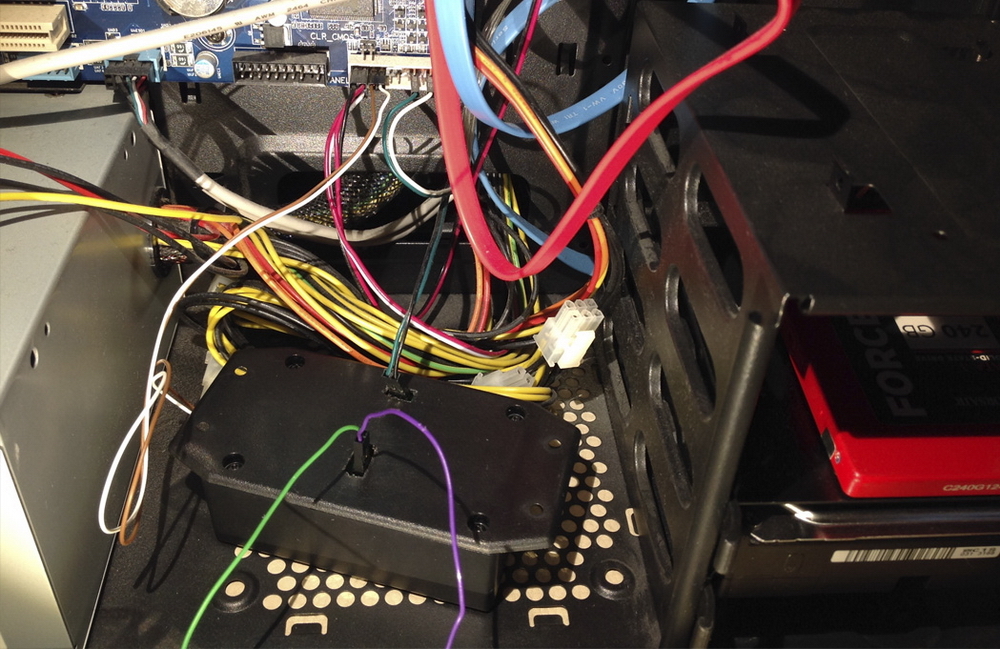
We hang the phone outside the system unit, preferably on the back wall, so that it can be accessed. We lead the wires inside the case through the PCI-hole. The phone can be connected to a constant charge, so as not to forget to charge.
Operational Features
As I said, the POWER button still works as normal, regardless of the relay. Hamachi informs whether the computer is currently turned on or not. I don’t tell anyone the phone number for enabling DT, but still there is no 100% guarantee that no one will call from the left number. Unfortunately, in Texet TM-B110 it is not possible to configure the vibrating alert separately for incoming messages and calls, so any message will trigger DT. True, in my practice this only happened twice in three months.
What could be improved
For example, when the next SMS alert from Beeline came to my smartphone, it was clear that the same SMS could come to Texet. At this moment, I might not have NB with Hamachi with me, but there was a need to check the status of DT. Theoretically, it would be possible to install on DT an application that sends an email for my primary e-mail and a smartphone with mobile Internet notifies me of this.
Alternative way: install mail agent on DT and smartphone and thus control the situation. An even more advanced way is to replace Texet with a more advanced device that will not vibrate with incoming SMS and will only respond to calls. The dark side of the force is the inclusion of vibration when calling only from a certain number.
The suitability of the remaining phones
Nokia 1280, Nokia 1200, Nokia 105 and Nokia 1800 - despite their simple design, they were completely unusable. In order to get inside, you need a screwdriver "asterisk", but this is not the biggest problem. The most important thing is that when I disassembled them all, I couldn’t visually determine where the contacts responsible for the vibrating alert were in one, the motor could not be detected.
Nokia 6500c and Nokia C5-00 I did not decide not to touch.
Alcatel one touch 112 - vibro ring contacts are easily detected, it’s also easy to solder wires to them and put them out through the headset jack, which I did. At the output, the voltmeter showed 2.95-3.01V, while the measurement of the output voltage on the native battery showed 3.8V.
The voltage at 3.01V is no longer enough to activate the purchased relay (TRG5-5VDC-SA-CL-R).
The conclusions can be drawn as follows: it is advisable to start sampling among the assortment of "grandmothers" on the market. It is possible that more advanced models from this category have advanced settings that allow you to turn off vibration during SMS.
I would also like to add that on sale there are relays that even 1.5V on are enough, but they are quite rare in stores.
Conclusion
The scheme I implemented for turning on a PC using a mobile device is essentially universal for activating any low-voltage devices.
If you return to the issue of implementing remote access to the necessary data, then of course you can use VPS or a cloud service, where in all cases you will see a gain in data transfer speed compared to the speed inside the Hamachi network. In my case, it was more a necessary measure until a CRM working from the web interface was ready. At the same time, it will be deployed one way or another on my own equipment, and will work there until a better solution is found. My position is that if the data is worth an order of magnitude higher than what is charged on a monthly basis in the form of rents, then this is an occasion to think about whether it is worth the risk. The owners will always have enough time to “audit” the data stored on their servers and then make a decision. Looks like paranoia? Not,
Components were bought in St. Petersburg, in the store "CHIP and DIP". A suitable phone can be picked up on the UNONA radio market. Thanks for attention!