Optimize OS X to extend SSD life
Hi Geektimes! If you bought an SSD and are interested in having a solid state drive last as long as possible, then welcome to cat.

Although OCZ provides a five-year warranty on Vector and Vertex SSDs, you can extend the life on your own. And without third-party utilities - only with the help of “Terminal” and other standard OS X tools.
Since SSDs have a limited number of rewriting cycles, it is important to protect the drive from additional wear, which is facilitated by caches, hibernation mode, swap file, and so on. These and many other processes can be optimized in the system and noticeably delay the time when the number of rewrite cycles approaches the maximum.
An important step towards optimizing OS X for working with SSDs. When hibernation is turned on, the RAM data is on the drive each time the computer is turned off. It is convenient if the laptop suddenly runs out of battery, but it also wears out the drive, especially the SSD. So after disabling hibernation, you will gain much more than you lose.
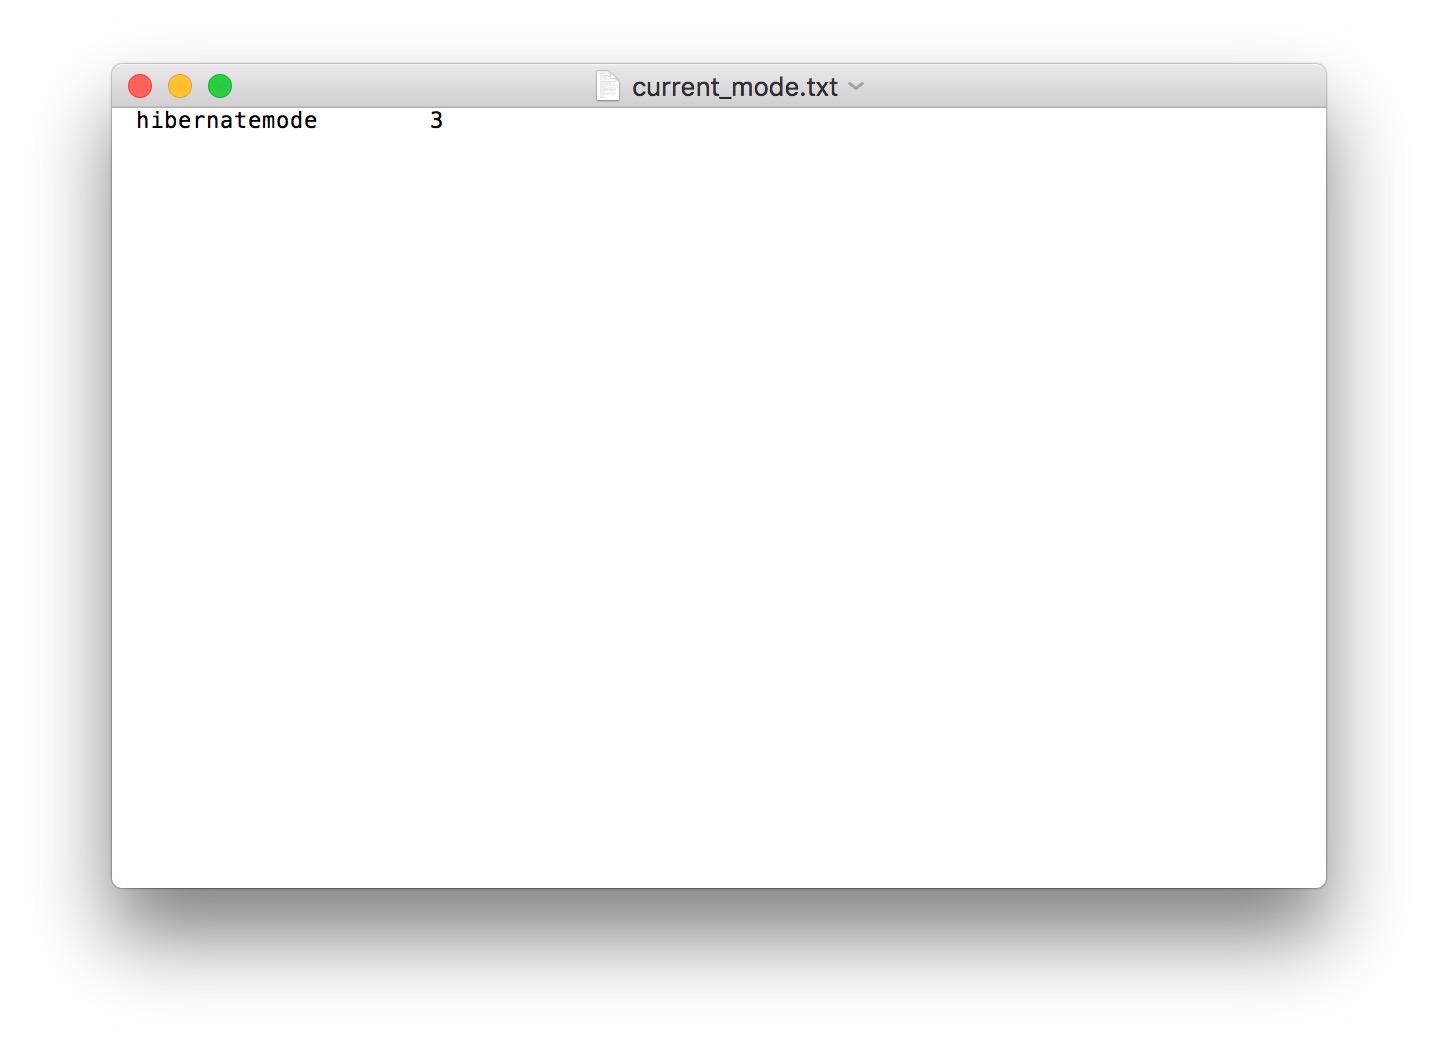
Open the “Terminal” and enter the command to check the hibernation mode:
Then be sure to enter the password for your account.

After that, a file with information will appear on the desktop that will later help you reactivate hibernation if you so wish.
Then we enter the command directly to turn off hibernation:
To reactivate it, you will need to change the value of the hibernatemode parameter from 0 to the number indicated in the current_mode.txt file (in our case, this is 3).
It remains only to delete the residual file using the command below, and then restart the Mac.
It is not recommended to trash SSD with garbage and small unimportant files, therefore it is better to remove all unnecessary from the drive. It’s best if you have both SSD and HDD installed on your Mac: then you can place the user's folder on the latter, thereby unloading the solid state drive.
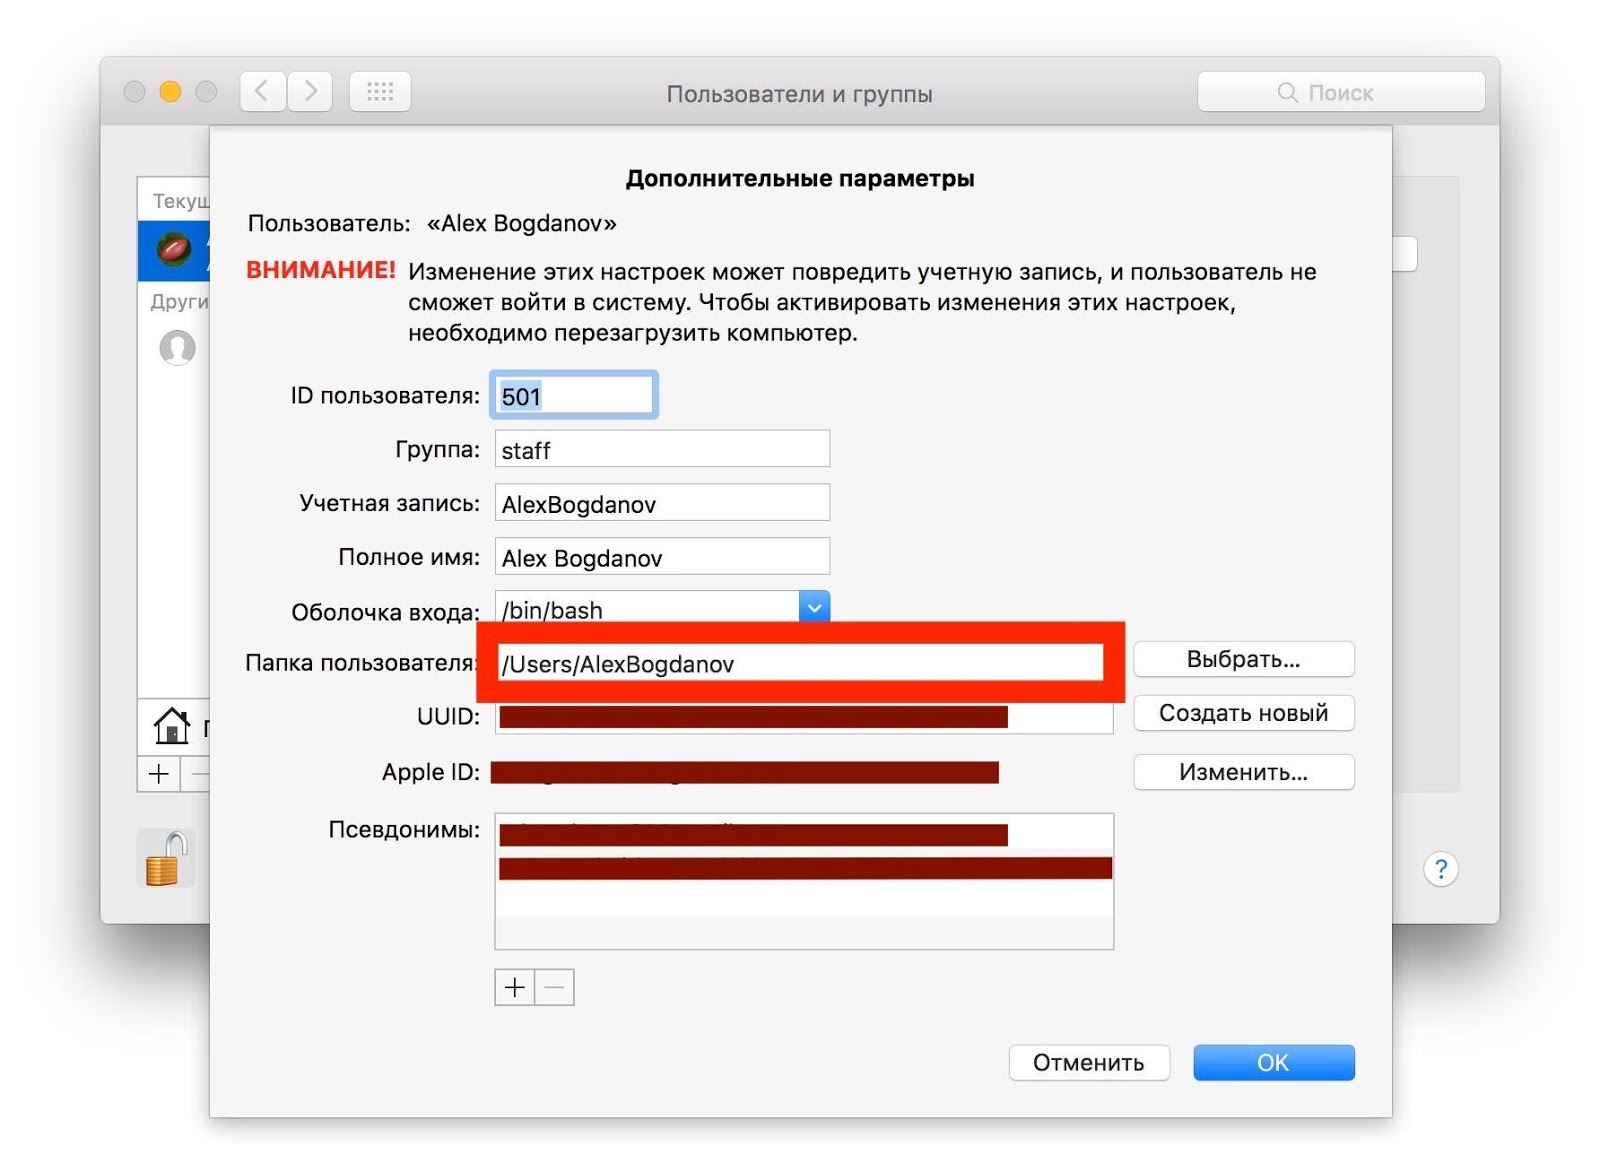
You can do this in the system settings. We open the "Users and groups" section, remove the password protection for the administrator and right-click on the user name, select "Advanced Settings".

In the "User folder" column, change the path to it and send it to the HDD.
Useful feature to reduce rewriting cycles. It writes the last access to the file to disk, and nothing critical will happen if you turn it off. But the SSD, on the contrary, will thank you.
In the folder / Library / LaunchDaemons / create the file com.hdd.noatime.plist with the following contents:
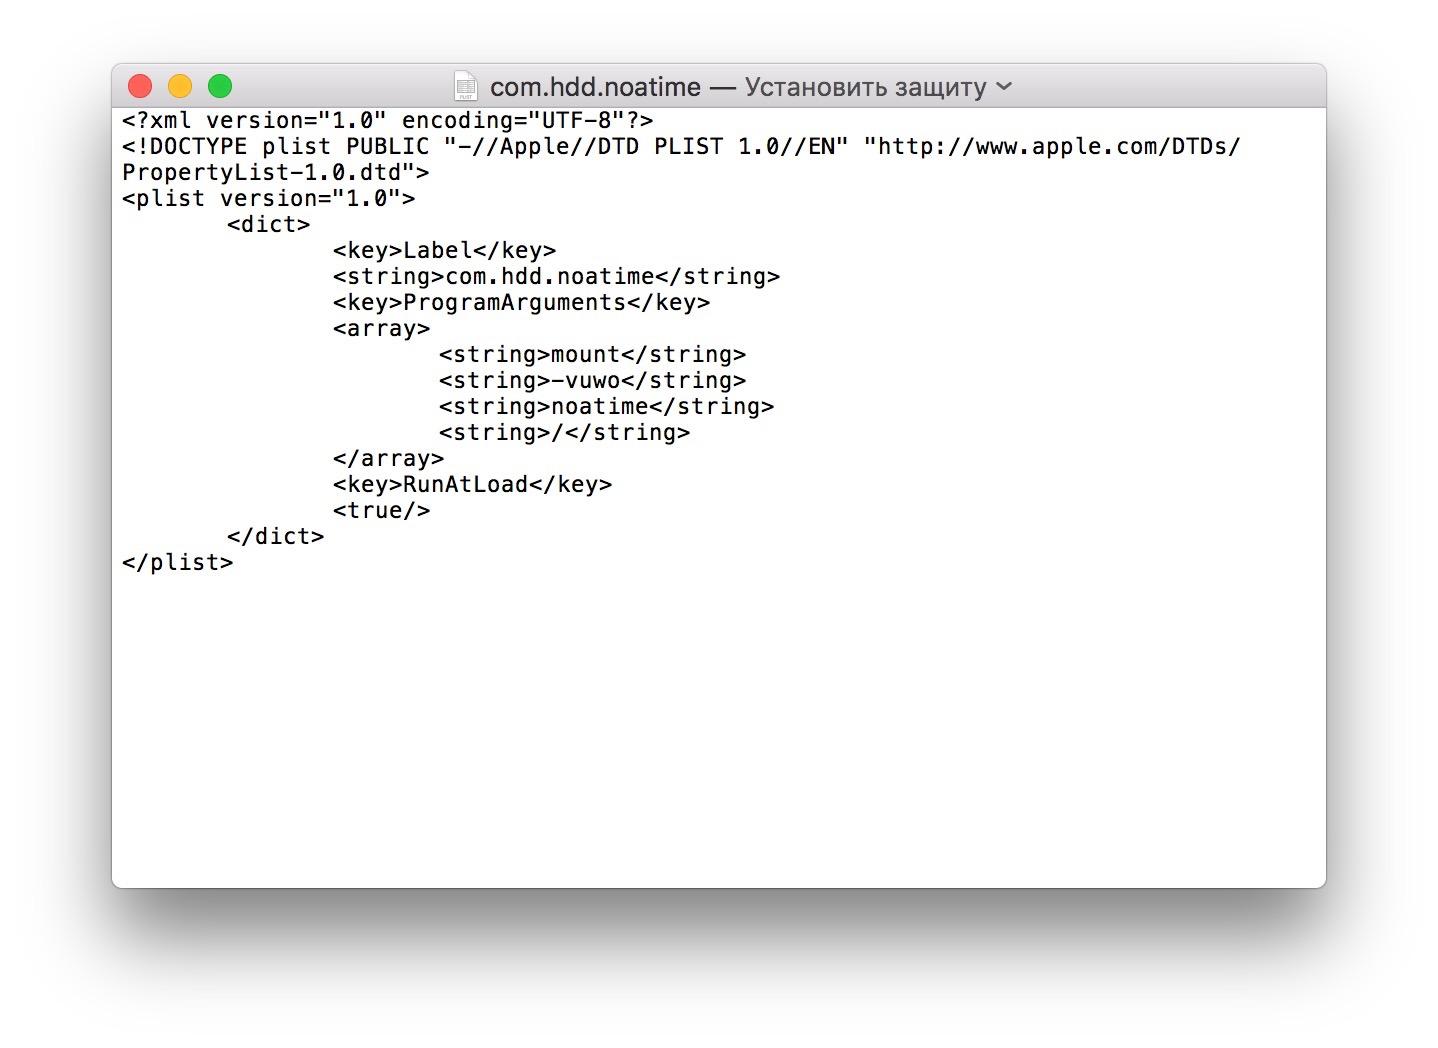
Remove protection from the file and give rights to it using this command:
We reboot the Mac and check the performance:
But this is only a small part of the ways to optimize OS X for SSDs.
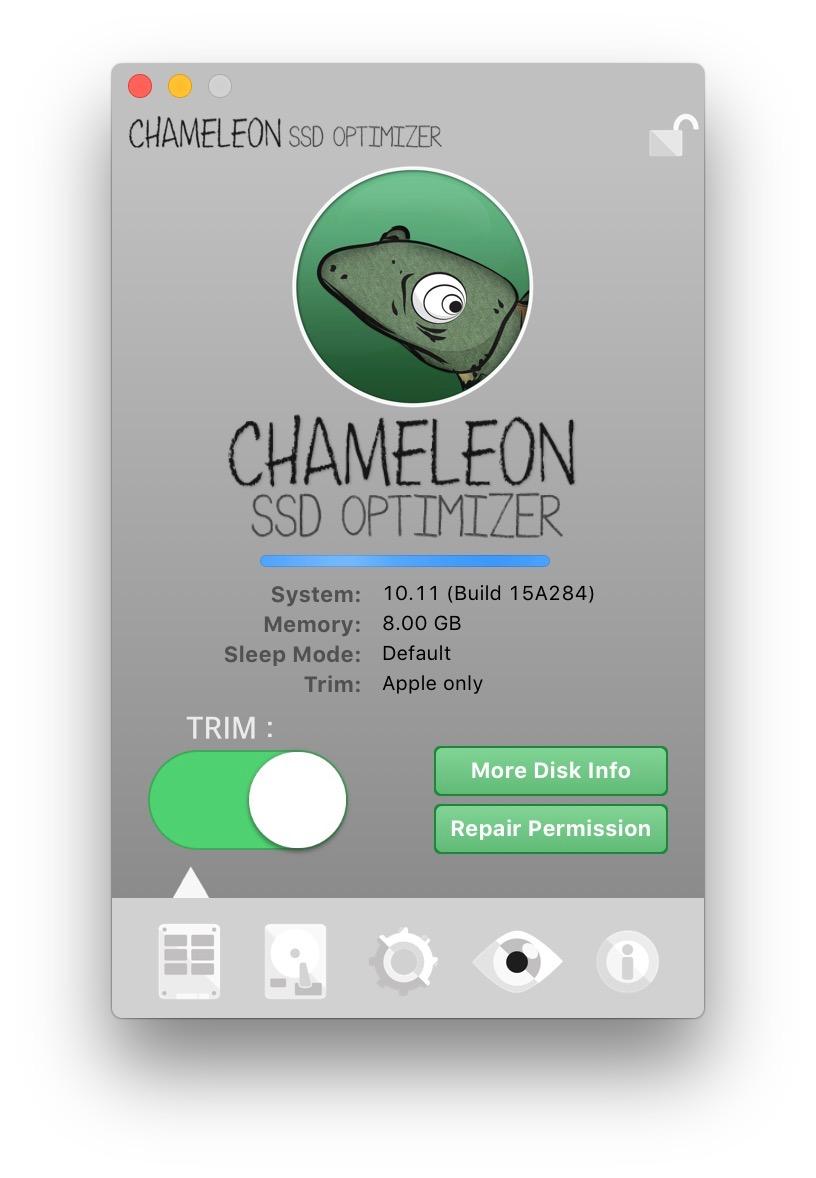
With the release of OS X El Capitan, many utilities have become available, including free ones that do a great job of activating TRIM by disabling the electronic signature of kernel extensions (.kext). We talked about some of them not so long ago, and the easiest to learn is Chameleon SSD Optimizer. Just download the program, run it and give it administrator rights, then activate TRIM and restart the computer. Perhaps the main advantage of this utility is that it is free.
Since SSDs are already characterized by low power consumption, you should not put them to sleep again. Even when the laptop is powered by a battery, turning on this function is not practical, so it’s better to turn it off in the “Energy Saving” section of the system settings, and to do this for both the battery and the network adapter.
And even more so, the Mac does not need to back up while in sleep mode - it does an excellent job of this in active mode. Turn off Power Nap when using power from the battery and AC adapter.
To increase the life of a solid-state drive, many people recommend disabling the default Spotlight search in OS X, since it indexes the contents of the drive and contributes to the wear and tear of the SSD. Modern drives, as a rule, are resistant to this and adapted to the use of a search tool, especially since many Mac owners cannot imagine their workflow without Spotlight. But caching in the browser, whether Safari or Chrome, is worth disconnecting. In Safari, the disconnect menu is located in the Design tab.
If you are sure that Spotlight greatly increases the load on the SSD, but you don’t want to remain without a search: go to the system settings - Spotlight and configure the search for certain categories, eliminating all unnecessary.
Oddly enough, the best way to extend the life of an SSD is to not litter it. Back up Time Machine once a day and clean up your computer of unnecessary files, especially those that the Mac categorizes as Other.

Where can they be stored? Alternatively, backups created by iTunes. Keep backups in the cloud, and it’s better to remove this from the computer. This also includes caches and temporary files, but they are much more convenient to clean with third-party utilities like CleanMyMac, DaisyDisk, MacClean and so on.
Forget about SMS - it was needed for the HDD and blocking the head of the disk, but the SSD does not have rotating elements, due to which they are noticeably more compact. This is an unnecessary service that does not affect the wear of a solid-state drive, but at the same time it is dead weight. The easiest way to disable it using the "Terminal":
You can check the Sudden Motion Sensor shutdown by another command:
You can enable SMS back by changing the value of the sms parameter from 0 to 1.
It is also important if you notice that a Mac with a solid state drive on board began to reboot for more than 15 seconds. Here again, “Terminal” comes to the rescue and one single command (you will need to enter the administrator password):
Prior to the release of OS X Mavericks, many Mac users with SSDs complained that the drive worked noticeably slower with encryption enabled. Then, when Apple transferred all its computers to solid state drives, the function was optimized and does not affect the system’s performance. Nevertheless, for the drive it’s unnecessary “nerves”, so if you are not an agent 007 or an employee of a state corporation, you can completely manage with a standard password.
If you do not have an additional disk for Time Machine backups, the system creates a backup directly to the SSD. This not only affects the wear of the drive itself, but takes up extra space on it. To disable the creation of local backups, just enter one command into the “Terminal”:
In general, many will agree that the "mortality" of SSDs from wear and tear is somewhat exaggerated - modern drives (including from OCZ) will last you a long time even if you follow basic principles, but many prefer to play it safe again and do it for good reason. If you encounter any problems with the disk, you can quickly identify them with the SSD Guru utility and find a solution.
Although OCZ provides a five-year warranty on Vector and Vertex SSDs, you can extend the life on your own. And without third-party utilities - only with the help of “Terminal” and other standard OS X tools.
Since SSDs have a limited number of rewriting cycles, it is important to protect the drive from additional wear, which is facilitated by caches, hibernation mode, swap file, and so on. These and many other processes can be optimized in the system and noticeably delay the time when the number of rewrite cycles approaches the maximum.
Disable hibernation
An important step towards optimizing OS X for working with SSDs. When hibernation is turned on, the RAM data is on the drive each time the computer is turned off. It is convenient if the laptop suddenly runs out of battery, but it also wears out the drive, especially the SSD. So after disabling hibernation, you will gain much more than you lose.
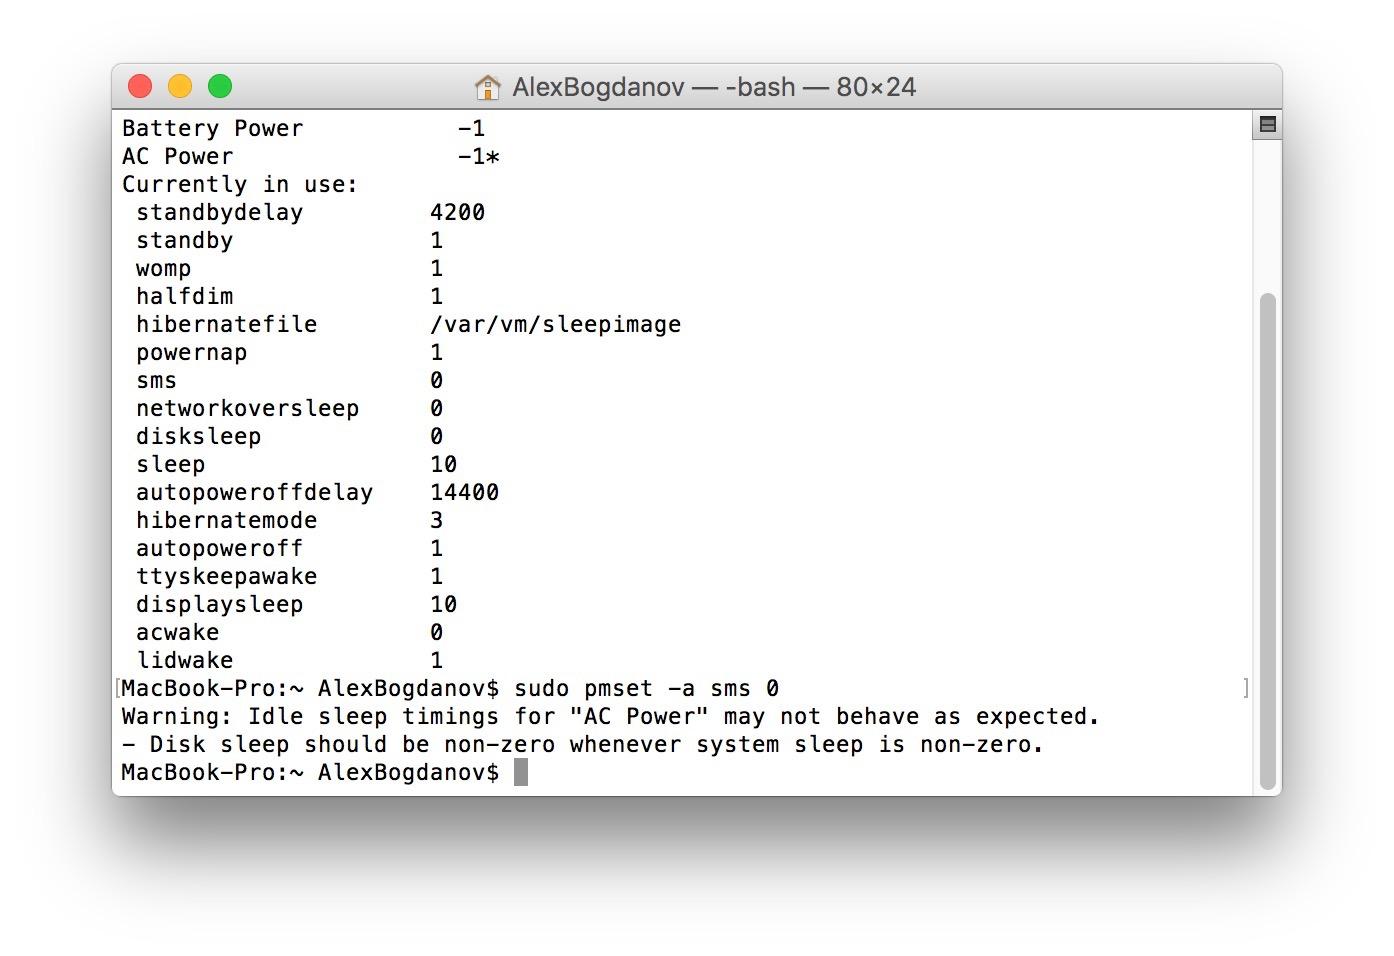
Open the “Terminal” and enter the command to check the hibernation mode:
sudo pmset -g | grep hibernatemode > ~/Desktop/current_mode.txtThen be sure to enter the password for your account.
After that, a file with information will appear on the desktop that will later help you reactivate hibernation if you so wish.
Then we enter the command directly to turn off hibernation:
sudo pmset -a hibernatemode 0To reactivate it, you will need to change the value of the hibernatemode parameter from 0 to the number indicated in the current_mode.txt file (in our case, this is 3).
It remains only to delete the residual file using the command below, and then restart the Mac.
sudo rm /private/var/vm/sleepimageTransfer files to HDD
It is not recommended to trash SSD with garbage and small unimportant files, therefore it is better to remove all unnecessary from the drive. It’s best if you have both SSD and HDD installed on your Mac: then you can place the user's folder on the latter, thereby unloading the solid state drive.
You can do this in the system settings. We open the "Users and groups" section, remove the password protection for the administrator and right-click on the user name, select "Advanced Settings".
In the "User folder" column, change the path to it and send it to the HDD.
Disabling noatime
Useful feature to reduce rewriting cycles. It writes the last access to the file to disk, and nothing critical will happen if you turn it off. But the SSD, on the contrary, will thank you.
In the folder / Library / LaunchDaemons / create the file com.hdd.noatime.plist with the following contents:
Label com.hdd.noatime ProgramArguments mount -vuwo noatime / RunAtLoad Remove protection from the file and give rights to it using this command:
sudo chown root:wheel /Library/LaunchDaemons/com.hdd.noatime.plistWe reboot the Mac and check the performance:
mount | grep noatimeBut this is only a small part of the ways to optimize OS X for SSDs.
Enabling TRIM
With the release of OS X El Capitan, many utilities have become available, including free ones that do a great job of activating TRIM by disabling the electronic signature of kernel extensions (.kext). We talked about some of them not so long ago, and the easiest to learn is Chameleon SSD Optimizer. Just download the program, run it and give it administrator rights, then activate TRIM and restart the computer. Perhaps the main advantage of this utility is that it is free.
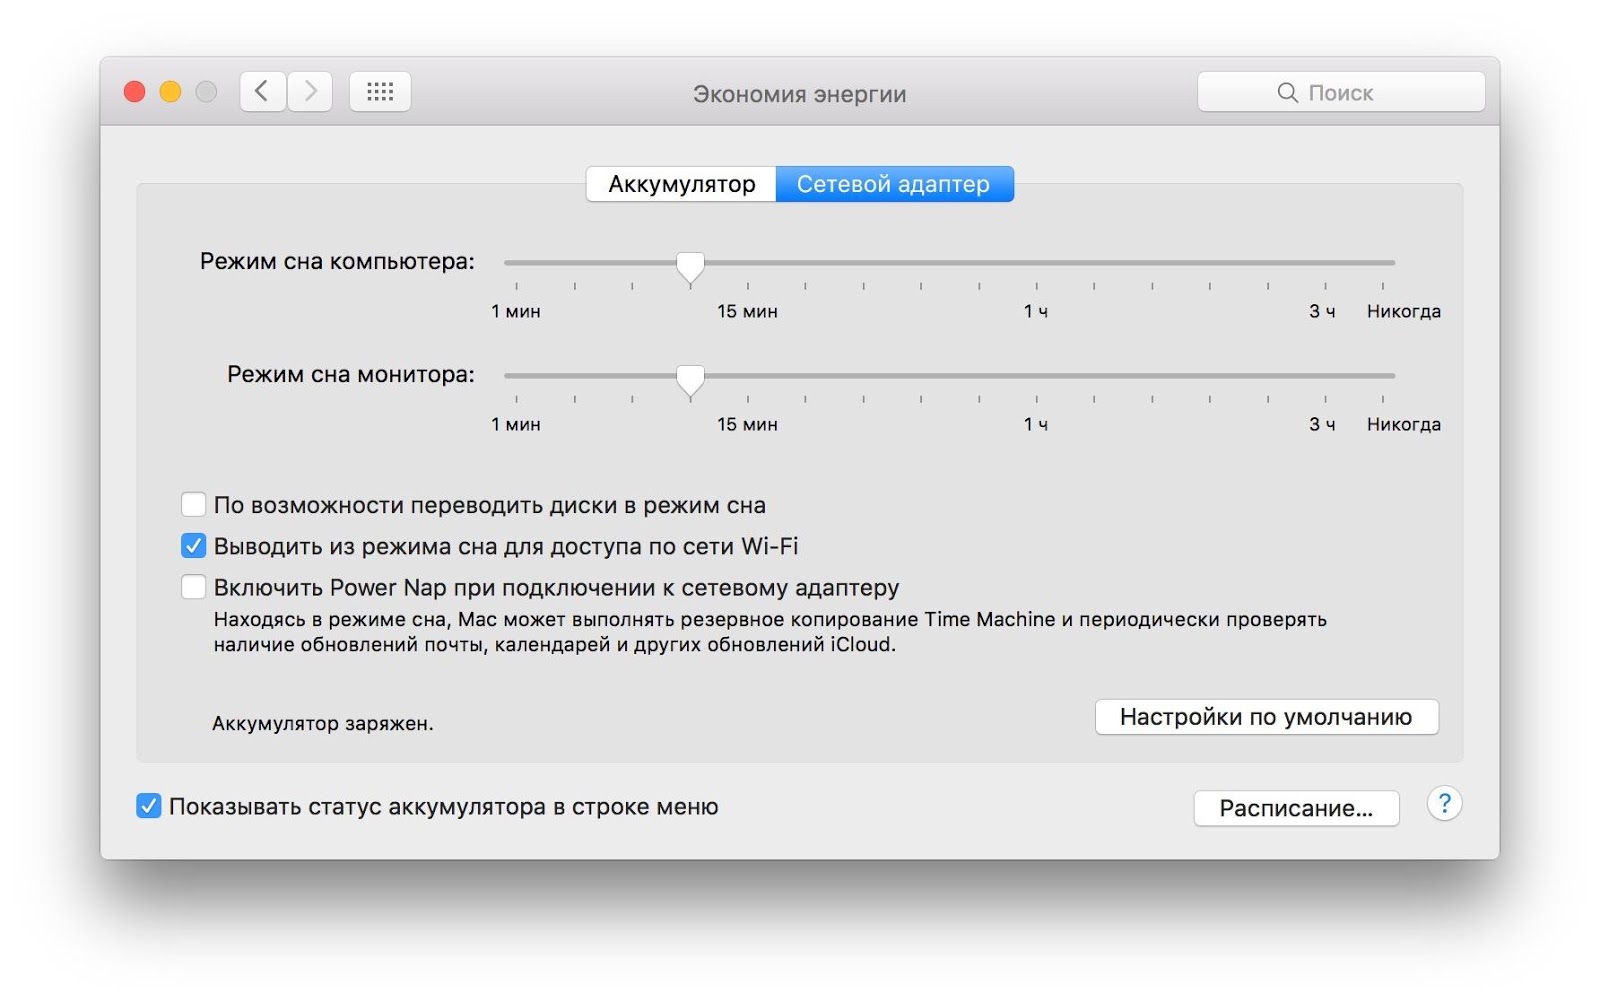
Drives, do not sleep!
Since SSDs are already characterized by low power consumption, you should not put them to sleep again. Even when the laptop is powered by a battery, turning on this function is not practical, so it’s better to turn it off in the “Energy Saving” section of the system settings, and to do this for both the battery and the network adapter.
And even more so, the Mac does not need to back up while in sleep mode - it does an excellent job of this in active mode. Turn off Power Nap when using power from the battery and AC adapter.
Turn off caching
To increase the life of a solid-state drive, many people recommend disabling the default Spotlight search in OS X, since it indexes the contents of the drive and contributes to the wear and tear of the SSD. Modern drives, as a rule, are resistant to this and adapted to the use of a search tool, especially since many Mac owners cannot imagine their workflow without Spotlight. But caching in the browser, whether Safari or Chrome, is worth disconnecting. In Safari, the disconnect menu is located in the Design tab.
If you are sure that Spotlight greatly increases the load on the SSD, but you don’t want to remain without a search: go to the system settings - Spotlight and configure the search for certain categories, eliminating all unnecessary.
Keep the disc clean
Oddly enough, the best way to extend the life of an SSD is to not litter it. Back up Time Machine once a day and clean up your computer of unnecessary files, especially those that the Mac categorizes as Other.
Where can they be stored? Alternatively, backups created by iTunes. Keep backups in the cloud, and it’s better to remove this from the computer. This also includes caches and temporary files, but they are much more convenient to clean with third-party utilities like CleanMyMac, DaisyDisk, MacClean and so on.
Disabling Sudden Motion Sensor
Forget about SMS - it was needed for the HDD and blocking the head of the disk, but the SSD does not have rotating elements, due to which they are noticeably more compact. This is an unnecessary service that does not affect the wear of a solid-state drive, but at the same time it is dead weight. The easiest way to disable it using the "Terminal":
sudo pmset -a sms 0You can check the Sudden Motion Sensor shutdown by another command:
-sudo pmset -gYou can enable SMS back by changing the value of the sms parameter from 0 to 1.
Clearing the boot cache
It is also important if you notice that a Mac with a solid state drive on board began to reboot for more than 15 seconds. Here again, “Terminal” comes to the rescue and one single command (you will need to enter the administrator password):
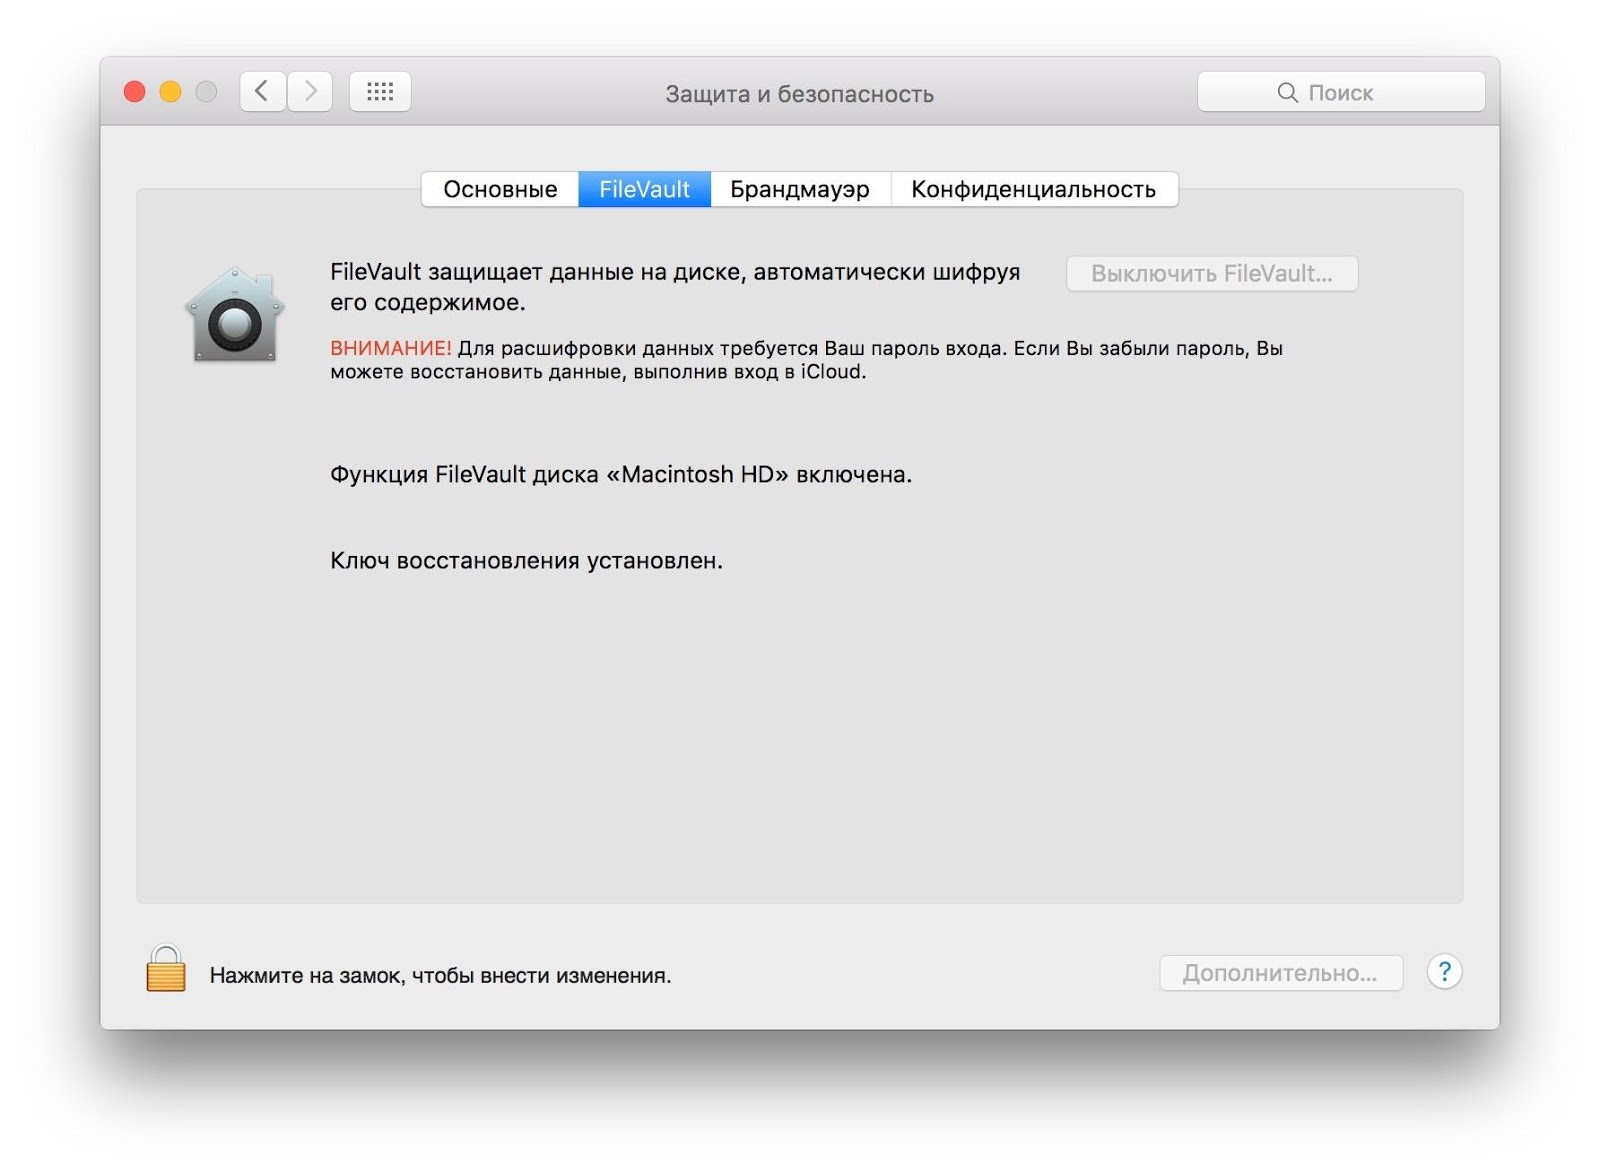
sudo kextcache -system-cachesDisabling FileVault
Prior to the release of OS X Mavericks, many Mac users with SSDs complained that the drive worked noticeably slower with encryption enabled. Then, when Apple transferred all its computers to solid state drives, the function was optimized and does not affect the system’s performance. Nevertheless, for the drive it’s unnecessary “nerves”, so if you are not an agent 007 or an employee of a state corporation, you can completely manage with a standard password.
Disabling Local Time Machine
If you do not have an additional disk for Time Machine backups, the system creates a backup directly to the SSD. This not only affects the wear of the drive itself, but takes up extra space on it. To disable the creation of local backups, just enter one command into the “Terminal”:
sudo tmutil disable localIs it necessary?
In general, many will agree that the "mortality" of SSDs from wear and tear is somewhat exaggerated - modern drives (including from OCZ) will last you a long time even if you follow basic principles, but many prefer to play it safe again and do it for good reason. If you encounter any problems with the disk, you can quickly identify them with the SSD Guru utility and find a solution.