Work of the “Master Kit” modules in the OpenHAB home automation control system. Part 3: Real time clock
Continuation of the work of the modules of the Master Kit in the OpenHAB home automation control system (beginning here and here ).
This short article started by asking myself a question: if I don’t have a permanently connected Internet in my country house, then where does OpenHAB get the time and date information from?
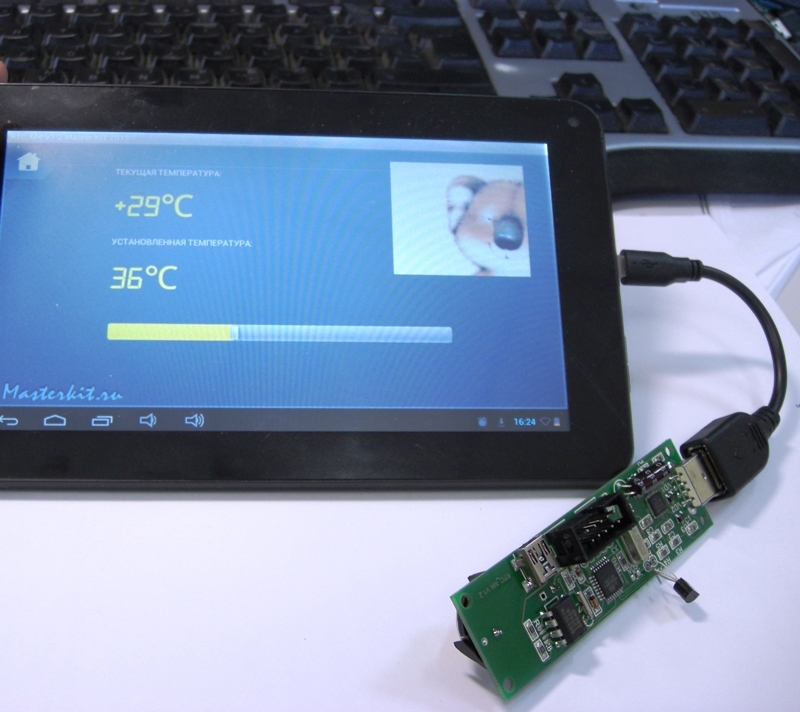
Real-time clock (RTC) class devices immediately came to my mind and among them I chose the little-known MK8900 module with a USB connection. It was the ability to plug it simply into a USB port that seemed to me the most attractive, unlike the need to be wise with Arduino.
The convenience of a USB connection coincided with the plan for mastering Serial Binding in OpenHAB. The module has a temperature sensor, a thermostat and the ability to twitch a few legs of the microcontroller (GPIO), but today this is not the main thing. I fired up on the development of the ability to connect devices through the COM port.
I’ll run ahead and say, in the process of mastering, I learned:
- to control the device and receive a response from it;
- it’s quite simple to pull out the time, date, temperature from the response line;
- display these values in the appropriate fields
So, the first thing to remember is to put the org.openhab.binding.serial-1.7.1.jar file in the C: \ OpenHab \ addons folder, this will save you several hours trying to figure out why nothing works (a bitter joke). Next, you should connect the module to the computer and in the Device Manager of the Windows Control Panel see the port number, which was formed at the same time. I got a lucky number COM5. If your computer does not see the device, then you need to install the Silicon Labs CP210x USB to UART driver for your operating system.
In .sitemap I did not do anything, in the .cfg configuration as well. Additions appeared only in the files testdrive.items and testdrive.rules. The
screen of the test configuration began to look like this:
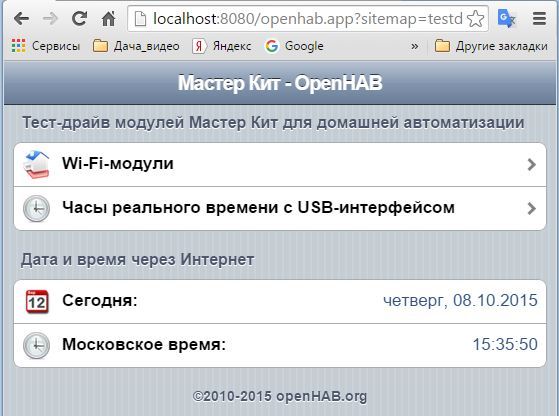
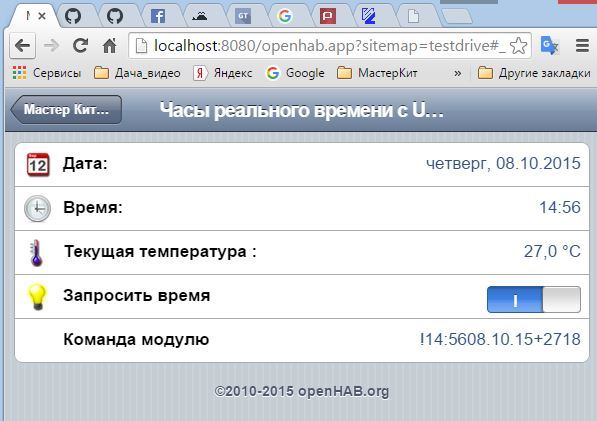
And if you enter the section "Real-time clock", then the picture is such
FilesYou can take the test configuration on the Download tab.
Details:
In .items I added a few lines that created a new group for the clock in my interface and several elements:
Group RTC (All) // Create a page for the MK8900 real-time clock
DateTime Date_RTC “Date : [% 1 $ tA,% 1 $ td.% 1 $ tm.% 1 $ tY] ”(RTC)
DateTime Time_RTC“ Time: [% tR] ”(RTC)
Number MK8900_T“ Current temperature: [% .1f ° C] ”(RTC)
Switch Get_Time“ Request Time ”(RTC)
String Serial_string“ Command / response module: [% s] ”(RTC) {serial =“ COM5 ”}
Here is this complex string: “ Date: [% 1 $ tA,% 1 $ td.% 1 $ tm.% 1 $ tY] ” just sets the date output format: Day of the week, day.month.year. And this: “Time: [% tR]”displays time. The most attentive ones will notice that the time received via the Internet is displayed differently “Moscow time: [% tT]” . I specifically replaced the letter T with R in the format in the expression [% tR], since “T” displays seconds, and “R” generates output without seconds. This is what I need, since the MK8900 module does not give out information about seconds.
The rest are ordinary elements, but note Serial_string has a binding setting
{serial = ”COM5”}.It turned out that this is enough for the exchange via USB to work. It is this line element that will transmit commands to the module and receive a response from it. You can not show it in the interface, but I left the process of exchanging information with the clock for clarity. The values of all other fields are filled (updated) as a result of the Rules.
The first rule is simple - you need to request information from the module. The easiest way to do this is with the command! GetA
rule "Get_Time ON"
when
Item Get_Time received command
then
if (receivedCommand == ON) Serial_string.sendCommand ("! GetA \ r")
end
In this example, I request information “manually” using the Switch Get_Time element and get a response in the format:! 14: 5608.10.15 + 2718 It can be seen that the line has time, date, current temperature and even thermostat setting (18), but we are not using it now.
The second rule will parse the response and display information in the appropriate fields, it looks like this:
rule "MK8900 sends to Openhab"
when
Item Serial_string changed
then
msg = Serial_string.state.toString.trim
var String time_rtc = ""
if (msg.contains ( ":")) {
time_rtc = "20" + (msg.mid (12,2)) + "-" + (msg.mid (9,2)) + "-" + (msg.mid (6,2) )) + "T" + msg.mid (1,5) + ": 00"
println ("time_rtc --->
postUpdate (Date_RTC, time_rtc)
postUpdate (MK8900_T, msg.mid (14.3))
}
end
Warning! Be sure to declare the msg variable global. This is done by placing the string Var String msg = "" at the beginning of the .rules file between the import blocks ... and the first rule rule ... Remember to do this.
Now the most interesting thing is that this line intercepts the response of the module:
msg = Serial_string.state.toString.trim Decrypts as the state of the Serial_string element in the string type and remove insignificant spaces in front. The condition if (msg.contains (":")) (if the answer contains a colon, then) I use so that only the response of the module gets to the processing, and not the commands themselves.
After the first answer of the module, we get msg =! 14: 5608.10.15 + 2718We cannot immediately use this line for processing, since a field of type DateTime understands a format of this kind: 2015-10-08T16: 41: 00 . I spied it in the OpenHAB monitor on the records of updating the date and time over the network.

I reasoned, if you convert the line! 14: 5608.10.15 + 2718 to a line of the form 2015-10-08T16: 41: 00, then with high probability I will be able to display information in my real-time clock fields. To do this, take another empty variable, already local, only for this rule: var String time_rtc = "". Then I start collecting the date format I need in this way:
time_rtc = "20" + (msg.mid (12,2)) + "-" + (msg.mid (9,2)) + "-" + (msg.mid (6,2)) + "T" + msg.mid (1,5) + ": 00"
The logic of constructing this expression is this: I need a year in the form of “2015”, so I take 20, put it in quotation marks, which means that exactly 20 will fall into the final value. Then I already take the information from the answer of the module (msg.mid (12,2)), which means from the 12th place to take a segment of 2 characters. The countdown starts at zero, in its place we have a “!”. This is 15 and in total it will be 2015. Then I add a dash and 2 digits, starting from the 9th place (this is the month), again a dash, 2 digits of the number, etc. until you get the line I need.
By the way, it turned out to be very convenient for debugging to use this line in the code of the rule: println ("time_rtc --->" + time_rtc) Then in the monitor you will see the result that you get. See the line --->?

It remains only to update the information in the fields I need:
postUpdate (Time_RTC, time_rtc)
postUpdate (Date_RTC, time_rtc)
postUpdate (MK8900_T, msg.mid (14.3))
I update the “entry” temperature, immediately pull out the characters I need. True, there is a problem with the display of the plus sign. But let this be your challenge. The second task could be an automatic survey of hours with a given period, I think this is not the most difficult rule, taking into account the material covered.
Good luck!
This short article started by asking myself a question: if I don’t have a permanently connected Internet in my country house, then where does OpenHAB get the time and date information from?
Real-time clock (RTC) class devices immediately came to my mind and among them I chose the little-known MK8900 module with a USB connection. It was the ability to plug it simply into a USB port that seemed to me the most attractive, unlike the need to be wise with Arduino.
The convenience of a USB connection coincided with the plan for mastering Serial Binding in OpenHAB. The module has a temperature sensor, a thermostat and the ability to twitch a few legs of the microcontroller (GPIO), but today this is not the main thing. I fired up on the development of the ability to connect devices through the COM port.
I’ll run ahead and say, in the process of mastering, I learned:
- to control the device and receive a response from it;
- it’s quite simple to pull out the time, date, temperature from the response line;
- display these values in the appropriate fields
So, the first thing to remember is to put the org.openhab.binding.serial-1.7.1.jar file in the C: \ OpenHab \ addons folder, this will save you several hours trying to figure out why nothing works (a bitter joke). Next, you should connect the module to the computer and in the Device Manager of the Windows Control Panel see the port number, which was formed at the same time. I got a lucky number COM5. If your computer does not see the device, then you need to install the Silicon Labs CP210x USB to UART driver for your operating system.
In .sitemap I did not do anything, in the .cfg configuration as well. Additions appeared only in the files testdrive.items and testdrive.rules. The
screen of the test configuration began to look like this:
And if you enter the section "Real-time clock", then the picture is such
FilesYou can take the test configuration on the Download tab.
Details:
In .items I added a few lines that created a new group for the clock in my interface and several elements:
Group RTC (All) // Create a page for the MK8900 real-time clock
DateTime Date_RTC “Date : [% 1 $ tA,% 1 $ td.% 1 $ tm.% 1 $ tY] ”(RTC)
DateTime Time_RTC“ Time: [% tR] ”(RTC)
Number MK8900_T“ Current temperature: [% .1f ° C] ”(RTC)
Switch Get_Time“ Request Time ”(RTC)
String Serial_string“ Command / response module: [% s] ”(RTC) {serial =“ COM5 ”}
Here is this complex string: “ Date: [% 1 $ tA,% 1 $ td.% 1 $ tm.% 1 $ tY] ” just sets the date output format: Day of the week, day.month.year. And this: “Time: [% tR]”displays time. The most attentive ones will notice that the time received via the Internet is displayed differently “Moscow time: [% tT]” . I specifically replaced the letter T with R in the format in the expression [% tR], since “T” displays seconds, and “R” generates output without seconds. This is what I need, since the MK8900 module does not give out information about seconds.
The rest are ordinary elements, but note Serial_string has a binding setting
{serial = ”COM5”}.It turned out that this is enough for the exchange via USB to work. It is this line element that will transmit commands to the module and receive a response from it. You can not show it in the interface, but I left the process of exchanging information with the clock for clarity. The values of all other fields are filled (updated) as a result of the Rules.
The first rule is simple - you need to request information from the module. The easiest way to do this is with the command! GetA
rule "Get_Time ON"
when
Item Get_Time received command
then
if (receivedCommand == ON) Serial_string.sendCommand ("! GetA \ r")
end
In this example, I request information “manually” using the Switch Get_Time element and get a response in the format:! 14: 5608.10.15 + 2718 It can be seen that the line has time, date, current temperature and even thermostat setting (18), but we are not using it now.
The second rule will parse the response and display information in the appropriate fields, it looks like this:
rule "MK8900 sends to Openhab"
when
Item Serial_string changed
then
msg = Serial_string.state.toString.trim
var String time_rtc = ""
if (msg.contains ( ":")) {
time_rtc = "20" + (msg.mid (12,2)) + "-" + (msg.mid (9,2)) + "-" + (msg.mid (6,2) )) + "T" + msg.mid (1,5) + ": 00"
println ("time_rtc --->
postUpdate (Date_RTC, time_rtc)
postUpdate (MK8900_T, msg.mid (14.3))
}
end
Warning! Be sure to declare the msg variable global. This is done by placing the string Var String msg = "" at the beginning of the .rules file between the import blocks ... and the first rule rule ... Remember to do this.
Now the most interesting thing is that this line intercepts the response of the module:
msg = Serial_string.state.toString.trim Decrypts as the state of the Serial_string element in the string type and remove insignificant spaces in front. The condition if (msg.contains (":")) (if the answer contains a colon, then) I use so that only the response of the module gets to the processing, and not the commands themselves.
After the first answer of the module, we get msg =! 14: 5608.10.15 + 2718We cannot immediately use this line for processing, since a field of type DateTime understands a format of this kind: 2015-10-08T16: 41: 00 . I spied it in the OpenHAB monitor on the records of updating the date and time over the network.
I reasoned, if you convert the line! 14: 5608.10.15 + 2718 to a line of the form 2015-10-08T16: 41: 00, then with high probability I will be able to display information in my real-time clock fields. To do this, take another empty variable, already local, only for this rule: var String time_rtc = "". Then I start collecting the date format I need in this way:
time_rtc = "20" + (msg.mid (12,2)) + "-" + (msg.mid (9,2)) + "-" + (msg.mid (6,2)) + "T" + msg.mid (1,5) + ": 00"
The logic of constructing this expression is this: I need a year in the form of “2015”, so I take 20, put it in quotation marks, which means that exactly 20 will fall into the final value. Then I already take the information from the answer of the module (msg.mid (12,2)), which means from the 12th place to take a segment of 2 characters. The countdown starts at zero, in its place we have a “!”. This is 15 and in total it will be 2015. Then I add a dash and 2 digits, starting from the 9th place (this is the month), again a dash, 2 digits of the number, etc. until you get the line I need.
By the way, it turned out to be very convenient for debugging to use this line in the code of the rule: println ("time_rtc --->" + time_rtc) Then in the monitor you will see the result that you get. See the line --->?
It remains only to update the information in the fields I need:
postUpdate (Time_RTC, time_rtc)
postUpdate (Date_RTC, time_rtc)
postUpdate (MK8900_T, msg.mid (14.3))
I update the “entry” temperature, immediately pull out the characters I need. True, there is a problem with the display of the plus sign. But let this be your challenge. The second task could be an automatic survey of hours with a given period, I think this is not the most difficult rule, taking into account the material covered.
Good luck!