Analysis of the VIPER architecture on the example of a small iOS application on Swift 4
- Tutorial
"Everyone has their own VIPER." author unknownIn this article, I would like to consider the VIPER architecture with a small concrete example, which at the same time showed the full power of this architecture and was written on the latest Swift 4 . For those who want to immediately look at the code without reading the entire article, the link to the rap is at the very bottom.

Table of contents
- Introduction
- Chapter 0. VIPER Architecture Scheme
- Chapter 1. An example of a very simple module
- Chapter 2. An example of a more complex module
- Conclusion
- Repository Link
Introduction
Quite a lot has already been written about the architecture of VIPER , including on the hub ( 1 , 2 ).
Therefore, developers needed a different architecture, which would be more or less flexible, consistent with SOLID principles (especially the " principle of sole responsibility ") and clean architecture ( review in Russian ).
Rambler picked up this topic and dedicated a whole conference to it and even wrote a book. By the way, if you are not familiar with VIPER, I would recommend reading this particular book as an introduction to architecture. It is well described and chewed for what this VIPER is needed for and how it appeared. The book also discusses the problems of the classic VIPER, and what Rambler developers have changed a bit in it. Unfortunately, the book was written in 2016 and the examples in it are on Objective-C , as well as their open source project , which at the time of this writing was not compiled and in general seemed too complicated for the first study. The project is hung with many additional things, excessive abstraction and too many classes. Which at first glance may seem too complex and repulsive.
Therefore, I wrote a small application " Currency Converter" на VIPER архитектуре, чтобы показать, что нужно писать в каждом слое и какие правила задаются для каждого слоя. Сразу следует сказать, что я использовал не т.н. классический VIPER, а его немного модифицированную версию, вдохновившись опытом Rambler и по их примеру.
Попрошу сильно не придираться, если стилистически на Swift что-то можно было написать более элегантно. Все же статья про архитектуру, а не про красоту самого Swift. Также я намеренно не стал использовать сторонние библиотеки и зависимости. Весь пример написан, используя только родные для iOS библиотеки.
Глава 0. Схема архитектуры VIPER
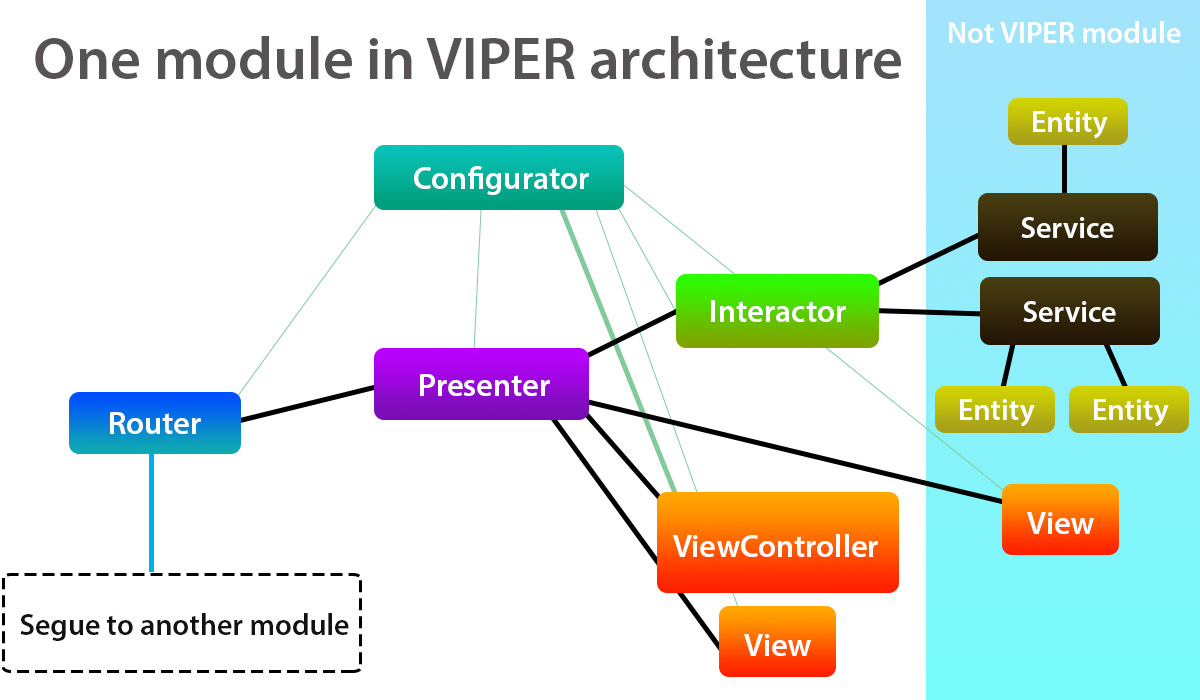
We’ll run a quick run on VIPER principles. One screen or more precisely one view controller must correspond to one module in VIPER. If in general, then VIPER is designed to break the long-suffering view controller into many layers, where everyone will fulfill their role. Schematically, the connection inside the module is shown in the figure below.
You have probably seen other schemes.
This, for example: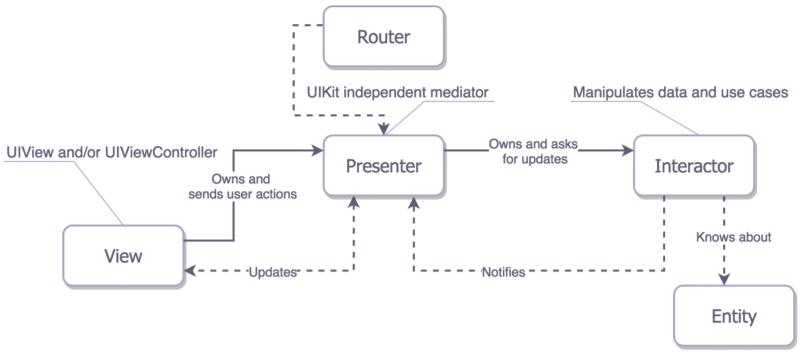
Each letter from the abbreviation VIPER on it means something: V iew– I nteractor– P resenter– E ntity– R outer. But the reality is that not only these components are included in the module, and Entity in general may not be included in the concept of a module, because is a self-contained class that can be used in any module or service. On complex screens, the module can be divided into submodules, where each will have its own presenters and interactors.
Unlike the classic VIPER, mine does not have a Wireframe , because it performed 2 roles: it assembled the module and switched to another screen (module). The diagram shows that Configurator will be responsible for the assembly of the module., and for the Router transitions . I adopted this logic from Rambler, with the only difference being that they have Assembly instead of Configurator . But the essence is the same. Configurator is aware of all the dependencies within the module. It states that the ViewController will have a Presenter , the Presenter will have an Interactor , etc. It will be considered in more detail later in the example. Also in the classic VIPER, Segue was abandoned , so you can not use storyboards to switch between screens. In our case, like Rambler, transitions through Segue
работают и являются рекомендуемыми для использования, как того хотела Apple.
Так уж получилось, что на 100% пассивную View из вьюконтроллера сделать не получится. Сама Apple заложила для нее определенную роль со своим циклом жизни и вызываемыми методами (viewDidLoad, viewDidAppear и др.), поэтому мы должны это учитывать и строить свою архитектуру, исходя из этого. Сборка модуля запускается из viewDidLoad, когда вьюконтроллер уже загрузился, а не просто инициализировался. Также это дает нам возможность задавать Initial View Controller из сториборда, а не в AppDelegateas is done in the classic version. This is much more convenient, because there is no rigid binding to any particular entry point, and it can be easily changed.
After the assembly of the module, the further behavior of the module is quite classic. View / ViewController is not responsible for the logic of button clicks, text input, or any other interaction with the UI . All this is immediately transferred to Presenter . View can be as part of a module, or be a common View , and used in different modules.
Presenter decides whether to redirect the action to Router or Interactor . Routerwill either close the current screen or open a new one. The specific implementation of the transition is carried out in it. Interactor decides what to do next with the received events and which service to call. It contains the logic of the module.
But a more important function of Presenter is the preparation and transmission of visual data for the View / ViewController , which will be visible to the user. Presenter is the heart of our module, it knows what data will be displayed and in what form. Even on different schemes, it is always in the middle. (And Interactor , probably by brains)
Interactor is a facade for other services. also Interactor может и сам содержать логику. В MVC его можно сравнить с контроллером, но который ничего не знает о том, как будут отображаться данные.
Сервисом в нашей интерпретации называются различные хелперы и другие классы, которые могут быть доступны из разных модулей и частей приложения (логика авторизации, работа с базой, работа с сервером, шифрование и т.п.). Сервисы могут взаимодействовать друг с другом и с Entity. Entity – это просто пассивные сущности (пользователь, книга, слово). Как и говорили ранее, Entity не является компонентом модуля VIPER. Вообще, изначально архитектура называлась VIP.
Если вы ничего не поняли, не беда. Дальше на примере все станет ясно, это было лишь поверхностное описание.
Chapter 1. An example of a very simple module
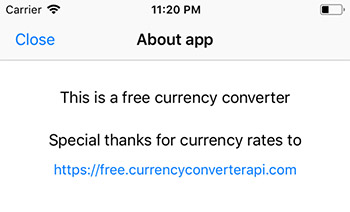 Oddly enough, I will not begin to consider architecture from the first more complex screen, but from the “About Application” screen , which is very simple. The screen itself has a couple of labels, a “Close” button and a button with a link to the site. When you click on "Close" the current screen will close and the previous main screen will be displayed, and when you click on the link it will open in Safari. Labels are passive and don't change.
 Such screens in the application do not show all the power and need of VIPER, because you could place everything in the ViewControlleras some might think. But the ideology of pure architecture contradicts this principle, therefore even the simplest screen and even the simplest application can and should be written on the VIPER architecture. You must adhere to the rules always.
It is advisable to choose the module names short, because inside the module for classes additional words will be added to this name. For example, the “About Application” module is called About . The view controller will be called AboutViewController . The remaining classes are AboutPresenter , AboutInteractor , AboutConfigurator , etc.
If the initialization of the module begins with the view controller, then consider the module must begin with it. Create the classes AboutViewController and AboutConfigurator . The AboutConfigurator class must conform to the AboutConfiguratorProtocol protocol and will have only one method:
protocol AboutConfiguratorProtocol: class {
    func configure(with viewController: AboutViewController)
}
class AboutConfigurator: AboutConfiguratorProtocol {
    func configure(with viewController: AboutViewController) {
    }
}
In the future, inside this method, I will configure the module. AboutViewController will have a configurator property that will be configured in viewDidLoad , and a presenter property that will conform to the AboutPresenterProtocol protocol .
Important rule! All components communicate with each other only through protocols, and not directly! This is necessary to write unit tests in the future and to keep the code clean as a whole.
AboutPresenterProtocol must contain the configureView () method , which will initialize and configure the initial data for the visual elements in the view controller. At this stageAboutViewController will look like this:
class AboutViewController: UIViewController {
    var presenter: AboutPresenterProtocol!
    let configurator: AboutConfiguratorProtocol = AboutConfigurator()
    override func viewDidLoad() {
        super.viewDidLoad()
        configurator.configure(with: self)
        presenter.configureView()
    }
}
Presenter will also have a router and methods that will be called when you click on the "Close" button and a button with a link to the site. AboutPresenterProtocol will look like this:
protocol AboutPresenterProtocol: class {
    var router: AboutRouterProtocol! { set get }
    func configureView()
    func closeButtonClicked()
    func urlButtonClicked(with urlString: String?)
}
This module is very simple, so the whole configuration of the view controller will be that the signature for the button with the URL will be set from the code, and not from the visual editor. For AboutViewController, such a protocol:
protocol AboutViewProtocol: class {
    func setUrlButtonTitle(with title: String)
}
Inside AboutPresenter, we implement the method:
func configureView() {
     view.setUrlButtonTitle(with: interactor.urlRatesSource)
}
Now the turn came up and the interactor. Logic and data storage / retrieval should always be transferred there. In our case, the interactor will have a property that will store the site URL and a method that will open this URL :
protocol AboutInteractorProtocol: class {
    var urlRatesSource: String { get }
    func openUrl(with urlString: String)
}
But what about handling the event of clicking the Close button , you might think? Here, the presenter decides that this event is associated with the transition between screens, so processing will be transmitted to the router. For this module, the router can only close the current view controller.
His protocol:
protocol AboutRouterProtocol: class {
    func closeCurrentViewController()
}
And the presenter protocol will look like this:
protocol AboutPresenterProtocol: class {
    var router: AboutRouterProtocol! { set get }
    func configureView()
    func closeButtonClicked()
    func urlButtonClicked(with urlString: String?)
}
Now that we have all the described protocols for the components of the VIPER module, let's move on to the implementation of these methods. Do not forget to add that the view controller complies with the AboutViewProtocol protocol . I will not describe how to associate a button from a storyboard with a property of a view controller and assign events to clicking on them, so I will immediately write the methods of the view controller:
@IBOutlet weak var urlButton: UIButton!
@IBAction func closeButtonClicked(_ sender: UIBarButtonItem) {
    presenter.closeButtonClicked()
}
@IBAction func urlButtonClicked(_ sender: UIButton) {
    presenter.urlButtonClicked(with: sender.currentTitle)
}
func setUrlButtonTitle(with title: String) {
    urlButton.setTitle(title, for: .normal)
}
The view controller has no idea what to do after clicking the buttons, but he knows exactly what to do when the setUrlButtonTitle (with title: String) method is called . The view controller only updates, moves, repaints, hides UI elements based on the data with which the presenter called this method. At the same time, the presenter does not know exactly how all this data is located in the View / ViewController .
The full presenter class looks like this:
class AboutPresenter: AboutPresenterProtocol {
    weak var view: AboutViewProtocol!
    var interactor: AboutInteractorProtocol!
    var router: AboutRouterProtocol!
    required init(view: AboutViewProtocol) {
        self.view = view
    }
    // MARK: - AboutPresenterProtocol methods
    func configureView() {
        view.setUrlButtonTitle(with: interactor.urlRatesSource)
    }
    func closeButtonClicked() {
        router.closeCurrentViewController()
    }
    func urlButtonClicked(with urlString: String?) {
        if let url = urlString {
            interactor.openUrl(with: url)
        }
    }
}
We completely forgot about our configurator. After all, nothing will not work without him. His code is:
class AboutConfigurator: AboutConfiguratorProtocol {
    func configure(with viewController: AboutViewController) {
        let presenter = AboutPresenter(view: viewController)
        let interactor = AboutInteractor(presenter: presenter)
        let router = AboutRouter(viewController: viewController)
        viewController.presenter = presenter
        presenter.interactor = interactor
        presenter.router = router
    }
}
It’s clear that in order not to get the Reference cycle , the presenter from the view controller is indicated as strong , and the view controller from the presenter is weak , the interactor from the presenter is indicated as weak , and so on. Throughout this chain, the ViewController remains the most important . Therefore, talking about passive View is inappropriate here. When you close the ViewController, all other elements are also destroyed, because no one can have a strong link to the ViewController . Otherwise, we would get a memory leak .
The interactor class looks like this:
class AboutInteractor: AboutInteractorProtocol {
    weak var presenter: AboutPresenterProtocol!
    let serverService: ServerServiceProtocol = ServerService()
    required init(presenter: AboutPresenterProtocol) {
        self.presenter = presenter
    }
    var urlRatesSource: String {
        get {
            return serverService.urlRatesSource
        }
    }
    func openUrl(with urlString: String) {
        serverService.openUrl(with: urlString)
    }
}
The code is pretty simple, so comments are redundant. It is worth paying attention to ServerService . This is a service that will give the URL for our button on the view controller and open the link in Safari (or something else). The code for ServerService and its protocol looks like this:
protocol ServerServiceProtocol: class {
    var urlRatesSource: String { get }
    func openUrl(with urlString: String)
}
class ServerService: ServerServiceProtocol {
    var urlRatesSource: String {
        return "https://free.currencyconverterapi.com"
    }
    func openUrl(with urlString: String) {
        if let url = URL(string: urlString) {
            UIApplication.shared.open(url, options: [:])
        }
    }
}
Everything here is also simple. Only the router remains:
class AboutRouter: AboutRouterProtocol {
    weak var viewController: AboutViewController!
    init(viewController: AboutViewController) {
        self.viewController = viewController
    }
    func closeCurrentViewController() {
        viewController.dismiss(animated: true, completion: nil)
    }
}
Once again, all source code is in the repository. Link at the end of the article.
Chapter 2. An example of a more complex module
It is time to look at the architecture with a more complex example and summarize the rules for each layer.
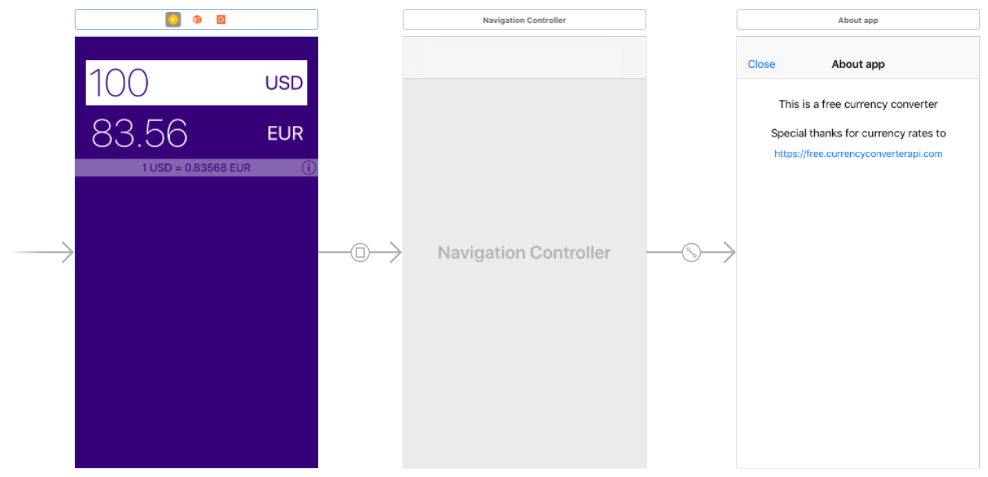
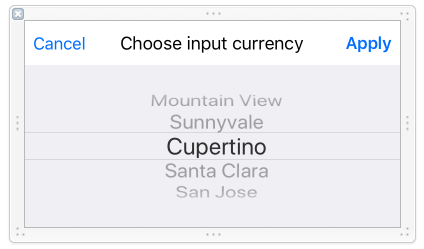
The storyboard with all the screens looks like this. The main screen allows you to choose the currency from which we convert and into which we convert. You can also enter the amount from which you want to convert to another currency. The amount converted to another currency is displayed under the input field. And at the very bottom, the conversion rate and the button for switching to the " About the application " screen .
Data on all currencies and their exchange rates are requested from the free site https://free.currencyconverterapi.com . For simplicity of the example, we will store the data in UserDefaults , but you can easily redo just one class to store them in Core Dataor in any other way.
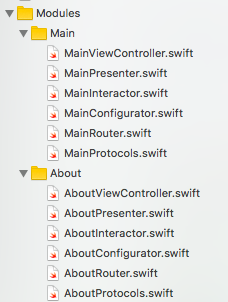 Now that we know what the VIPER module frame looks like, we can easily do the same for the main screen. The files of the Main module (main screen) are shown on the right . A small disadvantage of the architecture is that for each module you need to create a lot of files, and manually it takes a lot of time. Therefore, Rambler came up with the Generamba code generator , which does the routine work for us. If you dig around, then you can customize it for yourself. Or you can use templates for Xcode , there are plenty of examples on the net. For example, https://github.com/Juanpe/Swift-VIPER-Module or https://github.com/infinum/iOS-VIPER-Xcode-Templates. These topics will not be considered in more detail, because this is beyond the scope of the article.
 It is striking that for the protocols I created a separate file in each module. If you do not like this approach, then you can describe the protocols directly in the file of the classes themselves. Personally, it’s more convenient for me when all the module protocols are collected in one place. A matter of taste.
By tradition, we will also begin to consider the module from the view controller. An important rule for View / ViewController is that Entity is not directly passed to them . For this, additional layers / services must be created.
The viewDidLoad method will be identical to the implementation from the About module. The module configuration is called up and a command is given to the interactor to configure the View ( ViewController in our case).
 The configuration of the module is almost the same as in the “About” module . But on the main screen you need an additional View component of CurrencyPickerView , it is created as a separate class and can be reused in other places or even applications. In the storyboard, on the main screen, the usual UIView is added and the CurrencyPickerView class is set for it.
 All code CurrencyPickerView will not be considered. Although IBOutletfor it is in the view controller, its logic will be processed in the presenter. Therefore, a link to it is registered in the configurator. In CurrencyPickerView also has a delegate, and they will not vyukontroller and presenter. In the configurator, add the following calls:
class MainConfigurator: MainConfiguratorProtocol {
    func configure(with viewController: MainViewController) {
        ...
        presenter.currencyPickerView = viewController.currencyPickerView
        viewController.currencyPickerView.delegate = presenter
    }
}
Using a more complex example, it becomes clear that the view controller is unloaded, and the logic is transferred from the presenter to the interactor and further to the services. Configuring View in this module is more complicated and involves setting saved values that were used the last time before closing the application. The code is:
func configureView() {
    view?.setInputValue(with: inputValue)
    view?.setOutputValue(with: outputValue)
    view?.setInputCurrencyShortName(with: inputCurrencyShortName)
    view?.setOutputCurrencyShortName(with: outputCurrencyShortName)
    view?.addDoneOnInputCurrencyKeyboard()
    updateRateText()
    interactor.getAllCurrencies()
}
In addition to setting the initial values for the UI components, a request is sent to the interactor for a list of all currencies. The presenter does not know where this data will be received from, but he knows that he needs it. Also, the values inputValue , outputValue , inputCurrencyShortName and outputCurrencyShortName are requested from the interactor, because only he knows where to get this saved data:
var inputValue: String? {
    set {
        if let value = newValue {
            interactor.inputValue = Double(value) ?? 0.0
        }
    }
    get {
        var input = String(interactor.inputValue)
        if input.hasSuffix(".0") {
            input.removeLast(2)
        }
        return input
    }
}
var outputValue: String? {
    get {
        let formatter = NumberFormatter()
        formatter.numberStyle = .decimal
        formatter.maximumFractionDigits = 2
        formatter.roundingMode = .down
        formatter.usesGroupingSeparator = false
        let number = NSNumber(value: interactor.outputValue)
        var output = formatter.string(from: number)!
        if output.hasSuffix(".00") {
            output.removeLast(2)
        }
        return output
    }
}
var inputCurrencyShortName: String {
    get {
        return interactor.inputCurrencyShortName
    }
}
var outputCurrencyShortName: String {
    get {
        return interactor.outputCurrencyShortName
    }
}
In the comments on VIPER, I met such an opinion that the presenter does nothing special and simply transfers data from the view controller to the interactor and vice versa. From the code above it becomes clear that the presenter does not just request data from the interactor and gives it “as is”, but also prepares and formats the data in the right way. Remember that the presenter is responsible for what kind of data and in what form will be transferred to the view controller. The view controller no longer needs to care about their formatting, it only assigns them to the necessary UI components.
The presenter does not know anything about UIKit , he does not know about UIButton , UILabel and any other visual components. It is very important. All work with UIKitoccurs in view controllers and other View components. Also, when you click on a button, you cannot pass in the UIButton parameter , the presenter should not know about it. Therefore, pressing the buttons and entering text in the input field is processed in the view controller in this way:
@IBAction func inputCurrencyButtonClicked(_ sender: UIButton) {
    presenter.inputCurrencyButtonClicked()
}
@IBAction func outputCurrencyButtonClicked(_ sender: UIButton) {
    presenter.outputCurrencyButtonClicked()
}
func textFieldDidBeginEditing(_ textField: UITextField) {
    presenter.textFieldDidBeginEditing()
}
func textField(_ textField: UITextField, shouldChangeCharactersIn range: NSRange, replacementString string: String) -> Bool {
    if textField == inputTextField {
        if textField.availableAdding(string: string) {
            textField.addString(string)
            self.presenter.inputValueChanged(to: textField.text ?? "")
        }
        return false
    }
    return true
}
func textFieldShouldClear(_ textField: UITextField) -> Bool {
    if textField == inputTextField {
        textField.clear()
        self.presenter.inputValueCleared()
        return false
    }
    return true
}
Let's say you need to write a custom UI element or add extension for the finished one. Consider, for example, a UITextField from the main module. A component can contain its own internal logic, concerning only it. For example, the currency amount input field may be fractional, but you cannot enter 2 zeros in a row at the beginning (“00”) or enter several points (“0.11.2”) , the comma is converted to a point, you can enter only numbers, an additional button is added to keyboard, etc. In this case, it is allowed to put this logic into the element itself. After all, this logic does not affect the logic of other components of the application, but only applies to it. For example, like this:
extension UITextField {
    func availableAdding(string: String) -> Bool {
        switch string {
        case "":
            return self.text != ""
        case "0"..."9":
            return self.text != "0"
        case ".", ",":
            return self.text!.count > 0 && self.text!.range(of: ".") == nil && self.text!.range(of: ",") == nil
        default:
            return false
        }
    }
    func addString(_ string: String) {
        var newValue: String = self.text ?? ""
        var addingString = string
        if addingString == "", newValue.count > 0 {
            newValue.removeLast()
        } else if addingString != "" {
            if addingString == "," {
                addingString = "."
            }
            newValue.append(addingString)
        }
        self.text = newValue
    }
    func clear() {
        self.text = ""
    }
    func addDoneOnKeyboard() {
        let keyboardToolbar = UIToolbar()
        keyboardToolbar.sizeToFit()
        let flexBarButton = UIBarButtonItem(barButtonSystemItem: .flexibleSpace, target: nil, action: nil)
        let doneBarButton = UIBarButtonItem(barButtonSystemItem: .done, target: self, action: #selector(dismissKeyboard))
        keyboardToolbar.items = [flexBarButton, doneBarButton]
        self.inputAccessoryView = keyboardToolbar
    }
    @objc func dismissKeyboard() {
        self.resignFirstResponder()
    }
}
Another thing is when such logic can affect external data, for example, the availability of the login for the user during registration, because there will be a request to the server or database. Or password replay, because this will already affect another component. In general, you can add logic to the UI component that applies only to it. Although for some it may seem a moot point.
Consider how the data on currencies is received from the server. The presenter got a call to the getAllCurrencies () method and that’s it. What should happen next, the presenter does not know. Further logic is written in the interactor and there, if necessary, commands are sent to the presenter what needs to be done. The implementation is as follows:
func getAllCurrencies() {
    presenter.showHUD()
    serverService.getAllCurrencies { (dict, error) in
        if let error = error {
            self.presenter.hideHUD()
            self.presenter.showLoadCurrenciesButton()
            self.presenter.showAlertView(with: error.localizedDescription)
            return
        }
        if let dictResponse = dict {
            self.currencyService.saveAllCurrencies(with: dictResponse, completion: { (error) in
                if let error = error {
                    self.presenter.hideHUD()
                    self.presenter.showAlertView(with: error.localizedDesc)
                    return
                }
                self.currencyService.sortAndUpdateCurrentCurrencies()
                self.getOutputCurrencyRatio(newCurrency: nil)
            })
        }
    }
}
There are already 2 services involved in this interactor: CurrencyService , which is responsible for working with currencies, and the previously known ServerService , which is responsible for working with the server. Of course, it would be more correct to divide ServerService into several service classes in order to reuse the methods of working not with a specific server, but with any. But here I limited myself to one class, in order to simplify and not create a million classes for everything, because it won’t harm the architecture of VIPER modules.
For services, it is also very desirable to create protocols in order to work through them and not be tied to specific classes, according to one of the principles of SOLID, the principle of dependency inversion . CurrencyService
ServiceIt will help to work with such data structure as Currency (currency). He will give all available currencies, the current entered value for the currency, types of currencies, as well as be able to save, sort and receive the rate relative to two currencies. His protocol looks like this:
protocol CurrencyServiceProtocol: class {
    var currencies: [Currency] { set get }
    var currencyNames: [String] { set get }
    var inputValue: Double { set get }
    var outputValue: Double { get }
    var inputCurrency: Currency { set get }
    var outputCurrency: Currency { set get }
    func saveAllCurrencies(with dict: [String: Any], completion: @escaping (CurrencyError?) -> Swift.Void)
    func sortAndUpdateCurrentCurrencies()
    func saveOutputCurrencyRatio(with dict: [String: Any], completion: @escaping (CurrencyError?) -> Swift.Void)
}
The CurrencyService service requests data from another StorageService service , which stores the data in UserDefaults , and the interactor does not even suspect that the data is saved at all, not to mention how it is saved. The interactor does not even know that there is a StorageService service , because the CurrencyService helper service does all the work itself and only gives the data to the interactor.
The main module’s interactor mainly consists of abstractions and calls to service protocol methods, therefore it is very easy to write unit tests for such layers, as to create moki and stubs for them is not a big deal. No binding to specific classes.
I will not continue to examine in detail each method and each line of the remaining classes. The general essence of architecture and the role of each layer should already be clear. The last thing I would like to say is the transition to another screen through Segue .
Apple laid this functionality for the view controller, so we need to proceed from this approach, and not go through the navigationController? .PushViewController (vc, animated: true) . After clicking on the “Info” button, the “About Application” screen should open . Therefore, the presenter passes the event of pressing the button to the router, and it calls the following method:
func showAboutScene() {
    viewController.performSegue(withIdentifier: viewController.selfToAboutSegueName, sender: nil)
}
The view controller calls the system prepare (for segue ...) , and it already directly passes this event to the router:
override func prepare(for segue: UIStoryboardSegue, sender: Any?) {
    presenter.router.prepare(for: segue, sender: sender)
}
It turned out that the presenter is over in this case. If someone does not like such a violation, then you must either pass the method through the presenter, passing the UI element as a parameter, which will also be a violation. Or come up with something else. I myself have not yet found a better option. If you could set a delegate for prepare (for: segue, sender: sender) , then of course it would be a router.
Conclusion
The indicated architecture is not ideal. No wonder at the beginning of the article I quoted the saying that everyone has their own VIPER. How many people, so many opinions. I met options when several modules were grouped within the same user story and wrote one router for several modules. Or in another embodiment, one interactor for several modules. Many use the classic Wireframe , others come up with something else. Someone passes to the Entity view controller . The latter, of course, is wrong.
Even if you have a horribly written application, VIPER allows you to rewrite everything gradually. The view controller behind the view controller. This is the presentation layer and each module does not depend on the architecture and implementation of the other. Start migrating logic to services gradually. Unload the view controller. And in further code support, such a separation by layers will pay off many times.
In the article, I did not touch on Dependency Injection in modules for iOS, for example, Typhoon . And many more
Whatever your VIPER, it is important to follow a clear separation of responsibilities between layers and work with abstractions (protocols). Writing tests for VIPER-modules can not be considered, but for such code it will be much easier to write them.
The article probably turned out to be a bit messy and voluminous, but for that I provided all the source code so that you can figure it out yourself. Constructive criticism and discussion is welcome. Perhaps I wrote something wrong. Write in the comments.
Link to the repository .
Only registered users can participate in the survey. Please come in.
What architecture will you use / will use for the presentation layer in iOS?
- 18.9% VIPER. I already use it actively 30
- 22.1% I guess I will try VIPER in the next application 35
- 19.6% MVVM 31
- 7.5% MVP 12
- 18.9% MVC (Model-View-Controller) 30
- 7.5% MVC (Massive ViewController) 12
- 5% Other (I will indicate in the comments) 8