Margin trading robot on BitMEX cryptocurrency exchange
Good day to all!
My name is Ilya and today I want to tell you a little about my hobby - cryptocurrency algo trading. Soon there will be a year when I was overtaken by the idea of writing a trading robot that would minimize the human factor of trading (trading people probably know what it is to update the balance every five minutes and often make some hasty and therefore incorrect trading decisions). Therefore, it was decided to shift everything to the robot, remove the application for viewing courses from the phone and start to sleep peacefully. Having spent a lot of time writing something more or less working, I want to give the reader a small overview, where to start in this fun (and nervous) field, like algorithmic trading. This guide is not a call to start trading, does not contain investment tips, exclusively educational goals are pursued.
As you can see from the title, that robot that we will write will work on the BitMEX exchange. The choice is explained very simply - there are shoulders up to 100. And our robot will work with margin.
For those who do not understand what I'm talking about. Margin trading is leverage trading. [1] What is leverage?
Leverage is the ratio of your deposit to the lot with which you work. Those. having a deposit of $ 100, you can make a deal with a lot of 10,000, and then it will be 1 to 100. If you put a lot of 5,000, the leverage will be 1 to 50, etc. [2]
So, I hope that the reader has basic knowledge about trading on the exchange, for example, what are OHLCV candles (aka Japanese candles), that there are different time periods for their presentation, etc.
Well, let's start our little adventure in the country of algorithmic margin trading?
I am a lover of top-down communication, and so for starters I’ll tell you what I’m going to do, and then we will start implementation. Globally, there are two important things that you need to do to start the robot: to develop a decision-making strategy (under what conditions to buy) and to develop logic on top of the decision (how much and how to buy).
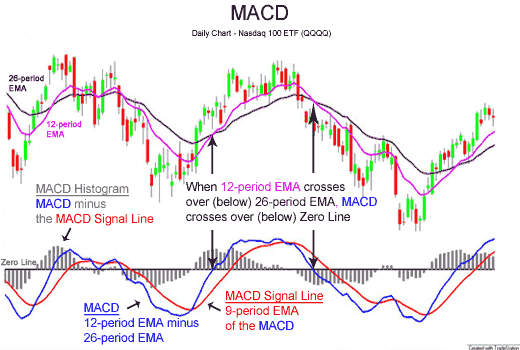
The decision-making strategy (brain) in our case will consist of the MACD indicator (English Moving Average Convergence / Divergence - Moving Average Convergence / Divergence). The indicator is used to check the strength and direction of the trend, as well as determine pivot points. It is based on moving averages. There are two modifications to the MACD indicator: linear MACD and MACD histogram. [3] We will use the implementation of the MACD histogram from the TA-lib library and based on this indicator we will make a decision about buying or selling.
The logic on top of the solution of our indicator will be simple: if the indicator said buy, then we will buy, if we sell, then we will sell. We will trade a fixed amount of money with a fixed leverage.
The first thing we will start with is installing the necessary libraries. First, we need a customer exchange, we take it here . The brain of our robot will be based on technical analysis, so we need to install the TA-lib library. Well, the standard set is numpy, pandas.
After installing all the necessary libraries, I suggest the reader to register at https://testnet.bitmex.com - this is a copy of the BitMEX exchange, but there you are trading not virtual money, but virtual. It is very convenient to use for debugging robots before launching on a real exchange. After registration, we create keys for ourselves and create an exchange client:
client = bitmex.bitmex(
    test=True,
    api_key="YOUR_KEY",
    api_secret="YOUR_SECRET"
)
Pay attention to the test parameter. It is set to true, which means that we will trade on a test exchange. This post will not be about the use of the exchange API, you can redirect all arising questions on it to the API explorer , since it is very convenient for them.
The next step is to get the data to use on the MACD indicator. We will get 100 candles with a resolution of 1 hour.
ohlcv_candles = pd.DataFrame(client.Trade.Trade_getBucketed(
            binSize=self.timeframe,
            symbol='XBTUSD',
            count=100,
            reverse=True
        ).result()[0])
Now we have a candlestick data frame, let's apply the indicator.
macd, signal, hist = talib.MACD(ohlcv_candles.close.values,
fastperiod = 8,
slowperiod = 28,
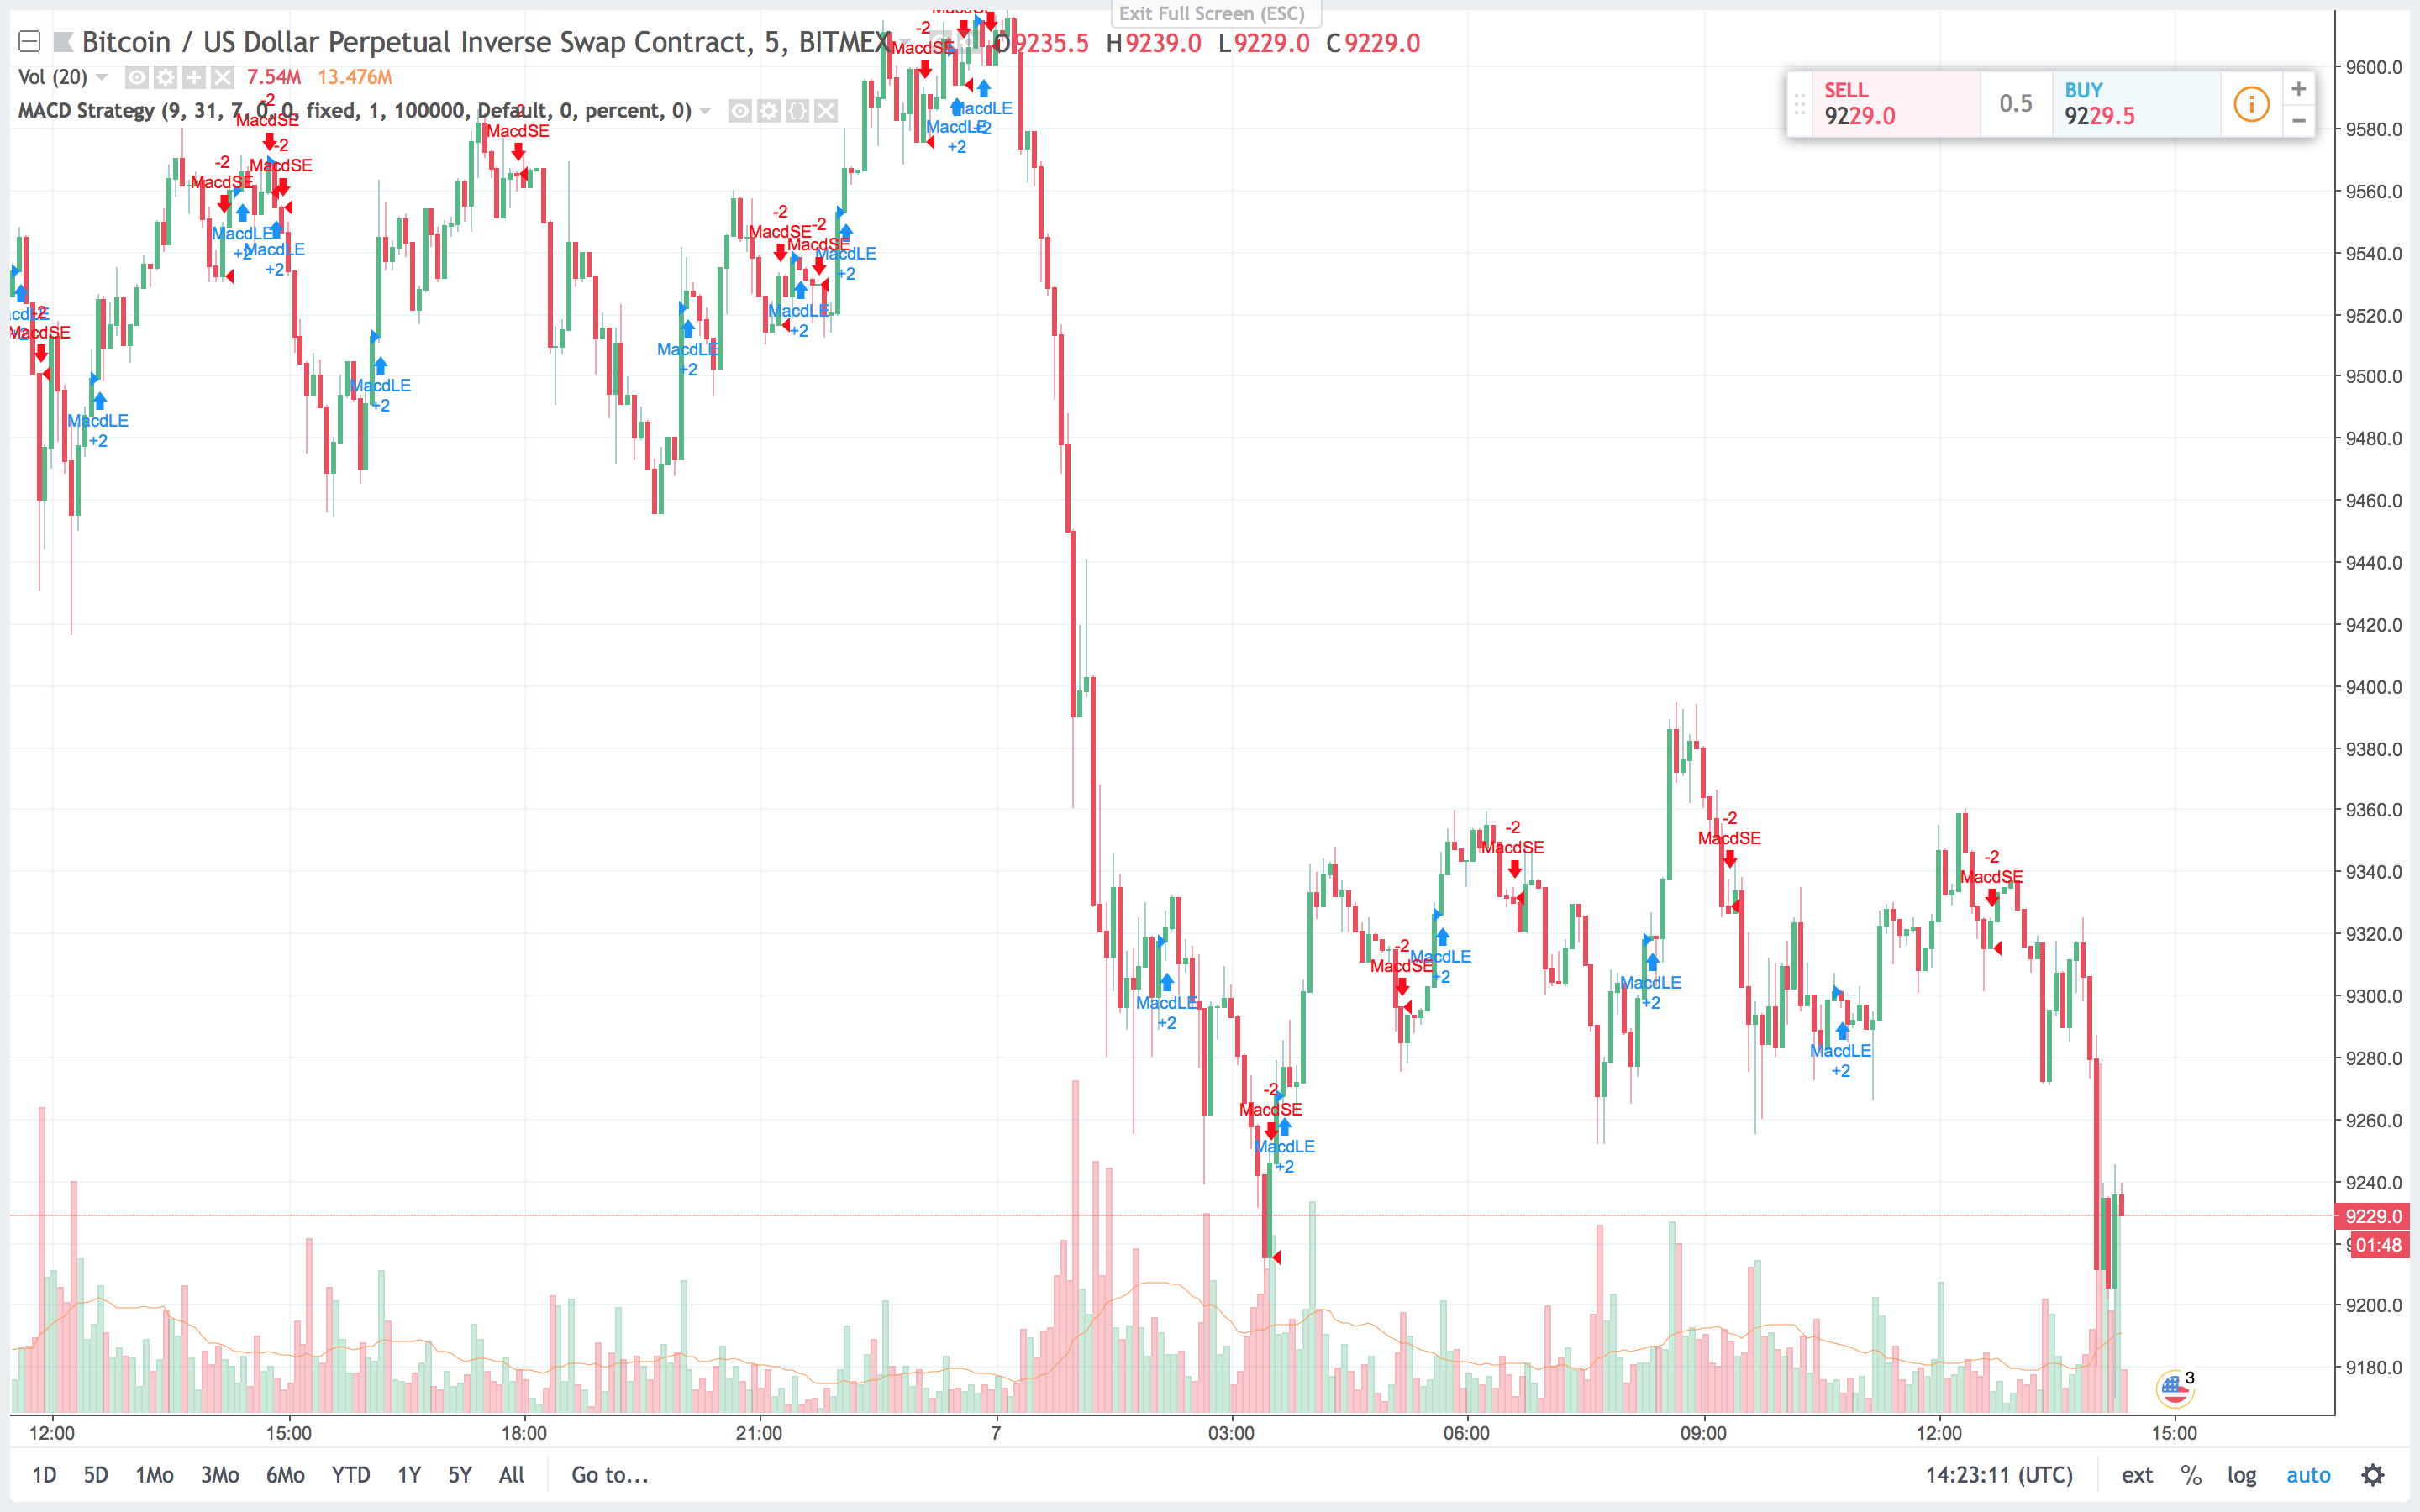
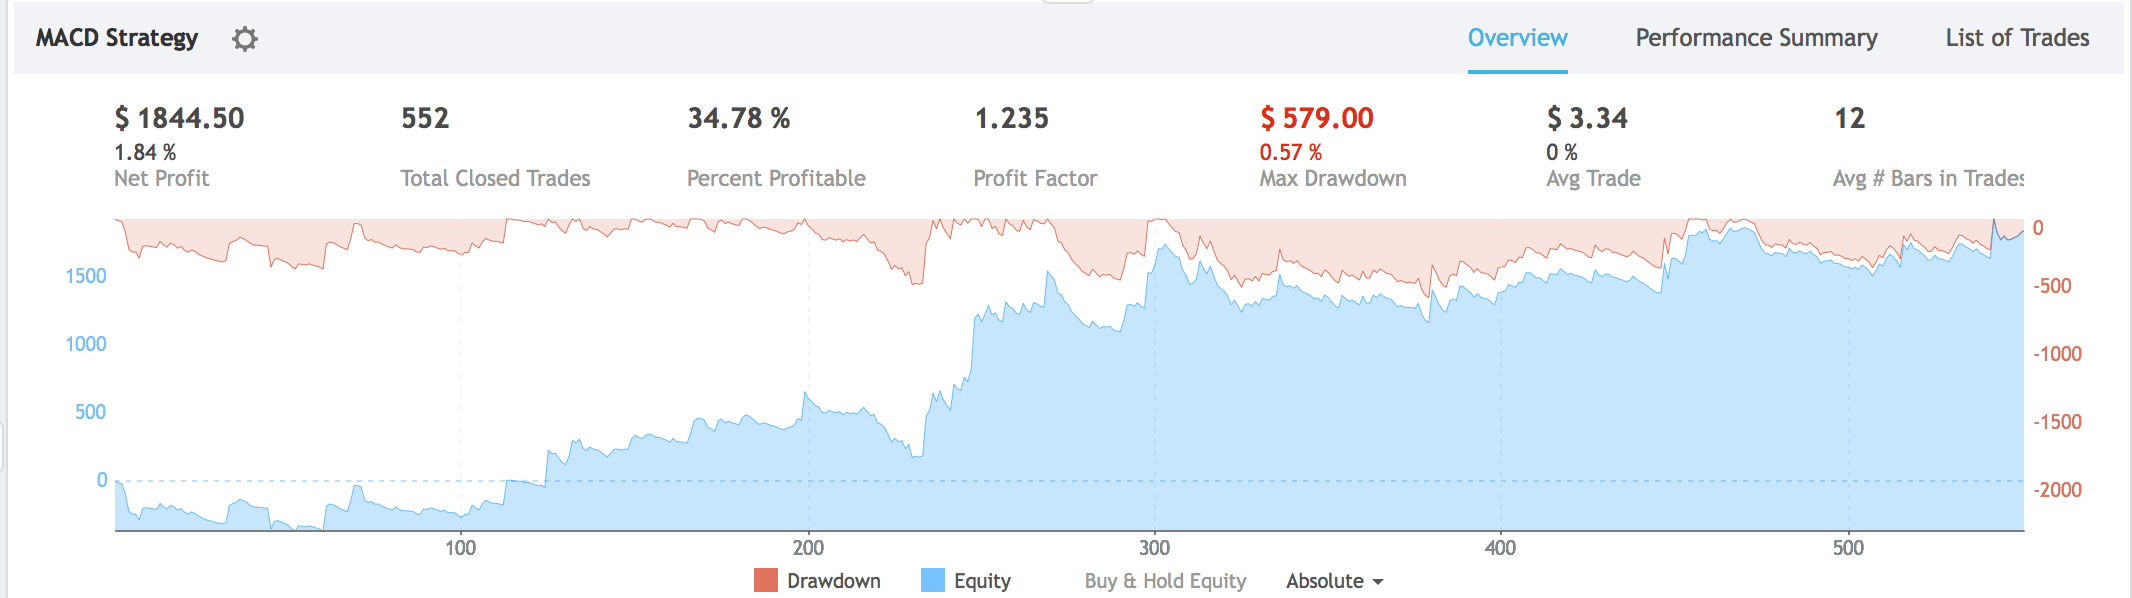
signalperiod = 9)I chose such parameters after playing a bit with the strategy and its backtest on Trading View. Here are examples of pictures with entry / exit points of the strategy on the chart and how much money it earned. But remember, this strategy was tested without a shoulder.
So, having received the indicator, let's understand how to make a decision based on it. Well, everything is simple. When the histogram crosses the zero value from the bottom up, this is a signal to buy, and vice versa.
#sell
if hist[-2] > 0 and hist[-1] < 0:
    return -1
#buy
if hist[-2] < 0 and hist[-1] > 0:
    return 1
#do nothing
else:
    return 0
Everything is very simple and clear. Let's put this into one class, which we call strategy.
class Strategy():
    def __init__(self, client, timeframe='5m'):
        self.client = client
        self.timeframe = timeframe
    def predict(self):
        ohlcv_candles = pd.DataFrame(self.client.Trade.Trade_getBucketed(
            binSize=self.timeframe,
            symbol='XBTUSD',
            count=100,
            reverse=True
        ).result()[0])
        macd, signal, hist = talib.MACD(ohlcv_candles.close.values,
                                                      fastperiod = 8,
                                                      slowperiod = 28,
                                                      signalperiod = 9)
        #sell
        if hist[-2] > 0 and hist[-1] < 0:
            return -1
        #buy
        if hist[-2] < 0 and hist[-1] > 0:
            return 1
        #do nothing
        else:
            return 0
Now let's write the executor of our solutions. The logic is simple - the strategy told us to buy, so we buy. I’ll quote the merchant’s code right away; there’s nothing complicated about it:
class Trader():
    def __init__(self, client, strategy, money_to_trade=100, leverage=5):
        self.client = client
        self.strategy = strategy
        self.money_to_trade = money_to_trade
        self.leverage = leverage
    def execute_trade(self):
        prediction = self.strategy.predict()
        print(f"Last prediction: {prediction}")
        try:
            if prediction == -1:
                response = self.client.Order.Order_new(
                    symbol="XBTUSD",
                    side="Sell",
                    orderQty=self.money_to_trade * self.leverage,
                ).result()
            if prediction == 1:
                response = self.client.Order.Order_new(
                    symbol="XBTUSD",
                    side="Buy",
                    orderQty=self.money_to_trade * self.leverage,
                ).result()
        except Exception as e:
            print("Something goes wrong!")
            print(str(e))
        return
A small nuance - to simplify your life, orders are not executed at the price set in advance, but at the market. In the case of BitMEX, this is good for two reasons:
- Returns commission for placing an order
- There is no need to steal with an individual price performer, which in general should protect against stock exchange falls, move the placed order in case of delay in execution, etc. etc.
Now we have the logic of decision-making, we have the logic of execution of decisions, it remains to put together this whole thing. We need to start the trading process once in the time period chosen by us, in this case it was 1 hour. I will do this with a crutch in the name of speed of writing, but it is better to do this, for example, through cron.
time_to_wait_new_trade = 60*60 #sec
strategy = Strategy(client, timeframe='1h')
trader = Trader(client, strategy)
while True:
    if round(time.time()) % time_to_wait_new_trade == 0:
        trader.execute_trade()
        time.sleep(10)
Well, now this business can be executed in one script and safely run, but only on a test exchange! I do not advise doing this on a real exchange, because you can lose money. This script set as its goal to show that it is easy to start, and made a more intelligent brain in this model, you can easily earn some amounts.
I posted a Jupyter code book in my repository , if someone is interested to see it - you are welcome!