Morrowind speedran scheduling using simulated annealing
- Transfer

Well, you and Sonya, even yesterday’s storm didn’t wake you. They say we have already sailed to Morrowind. They will let us out and let us do speedran, that's for sure!
Introduction
There is the famous speedran of the main Morrowind quest, in which, in fact, the player moves to the end of the game, uses several scrolls and spells, and then kills the boss.
However, there is no Morrowind speedran category in which the player seeks to become the head of all factions. Despite the critics' love and excellent plot, most Morrowind quests consist of “bring a thing” or “kill this type” quests, and there are not many quests that require anything else. But planning such a speedran route can still be extremely interesting for the following reasons:
- Morrowind has 10 factions to join (Mages / Thieves / Fighters Guilds, Imperial Cult, Imperial Legion, Temple of the Tribunal and Great Houses: Hlaalu, Redoran, Telvanni). During the passage, a player can become a member of only one Great House, but still there are 8 factions left.
- Transport system. This is not only a matter of quickly moving to the right places that the player used in Skyrim or Oblivion. It is also travel using various means of transportation, including boats, caravans and teleportation spells, which I explored earlier . Walking is very active, and it is extremely important to manage the quest lines of the factions in order to avoid unnecessary travel to various cities.
- There are many ways to become the head of a faction. In quest lines of factions, a promotion system is used in which new quest lines are opened when a character receives a rank increase in a fraction. The increase depends not only on reputation points (which are given for completing quests), but also on the skills and attributes of the player.
- The tasks of some quests can be completed in advance or completed in another way. For example, if the character giving the quest wants the player to kill someone, then this person can often be killed before the quest begins, and in this case the character issuing the quest will still give the player a reward. However, sometimes this does not work and the player does not have access to the reputation points necessary to open further quest lines. Similarly, in most “bring an item” quests, the issuing quest tells you where the player can get the item, but he doesn’t care if he was bought at the nearest store a few minutes ago.
Given all these features, the task can be very difficult. On the way to the chosen goal of the quest, the player can pick up another quest or pick up an item that at some point may be necessary for the quest of another fraction, of which he is not even a member. What seems to be an effective route for all quests of one faction can slow down the route when passing the game for all factions, because there may be points on this route that you still need to visit to complete quests of other factions, and so on.
In other words, planning an effective route with passage for all fractions will be an interesting task about automated data processing.
Note on Morrowind Skills and Levels
There are a couple of factions, the last quest of which can be completed immediately, but the result will be just a journal entry informing that the player’s character is now the head of the faction (and this increase does not affect the character’s parameters). I decided that instead I want to get to the top in the most honest way.
Unlike Skyrim and Oblivion, an increase in Morrowind factions requires the player to have certain skills with a certain level. Morrowind has 27 skills and each faction has 6 so-called “preferred skills”. To become the head of a faction, a player must have a very high level of one of these skills (approximately 80-90 out of 100) and two of them at an average level (approximately 30-35).
In addition, Morrowind characters have 7 attributes, each of which “controls” several skills. Attributes also influence the increase of rank in fractions.
This is sad news for us, because in speedran we won’t have enough time to develop character skills. However, the good news is that Morrowind has scattered skill teachers who are able to instantly increase these skills for a fee. The sad news is that these teachers will not be able to raise their skills higher than the attributes that drive them. Increasing attributes requires leveling up, and this task in Morrowind has a very long history . I’ll talk about the leveling strategy later.
Different routes for a single faction
I was quickly tired of pulling out quest data from the game files (because most quests are managed and updated by a lot of dialog conditions and in-game scripts), so instead I used the Morrowind UESP quest page and manually created several spreadsheets for each fraction into which the quests given their reputation, and their approximate requirements.
Here is an example of one of these spreadsheets:

From this table, the complexity of the Morrowind fractions is already clear. There are two suggested ways to reach the top of the Mages Guild: to get enough reputation and skills to become a Master Wizard, complete all the quests of Edwinna Elbert and challenge the Archmage to a duel, or complete all Skink-in-Shadow-Tree quests and receive a letter from the management informing of removal of the current Archmage. Later, I found another way - to reach the rank of Wizard (one rank lower than the Wizard Master), and then talk to the Archmage about a duel, which turns out to be faster.
In addition, there are many different ways to complete the quest. In the last three quests of Edwinna Elbert, where the player is required to bring the gnome artifacts to her, in fact, it is not necessary to go to her recommended places: artifacts can be obtained in other places or even bought.
Generation of all possible routes for passing a fraction
... proved to be a daunting task. The first attempt was to encode each quest into a YAML file as a set of prerequisites and required to complete items / actions. Here is an example:
  edwinna_2:
    giver: edwinna elbert
    prerequisites:
      rank: Conjurer
      quest: Chimarvamidium 2
    quests:
      - Dwemer Tube:
          rep: 5
          completion:
            items: misc_dwrv_artifact60
      - Nchuleftingth:
          rep: 10
          completion:
            go_person: anes vendu
      ...
This is how the beginning of Edwanna Elbert’s extended quest line is encoded - a Dwemer tube from Arkngtunch-Sturdumts , which requires the player to become a Conjurer in the Guild and complete the previous Edwinn quest. To complete this quest, the player must have a pipe in the inventory (I used the in-game item ID). Completing the quest gives the player 5 faction reputation points.
The quest line continues with an expedition to Nchuleftingt , and to complete this quest the player needs to get to a certain NPC (an archaeologist who, it turns out, died). Unlike the previous quest, this action (moving to the character and interacting with him) requires the player to start the quest first.
With all of this in mind, we can generate a lot of all the possible ways to go through the guild using breadth-first search:
- the set of all guild passage sequences S = is empty
- execute:
- for each sequence in S:
- if she already completes the guild, then ignore
- otherwise, get all the following quests that can be completed in this sequence:
- where the prerequisites of the quest are met (for example, the previous / necessary quest in the quest line is completed)
- where there is enough reputation to start a new quest line
- add each of these possible quests to the sequence to create several new sequences
- replace the current sequence with the generated new ones
- for each sequence in S:
- continue until S stops changing
Combinatorial explosions, combinatorial explosions everywhere
What could have gone wrong? Well, firstly, there is a problem with the order. If a player juggles two parallel quest lines from different characters issuing quests, then each possible intersection is taken into account, which leads to a combinatorial explosion. Secondly, routes are generated that are definitely worse than existing routes. For example, if passing a certain guild requires us to complete only quests A, B, D and E, then it makes no sense to generate a route A, B, C, D, E: completing D in any case will require additional time.
Therefore, I cut off, making sure that during the generation we did not consider the sequence, if there is a superset of the existing sequence of quests. This reduced the number of generated routes (actually subsets) to a manageable 300 pieces.
Is it good? Well, actually not really. Here, only those sets of quests that can be completed are taken into account. There is no accounting for the order in which these quests can be completed (which would probably give us millions of permutations), the order of actions for completing a particular quest (for example, for completing a quest, it may be necessary to kill someone, but it can even happen before as the player’s character learns about the quest) and alternative routes (for example, getting the desired item from another place or completing an additional task to get more faction reputation points).
But even worse, it was generating a route for only one faction. It will be necessary to process another 7 fractions (in addition, I will need to choose the Great House, the passage of which is the fastest) and even they will not have so many ways to pass, a simple enumeration of all possible routes for all fractions will definitely become unjustified.
In addition, this method will not allow me to encode the features of some guilds. For example, the Morag Tong legal killer guild has several quest givers around the world, each of whom can give the player his next contract. Moreover, the reputation required for the last quest line to be opened can be obtained not only by completing kill contracts, but also by collecting certain objects scattered around the worldgiving about the same reputation as the contract. These items can often be found in dungeons, which the player must visit for other guilds anyway, and may turn out to be. that completing such collection quests can generally be faster.
Attempt 2: dependency graph of individual quests
Therefore, I abandoned the idea of combining all possible routes from all guilds, and experimented instead to find out if there are obvious quick routes for most guilds. It turned out that they exist, and instead of solving millions of examples of the traveling salesman problem, I decided to choose only one. The solution is still impossible, but less impossible.
A brief overview of the fastest routes for a particular faction
The Mages Guild's introductory quest line can be completed in a matter of minutes and earned 22 reputation points, and Edwin’s quests can be completed on the way to the locations of other quests, which you will most likely have to visit. These two quest givers can earn player character points that exceed the 70 reputation limit required to challenge the Archmage (at this point I have not yet considered skills training).
The guild of fighters can be completed by completing all the quests of one quest giver (most of which are related to the murder of bandits in approximately one area; this task can be completed even before the quest begins), a couple from another quest giver and moving to the last quest line (in which there is a quest requiring bringing items to some wildernessbut an alternative ending requires a lot more reputation points).
The Thieves Guild has several conflicts with the Guild of Fighters, so the two quest lines must be carefully considered. Almost all the quests in the Thieves Guild must be completed (since some of the fighters Guild quests reduce the reputation in the Thieves Guild), but the good news is that they have one common antagonist, so after reaching a certain reputation in the Thieves Guild, passing the Mages Guild raises the character in rank to the Master of business.
Morag Tongin fact, you can complete it in one step: after the first contract necessary for joining the Guild, the player collects enough Sanguine artifacts to skip all the contracts and go straight to the last quest line, and the location of the last boss is visited twice in quests of other guilds.
The Temple of the Tribunal begins with a compulsory pilgrimage with a visit to several points on the map of the game. There are several more pilgrimages in the quest line, and some of them can be completed without even joining the faction.
The quest line of the Imperial Legion is carried out in a single city and requires the player to visit the place that he already visits in the quest line of Edwinna Elbert in the Mages Guild. In addition, one questgives an additional reputation at the Temple, which allows you to miss one of his quest.
The Imperial cult has three quest lines. In one of them, fundraising is required, therefore, as in real life, a player can simply give the quest giver money on the spot, and not beg for others. In another, you need to collect several powerful artifacts and visit a couple of places visited in the quest lines of other guilds.
After reviewing the quest lines of the Great Houses, I stopped at the House of Hlaalu . The quest line of House Redoran is much longer, and the main action of House Telvanni takes place in the eastern part of the game map, which usually does not need to be visited for other quests. In addition, the last quest line of Hlaalu, which leads to becoming Chairman of the Board, can be started at a lower rank.
Quest Dependency Graph
Now that I had a single route for each guild, instead of coding each requirement and location of the quest in the graph, I chose a simpler way. Each node in the dependency graph of quests will be something that can be completed relatively quickly and that happens in one location. This may be a quest, a series of quests, or an action to clear a dungeon involved in several future quests.
A node contains two elements: the location of this node in the game (for example, the in-game quest gadget ID or NPC in the location that the player must clear or find a specific item) and the nodes that the player must complete before the current one.
For instance:
# Соединённая квестовая линия Ажиры
mg_ajira_1:
  giver: ajira
# Квесты Эдвинны до экспедиции в Нчулефтингт, все выполняются за один раз (двемерская трубка, украденная
# у Ворара Хеласа в Балморе, затем Кимервамидиум, Сцинк и Хулин)
mg_edwinna_1:  # также даёт амулеты Almsivi/Divine
  giver: edwinna elbert
  prerequisites:
    - mg_ajira_1
mg_edwinna_2:
  giver: edwinna elbert
  prerequisites:
    - mg_edwinna_1
    - mg_edwinna_nchuleftingth
    - mg_edwinna_scarab_plans
    - mg_edwinna_airship_plans
# локации мест, необходимых для выполнения квестов Эдвинны
mg_edwinna_nchuleftingth:
  giver: anes vendu # можно обнаружить его тело до начала квеста
mg_edwinna_scarab_plans:
  giver: Khargol gro-Boguk # орк в Свободной башне с другой копией чертежей
mg_edwinna_airship_plans:
  giver: lugrub gro-ogdum # расположен рядом с орком в Яичной шахте Гнисиса, которая также является частью квеста Имперского легиона
mg_master:
  giver: trebonius artorius
  prerequisites:
    - mg_edwinna_2
In this case, the Dwemer drawings Edwinne needs can be taken even before the start of the quest line and transferred all of them at the same time.
When communicating with someone is part of the quest, I encoded this as several nodes depending on each other:
fg_eydis_1_start: # вступление в Гильдию бойцов и начало первого квеста
  giver: eydis fire-eye
fg_eydis_1_do:
  giver: drarayne thelas # выполнение первого квеста
  prerequisites:
    - fg_eydis_1_start
fg_eydis_1_end: # сдача квеста
  giver: eydis fire-eye
  prerequisites:
    - fg_eydis_1_do
Here's what the final quest dependency graph looks like:
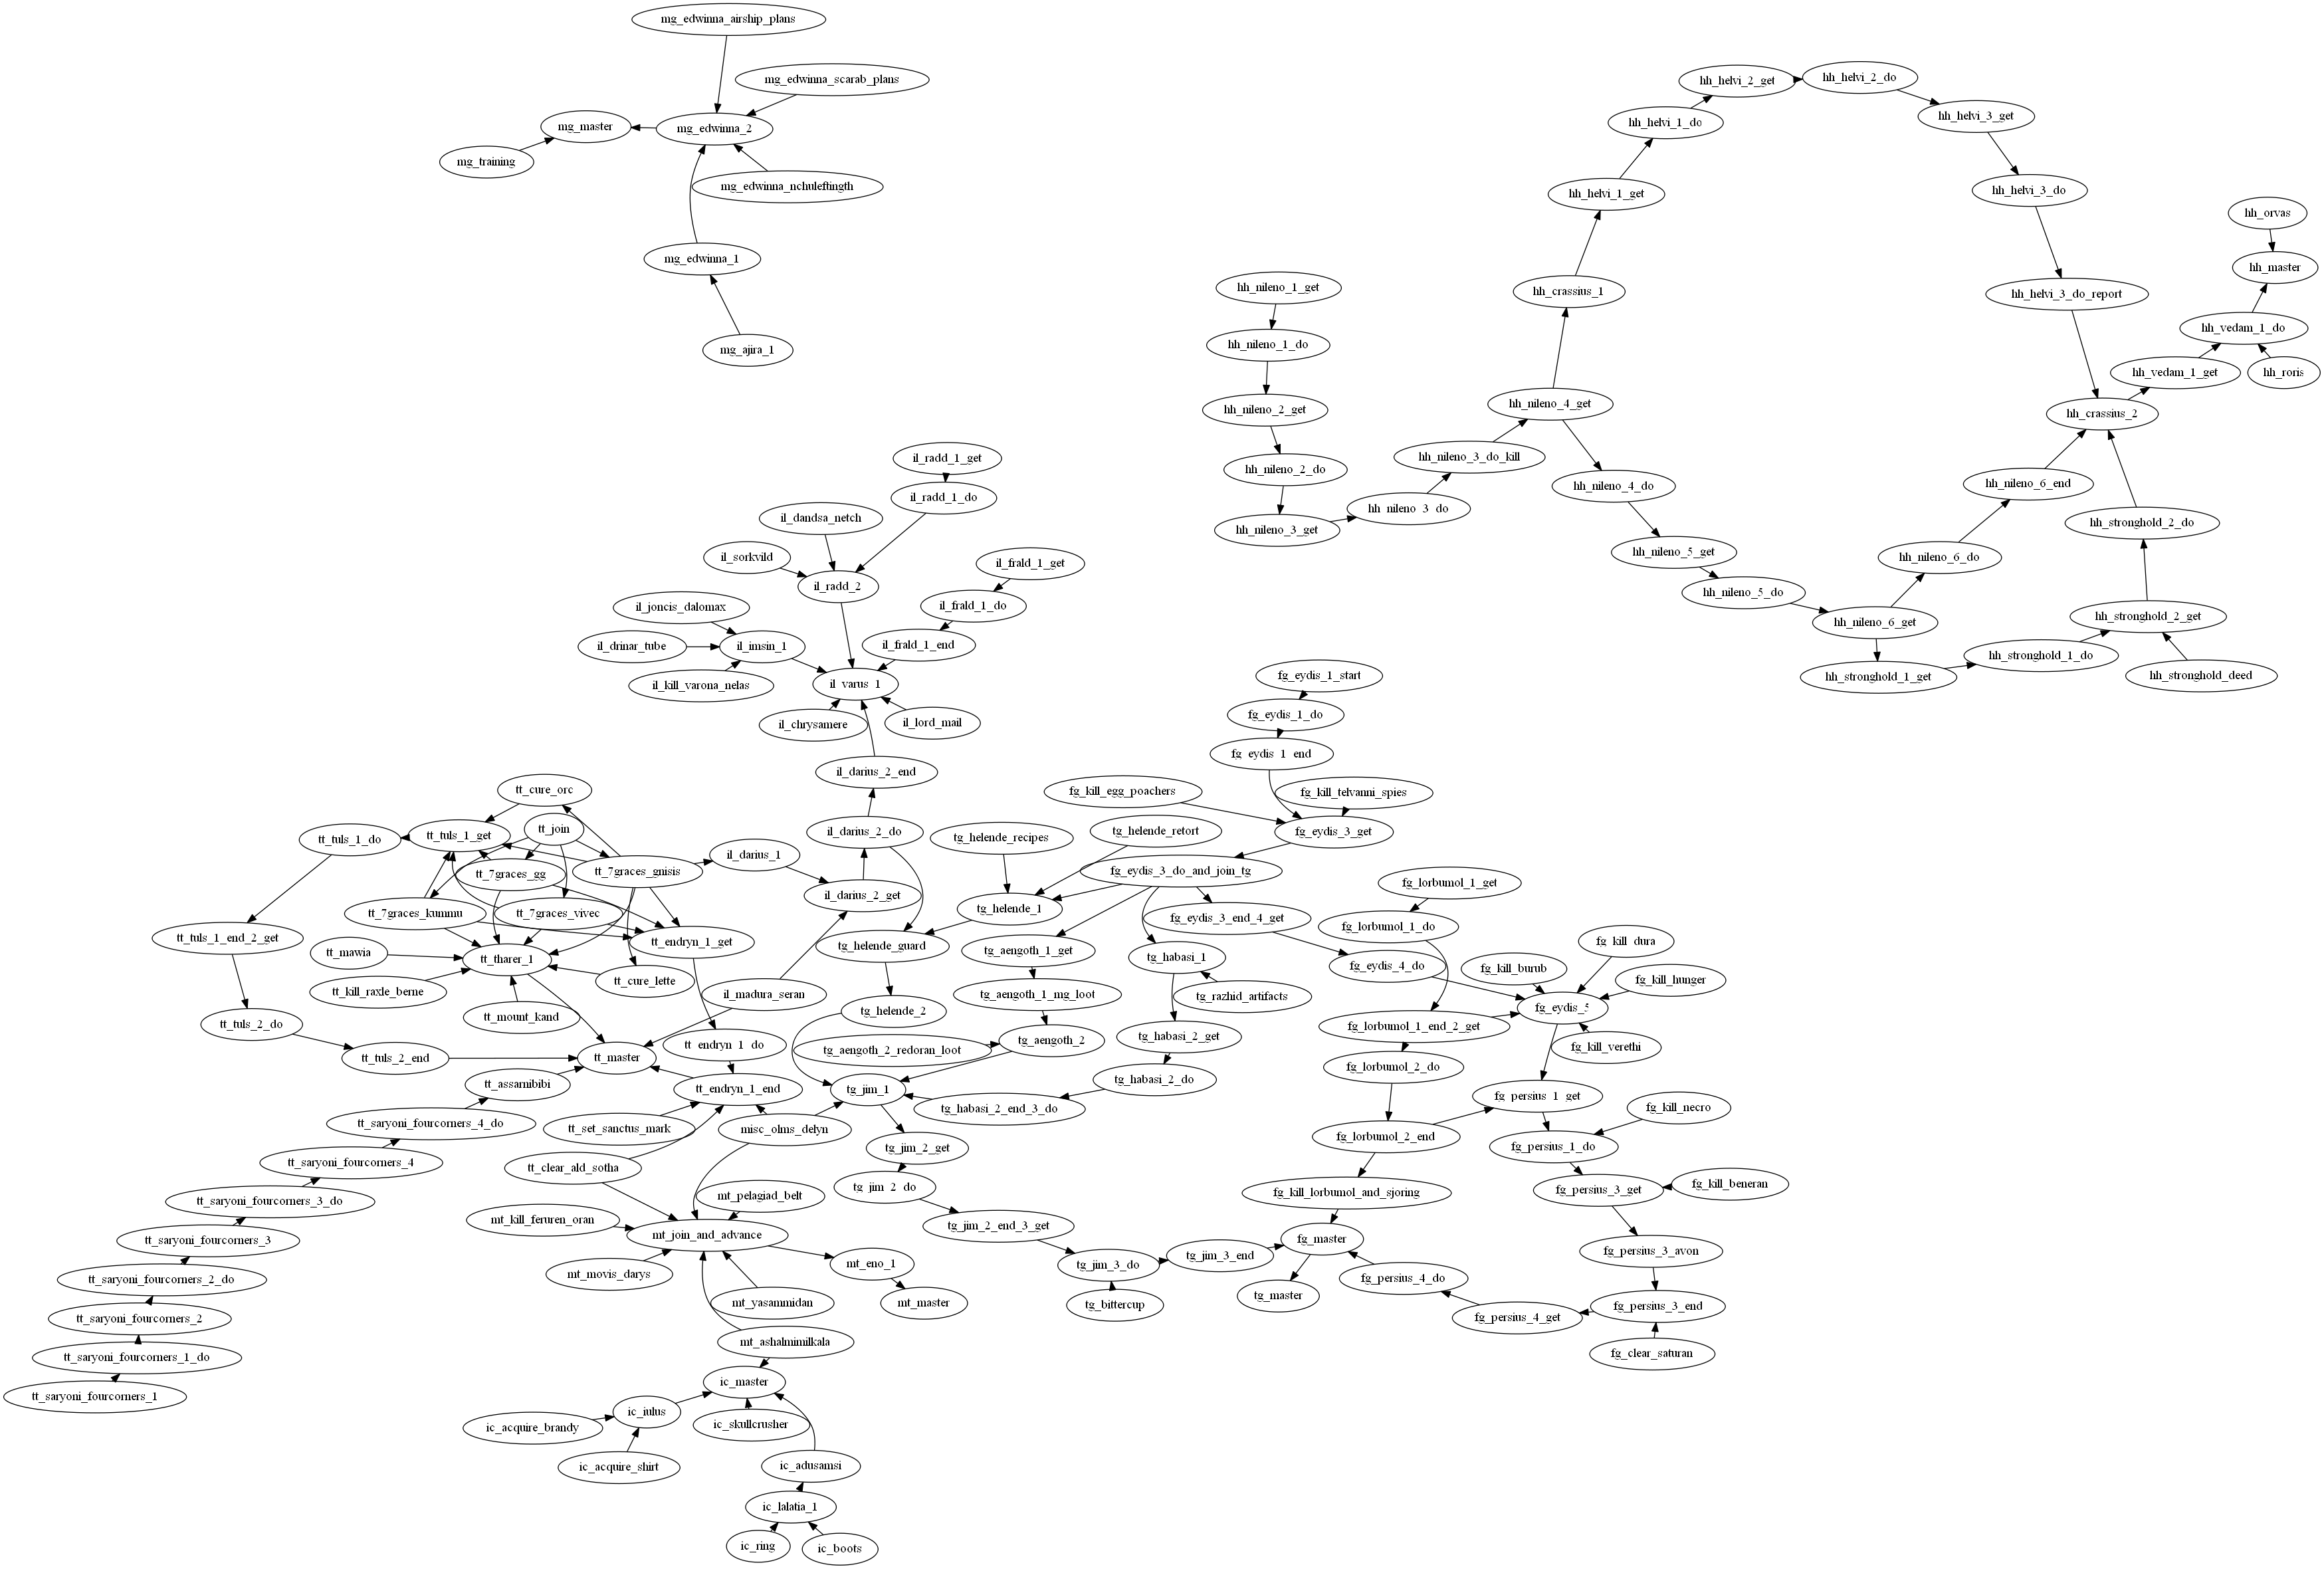
This is much better than fussing with reputation points and quest prerequisites. Any topological sorting of this dependency graph will be the correct route for the quests of the game (assuming that I correctly encoded all the dependencies). Since each node has a fixed geographic location, I can use the path search algorithm and data from my previous project to find the time required for each specific route that satisfies this dependency graph (using teleportation and public transport).
However, there is still a problem: there are many possible topological sortings of a given graph, and their calculation is a # P-complete task.
This is a common case of the traveling salesman problem: if here we need to find the shortest route visiting all nodes subject to many dependencies (for example, we cannot visit A until we visit C), then in the traveling salesman problem we need to visit all nodes without any dependencies. The presence of dependencies reduces the search space (in the most extreme case, the dependency graph is a straight line, that is, there is only one possible route), but it does not decrease much.
Therefore, I had to develop approximations in order to turn this graph and the matrix of the time of movement between its nodes into a fairly good route.
Generation of displacement time matrix
Here we will talk about two graphs: the first is the quest dependency graph described above, and the second is the displacement graph that I generated in one of the previous articles .
At this stage, the dependency graph contains about 110 geographically distant nodes, therefore, first of all, you need to create a matrix of the fastest routes and travel time between each two of these nodes, because the final route will, of course, use the movement between any two points.
For this, I used Dijkstra’s algorithm: since this is an algorithm for finding the shortest path from one point, if I execute it for one geographical node in the dependency graph of quests, I will get the shortest routes (in the displacement graph) to all other points. Therefore, it was enough for me to perform it a hundred times.
However, there is a problem: the displacement graph contains about 6,500 vertices and 16,000 teleportation edges (i.e. moving by public transport or using Almsivi / Divine Intervention spells: this number does not include edges of physical movements between points in one cell). It took about 10 minutes to complete the Dijkstra's algorithm for one starting point, so I would spend about a day on generating a matrix of travel times.
Therefore, I decided to truncate the displacement graph a little, combining the vertices located in one cell. For each cell (internal or external), I replaced all the vertices in it with one vertex with averaged coordinates, and then recalculated the costs of moving between them:
def coalesce_cells(vertices, edges):
    # Заменяет все вершины в графе в одной ячейке единственной ячейкой (усреднённым местоположением)
    vertices_map = defaultdict(list)
    for v in vertices:
        vertices_map[v.cell].append(v)
    # Вычисление усреднённой вершины для каждой ячейки
    average_vertices = {}
    for cell, vs in vertices_map.items():
        coords = tuple(sum(v.coords[i] for v in vs) / float(len(vs)) for i in range(3))
        average_vertices[cell] = Location(coords=coords, cell_id=vs[0].cell_id, cell=vs[0].cell)
    new_vertices = set([average_vertices[v.cell] for v in vertices])
    # Группировка рёбер по усреднённым вершинам, к которым они принадлежат
    grouped_edges = defaultdict(lambda: defaultdict(list))
    for v1 in edges:
        av1 = average_vertices[v1.cell]
        for v2 in edges[v1]:
            av2 = average_vertices[v2.cell]
            # Вычисление затрат на новые рёбра
            grouped_edges[av1][av2].append((edges[v1][v2][0], get_distance(av1.coords, v1.coords) / WALKING_SPEED + edges[v1][v2][1] + get_distance(v2.coords, av2.coords) / WALKING_SPEED))
    new_edges = defaultdict(dict)
    for av1 in grouped_edges:
        for av2 in grouped_edges[av1]:
            # Заменяем все возможные рёбра между двумя новыми вершинами самым дешёвым
            new_edges[av1][av2] = min(grouped_edges[av1][av2], key=lambda md: md[1])
    return new_vertices, new_edges
Due to this truncation, the displacement graph narrowed to approximately 800 vertices and 2200 teleportation edges, and I successfully managed to create a matrix of the shortest time of displacement between any two nodes in the dependency graph.
Here is one of the things that can be done with such a distance matrix: use the clustering algorithm to visualize groups into which points important for quests are ordered (click on the image to enlarge).

For example, in the upper left of this heatmap there is an NPC group located on the set of remote islands in the north of the game map. It’s difficult to get to them and it takes a lot of time, so it’s worth arranging our quests in such a way that we have to get here only once.
Simulated annealing (genetic algorithm?)
Suppose we have a candidate route, which is one of the topological sortings of the dependency graph. We can see how long this route takes by simply summing the costs of moving between consecutive nodes using our cost matrix.
How do we find the best route? A simple exhaustive search will not help here. I decided to do something a little less stupid: take a route and randomly mix it. Of course, the resulting route may be less effective than it was before. But imagine that we will do this for tens of thousands of randomly generated routes, save the part that turned out to be the most efficient, and then again mix the best routes many times. Gradually, we will come to a decent route, if not the most optimal.
As a result, I used the following algorithm:
- Let's start with the pool of candidate routes: take a simple topological sort and repeat this 20,000 times
- Continue until you get bored, then stop optimizing:
- sort routes by their total time, keeping the best 1000 routes
- for each remaining route:
- we generate 20 candidate routes from it:
- select a random route point and move it a random number of steps up or down
- check if the requirements of the dependency graph are satisfied, if not, then repeat again
- perform such permutations 30 times
- we generate 20 candidate routes from it:
- in the pool now again 20,000 routes, repeat
Of course, you can experiment with constants, and the termination condition can be better defined. Some call it a genetic algorithm (in which we simulate evolution and random mutations in a genetic pool), others call it an imitation of annealing (in which the value of random displacements decreases over time, until we come to the decision pool). The “genetic algorithm” sounds more interesting, so I mentioned it in this paragraph.
I left the program to work at night and in the morning I saw a route that seemed suitable for passing the game.

The movement time here is derived from in-game distances, taking into account the fact that the minimum walking speed is approximately equal to 100 game units per second. Of course, there are potions and spells that increase walking speed. In addition, it does not take into account the time spent on the menu or killing those who must be killed by the player.
In general, in some aspects the optimizer pleasantly surprised me.

I wrote a handy program that takes graph nodes and deploys them into a travel plan using the Almsivi / Divine Intervention spells and public transport. For example, in this fragment, the route planner correctly set the progress in the quest line of the faction, so that all six tasks in the far southwest corner of the map can be completed in one go (lines 592-618).
However, this route has some problems:
- It does not take into account the use of Mark / Recall spells. These spells are very powerful: Recall teleports the player to the point at which the last Mark spell was cast.
- It does not account for skills training for switching between faction quests.
Skills training
Increasing the rank of Morrowind factions requires not only completing quests, but also skills training. I already mentioned that although you can pay to learn a skill, it cannot be raised above the attribute that controls it.
Attribute values can only be raised with a level increase. The player’s character has 5 of 27 skills as the main skills (which allow him to increase their level faster and give a +25 bonus to these skills at the beginning of the game) and 5 side skills (which also allow them to increase their level faster, although not so fast , as in the main ones, and also give a bonus of +10 to these skills). The character increases the level when he gains 10 points of the main or secondary skill.
And here everything starts to get weird. When increasing the level, the player selects 3 attributes, the level of which he wants to increase. The amount of increase depends on the skills that the player was trained. For example, if he received 10 points in Alchemy (controlled by Intellect), then if Intellect is selected when the level is increased, it will increase not by 1, but by 5 points. However, if a player raises the level by learning 1 point in Long Blades (controlled by Strength) and 9 points in Alchemy, he will receive a multiplier of 4x to Intellect and 1x to Strength.
The player can also learn skills that are not primary or secondary to get enough points to increase the attribute multiplier. Suppose a player also learns 1 point in Security (controlled by Intelligence), which is not his main or secondary skill. It will not be counted in the 10 points needed to level up, but it is counted in the calculation of the attribute multiplier. Therefore, the player will be able to increase his Intellect by 5.
Therefore, I needed to tactically select the main / side skills of my character, as well as his race (which gives bonuses to certain skills and attributes) in order to quickly achieve the requirements of each faction.
Overview of fractions and required skill levels
Below is a list of the skill levels required by each faction so that the player can become the head of the faction. It is worth considering that it does not necessarily meet the requirements of the skills for the highest rank in the faction, because most factions stop checking the player’s parameters during their last quest lines and simply raise the player to the highest rank after completing the quest line.
- Mages Guild : Change, Destruction, Alchemy, Enchantment, Illusion, Mysticism. One skill is not less than 70, two not less than 25, Intelligence and Willpower not less than 33.
- Fighters Guild : Ax, Long Blades, Blunt Weapons, Heavy Armor, Blacksmith, Defense; 70/25/25, Strength and Stamina 33.
- Thieves Guild : Accuracy, Short Blades, Light Armor, Acrobatics, Stealth, Security; 80/30/30, Dexterity and Attraction 34.
- Temple of the Tribunal : Alchemy, Blunt weapons, Witchcraft, Mysticism, Restoration, Silent battle; 80/30/30, Intelligence and Attraction 34.
- Morag Tong : Acrobatics, Illusion, Accuracy, Light Armor, Short Blades, Sneak; 80/30/30. Speed and Agility 34.
- Imperial cult : Eloquence, Battle without success, Restoration, Mysticism, Enchantment, Blunt weapon; 90/35/35. Attraction and Willpower 35.
- Imperial Legion : Athletics, Polearms, Long Blades, Blunt weapons, Heavy Armor, Defense; 70/25/25. Stamina and Attractiveness 33.
- House Hlaalu : Oratory , Trade, Accuracy, Short Blades, Light Armor, Security; 70/25/25. Speed and Agility 33.
Character planning
With all of this in mind, I decided to choose Alchemy, Blunt Weapons, and Accuracy as my high-level skills. Alchemy (the main skill for the Mages Guild) can be quickly learned to make potions. Blunt weapons are a common skill for 4 factions (Guilds of Fighters, Temple, Imperial Cult and Imperial Legion) and should increase to 90. Accuracy is associated with other 3 factions (Guild of Thieves, Morag Tong and House of Hlaalu) and increases to 80.
Other skills must be selected partly then to cover the remaining, weaker requirements, and partly because training them increases Strength or Dexterity to 90 or 80 (otherwise it will not be possible to learn Blunt Weapons or Accuracy). Therefore, I decided to upgrade the character starting with high Strength and with a bonus to Blunt weapons, and also learn Long Blades to increase Strength (and to meet the requirements of secondary skills for the Guild of Fighters / Imperial Legion).
For Dexterity, I will be trained in Defense, Light Armor and Stealth. All of them are controlled by Dexterity and training them to the required levels will lead to Dexterity rising so that it allows me to learn Accuracy to 80.
Enchantment and Mysticism meet the secondary requirements of the Temple, the Mages Guild, and the Imperial Legion.
Here is the final outline of the character . She begins with the following basic and secondary skills:
- The main ones:
- Alchemy: 35. To raise it to 70 by creating potions (primary skill for the Mages Guild, secondary skill for the Temple).
- Blunt Weapon: 40. To raise it to 90 (basic skill for the Guild of Fighters, the Imperial Legion, the Imperial Cult and the Temple).
- Accuracy: 30. To raise it to 80 (the main skill of the Thieves Guild, Morag Tong and House Hlaalu).
- Mysticism: 35, no need to learn (secondary skill for the Mages Guild, Temple and Imperial cult).
- Enchantment: 35, no need to learn (secondary skill for the Mages Guild and Imperial cult).
- Collateral:
- Long Blades: 25. To raise to 45 for additional Strength points (a secondary skill for the Guild of Fighters and the Imperial Legion).
- Stealth: 15. To raise to 30 (secondary skill for the Thieves Guild and Morag Tong)
- Defense: 15. To raise to 30 (secondary skill for the Guild of Fighters and the Imperial Legion).
- Eloquence: 15. To raise to 25 for an additional five points of Attraction (secondary skill for House Hlaalu).
- Light Armor: 15. To raise to 30 (secondary skill for the Thieves Guild, Morag Tong and House Hlaalu).
Encoding training in the graph of quest dependencies
I decided not to upload Morrowind teacher data to embed it in the route planner. Instead, I found the best teachers of Blunt Weapons and Accuracy (because these are the only skills that allow the player to reach the required level), as well as the second-best teachers and tried to figure out the people with whom the player’s character will still meet on his way. Thus, funny coincidences emerged, for example, Alveleg , who needs to be killed as part of the Fighters Guild quest, but which can also train the player in Defense, Stealth and Accuracy to fairly high levels.
Then I added a few additional nodes to the dependency graph to reflect new training sessions:
# Узлы обучения
training_alveleg:
  # мы убиваем его как часть квеста Гильдии бойцов и он обучает Меткости (45), Скрытности (42) и Защите (38)
  description: Train Block x10 (up to 25), Sneak x15 (up to 30), Marksman x15 (up to 45), should get Agi 60
  giver: alveleg
training_bolnor:
  description: Train Light Armor x15 (up to 30), Marksman x5 (up to 50), should get Agility 70
  giver: bolnor andrani
  prerequisites:
    - training_alveleg
training_eydis:
  description: Train Long Blade x20 (up to 40), Blunt x30 (up to 70), Strength 85
  giver: eydis fire-eye
training_ernse:
  description: Train Blunt x20 (up to 90)
  giver: ernse llervu
  prerequisites:
    - training_eydis
training_missun:
  description: Train Marksman x30 (up to 80)
  giver: missun akin
  prerequisites:
    - training_bolnor
training_falvel:
  description: Train Mercantile x10 (should get Personality 35)
  giver: falvel arenim
Then they should become prerequisites for some later quests in the faction quest lines:
tt_tharer_1:
  description: Get and hand in all Tharer Rotheloth quests
  giver: tharer rotheloth
  prerequisites:
    - tt_7graces_vivec
    - tt_7graces_gnisis
    - tt_7graces_kummu
    - tt_7graces_gg
    - tt_cure_lette
    - tt_mount_kand
    - tt_mawia
    - tt_kill_raxle_berne
    - training_eydis # Curate (50 blunt) to hand in Galom Daeus quest
In some cases, the requirements I add are stricter than necessary. For example, a player may rise to the Fighter Guild Master with a Blunt Weapon skill of 80, however this depends on the node of the Blunt Weapon training graph to 90. The reason for this is that I don’t want to visit the teacher of the Blunt Weapon Master more than once: if we visit it, We train ourselves in Blunt Weapons to the highest possible level.
Conclusion
In the next article, we will try to add the use of Mark and Recall spells to the route, and also discuss some of the many Morrowind tricks and glitches that can help us during speedran.