IPv6 to every home: Your own IPv6 server broker (6in4)
- Tutorial
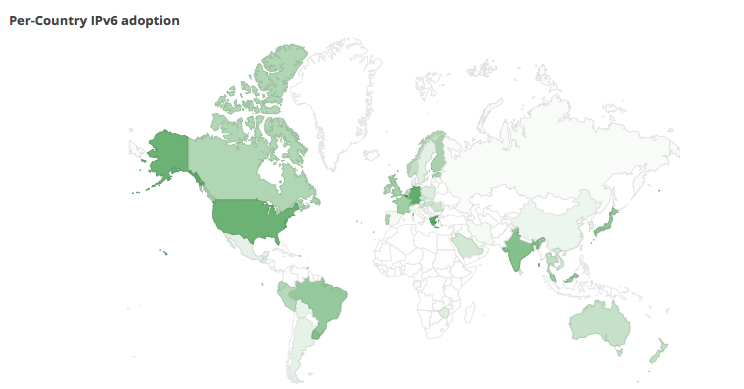
IPv6 is moving around the planet, in many countries IPv6 support is already native from your provider, if you do not already have IPv6 but you want to have it, you can do it using this instruction.
What is important - we will let traffic through our own rented server, and not through an incomprehensible broker.
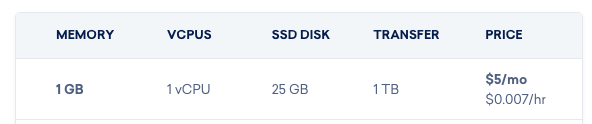
First you need a server that has an IPv6 connection, I will use a server from DigitalOcean for $ 5 with the latest version of Ubuntu OS.
Configure the server
Note! part of the software can not be installed, it is marked as optional, it should be installed only if you have a dynamic IP and you want to automatically configure access when updating the IP
After receiving the server, you need to update the available packages on it:
sudo apt-get update -y
sudo apt-get upgrade -y
Install git, sipcalc, apache and php (the latter 2 are optional)
sudo apt-get -y git sipcalcIf you do not plan to auto-configure when changing the IP address, you can skip this command.
sudo apt-get -y apache2 php libapache2-mod-php php-mcryptNow it's time to download a script that will help you configure the github.com/sskaje/6in4 tunnel
git clone https://github.com/sskaje/6in4.gitcd 6in4Copy the script to / bin for the usual call
sudo cp ./bin/6to4 /bin/6to4We give rights to launch
sudo chmod +x /bin/6to4Copy the settings file
sudo cp ./etc/config.ini /etc/config.iniEditing the settings file
ifconfig | grep 'inet6 addr:'
$ ifconfig | grep 'inet6 addr:'
          inet6 addr: fe80::000:000:000:000/64 Scope:Link
          inet6 addr: 2a03:000:0:000::00:0000/64 Scope:Global
We need the one with Global:
inet6 addr: addr: 2a03: 000: 0: 000 :: 00: 0000/64 Scope: Global.
Open the file with the settings for editing:
sudo nano /etc/config.iniWe remove the ";" at lines:
IPV6_NETWORK =
IPV6_CIDR =
and specify:
IPV6_NETWORK=2a03:000:0:000::
IPV6_CIDR=48
Press CNTRL + x, save and go on to add the network:
sudo 6to4 add 1 8.8.8.8where 8.8.8.8 is your external IP, you can find it out, for example here .
In response, you will get something like this:
Please set up tunnel on your machine with following parameters:
    Server IPv4 Address:        99.99.9.9
    Server IPv6 Address:        2a03:000:0:000::1/64
    Client IPv4 Address:        88.8.88.8
    Client IPv6 Address:        2a03:000:0:000::2/64
    Routed /64:                 2a03:g0e0:00g0:3402::/64
Now it remains to register the settings in your router. The
example below is the setting for Apple Airport:

Other routers are configured in the same way.
Server routing setup
Now back to the server and configure routing from the IPv6 virtual interface - to the main one:
sudo ip6tables -t nat -A POSTROUTING -s 22a03:g0e0:00g0:3402::/64 -o eth0 -j MASQUERADE2a03: g0e0: 00g0: 3402 :: / 64 - this is your Routed / 64 or any IP that will come to any of your devices from the router after saving the settings
Allow traffic forward:
sudo sysctl -w net.ipv6.conf.all.forwarding=1Can check
After that, save the settings on the router, reboot the router. You should have earned IPv6. IPv6 addresses will come to the connected devices.
You can check the operation of IPv6 here - ipv6.google.com or ipv6-test.com
Please note - if you change the IP address (external), IPv6 will disappear, access updates after changing the address will be discussed in the next article (or you can use the instructions from the repository github.com/sskaje/6in4 )
After setting up IPv6, you need to be vigilant - all your devices inside your home network will receive a public IPv6 address! if you are not sure about the security of the devices, enable blocking of incoming ipv6 connections on your router.

PS Telegram / Youtube / Google servers work through IPv6 like many others. You can verify this by doing ping6 google.com