Authorization for the lazy. Our rake
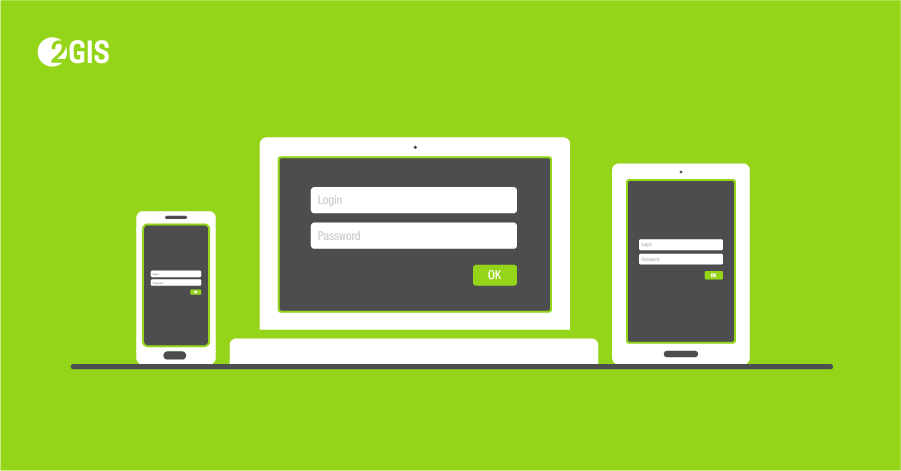
Hello! Recently, we solved the problem of authorizing users of a mobile application on our backend. So what, you ask, the task has already been solved a thousand times . In this article I will not tell a success story. I’d better tell you about the rake that we collected.
A little about the project
At 2GIS we make a cool and accurate directory of companies. To ensure the quality and relevance of data in 2GIS there are several internal systems. One of them is called YouLa - no, not the one where the ads are published. Our YouLa supports the process of reconciling data on the ground.
Part of the system is the mobile app pedestrians walk with. Pedestrians are specialists who go around the whole city. The map is divided into different sections for verification.
Look at what the territorial division of the Moscow region looks like. Different colors on the map indicate different destination areas.

Pedestrians bring us information about organizations that cannot be called or have no website. For example, barbecue, stalls with vegetables. In addition, it happens that the organization has changed the phone and we can not get through there. In all the cases mentioned, our specialist comes to the organization and checks the information on the ground.
Just a few days ago, we launched a new mobile application for which we wrote a backend for data synchronization.
At our new backend we want to know what kind of user came to us.
We have several requirements for authorization:
- reliability and security,
- authentication from various sources,
- authentication of several types of Web, Mobile, API clients.
Choosing an Authentication Method
There are many different approaches to implementing authentication, each with its own pros and cons. Given that we have a large number of integration points,
we decided not to reinvent the wheel and take an authentication and authorization provider based on OpenId Connect. For authorization on the backend we use JWT.
Read more in the article “ Authentication and authorization in microservice applications ”.
What is good about JWT and the OpenId Connect standard in Enterprise?
Now, even within the framework of one company, systems are developed on different technology stacks and it is often difficult to make friends later on. Within one technology stack, you can also catch many strange and unexpected effects , to say nothing of the situation when you have several systems. For JWT and OpenId Connect, the list of supported clients and platforms is impressive .
The scheme of operation of all components looks like this: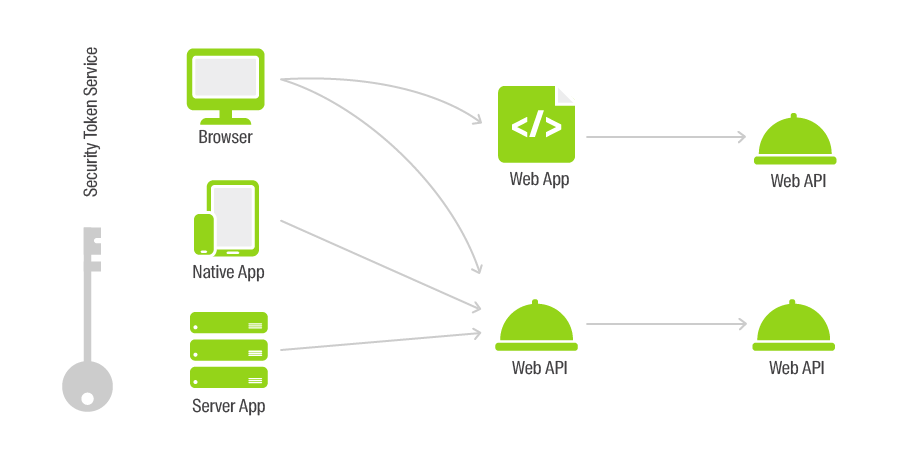
The protocol supports dynamic connection of authentication providers. We examined two sources - Google+ and ADFS. But in the future, we would like to simply and quickly expand the product audience, for example, by connecting other companies to the system that could solve their problems in our system.
Using JWT, you can easily organize authentication of variegated clients. Moreover, many cloud clients immediately offer a whole set of libraries that facilitate the integration of the provider in your application.
Cloud solutions
The first platform we decided to try was Auth0. The platform is very cool for both the developer and the administrator. It has detailed documentation, a beautiful and intuitive Web UI for setting all the parameters. In our Java / Kotlin application and backend, authentication was fastened in a couple of hours.
The main advantages that we noted when working with the Auth0 platform:
- Detailed documentation and an infinite number of code samples in common programming languages;
- the ability to use for authentication not the web, but the native login form.
In order to implement support for JWT authentication in the backend, it’s enough to write only a few lines (this code for different platforms will differ only in the parameters Authority and Audience), in some cases, you will also need to specify certificates to verify the signature of tokens:
        public void ConfigureServices(IServiceCollection services)
        {
            services.AddMvc();
            // 1. Add Authentication Services
            services.AddAuthentication(options =>
            {
                options.DefaultAuthenticateScheme = JwtBearerDefaults.AuthenticationScheme;
                options.DefaultChallengeScheme = JwtBearerDefaults.AuthenticationScheme;
            }).AddJwtBearer(options =>
            {
                options.Authority = "https://devday2gis.auth0.com/";
                options.Audience = "https://devday.api";
            });
        }
        // This method gets called by the runtime. Use this method to configure the HTTP request pipeline.
        public void Configure(IApplicationBuilder app, IHostingEnvironment env)
        {
            if (env.IsDevelopment())
            {
                app.UseDeveloperExceptionPage();
            }
            // 2. Add Authentication
            app.UseAuthentication();
            app.UseMvc();
        }
In order to fasten authentication to the mobile phone - a few more lines:
 private void login() {
        token.setText("Not logged in");
        Auth0 auth0 = new Auth0(this);
        auth0.setOIDCConformant(true);
        WebAuthProvider.init(auth0)
                .withScheme("demo")
                .withAudience(String.format("https://%s/userinfo", getString(R.string.com_auth0_domain)))
                .withScope("openid email profile")
                .start(MainActivity.this, new AuthCallback() {
                    @Override
                    public void onSuccess(@NonNull final Credentials credentials) {
                        runOnUiThread(new Runnable() {
                            @Override
                            public void run() {
                                idToken = credentials.getIdToken();
                                accessToken = credentials.getAccessToken();
                                Log.d("id token", credentials.getIdToken());
                                Log.d("access token", credentials.getAccessToken());
                                token.setText("Logged in: " + credentials.getIdToken());
                            }
                        });
                    }
                    @Override
                    public void onFailure(@NonNull final Dialog dialog) {
                        runOnUiThread(new Runnable() {
                            @Override
                            public void run() {
                                dialog.show();
                            }
                        });
                    }
                    @Override
                    public void onFailure(final AuthenticationException exception) {
                        runOnUiThread(new Runnable() {
                            @Override
                            public void run() {
                                Toast.makeText(MainActivity.this, "Error: " + exception.getMessage(), Toast.LENGTH_SHORT).show();
                            }
                        });
                    }
                });
    }
As you can see from the example, after authentication, two tokens come to us + one more (RefreshToken) is not shown in the code.
What are they needed for?
IdToken - contains the credentials of the
AccessToken user - for authorization on the
RefreshToken API - for updating the AccessToken
Backfill question: why are two Access and Refresh tokens necessary?
Consider two cases of key theft:
- The scoundrel stole only the AccessToken. Then it will be valid only until you use your RefreshToken.
- The scoundrel stole both tokens. Then, as soon as it uses RefreshToken, your tokens will cease to function and you will be logged out of the application. If you use your credentials, then the attacker's tokens will cease to act.
Using two tokens limits the time that an attacker will have access to your APIs.
The JWT-IdToken token itself looks like this: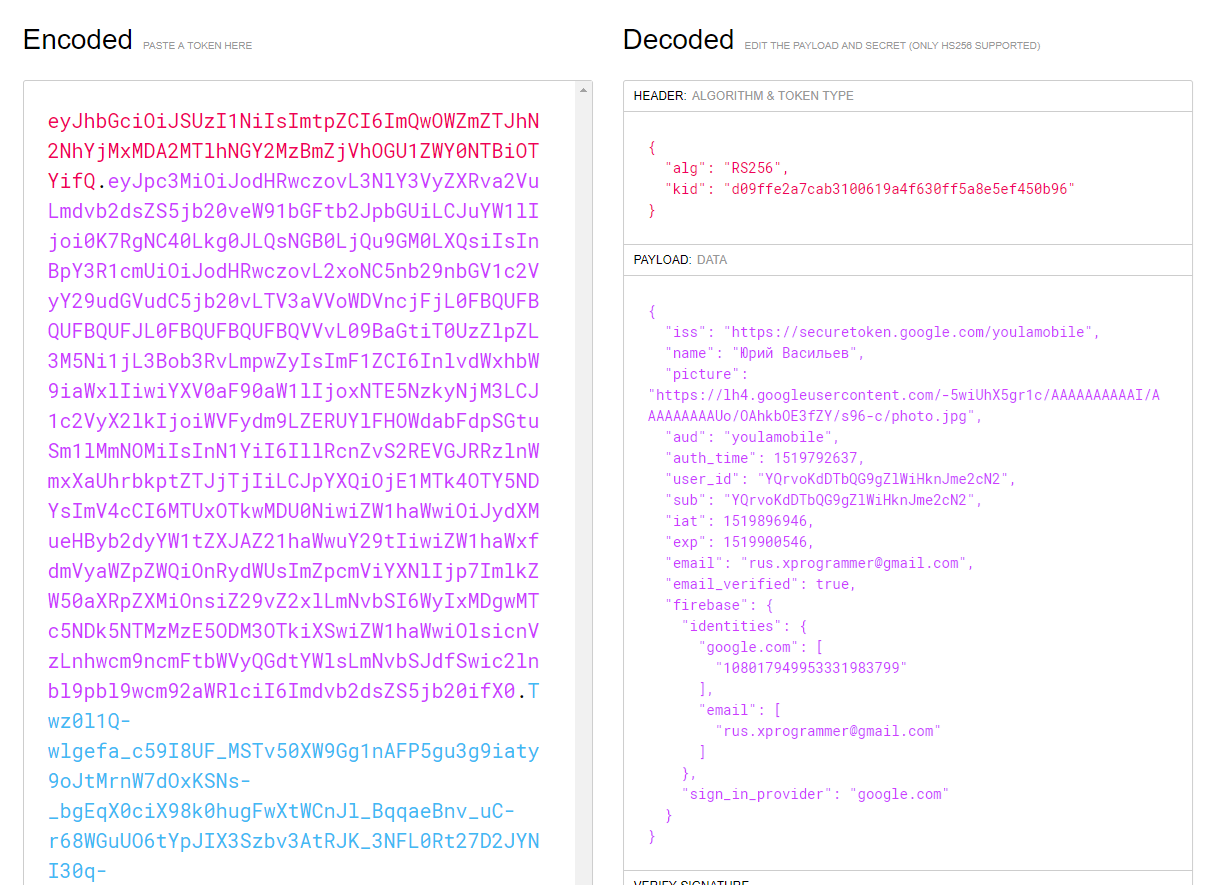
The mobile application receives information about the authenticated user from this token. Accordingly, we use IdToken to draw the name of the user and his avatar.
AccessToken we attach to the header of requests:
private void makeApiCall()
    {
        DevDayApi api = CreateApi("http://rnd-123.2gis.local/", accessToken);
        api.getUserProfile().enqueue(new Callback() {
            @Override
            public void onResponse(Call call, Response response) {
                runOnUiThread(() -> {
                    if(response.body() != null)
                        apiAnswer.setText(response.body().Answer);
                });
            }
            @Override
            public void onFailure(Call call, Throwable t) {
                apiAnswer.setText(t.getMessage());
            }
        });
    }
    private DevDayApi CreateApi(String baseUrl, String authToken)
    {
        HttpLoggingInterceptor logging = new HttpLoggingInterceptor();
        logging.setLevel(HttpLoggingInterceptor.Level.HEADERS);
        OkHttpClient client = new OkHttpClient.Builder()
                .addInterceptor(chain -> {
                    Request newRequest = chain.request().newBuilder()
                            .addHeader("Authorization", "Bearer " + authToken)//tokenProvider.getAuthToken())
                            .build();
                    return chain.proceed(newRequest);
                })
                .addInterceptor(logging)
                .build();
        Retrofit retrofit = new Retrofit.Builder()
                .client(client)
                .baseUrl(baseUrl)
                .addConverterFactory(GsonConverterFactory.create())
                .build();
        return retrofit.create(DevDayApi.class);
    }
For web client authentication, it is also quite simple to do an interactive login through IdenitityProvider. Below is an example from the official documentation on how to fasten this to an Angular4 application.
import { Injectable } from '@angular/core';
import { AUTH_CONFIG } from './auth0-variables';
import { Router } from '@angular/router';
import * as auth0 from 'auth0-js';
@Injectable()
export class AuthService {
  auth0 = new auth0.WebAuth({
    clientID: AUTH_CONFIG.clientID,
    domain: AUTH_CONFIG.domain,
    responseType: 'token id_token',
    audience: `https://${AUTH_CONFIG.domain}/userinfo`,
    redirectUri: AUTH_CONFIG.callbackURL,
    scope: 'openid'
  });
  constructor(public router: Router) {}
  public login(): void {
    this.auth0.authorize();
  }
  public handleAuthentication(): void {
    this.auth0.parseHash((err, authResult) => {
      if (authResult && authResult.accessToken && authResult.idToken) {
        this.setSession(authResult);
        this.router.navigate(['/home']);
      } else if (err) {
        this.router.navigate(['/home']);
        console.log(err);
        alert(`Error: ${err.error}. Check the console for further details.`);
      }
    });
  }
}
As you can see from the examples, no one was offended - the implementation for the customers is simple and straightforward.
For complete happiness, we lacked user authentication through our local Active Directory.
To configure synchronization between Auth0 and the local Active Directory, Auth0 provides a powershell script.

Когда мы уже обрадовались, что всё отлично работает, и пошли к админам с просьбой настроить синхронизацию между нашим AD и Auth0, то получили отказ. Ребята сказали, что максимум, куда они готовы лить наши данные, — это Azure. Также на решение повлияло то, что у нас уже использовалась подписка Office 365 и часть учёток уже была залита в Azure.
Окей, сказали мы.
Azure Active Directory B2C
У Microsoft есть сервис, который называется Azure Active Directory B2C. С помощью админов удалось настроить синхронизацию нашей AD с инстансом Azure AD и настроить вход через наш Active Directory Federation Services (ADFS).
Настройка политик входа в Azure B2C
На момент написания статьи сервис находится в превью версии, поэтому через UI можно настроить только самые примитивные сценарии, вроде входа через Google+ или Facebook. Вход через Active Directory производится через загрузку xml-файлов через Identity Experience Framework. На отладку сценариев входа ушло около восьми часов + ещё день на рефакторинг входа мобилки и прикручивание провайдера аутентификации от Microsoft.
На бекенде потребовалось только указать новый IdentityProvider и Audience.
Для того, чтобы настроить вход, потребуется скачать репозиторий и пройти процедуру настройки, описанную в статье. Всего несколько часов вы программируете на xml — и вуаля! Ваш клиент аутентифицируется через серверы Azure.
Username string TextBox User's Object's Tenant ID string Tenant identifier (ID) of the user object in Azure AD. User's Object ID string Object identifier (ID) of the user object in Azure AD. Sign in name string TextBox Email Address string Email address to use for signing in. TextBox Password string Enter password Password New Password string Enter new password Password Confirm New Password string Confirm new password Password Password Policies string Password policies used by Azure AD to determine password strength, expiry etc. client_id string Special parameter passed to EvoSTS. Special parameter passed to EvoSTS. resource_id string Special parameter passed to EvoSTS. Special parameter passed to EvoSTS. Subject string AlternativeSecurityId string MailNickName string Your mail nick name as stored in the Azure Active Directory. Identity Provider string Display Name string Your display name. TextBox Phone Number string XXX-XXX- Your telephone number Verified Phone Number string XXX-XXX- Your office phone number that has been verified New Phone Number Entered boolean UserId for MFA string Email Address string Email address that can be used to contact you. TextBox Alternate Email Addresses stringCollection Email addresses that can be used to contact the user. UserPrincipalName string Your user name as stored in the Azure Active Directory. UPN User Name string The user name for creating user principal name. User is new boolean Executed-SelfAsserted-Input string A claim that specifies whether attributes were collected from the user. AuthenticationSource string Specifies whether the user was authenticated at Social IDP or local account. nca string Special parameter passed for local account authentication to login.microsoftonline.com. grant_type string Special parameter passed for local account authentication to login.microsoftonline.com. scope string Special parameter passed for local account authentication to login.microsoftonline.com. objectIdFromSession boolean Parameter provided by the default session management provider to indicate that the object id has been retrieved from an SSO session. isActiveMFASession boolean Parameter provided by the MFA session management to indicate that the user has an active MFA session. Given Name string Your given name (also known as first name). TextBox Surname string Your surname (also known as family name or last name). TextBox LineMarkers, MetaRefresh ~/tenant/default/exception.cshtml ~/common/default_page_error.html urn:com:microsoft:aad:b2c:elements:globalexception:1.1.0 - Error page
~/tenant/default/idpSelector.cshtml ~/common/default_page_error.html urn:com:microsoft:aad:b2c:elements:idpselection:1.0.0 - Idp selection page
- Sign in
~/tenant/default/idpSelector.cshtml ~/common/default_page_error.html urn:com:microsoft:aad:b2c:elements:idpselection:1.0.0 - Idp selection page
- Sign up
~/tenant/default/unified.cshtml ~/common/default_page_error.html urn:com:microsoft:aad:b2c:elements:unifiedssp:1.0.0 - Signin and Signup
~/tenant/default/multifactor-1.0.0.cshtml ~/common/default_page_error.html urn:com:microsoft:aad:b2c:elements:multifactor:1.1.0 - Multi-factor authentication page
~/tenant/default/selfAsserted.cshtml ~/common/default_page_error.html urn:com:microsoft:aad:b2c:elements:selfasserted:1.1.0 - Collect information from user page
~/tenant/default/updateProfile.cshtml ~/common/default_page_error.html urn:com:microsoft:aad:b2c:elements:selfasserted:1.1.0 - Collect information from user page
~/tenant/default/selfAsserted.cshtml ~/common/default_page_error.html urn:com:microsoft:aad:b2c:elements:selfasserted:1.1.0 - Local account sign up page
~/tenant/default/selfAsserted.cshtml ~/common/default_page_error.html urn:com:microsoft:aad:b2c:elements:selfasserted:1.1.0 - Local account change password page
facebook.com Facebook Facebook - facebook
- https://www.facebook.com/dialog/oauth
- https://graph.facebook.com/oauth/access_token
- GET
- 0
- json
Local Account SignIn Local Account SignIn - We can't seem to find your account
- Your password is incorrect
- Looks like you used an old password
- https://sts.windows.net/
- https://login.microsoftonline.com/{tenant}/.well-known/openid-configuration
- https://login.microsoftonline.com/{tenant}/oauth2/token
- id_token
- query
- email openid
- false
- POST
PhoneFactor PhoneFactor - api.phonefactor
- true
Azure Active Directory Azure Active Directory false - Write
- true
- You are already registered, please press the back button and sign in instead.
false - Read
- true
- User does not exist. Please sign up before you can sign in.
- false
- Write
- true
false - Read
- true
- An account could not be found for the provided user ID.
false - Write
- true
false - Write
- false
- true
false - Read
- true
false - Write
- false
- true
false Self Asserted User ID signup - api.selfasserted
User ID signup - api.selfasserted.profileupdate
false Local Account Email signup - IpAddress
- api.localaccountsignup
- Create
Local Account Signin - SignUpWithLogonEmailExchange
- Email
- api.selfasserted
false Reset password using email address - IpAddress
- api.localaccountpasswordreset
false Change password (username) - api.localaccountpasswordreset
Session Management Noop Session Management Provider Session Mananagement Provider Session Mananagement Provider - true
Session Mananagement Provider Trustframework Policy Engine TechnicalProfiles Trustframework Policy Engine Default Technical Profile - {service:te}
Token Issuer JWT Issuer JWT - {service:te}
- objectId
- true
objectId SkipThisOrchestrationStep authenticationSource localAccountAuthentication SkipThisOrchestrationStep objectId SkipThisOrchestrationStep authenticationSource socialIdpAuthentication SkipThisOrchestrationStep objectId SkipThisOrchestrationStep isActiveMFASession SkipThisOrchestrationStep newPhoneNumberEntered SkipThisOrchestrationStep authenticationSource localAccountAuthentication SkipThisOrchestrationStep authenticationSource socialIdpAuthentication SkipThisOrchestrationStep Тут я привёл базовую политику входа. Для того, чтобы всё работало, требуется загрузить ещё три файла (они гораздо меньше, но вам всё равно придётся залезть в базовую политику).
Аутентификация Azure Active Directory B2C через ADFS выглядит следующим образом:
public class AuthImpl {
    private static final String TAG = AuthImpl.class.getSimpleName();
    private Activity activity;
    private PublicClientApplication authClient;
    private AuthTokenProvider authTokenProvider;
    private String[] scopes;
    @Inject
    AuthImpl(AppCompatActivity activity, PublicClientApplication authClient, AuthTokenProvider authTokenProvider)
    {
        this.activity = activity;
        this.authClient = authClient;
        this.authTokenProvider = authTokenProvider;
        this.scopes = Constants.SCOPES.split("\\s+");
    }
    public boolean isUserAuthenticated() {
        return AndroidHelpers.isEmulator() || getCurrentUser() != null;
    }
    private User getCurrentUser() {
        try {
            return Helpers.getUserByPolicy(authClient.getUsers(), Constants.SISU_POLICY);
        } catch (MsalClientException e) {
            /* No token in cache, proceed with normal unauthenticated app experience */
            Log.d(TAG, "MSAL Exception Generated while getting users: " + e.toString());
        } catch (IndexOutOfBoundsException e) {
            Log.d(TAG, "User at this position does not exist: " + e.toString());
        }
        return  null;
    }
    public Single login()
    {
        /* Attempt to get a user and acquireTokenSilently
         * If this fails we will do an interactive request
         */
        return Single.create(emitter -> {
            try {
                User currentUser = Helpers.getUserByPolicy(authClient.getUsers(), Constants.SISU_POLICY);
                if (currentUser != null) {
            /* We have 1 user */
                    authClient.acquireTokenSilentAsync(
                            scopes,
                            currentUser,
                            String.format(Constants.AUTHORITY, Constants.TENANT, Constants.SISU_POLICY),
                            false,
                            getAuthSilentCallback(emitter));
                } else {
            /* We have no user */
                    authClient.acquireToken(activity, scopes, getAuthInteractiveCallback(emitter));
                }
            } catch (MsalClientException e) {
        /* No token in cache, proceed with normal unauthenticated app experience */
                Log.d(TAG, "MSAL Exception Generated while getting users: " + e.toString());
            } catch (IndexOutOfBoundsException e) {
                Log.d(TAG, "User at this position does not exist: " + e.toString());
            }
        });
    }
    //
    // App callbacks for MSAL
    // ======================
    // getActivity() - returns activity so we can acquireToken within a callback
    // getAuthSilentCallback() - callback defined to handle acquireTokenSilent() case
    // getAuthInteractiveCallback() - callback defined to handle acquireToken() case
    //
    /* Callback used in for silent acquireToken calls.
     * Looks if tokens are in the cache (refreshes if necessary and if we don't forceRefresh)
     * else errors that we need to do an interactive request.
     */
    private AuthenticationCallback getAuthSilentCallback(final SingleEmitter emitter) {
        return new AuthenticationCallback() {
            @Override
            public void onSuccess(AuthenticationResult authenticationResult) {
                /* Successfully got a token, call api now */
                Log.d(TAG, "Successfully authenticated");
                emitter.onSuccess(new AuthResultDto(authenticationResult.getIdToken()));
            }
            @Override
            public void onError(MsalException exception) {
                /* Failed to acquireToken */
                Log.d(TAG, "Authentication failed: " + exception.toString());
                if (exception instanceof MsalClientException) {
                    /* Exception inside MSAL, more info inside MsalError.java */
                    emitter.onError(exception);
                    assert true;
                } else if (exception instanceof MsalServiceException) {
                    /* Exception when communicating with the STS, likely config issue */
                    emitter.onError(exception);
                    assert true;
                } else if (exception instanceof MsalUiRequiredException) {
                    /* Tokens expired or no session, retry with interactive */
                    authClient.acquireToken(activity, scopes, getAuthInteractiveCallback(emitter));
                }
            }
            @Override
            public void onCancel() {
                /* User canceled the authentication */
                Log.d(TAG, "User cancelled login.");
                emitter.onSuccess(new AuthResultDto(true));
            }
        };
    }
    /* Callback used for interactive request.  If succeeds we use the access
     * token to call the api. Does not check cache.
     */
    private AuthenticationCallback getAuthInteractiveCallback(final SingleEmitter emitter) {
        return new AuthenticationCallback() {
            @Override
            public void onSuccess(AuthenticationResult authenticationResult) {
                /* Successfully got a token, call api now */
                Log.d(TAG, "Successfully authenticated");
                Log.d(TAG, "ID Token: " + authenticationResult.getIdToken());
                authTokenProvider.setAuthToken(authenticationResult.getIdToken());
                emitter.onSuccess(new AuthResultDto(authenticationResult.getIdToken()));
            }
            @Override
            public void onError(MsalException exception) {
                /* Failed to acquireToken */
                Log.d(TAG, "Authentication failed: " + exception.toString());
                if (exception instanceof MsalClientException) {
                    /* Exception inside MSAL, more info inside MsalError.java */
                    emitter.onError(exception);
                    assert true;
                } else if (exception instanceof MsalServiceException) {
                    /* Exception when communicating with the STS, likely config issue */
                    emitter.onError(exception);
                    assert true;
                }
            }
            @Override
            public void onCancel() {
                /* User canceled the authentication */
                Log.d(TAG, "User cancelled login.");
                emitter.onSuccess(new AuthResultDto(true));
            }
        };
    }
    static final int BROWSER_FLOW = 1001;
    boolean handleInteractiveRequestRedirect(int requestCode, int resultCode, final Intent data){
        if(requestCode == BROWSER_FLOW)
        {
            authClient.handleInteractiveRequestRedirect(requestCode, resultCode, data);
            return true;
        }
        return false;
    }
}
Всё было отлично. Мы запустили тестовую эксплуатацию приложения на наших пользователей, но столкнулись с несколькими блокирующими проблемами:
- Компонента аутентификации полностью не работал, если на устройстве не был установлен Google Chrome.
- Авторизация в Azure AD для новых пользователей перестала работать.
- После удачного логина через ADFS было невозможно разлогиниться. Для разлогина требовалось очищать кэш браузера Chrome на устройстве.
Переезд на Google Firebase Auth
Вопрос с синхронизацией пользователей долго оставался подвешенным и, так как не было понятно, сколько времени потребует решение этой проблемы, мы экстренно переехали на другого провайдера. В этот раз мы попробовали Google Firebase Auth, так как он обладал нативным интерфейсом для входа и хорошо работал на всех наших тестовых устройствах.
Так как на клиенте мы абстрагировались от конкретного провайдера, то переехали на Google Firebase Auth за час.
Из доработок на бекенде потребовалось добавить код для скачивания сертификатов Google, которыми Firebase подписывает токены авторизации.
 private final FirebaseAuth authInstance;
  private CompositeDisposable disposables;
  private EventSubscriber eventSubscriber;
  public Single login(boolean forceRefreshToken)
    {
        if (disposables != null) {
            disposables.dispose();
        }
        disposables = new CompositeDisposable();
        return Single.create(emitter -> {
            FirebaseUser user = authInstance.getCurrentUser();
            if (user == null || !user.isEmailVerified()) {
                List providers = Arrays.asList(
                        new AuthUI.IdpConfig.EmailBuilder().setRequireName(true).build(),
                        new AuthUI.IdpConfig.GoogleBuilder().build());
                activity.startActivityForResult(
                        AuthUI.getInstance()
                                .createSignInIntentBuilder()
                                .setAvailableProviders(providers)
                                .build(),
                        MainActivity.REQUES_LOGIN);
            } else {
                if (forceRefreshToken) {
                    refreshToken();
                } else {
                    emitter.onSuccess(new AuthResultDto(false));
                }
            }
            disposables.add(this.eventSubscriber.getEvent(new AuthResultDto(true))
                    .subscribe(e ->  {
                        emitter.onSuccess(e);
                        disposables.dispose();
                    }));
        });
    }
    private void refreshToken() {
        FirebaseUser user = authInstance.getCurrentUser();
        user.getIdToken(true)
                .addOnCompleteListener(task -> {
                    if (task.isSuccessful()) {
                        GetTokenResult tokenResult = task.getResult();
                        String idToken = tokenResult.getToken();
                        // Сохраняем idToken
                        eventSubscriber.Publish(new AuthResultDto( false));
                        // ...
                    } else {
                        AuthResultDto result = new AuthResultDto( false);
                        result.Error = new Exception(task.getException());
                        eventSubscriber.Publish(new AuthResultDto(false));
                    }
        });
    }
Сейчас, когда мы запустились в продакшн на Firebase, проблему с синхронизацией данных в Azure AD удалось решить. Поэтому в перспективе мы возможно вернёмся на Azure.
Обо всём ещё разок
Мы попробовали поработать с тремя разными провайдерами аутентификации в реальном проекте и, исходя из нашего опыта, я могу порекомендовать следующее.
Auth0 — отличный провайдер, очень дружественно настроенный к разработчикам. Приятное API, нет проблем с интеграцией. Если у вас нет каких-то административных барьеров, то рекомендую к использованию :)
Azure Active Directory B2C — хорош для Enterprise. Скорее всего, удастся договориться с админами и юристами. Пока ещё довольно сырой, поэтому приходится писать конфиги в xml. Ещё одна особенность платформы — для администрирования инстанса B2C в России требуется учётка того, кто привязал карту к аккаунту. Это неудобно, пока идёт отладка и тестирование.
Firebase Auth is the lightest option. Suitable if you do not need complex login scripts and just have authentication. Of the minuses - a rather ascetic admin panel and a small list of default authentication sources.
What else can I add?
Using standards, in particular OpenId Connect, allowed us to:
- quickly and cheaply adapt our solution on the client,
- save resources on the development of the server side,
- do not waste time debugging and debugging custom authentication code.
All secure backend and easy authentication at the front :)