UI Autotests for Xamarin
Testing is an integral part of any software development. Quite a lot of time is allocated for it in the total amount of labor, but testing itself is a monotonous and monotonous thing, so it lends itself well to automation. In our article today, we will look at how to use UI tests in your Xamarin projects, including large business applications.

I give the floor to the author.
While the software used few third-party modules and had a primitive user interface, traditional unit tests were enough for most tasks, checking the operability of individual methods and classes. In mobile applications, unit tests have also found their application, but it is not so easy to cover modules and classes that are tied to a user interface or platform functionality. This will help us with special UI tests that will simulate the action of a real user: entering data, clicking on the screen, swipes and other gestures.
If you have not had occasion to use Xamarin UI Tests in your projects, then briefly recall that with this framework you can write self-tests in C # and run them both locally and in the App Center Test Cloud. Currently supported by iOS / Android, on Windows UWP this still does not work, but you can use Coded UI Tests or another framework instead of Xamarin UI Tests.
For a deeper acquaintance with the automatic testing of mobile applications and Xamarin UI Tests, we recommend these articles on Habré:
These articles describe the first steps in mastering autotests very much, but we will move on and consider how best to use autotests on large projects and integrate them with the App Center to run in the cloud on a wide fleet of devices.
Since UI tests are regularly used by no means in all teams, let us determine what and how can be checked with the help of automatic tests. To do this, we will go from those classes of errors and problems that are specific to mobile applications:
The curvature of some programmers, leading to bugs, is not a feature of mobile development, so we will leave it outside our article.
Based on the frequent problem areas, it is reasonable to divide self-tests into 3 main types:
We will tell you how to properly organize the QA process using UI tests in our next articles, and today we will focus on practice - how to organize your code base with tests on Xamarin UI Tests and how to run tests in the App Center.
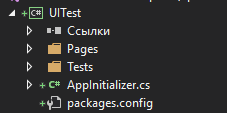
The structure of the UI tests that have just been added to the project is as follows:

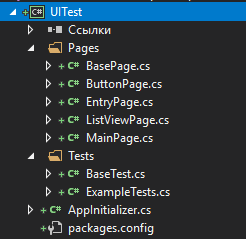
The default structure is not very suitable for large projects where there can be many tests. Therefore, we will divide the logic into the description of the pages and the logic of the tests itself, which will operate on the pages. A similar structure is recommended by Xamarin in its examples:
An example project structure with a large number of tests:
For greater convenience, tests can be grouped by the functionality that they test. For example: MapTests, AutorizationTests, etc.
For all visual elements (buttons, labels, lists, and other controls) in Xamarin.Forms applications that you can interact with, you need to set the AutomationId property through which they are accessed from the tests. If you are writing on classic Xamarin iOS / Android, you need to set the AccessibilityIdentifier properties on iOS and the ContentDescription on Android. This must be done in the application code, and the tester himself will cope with this.

This is necessary for more convenient work with UI tests. The separation of the logic of the behavior of pages (Pages) and the logic of the tests (Tests) increases the readability of the code and allows them to be further developed much faster as the project develops.
After creating the structure of UI tests, you can start writing them. Tests are launched from the unit tests panel. Tests for Android can be run directly on Windows from Visual Studio, but for iOS, at least for debugging, you will need to run them on Mac using Visual Studio for Mac, and then run them in the App Center.
The main tool for writing tests is the Repl method . It launches a console in which we will introduce the methods necessary for working with the Xamarin UI Test.


The main methods include :
You can learn more about how to manually write tests using Xamarin UI Tests in the official documentation:
At the moment, Xamarin UI Tests cannot perform the following actions:
It will also take a little extra action when interacting with system dialogs, for example, when obtaining Permissions.
In addition to manually writing tests, you can use the Xamarin Test Recorder tool, which will record your actions on the device (data entry, tapes, gestures) and automatically create UI test code in C #. As intended by Xamarin, it should reduce the time required to create tests, but it is worth remembering that this tool is still in the Preview stage. Often does not see AutomationId, and tests written for iOS do not work on Android.
In real projects on Xamarin Test Recorder, it’s better not to count so far, so we recommend getting used to writing tests in C #.
So, with the writing of tests we figured out. Before embedding UI tests in your CI / CD pipeline to run automatically, they must be run and debugged locally. To do this, you can perform UI tests through the unit test tool in Visual Studio on both Windows (Android only) and Mac (Android + iOS).

In order to get to practice, let's look at a simple example of UI tests for local testing.
There is a simple application consisting of 4 screens. Let's write a test for him.
First we compose the structure and describe BasePage, BaseTest and AppInitializer:
Then we describe each page (Page):

And only now we write the test itself:

If you did everything correctly, then the test will succeed.

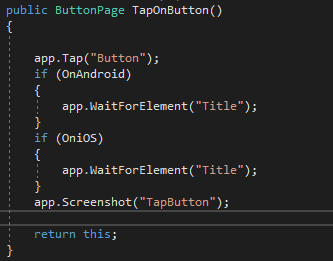
If you need to perform different actions on iOS and Android in one test, the OniOS and OnAndroid properties from BasePage will come in handy. This allows you to write single scripts for both platforms:
The main advantage of UI tests is revealed when they are embedded in your daily product development process. You can make your own device farm for autotests, but it's expensive and very labor intensive. It’s better to use the ready-made one, now there are different cloud farms, including those from Google and Amazon (see the 7 best device farms for testing mobile applications ).
Recall that most recently, Microsoft combined the services of the Hockey App (feedback collection and distribution), Xamarin Test Cloud (automated UI testing on real devices) with developments from Visual Studio Team Services (assembly) and introduced a service called App Center.
If you have already used the Xamarin Test Cloud, then the interface will seem familiar to you:
Information about a specific test includes step-by-step results with screenshots:

Getting to know the App Center is better according to official documentation .
To run the tests themselves in the console, you need to write the following commands:
You can see an example of the launch on the AppCeter.ms website in the Test section. For our sample application, it looked like this:

The minimum execution time for one test on one device takes about 1 minute, but it takes time to prepare the device and deploy your application to it. Thus, the minimum time to launch your project in the App Center will be about 5 minutes. The tests themselves will also take from 2 to 15 minutes, depending on the number of steps and the required time to wait for data from the server.
Often in practice there is a need to run various types of tests, for example, Smoke, Acceptance and others. To do this, you must specify the name of the category (Category) for each set of tests (or a separate test) and run in the App Center only the desired set of scripts.

And this is how the line for launching tests of the desired category will look:

This will allow you to run only those tests that are needed at the moment.
Autotests allow you to remove the itch of manual testing, and with the help of Xamarin UI Tests you can write and debug custom C # scripts directly in Visual Studio. Xamarin UI Test allows you to cover most of the user scripts for iOS / Android, and then also run your tests on hundreds of real devices in the App Center.
Repository with an example .
Stay connected and ask your questions in the comments!
 Vyacheslav Chernikov - Head of Development, Binwell . In the past, one of Nokia Champion and Qt Certified Specialist, currently a specialist in Xamarin and Azure platforms. He came into the mobile sphere in 2005, since 2008 he has been developing mobile applications: he started with Symbian, Maemo, Meego, Windows Mobile, then switched to iOS, Android and Windows Phone.
You can also read Vyacheslav's articles on the blog on Medium .
 Pavel Grushevsky , Automated Testing Specialist , Binwell .
I give the floor to the author.
While the software used few third-party modules and had a primitive user interface, traditional unit tests were enough for most tasks, checking the operability of individual methods and classes. In mobile applications, unit tests have also found their application, but it is not so easy to cover modules and classes that are tied to a user interface or platform functionality. This will help us with special UI tests that will simulate the action of a real user: entering data, clicking on the screen, swipes and other gestures.
Xamarin UI Tests
If you have not had occasion to use Xamarin UI Tests in your projects, then briefly recall that with this framework you can write self-tests in C # and run them both locally and in the App Center Test Cloud. Currently supported by iOS / Android, on Windows UWP this still does not work, but you can use Coded UI Tests or another framework instead of Xamarin UI Tests.
For a deeper acquaintance with the automatic testing of mobile applications and Xamarin UI Tests, we recommend these articles on Habré:
These articles describe the first steps in mastering autotests very much, but we will move on and consider how best to use autotests on large projects and integrate them with the App Center to run in the cloud on a wide fleet of devices.
Types of UI Tests and Mobile Issues
Since UI tests are regularly used by no means in all teams, let us determine what and how can be checked with the help of automatic tests. To do this, we will go from those classes of errors and problems that are specific to mobile applications:
- Various operating systems and their versions. The application should work correctly on a wide range of different OSs, each of which has its own characteristics and limitations. Frequent errors: the application does not start or crashes in any version of the OS.
- Various options for the architecture of the central processor. The hardware of smartphones and tablets is constantly improving, but do not forget about the "old people" five years ago, which may be in the hands of your real users. Frequent errors: the application cannot be installed on devices that are too old, too new, or rare (for example, Android x86).
- Different screen resolutions of devices. Regardless of the number of pixels or aspect ratio, the interface of the mobile application must correctly “stretch” and “wrap”. Frequent errors: user interface elements are truncated or clumsily displayed on the smallest or largest screens.
The curvature of some programmers, leading to bugs, is not a feature of mobile development, so we will leave it outside our article.
Based on the frequent problem areas, it is reasonable to divide self-tests into 3 main types:
- Smoke tests to run the assembled application on the “most” extreme versions of iron: the oldest and newest. This will make sure that updating any dependent library or checkmark in the project settings did not break anything.
- Acceptance tests to test key user scenarios. This will make sure that the latest edits did not break at least those scenarios that real users will follow in most situations.
- Advanced tests for checking the layout of all screens at a variety of resolutions, as well as tests for any specific functionality. This also includes regression auto-tests.
We will tell you how to properly organize the QA process using UI tests in our next articles, and today we will focus on practice - how to organize your code base with tests on Xamarin UI Tests and how to run tests in the App Center.
Project structure with UI tests
The structure of the UI tests that have just been added to the project is as follows:
The default structure is not very suitable for large projects where there can be many tests. Therefore, we will divide the logic into the description of the pages and the logic of the tests itself, which will operate on the pages. A similar structure is recommended by Xamarin in its examples:
- github.com/Microsoft/SmartHotel360-mobile-desktop-apps/tree/master/src/SmartHotel.Clients.UITests
- github.com/xamarinhq/app-evolve/tree/master/src/XamarinEvolve.UITests
- github.com/xamarin/test-cloud-samples
An example project structure with a large number of tests:
- Pages contains methods that describe the logic of individual pages.
- Tests contains tests that use predefined methods from Pages
For greater convenience, tests can be grouped by the functionality that they test. For example: MapTests, AutorizationTests, etc.
For all visual elements (buttons, labels, lists, and other controls) in Xamarin.Forms applications that you can interact with, you need to set the AutomationId property through which they are accessed from the tests. If you are writing on classic Xamarin iOS / Android, you need to set the AccessibilityIdentifier properties on iOS and the ContentDescription on Android. This must be done in the application code, and the tester himself will cope with this.
This is necessary for more convenient work with UI tests. The separation of the logic of the behavior of pages (Pages) and the logic of the tests (Tests) increases the readability of the code and allows them to be further developed much faster as the project develops.
Running UI Tests and Basic Methods
After creating the structure of UI tests, you can start writing them. Tests are launched from the unit tests panel. Tests for Android can be run directly on Windows from Visual Studio, but for iOS, at least for debugging, you will need to run them on Mac using Visual Studio for Mac, and then run them in the App Center.
The main tool for writing tests is the Repl method . It launches a console in which we will introduce the methods necessary for working with the Xamarin UI Test.
The main methods include :
- tree - displays all the information on the elements on the screen;
- app.Tap - tap on the selected item;
- app.WaitForElement - waiting for the element to appear on the page;
- app.Scroll Down \ Up - scrolling simulation;
- app.EnterText - text input;
- app.Query - displays all the information on the selected item on the screen;
- app.Screenshot - makes a screenshot of the screen.
You can learn more about how to manually write tests using Xamarin UI Tests in the official documentation:
At the moment, Xamarin UI Tests cannot perform the following actions:
- Manage your Internet connection and networks;
- Integration with other applications on the device is not available;
- Bluetooth / WiFi control functions, physical rotation are not available; devices and simulations of various battery conditions;
- Interaction with system notifications is not available;
- Limited work with the camera.
It will also take a little extra action when interacting with system dialogs, for example, when obtaining Permissions.
Xamarin Test Recorder
In addition to manually writing tests, you can use the Xamarin Test Recorder tool, which will record your actions on the device (data entry, tapes, gestures) and automatically create UI test code in C #. As intended by Xamarin, it should reduce the time required to create tests, but it is worth remembering that this tool is still in the Preview stage. Often does not see AutomationId, and tests written for iOS do not work on Android.
In real projects on Xamarin Test Recorder, it’s better not to count so far, so we recommend getting used to writing tests in C #.
Local testing
So, with the writing of tests we figured out. Before embedding UI tests in your CI / CD pipeline to run automatically, they must be run and debugged locally. To do this, you can perform UI tests through the unit test tool in Visual Studio on both Windows (Android only) and Mac (Android + iOS).
In order to get to practice, let's look at a simple example of UI tests for local testing.
There is a simple application consisting of 4 screens. Let's write a test for him.
First we compose the structure and describe BasePage, BaseTest and AppInitializer:
Then we describe each page (Page):
And only now we write the test itself:
If you did everything correctly, then the test will succeed.
If you need to perform different actions on iOS and Android in one test, the OniOS and OnAndroid properties from BasePage will come in handy. This allows you to write single scripts for both platforms:
App center
The main advantage of UI tests is revealed when they are embedded in your daily product development process. You can make your own device farm for autotests, but it's expensive and very labor intensive. It’s better to use the ready-made one, now there are different cloud farms, including those from Google and Amazon (see the 7 best device farms for testing mobile applications ).
Recall that most recently, Microsoft combined the services of the Hockey App (feedback collection and distribution), Xamarin Test Cloud (automated UI testing on real devices) with developments from Visual Studio Team Services (assembly) and introduced a service called App Center.
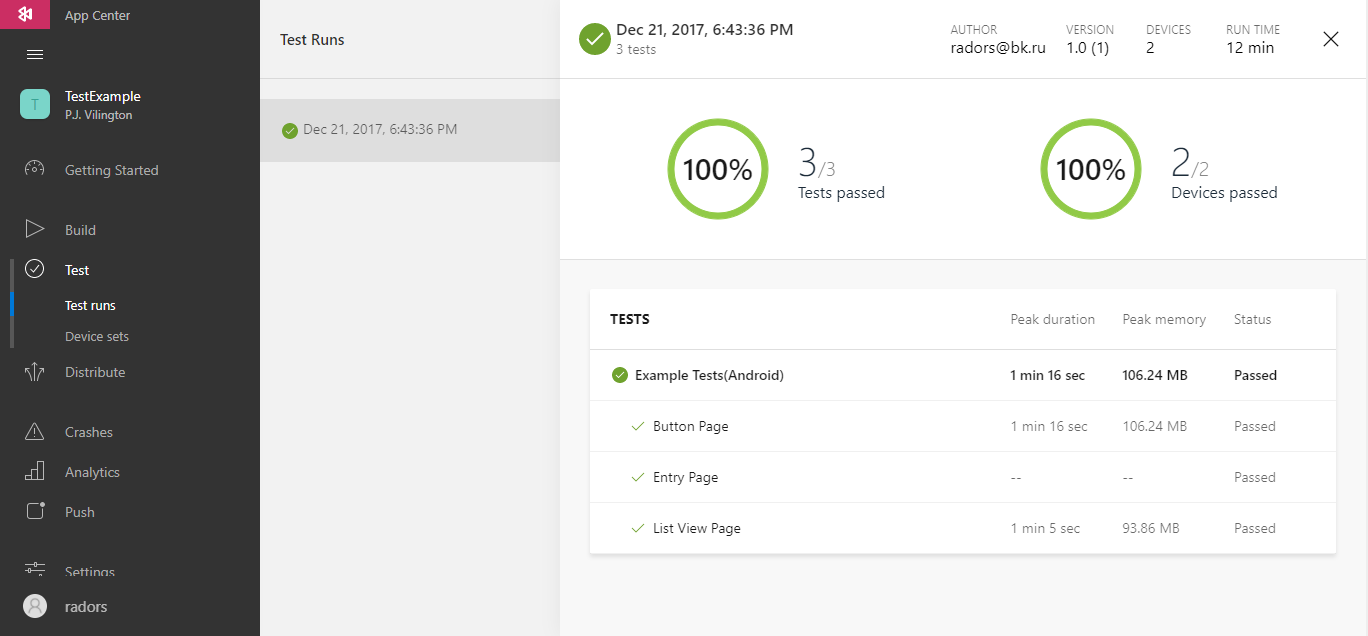
If you have already used the Xamarin Test Cloud, then the interface will seem familiar to you:
Information about a specific test includes step-by-step results with screenshots:
Getting to know the App Center is better according to official documentation .
To run the tests themselves in the console, you need to write the following commands:
appcenter test run uitest --app “НАЗВАНИЕ_ПРИЛОЖЕНИЯ” --devices "НАЗВАНИЕ_DEVICE_SET" --app-path “ПУТЬ_ДО_APK/IPA” --test-series "НАЗВАНИЕ_TEST_SERIES" --locale "ru_RU" --build-dir “ПУТЬ_ДО_БИНАРЕЙ_С_UI_ТЕСТАМИ” --uitest-tools-dir “ПУТЬ_К_ФАЙЛУ_test-cloud.exe”You can see an example of the launch on the AppCeter.ms website in the Test section. For our sample application, it looked like this:
The minimum execution time for one test on one device takes about 1 minute, but it takes time to prepare the device and deploy your application to it. Thus, the minimum time to launch your project in the App Center will be about 5 minutes. The tests themselves will also take from 2 to 15 minutes, depending on the number of steps and the required time to wait for data from the server.
Several types of tests in one project
Often in practice there is a need to run various types of tests, for example, Smoke, Acceptance and others. To do this, you must specify the name of the category (Category) for each set of tests (or a separate test) and run in the App Center only the desired set of scripts.
And this is how the line for launching tests of the desired category will look:
This will allow you to run only those tests that are needed at the moment.
Total
Autotests allow you to remove the itch of manual testing, and with the help of Xamarin UI Tests you can write and debug custom C # scripts directly in Visual Studio. Xamarin UI Test allows you to cover most of the user scripts for iOS / Android, and then also run your tests on hundreds of real devices in the App Center.
Repository with an example .
Stay connected and ask your questions in the comments!
The authors
Vyacheslav Chernikov - Head of Development, Binwell . In the past, one of Nokia Champion and Qt Certified Specialist, currently a specialist in Xamarin and Azure platforms. He came into the mobile sphere in 2005, since 2008 he has been developing mobile applications: he started with Symbian, Maemo, Meego, Windows Mobile, then switched to iOS, Android and Windows Phone. You can also read Vyacheslav's articles on the blog on Medium .
Minute of advertising. We invite you on April 13 to a workshop “ Mobile DevOps in Practice ”, where you can talk with Vyacheslav Chernikov and learn how to organize the DevOps process in a team of mobile developers.
Pavel Grushevsky , Automated Testing Specialist , Binwell .