Introduction to Layer 3 Firewall MikroTik
Firewall (or packet filter) is a large and complex topic, both theoretically and practically. A packet filter in different operating systems may have its advantages and disadvantages compared to other implementations. In this article, I will consider the exceptionally firewall in RouterOS with an eye on its iptables progenitor.
Foreword
Who is this article for?
If you know how to work with iptables, then dare and configure the firewall, for you in this article will not be anything new (well, except that the NAT table uses chains with different names). If you first see the firewall in RouterOS and want to get a ready-made script for configuration, then you will not find it here. The material is aimed at those who want to get a basic idea of how the firewall works and what happens with the ip package at different stages of its processing. A deeper understanding will come with experience and solving everyday and unusual tasks using a packet filter.
Theoretical part
What is a Layer3 Firewall
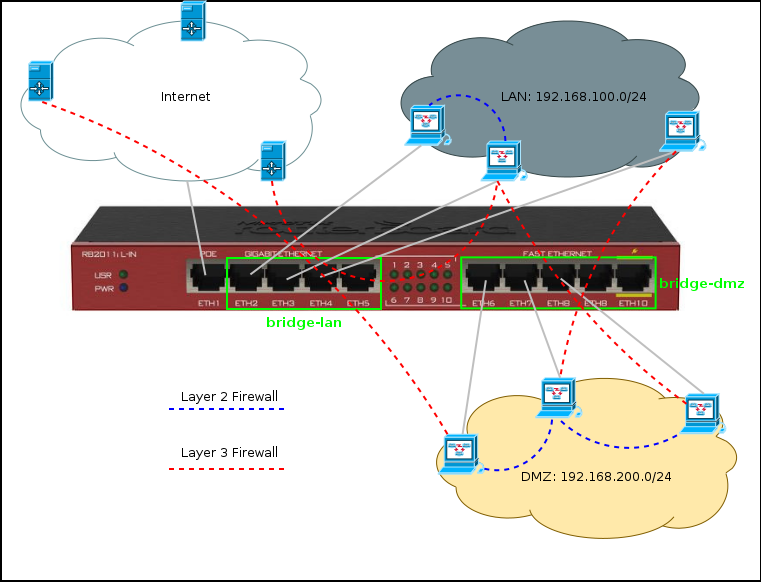
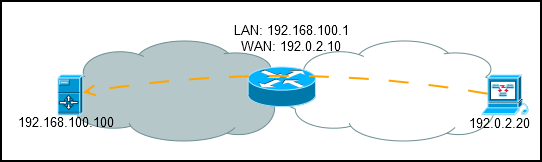
Suppose you have a router with Internet access and two bridge interfaces: bridge-lan (ether2-ether5) and bridge-dmz (ether6-ether10).
Within the Bridge interface interface, devices independently find neighbors from their subnet and exchange packets, the router acts as a switch and does not track such traffic at the network level (of course, you can force it to do this, but let's talk about Layer2 Firewall another time).
If you need to communicate with a device connected to another bridge interface or a device located in the global network, send packets to the router, which determines the route and processes them at the network (Layer 3) level.
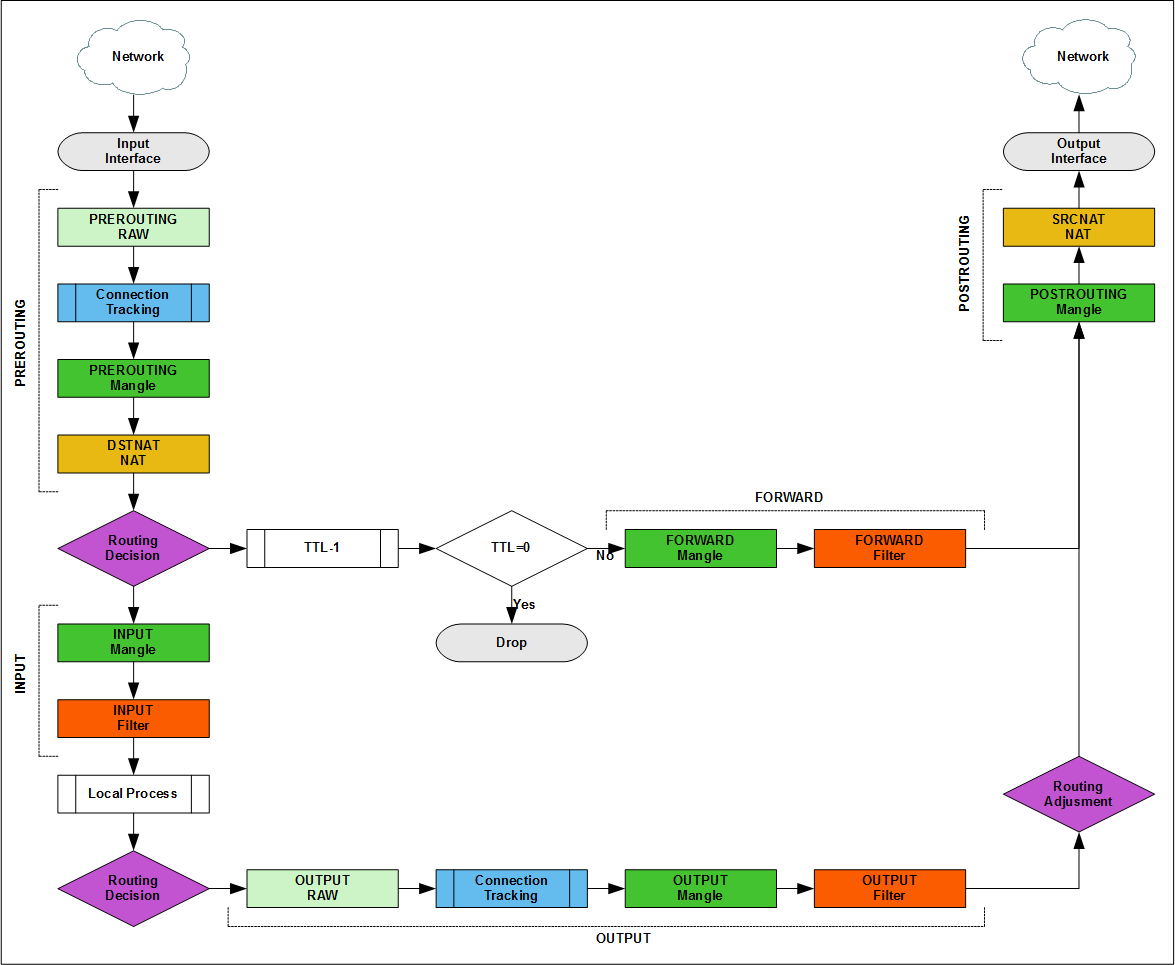
Packet flow diagram
The full traffic path is described in the Packet Flow Diagram, there are several official (v5, v6 ) versions, they need to be known and used in everyday work, but to understand how the packet filter works, they are overloaded, so I will explain in a lightweight version.
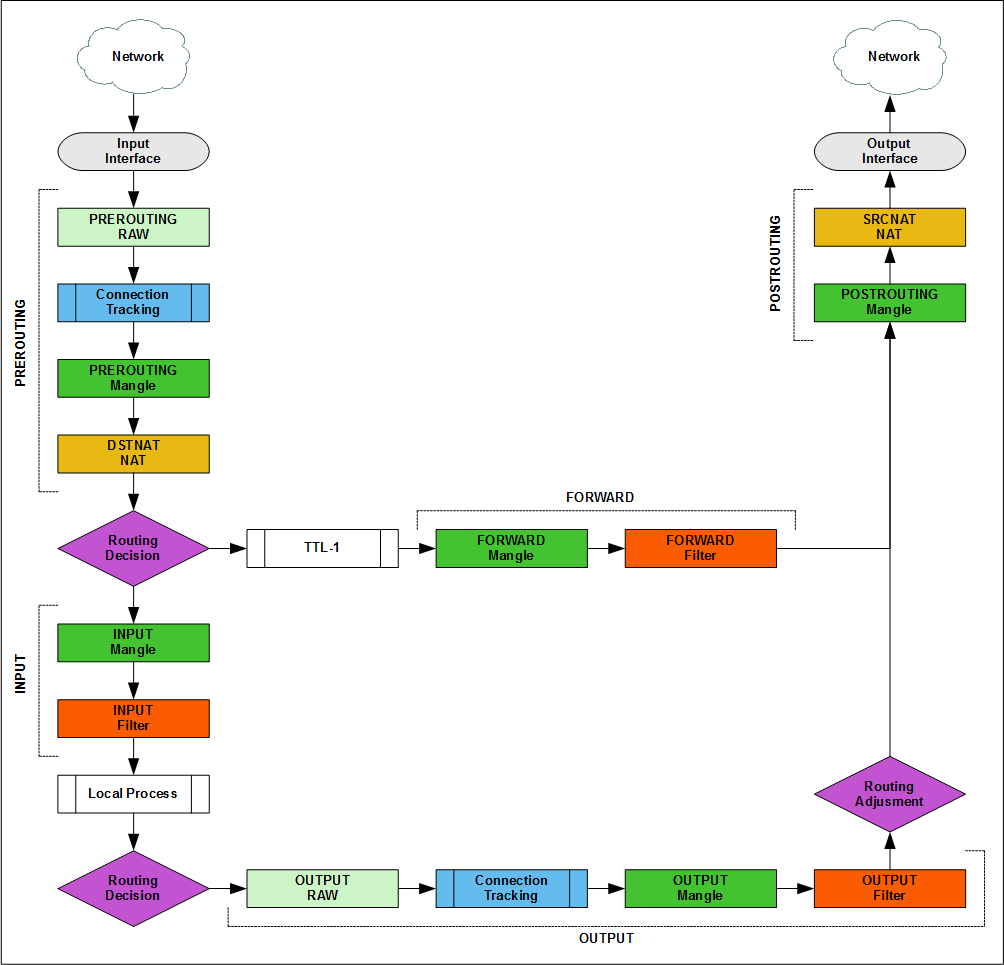
The Input / Output Interface is any (physical or virtual) Layer 3 router interface. The packet that goes from the local network to the Internet goes to the input interface, and goes to the output interface. The packet from the Internet to the local network also goes to the input interface, and leaves the output interface. Packet Flow is always read in one direction input -> output.
Terminology features
Studying the packet flow for iptables, you can find descriptions through "chains in tables" or "tables in chains". The diagram shows tables in chains, when adding rules to a firewall, everything will be the other way around.
But in fact, the packet is moved between the blocks [chain + tables], for example, if you make accept in the [prerouting + mangle] block, the transit packet will still be processed in [forward + mangle]. This is important to remember in complex configurations with pbr and queues.
There are more precise definitions in the iptables documentation, but in simple terms:
Chains are responsible for the packet processing point and the sequence of rules.
Tables define the actions that can be performed on a package.
Basic package sequence options
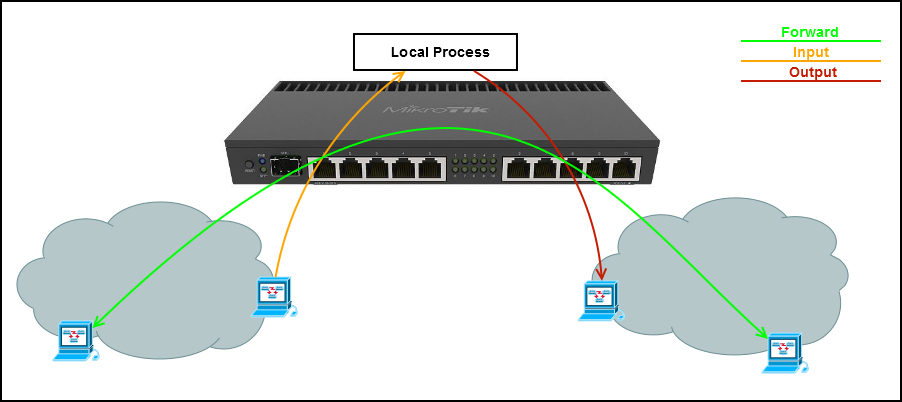
Transit
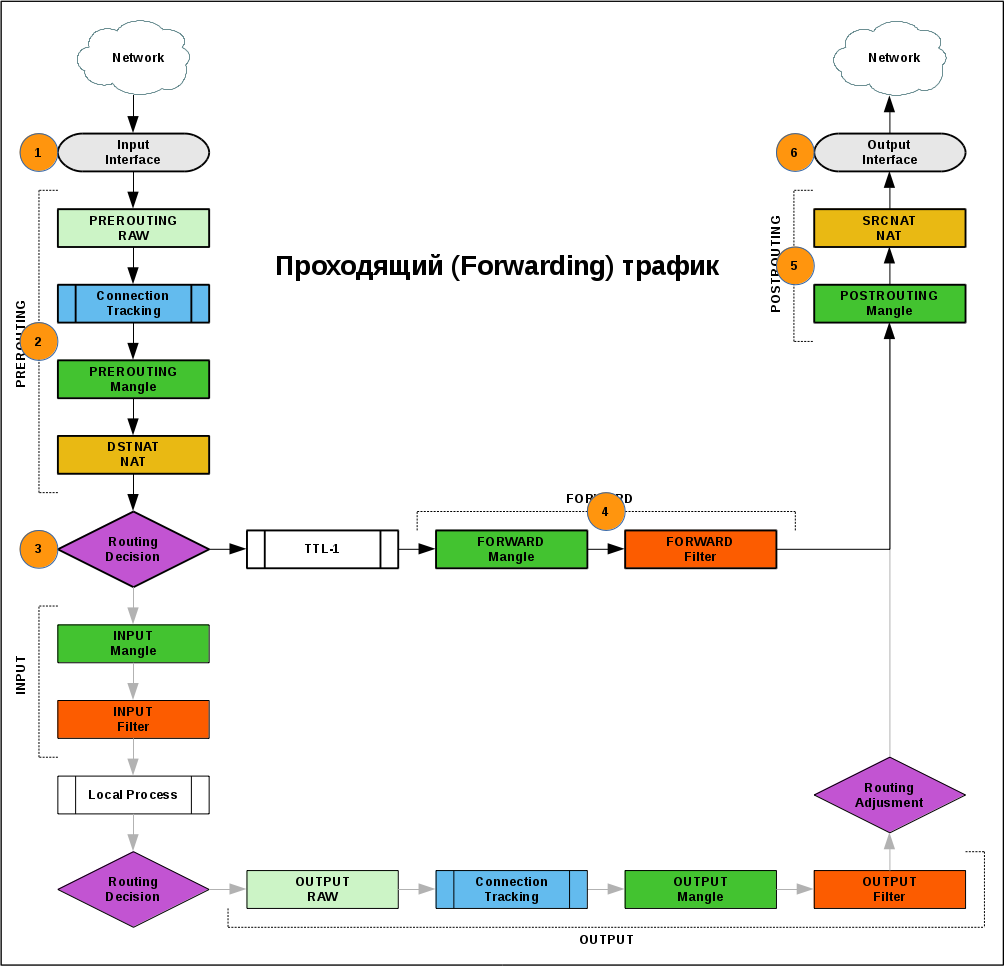
- A packet from the network comes to one of the interfaces of the router
- In the PREROUTING chain, the administrator can influence the route of the packet: determine the output interface (Policy base routing) or redirect to another address (dst-nat).
- The outgoing interface is determined according to the routing table for a packet.
- FORWARD chain is the main place for filtering passing traffic.
- The last item before going online is the POSTROUTING chain, in which you can change the sender's address (src-nat).
- The package went to the network.
Incoming
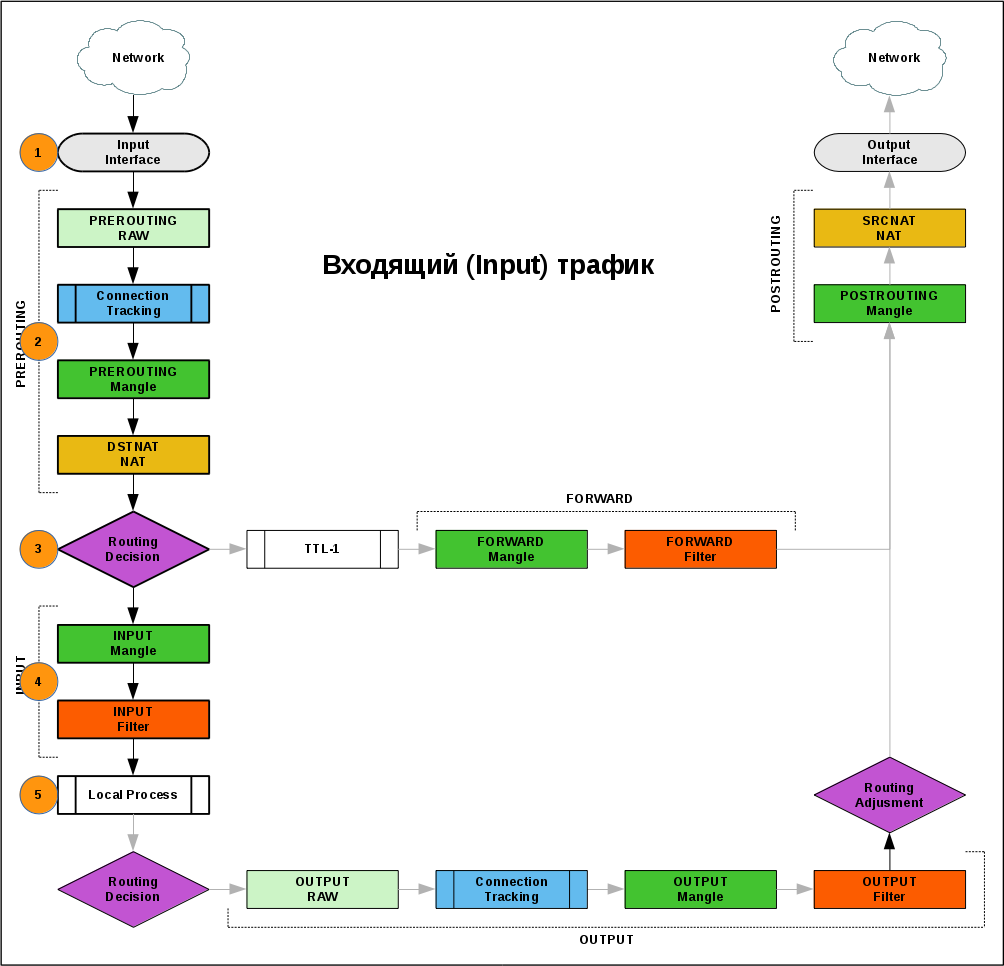
- A packet from the network came to one of the interfaces of the router
- Got into the PREROUTING chain.
- In accordance with the routing table, the packet was sent for processing to a local process.
- In the INPUT chain, incoming traffic is filtered by the administrator.
- The package is left for local process processing.
Outgoing
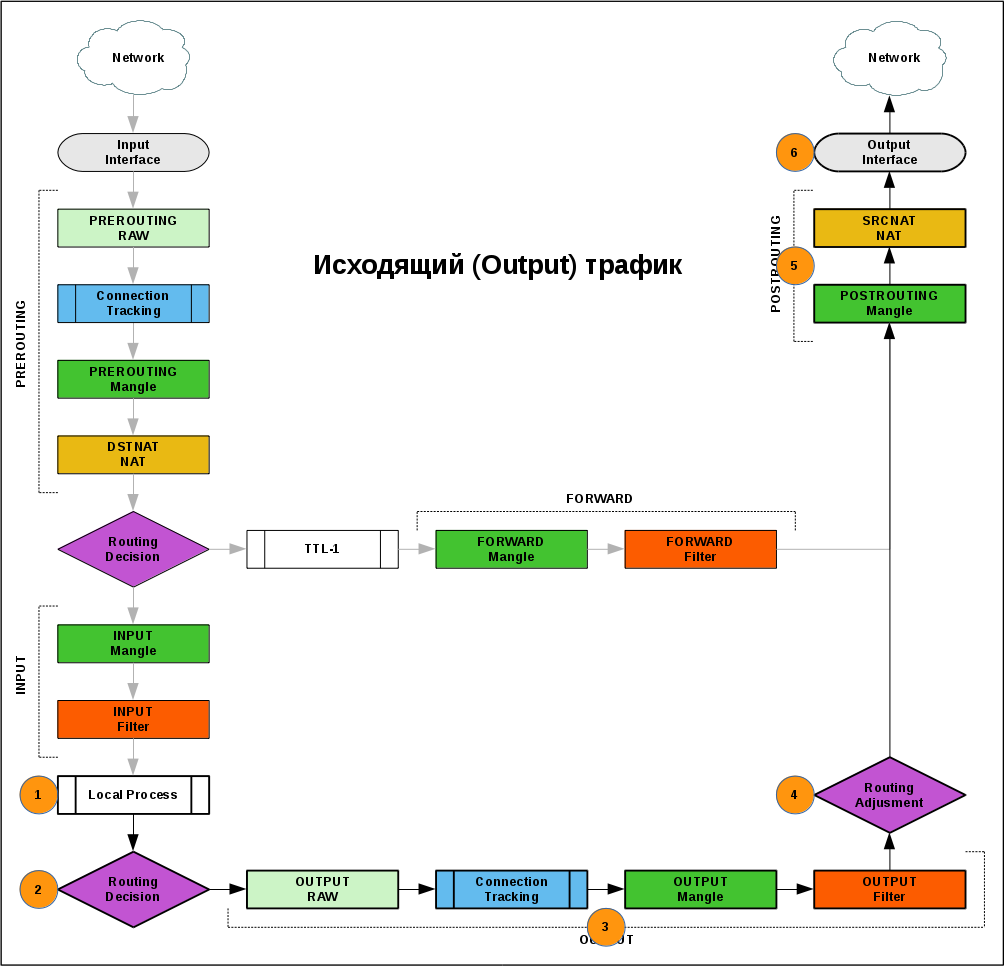
- One of the processes of the router generated the ip packet (new or return - it does not matter).
- The output interface is defined according to the routing table for the packet.
- The administrator can filter outgoing traffic, or change the route in the OUTPUT chain.
- For the packet, the final decision is made on the output interface.
- The packet gets into POSTROUTING, as well as passing traffic.
- The package went to the network.
Connection tracker
First you need to understand what the stateful and stateless packet filters are.
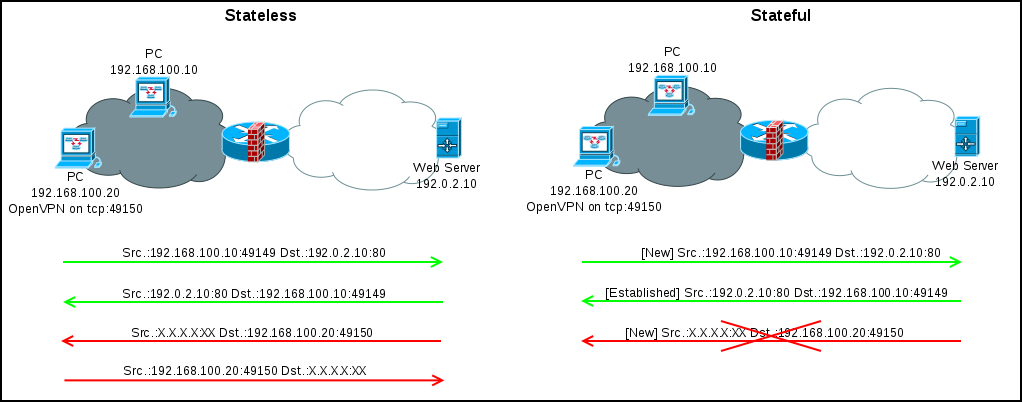
Example. Computer 192.168.100.10 opens the tcp connection with the server 192.0.2.10. On the client side, the dynamic port 49149 is used, on the server side 80. Even before receiving the content, the client and the server must exchange packets for setting up the tcp session.
In stateless, you will need to open traffic from the local network to the Internet and from the Internet to the local network (at least for a range of dynamic ports). What is generally a hole.
In a stateful router, it analyzes the packets and, having received tcp syn from 192.168.100.10:491414 for 192.0.2.10:80, considers this the beginning of a new (new) connection. All further packets (in any direction) between 192.168.100.10:49141414 and 192.0.2.10:80 will be considered part of the established connection until the tcp session is closed or the timers expire.
For UDP / ICMP and other types of traffic, where the beginning and end of the connection cannot be clearly distinguished, the new packet is the first, the others are considered part of the established connection and update the timers, the router forgets about such connections after the timers expire.
Connection tracker divides packages into several types:
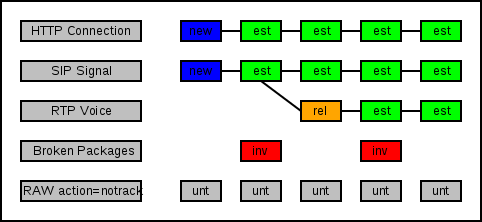
new - a packet opening a connection, for example, syn for tcp or the first packet in the udp stream.
Established is a package related to a known connection.
related - packet related to the additional connection in the multiprotocol (sip, pptp, ftp, ...).
invalid - packet from unknown connection.
untracked - package not monitored connection tracker.
Configuration Connection tracker
enabled = yes - enabled.
enabled = no - disabled.
enabed = auto - disabled until a rule using the conntrack capabilities appears in the firewall. Used by default.
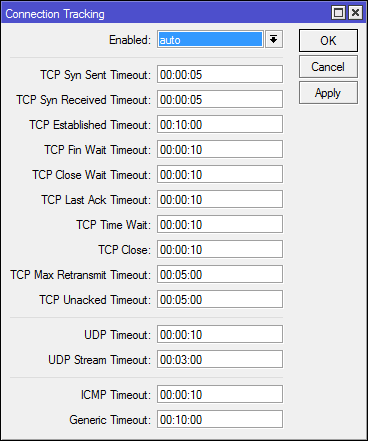
The remaining parameters are different timers and usually do not require tuning.
The administrator can view and delete connections, for example, this is how a NAT connection looks like:

Using conntrack affects the performance and resource consumption (especially with a large number of connections), but disable it in most configurations will not work, because you will have a stateless firewall without NAT.
TTL
Time To Live - the field in the IP packet header that defines the number of routers through which a packet can pass before it is destroyed, protects against infinite packet forwarding at routing loops.
When forwarding, the router decreases the TTL value by 1 drops, if TTL = 0. In this case, a packet with TTL = 1 will fall into the local process of the router.
Some communication operators use TTL tricks to prevent the use of routers. All these restrictions are well worth the increase in ttl values in the mangle table.
NAT
Network Address Translation - technology change addresses in the header of the ip package. As with linux, NAT is part of a packet filter. NAT works on the basis of connection tracker.
Initially, NAT was designed as a quick solution to the problem of the exhaustion of IPv4 addresses; for local networks, it was proposed to use a subnet from the following ranges: 10.0.0.0/8; 172.16.0.0/12; 192.168.0.0/16 and broadcast them to one (or several) routable addresses. In fact, there are still several service subnets that can be used in private networks and the router is basically all the same as NAT'it, but it is recommended to follow the standards.
NAT processes only: tcp, udp, icmp and some multiprotocol from [IP] -> [Firewall] -> [Service Port]. Only the first (connection-state = new) packet in the connection is processed, the rest are processed automatically without the participation of the NAT table. This can be tracked by changing the counters in the rules.
The packet header contains Source and Destination addresses, respectively, and NAT is divided into Source and Destination NAT.
Source NAT - the substitution of the sender's address, is present on the vast majority of home and corporate routers in the world.
Allows multiple devices with gray addresses on the local network to communicate with the Internet using one (or several) real addresses.
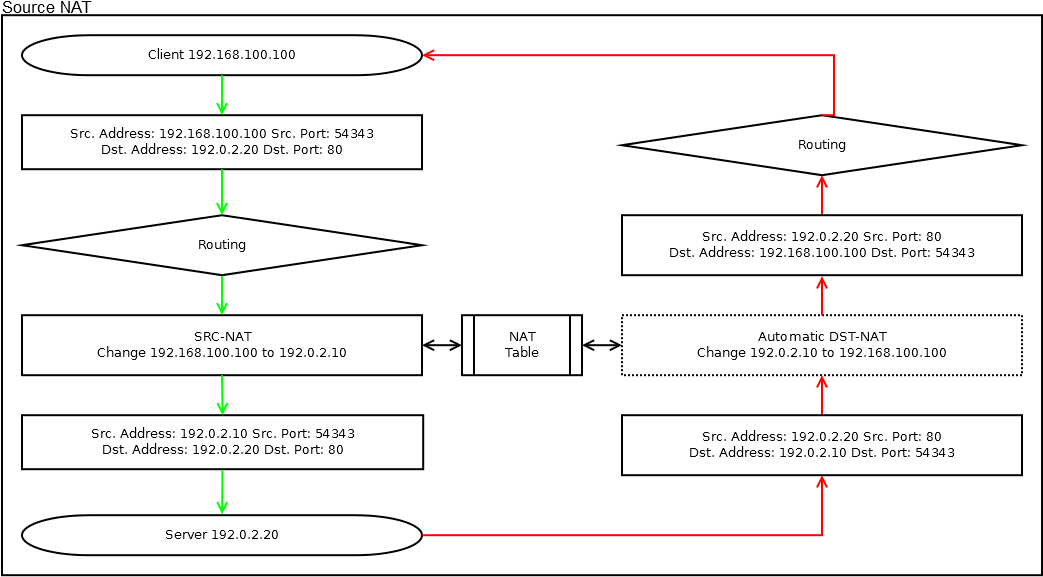
Returning to Packet Flow, we see that SRC-NAT is in Postrouting, after making a decision on packet routing.
The response packet passes an implicit DST-NAT in which the recipient address is changed to local.
Destination NAT - substitution of the address of the recipient.
It is used if necessary to forward a packet to another address, usually used for port forwarding from the external network to the local network.
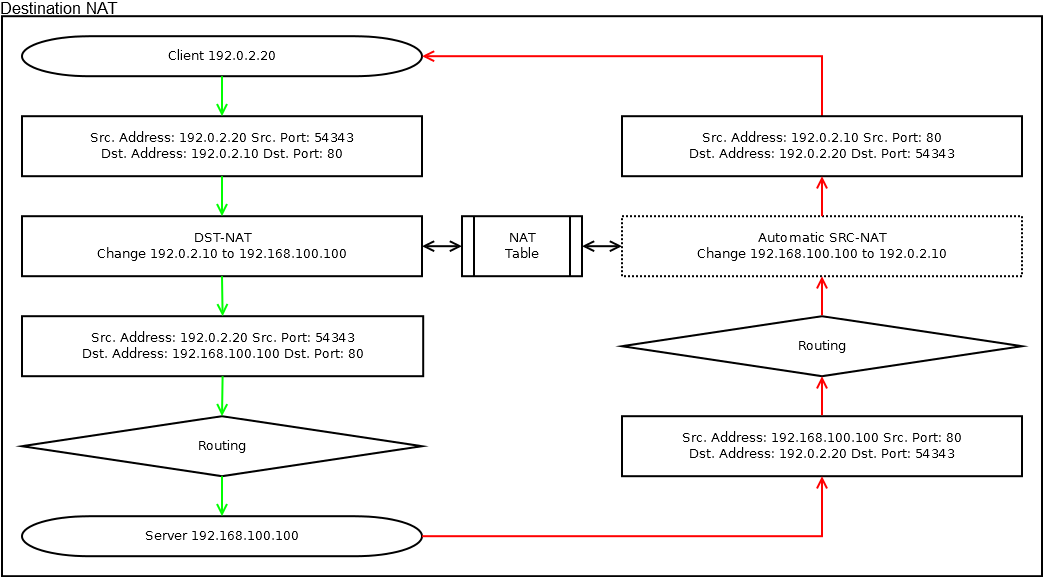
According to Packet Flow, DST-NAT operation takes place before making a routing decision in Prerouting, implicit SRC-NAT is present for response traffic.
NAT is a fairly powerful traffic management tool, but it is the last thing to use (when other tools cannot help).
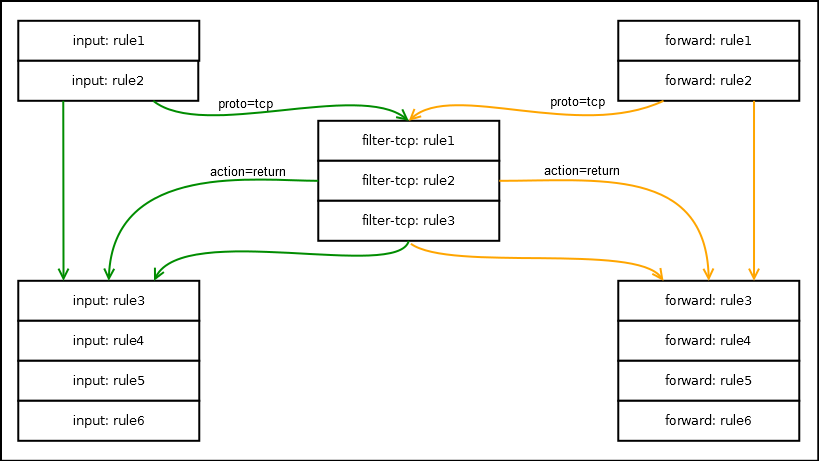
Chains (chains) basic and custom
Chains are made up of rules and force the processing logic of a package.
There are several basic chains mapped to packet flow:
Prerouting (dstnat) - packet processing before deciding on routing
Input - processing packets destined for local
Output Router processes - processing packets of packets generated by local
Forward Router processes - Processing passing traffic
Postrouting (srcnat) - Processing traffic ready for transmission to the interface
Everything is as in iptables, but the chains in nat are renamed. What is the reason for this (most likely with hotspot or hardware unloading nat) is unknown to me, but fundamentally changes nothing.
A packet passes the rules in a chain sequentially; if it matches all the conditions, then an action is applied to the packet. If the action is terminating and does not drop the packet, then it is transmitted to the next packet flow block.
All of the basic chains have a default action (if the package did not match any of the rules) - accept .
Custom chains are needed to reduce the number of rules that each packet passes and to build complex traffic processing rules. All user chains have a default action, return .
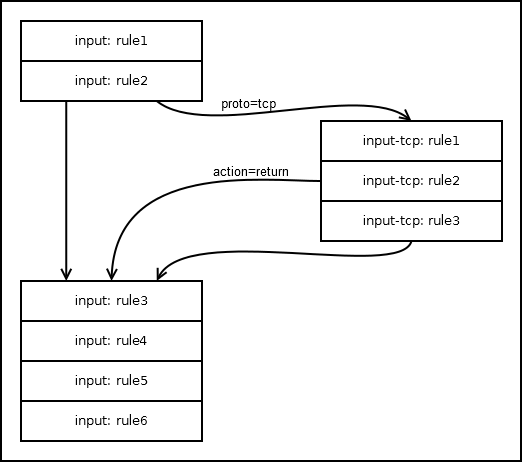
Within the table, you can send the rules from several different basic (and user) chains to the user, but the package will return to the chain from which it came.
Terms in the rules
Chains consist of rules, each rule consists of conditions and actions. There are a lot of conditions, but not all of you will use in real configurations. Most conditions can be prefixed with "not" (the "!" Sign). To match the rule, the package must fit all the specified conditions.

| Condition | Description |
|---|---|
| src-address | Source address |
| dst-address | Address of the recipient |
| src-address-list | The source address is listed. |
| dst-address-list | Recipient's address is on the list |
| protocol | Transport Protocol |
| src-port | Source port |
| dst-port | Receiver port |
| port | Source or destination port |
| in-interface | Interface to which the packet came |
| out-interface | Interface from which the package will be sent to the network |
| in-interface-list | Интерфес на который пришел пакет присутствует в списке |
| out-interface-list | Интерфейс с которого пакет будет отправлен в сеть присутствует в списке |
| layer7-protocol | Анализ содержимого первых 10 пакетов в соединениий |
| content | Поиск заданной строки в пакете |
| tls-host | Поиск хоста в заголовке tls |
| ipsec-policy | Проверить подпадает пакет под политику ipsec или нет |
| packet-size | размер пакета в байтах |
| src-mac-address | mac адрес источника пакета |
| connection-mark | Метка соединения |
| packet-mark | Метка пакета |
| routing-mark | Маршрутная метка пакета |
| connection-state | Состояние пакета в соединении |
| tcp-flags | Флаги tcp пакета |
| icmp-options | Опции icmp пакета |
| random | Правило срабатывает(при совпадении остальных условий) с заданной вероятностью |
| time | Можно указать рабочее время правила, к сожалению без конктеризации даты |
| ttl | Значение поля ttl в пакете |
| dscp | Значение поля DSCP(ToS) в пакете |
| --//-- | --//-- |
| place-before | Консольная опция(не условие), позволяет добавить правило перед указанным |
| disabled | Консольная опция(не условие), позволяет отключить правило |
Примечания
В качестве src.(dst.) address можно указывать: одиночный ip, диапазон адресов через дефис, либо подсеть.
Списки адресов необходимы для объединения под одним именем нескольких несвязанных ip. В отличии от ipset в netfilter, записи в списках MikroTik могут удаляться через заданный промежуток времени. Просмотреть списки и внести изменения можно в [IP]->[Firewall]->[Address Lists].
В качестве номера порта(port, src-port, dst-port) можно указывать одиночный порт, несколько портов через запятую, либо диапазон портов через дефис.
At the last MUM in the MSC, there was a good presentation on the effect of various conditions on the processing speed of packets (there you will also learn how to use the raw table to reduce the load on the router) who is interested: recording and presentation .
Actions in tables
The set of available actions on a package depends on the table in which it is processed. 
Filter is a traffic filtering table, one of two places where a packet can be dropped.
NAT - the table of ip address and port modification (tpc, udp) in the ip header of the packet.
Mangle is a table for modifying other fields of the ip package and setting various labels.
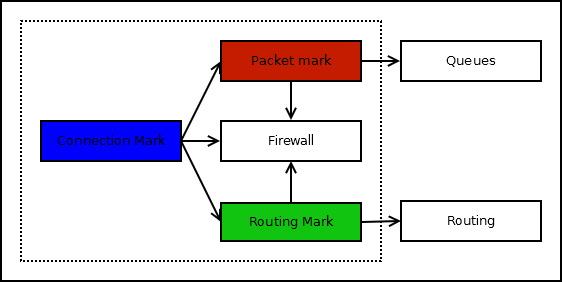
There are three types of internal packet labels: connection, packet, route. Tags exist only within the router and do not go to the network. A packet can have one label of each type, with the successive passing of several mark- * rules, the labels are overwritten.
Route labels can be set only in chains prerouting and output, the rest in any chains.
A good practice is to first mark the connection (connection), and then the packet (packet) or route (route). Checking for a label is faster than packet fields. In practice, this is not always the case and in complex queues or pbr the additional marking of the connection is not useful.
RAW is a table that allows packets to bypass the connection tracker. It is used to counteract DoS and reduce the load on cpu (for example, excluding multicast traffic). Allows you to drop a packet.
The terminating actions complete the processing of the packet in the chain and transfer it to the next block in the packet flow, or discard it.
| Таблица | Действие | Описание | Терминирующее? |
|---|---|---|---|
| Все | accept | Прекратить обработку пакета и передать в следующий блок Pakcet flow | Да |
| Все | log | Записать в log информацию о пакете.В современных версиях можно добавить log к любому другому действию | Нет |
| Все | passtrough | Посчитать число пакетов. Используется для отладки | Нет |
| Все | add src to address list и add dst to address list | Добавить source (destination) адрес из пакета в заданный список | Нет |
| Все | jump | Перейти в пользовательскую цепочку | Да |
| Все | return | Вернуться в родительскую цепочку. В базовых цепочках работает как accept | Да |
| Filter и Raw | drop | Остановить движение пакета по packet flow и отбросить | Да |
| Filter и Prerouting | fasttrack | Пометить пакет для быстрого прохождения packet flow | Да |
| Filter | reject | Аналогично drop, но отправителю пакетов отправляется уведомление(tcp или icmp) о отброшенном пакете | Да |
| Filter | trapit | Эмулировать наличие открытого порта. Используется для защиты от DoS, ввода в заблуждение и(иногда) отладке | Да |
| NAT | src-nat | Подмена адреса отправителя на указанный | Да |
| NAT | masquerade | Частный случай src-nat, подменяет адрес отправителя на один из адресов с интерфейса, используется на динамических(dhcp, vpn) интерфейсах. Не рекомендуется использовать при наличии нескольких ip на интерфейсе | Да |
| NAT | same | Частный случай src-nat. Подменяет адрес отправителя на адрес из заданного диапазона | Да |
| NAT | dst-nat | Подменяет адрес получателя на указанный | Да |
| NAT | redirect | Частный случай dst-nat, подменяет адрес получателя на адрес интерфейса роутера на который пришел пакет | Да |
| NAT | netmap | Не замена dst-nat. Применяется при трансляции сеть-в-сеть, смотрите примеры | Да |
| Mangle | mark connection | Метка соединения | Нет |
| Mangle | mark packet | Метка пакета, применяется в очередях | Нет |
| Mangle | mark routing | Метка маршрута, применяется в Policy base routing | Нет |
| Mangle | change ttl | Изменить ttl | Нет |
| Mangle | change dcsp(tos) | Изменить dcsp, в десятичном виде | Нет |
| Mangle | change mss | Изменить mss в tcp syn | Нет |
| Mangle | clear df | Очистить флаг do not fragmet | Нет |
| Mangle | strip ipv4 options | Очистить дополнительные опции ipv4 | Нет |
| Mangle | set priority | Установить приоритет для CoS | Нет |
| Mangle | route | Задать gateway для пакета. Простая версия PBR | Нет |
| Mangle | sniff tzsp | Инкапсулировать пакеты в udp и отправить на указанный ip | Нет |
| Mangle | sniff pc | Аналог tzsp, но с другим типом инкапсуляции. В wiki если примеры использования с calea | Нет |
| Mangle | passtrough | По умолчанию большинство правил в mangle не останавливает прохождение пакета, можно изменить это поведение установить passtrough=no | Нет |
| Raw | notrack | Не отслеживать пакет в connection tracker | Да |
Если найдутся желающие, могу написать подробнее про FastTrack и FastPath, но чудес от этих технологий ждать не стоит.
A couple of words about DPI
There are several possibilities to look into the package a little deeper than the header of the transport layer:
content - searches for the specified string in the package.
layer7-protocol - buffers the first 10 packets (or 2KiB) from the connection and searches by regexp in the buffered data. A large number of layer7 rules significantly affect performance.
tls-host is the hostname address in the TLS / SNI header of the HTTPS connection.
Examples
Do not copy the examples mindlessly, better take the device and try to write the configuration yourself (or rewrite the examples, but understand what each of the rules does). If you do not know how to supplement the rules: in the default and minimal home configurations there is no access to the router with the wan interface, add it with filtering by address list.
Default Firewall RouterOS
A fairly secure configuration, but in some places very confused:
/ip firewall filter
#Разрешает входящий трафик от уже установленных(established, related) соединений и неотслеживаемые(untracked) пакеты
add action=accept chain=input connection-state=established,related,untracked
#Отбрасываем входящие пакеты от неизвестных(invalid) соединений
add action=drop chain=input connection-state=invalid
#Разрешаем входящий icmp трафик
add action=accept chain=input protocol=icmp
#Отбрасываем все входящие пакеты пришеджие не с интерфейсов локальной сети
add action=drop chain=input in-interface-list=!LAN
#Для правильной работы ipsec в туннельном режиме
add action=accept chain=forward ipsec-policy=in,ipsec
add action=accept chain=forward ipsec-policy=out,ipsec
#Маркируем для быстрого прохождения транзитные пакеты от уже установленных соединений
add action=fasttrack-connection chain=forward connection-state=established,related
#Разрешаем транзитные пакеты от уже установленных соединений
add action=accept chain=forward connection-state=established,related,untracked
#Отбрасываем неизвестные транзитные пакеты
add action=drop chain=forward connection-state=invalid
#Отбрасываем транзитные пакеты со стороны wan интерфейсов, которы не относятся к dstnat (вспоминаем, что для ответных пакетов в src-nat присходит неявный dst-nat)
add action=drop chain=forward connection-nat-state=!dstnat connection-state=new in-interface-list=WAN
/ip firewall nat
#Source NAT для пакетов не относящихся к ipsec, уходящих с интерфесов из списка WAN
add action=masquerade chain=srcnat ipsec-policy=out,none out-interface-list=WAN
I have never used the default config, but before that the default firewall was much worse.
Minimal Home Firewall
The easiest thing to come up with. Yes, it does not allow untracked traffic (but you don’t need it anyway at the stage of basic firewall learning) and there will be problems with tunnel ipsec (again, if you know how to configure ipsec, then you know what needs to be done).
/ip firewall filter
#Разрешает входящий трафик от уже установленных(established, related) соединений
add chain=input connection-state=established,related action=accept
#Разрешаем входящий icmp трафик
add chain=input connection-state=new protocol=icmp action=accept
#Разрешаем входящий трафик из локальной сети
add chain=input connection-state=new in-interface-list=LAN action=accept
#Отбрасываем весь оставшийся входящий трафик
add chain=input action=drop
#Разрешаем транзитные пакеты от уже установленных соединений
add chain=forward connection-state=established,related action=accept
#Разрешаем транзитные пакеты из локальной сети в сеть интернет
add chain=forward connection-state=new in-interface-list=LAN action=accept
#Отбрасываем весь оставшийся транзитный трафик
add chain=forward action=drop
/ip firewall nat
#Source NAT для пакетов уходящих с интерфесов из списка WAN
add chain=srcnat out-interface-list=WAN action=masquerade
DMZ example
On home routers, the abbreviation DMZ likes to call the computer on a local subnet for which all ports from the external network are forwarded.
In fact, this is not the case, and one of the variants of the DMZ is the separation of the resource for which you need to provide access from the Internet and a successful attack can be carried out (a web server with cms in which holes are constantly found is a good target for a hacker). In the case of hacking, the attacker will not be able to affect the participants of the local network.
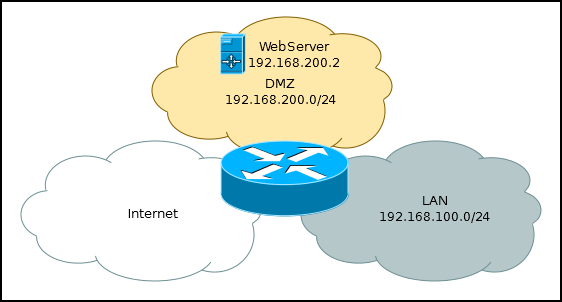
#Проброс порта
/ip firewall nat
add chain=dstnat dst-port=80,443 action=dst-nat to-address=192.168.200.2
/ip firewall filter
#Разрешаем ответный и icmp входящий трафик
add chain=input connection-state=established,related action=accept
add chain=input protocol=icmp connection-state=new action=accept
#Разрешаем входящий трафик из локальной сети
add chain=input in-interface=ether2-lan action=accept
#Отбрасываем оставшийся входящий трафик
add chain=input action=drop
#Разрешаем ответный транзитный трафик
add chain=forward connection-state=established,related action=accept
#Разрешаем пользователям из локальной сети создавать транзитные соединения
add chain=forward in-interface=ether2-lan connection-state=new action=accept
#Разрешаем транзитные соединения на web сервер
add chain=forward out-interface=ether3-dmz dst-address=192.168.200.2 dst-port=80,443 connection-state=new action=accept
#Отбрасываем оставшийся транзитныйтрафик
add chain=forward action=drop
HairPin NAT
/ip firewall nat
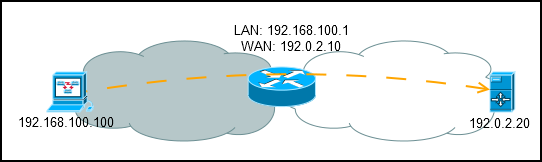
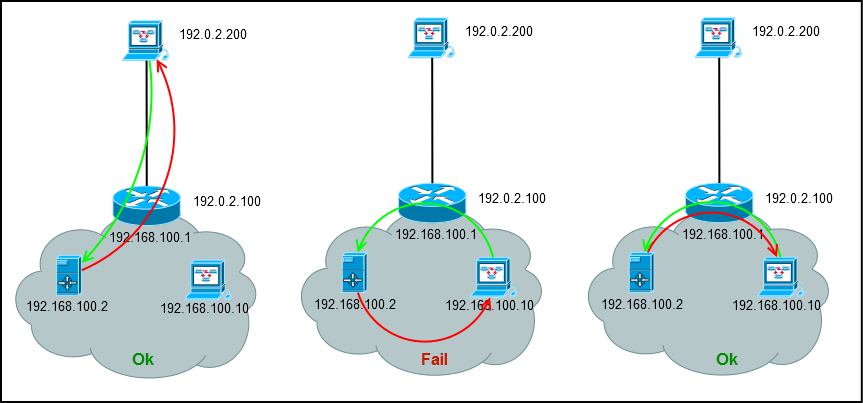
add chain=dstnat dst-port=80 action=dst-nat to-address=192.168.100.2A typical situation is when you do port forwarding to a server on the local network and everything is working from the outside, but the server is not accessible inside the local network by an external address.
Let's look at what is happening:
- Computer 192.168.100.10 sends a request for 192.0.2.100
- On the router it runs DST-NAT and the packet is forwarded to 192.168.100.2
- The server sees that a packet from 192.168.100.10 has arrived at 192.168.100.2 and responds from the local address
- The computer receives an unexpected packet from 192.168.100.2 and discards it.
The solution is to add an additional rule that changes the source address to the address of the router, so the server will return the packet to the router, which will send it to the computer initializer.
/ip firewall nat
#Правило проброса
add chain=dstnat dst-port=80 action=dst-nat to-address=192.168.100.2
#Новое правило, для пользователей из локальной сети
add chain=srcnat src-address=192.168.100.0/24 dst-address=192.168.100.2 action=masquerade
In practice, this scheme is not often used, but as an example of debugging a firewall, I really like it.
Proper use of netmap
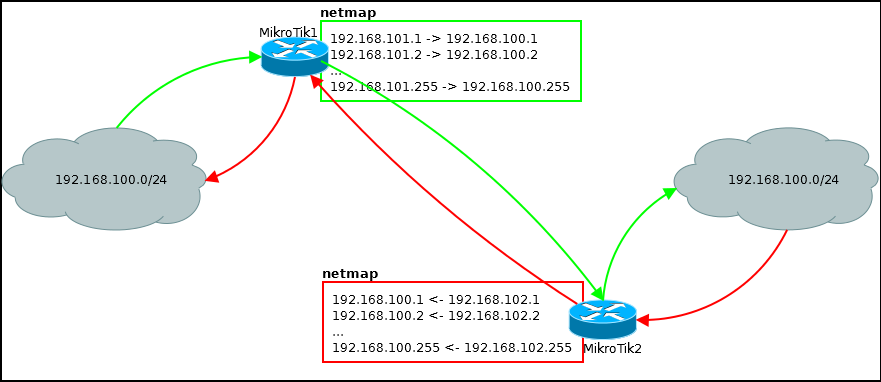
Netmap is a technology for translating addresses from one subnet to another subnet.
The IP address (in the masked entry) consists of two parts: the network (the number of bits specified in the subnet mask) and the host (the remaining bits). Netmap changes the network part of the address, but does not touch the host.
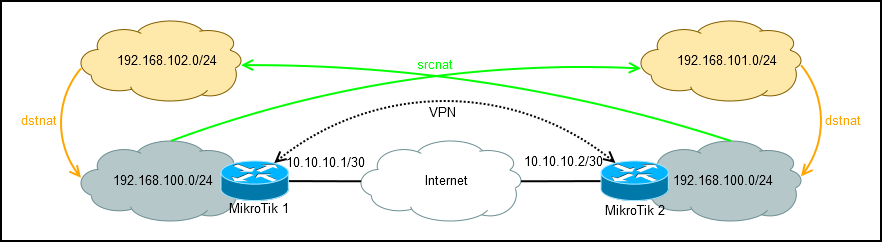
There are two routers connected by a VPN channel. Routers serve subnets with the same addressing. It is necessary to make access between subnets.
Without additional addressing is not enough.
Users from the left subnet will knock on the right through the subnet 192.168.102.0/24
Users from the right subnet will knock on the left via the subnet 192.168.101.0/24
Configuration on MikroTik 1.
#Без правила роутинга не обойтись
/ip route
add distance=1 dst-address=192.168.102.0/24 gateway
/ip firewall nat
#В исходящих пакетах будем менять адрес источника
add action=netmap chain=srcnat dst-address=192.168.102.0/24 out-interface=ipip src-address=192.168.100.0/24 to-address=192.168.101.0/24
#Во входящих пакетах будем менять адрес получателя
add action=netmap chain=dstnat dst-address=192.168.101.0/24 in-interface=ipip src-address=192.168.102.0/24 to-address=192.168.100.0/24
The MikroTik2 configuration is almost the same:
/ip route
add distance=1 dst-address=192.168.101.0/24 gateway=10.10.10.1
/ip firewall nat
add action=netmap chain=srcnat dst-address=192.168.101.0/24 out-interface=ipip src-address=192.168.100.0/24 to-address=192.168.102.0/24
add action=netmap chain=dstnat dst-address=192.168.102.0/24 in-interface=ipip src-address=192.168.101.0/24 to-address=192.168.100.0/24
There are more complex configurations using netmap, for example, if you have many connections to remote points with intersecting subnets and you cannot change the settings on remote equipment, but this is advanced routing.
If you do not understand (about netmap), then you don’t need it and just don’t use this action when port forwarding.