Delete what's hidden: optimize 3D scenes in a mobile game. Plarium Krasnodar employee tips
Already at the initial stage of creating mobile games, it should be borne in mind that detailed models heavily load a portable device, and this leads to a drop in frame rate, especially on weak devices. How to use the resources of three-dimensional models economically without losing visual quality? Under the cut - a solution found by specialists of the Krasnodar studio Plarium.

The method described here requires large calculations and is suitable only for preliminary preparation of scenes.
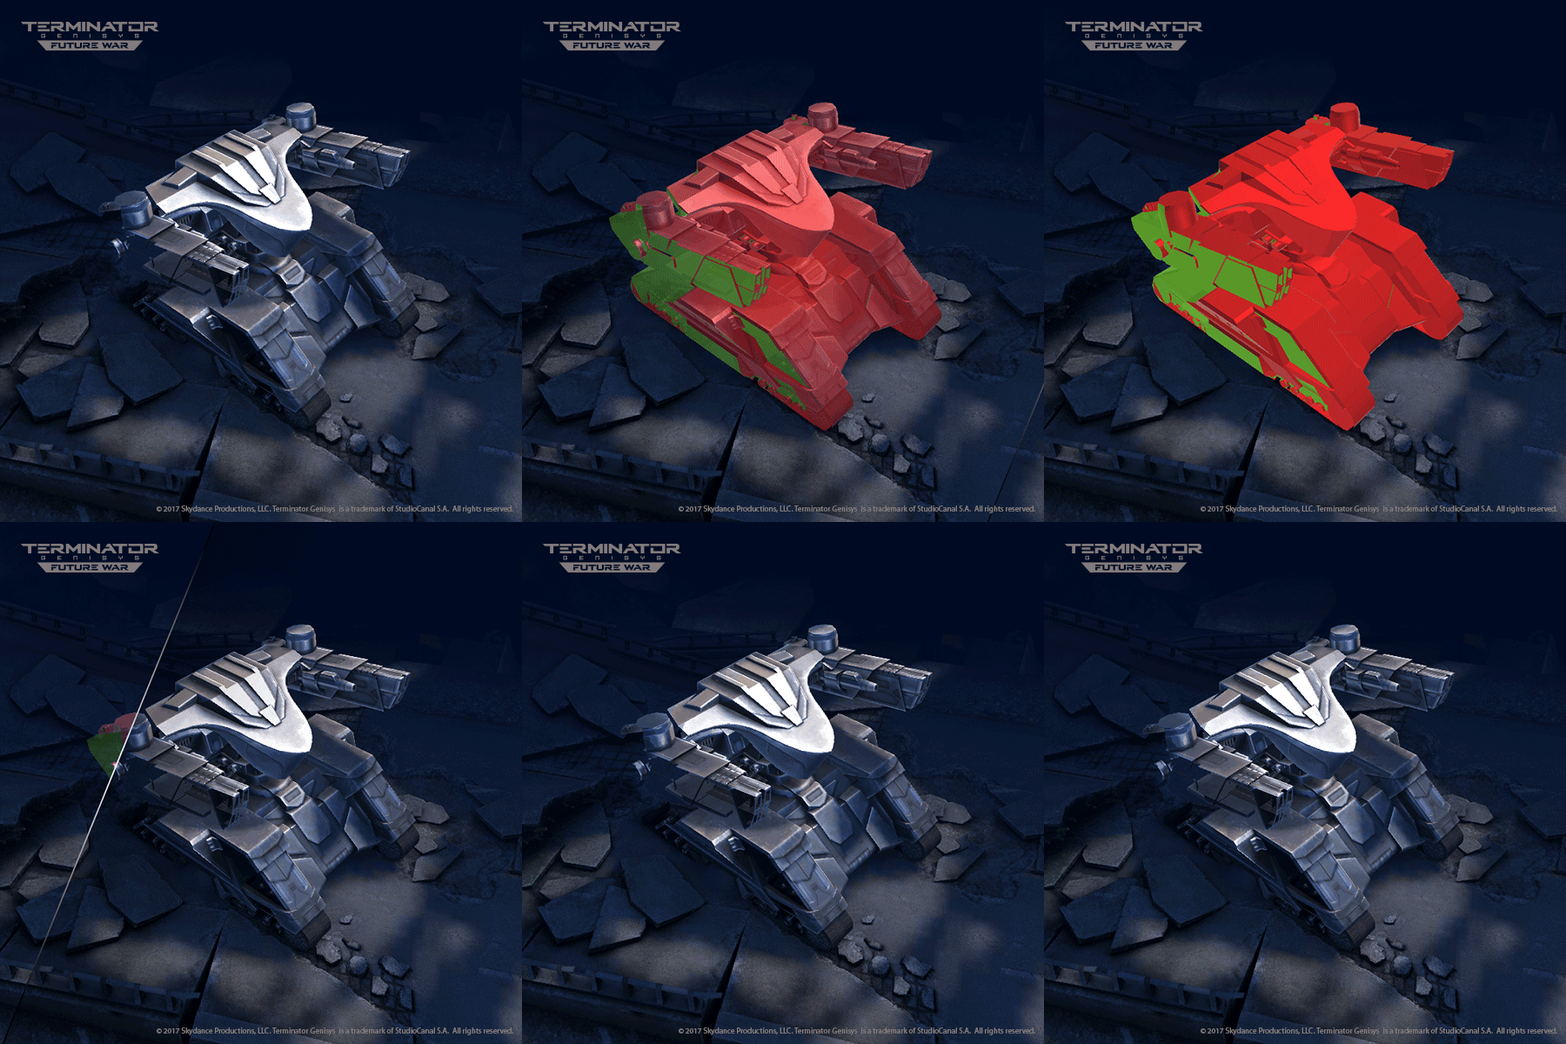
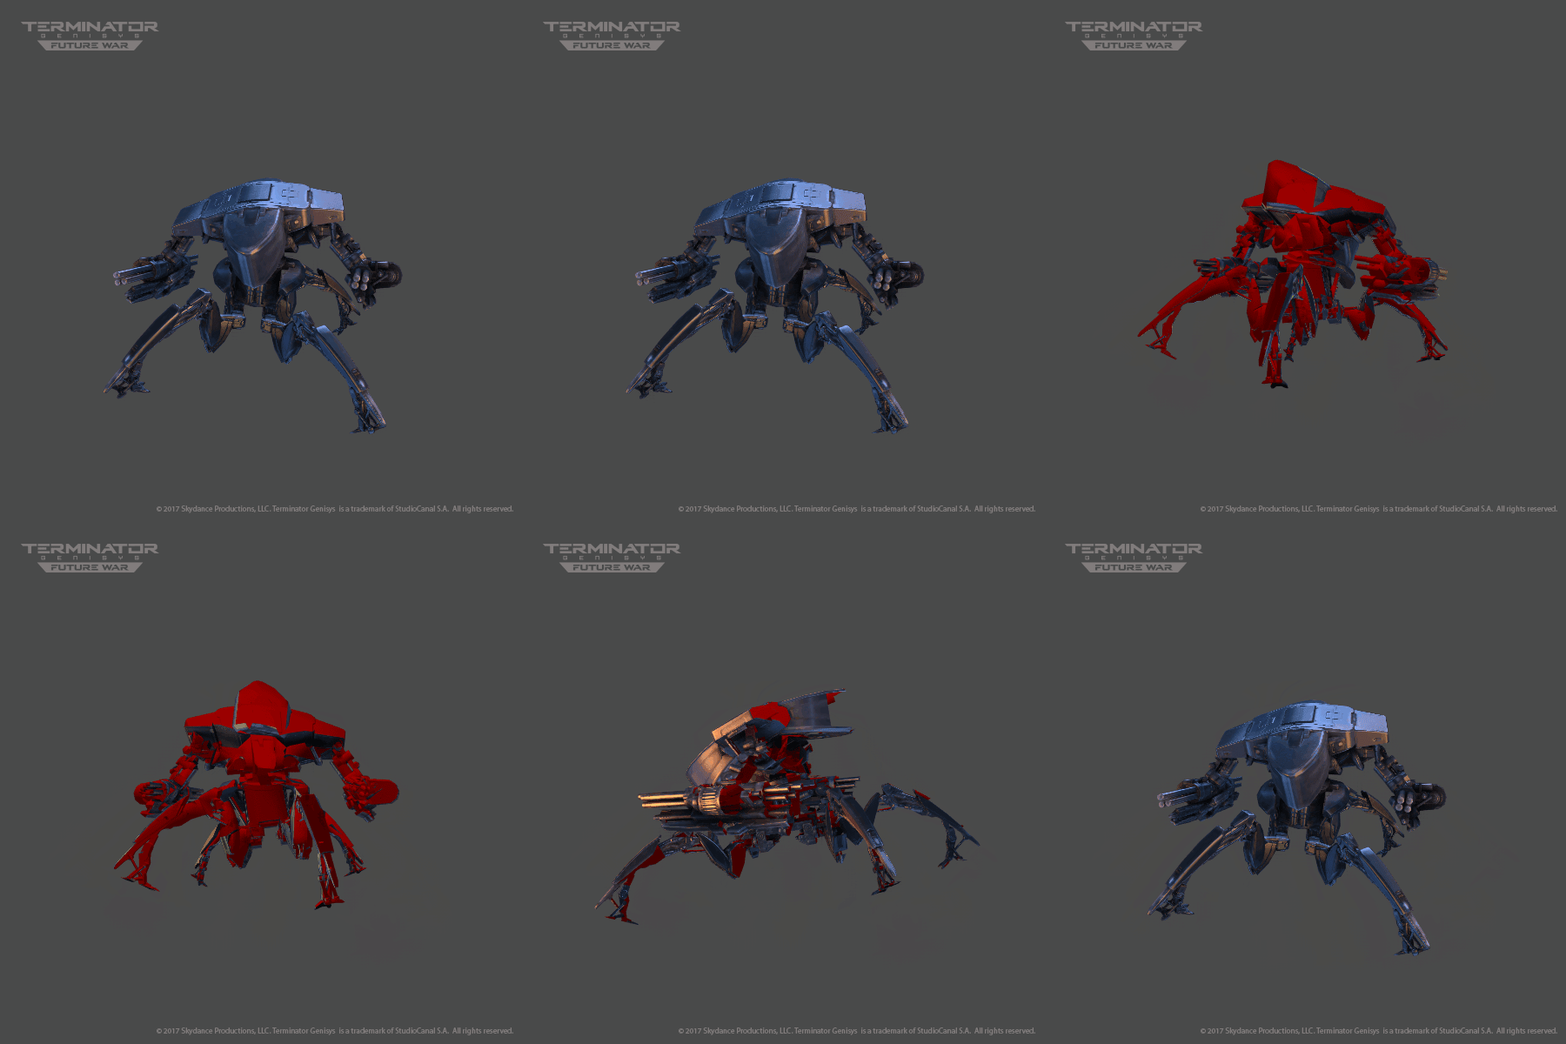
The game Terminator Genisys: Future War has three-dimensional miniatures of units (people, robots, cars) that can be viewed from different sides using the camera. However, its overview is limited programmatically, and certain parts of the models always remain hidden from the eyes of users. So, you need to find and remove such sites.
Invisible parts are divided into two categories:
Parts of the first category can be easily processed using the standard method for removing invisible triangles. With the second category, everything is not so obvious.
First you need to determine at what stage to delete hidden triangles. We created models of units and environment objects in 3D editors, and final assembly of the scene, camera and lighting settings were performed in Unity. Since optimization of model geometry in a 3D editor requires the development of additional tools for each 3D package, we decided to perform optimization in Unity.
To determine the invisible triangles, we developed a simple algorithm:
4.1. At each step, we cut out the current triangle from the mesh, save it in a separate temporary mesh and, accordingly, we get a separate object on the stage. At the same time, we paint its peaks in red. As a result, we get a black scene with a small red triangle.
4.2. We go through all the initially recorded positions and camera angles.
4.2.1. At the current camera position, take a picture of the scene. A good image resolution will make the result more accurate, but it will slow down the optimization process. We used 4K resolution.
4.2.2. In the resulting image we are looking for red color. We calculate the region of the image in which the tested triangle is located so as not to pass through all the pixels of the image. To do this, we transfer the coordinates of the vertices of the triangle from the scene space to the screen coordinates, taking into account the current position and camera angle. If we find a red pixel in the region being tested, then we can immediately proceed to the next step.
4.2.3. If we find a red pixel, then further verification for other camera angles and positions can be omitted. Check the next triangle, returning to step 4.1.
4.2.4. Go to the next camera position and to step 4.2.1.
4.3. If we went through all the steps and ended up here, then we did not find red in any of the shots. You can delete the triangle and go to step 4.1.
5. Profit! We have optimized one of the objects. You can go to step 4 for other objects.
6. The scene is optimized.

We decided not to stop at trimming the geometry and tried to save free texture space. To do this, optimized unit models were returned to the modelers, and they recreated texture scans in the 3D package. Then we added models with new textures to the project. It remains only to re-calculate the lighting in the scene.

Using the created algorithm, we were able to:
As a result, in the models we managed to remove up to 50% of polygons and reduce textures by 10–20%. It took three to five minutes to optimize each scene consisting of several objects.
We hope that these findings will make your future work more convenient and enjoyable.

The method described here requires large calculations and is suitable only for preliminary preparation of scenes.
The game Terminator Genisys: Future War has three-dimensional miniatures of units (people, robots, cars) that can be viewed from different sides using the camera. However, its overview is limited programmatically, and certain parts of the models always remain hidden from the eyes of users. So, you need to find and remove such sites.
Invisible parts are divided into two categories:
- Rear models.
- Overlapped by other parts.
Parts of the first category can be easily processed using the standard method for removing invisible triangles. With the second category, everything is not so obvious.
First you need to determine at what stage to delete hidden triangles. We created models of units and environment objects in 3D editors, and final assembly of the scene, camera and lighting settings were performed in Unity. Since optimization of model geometry in a 3D editor requires the development of additional tools for each 3D package, we decided to perform optimization in Unity.
To determine the invisible triangles, we developed a simple algorithm:
- Turn off effects that do not affect the visibility of objects in the scene.
- We set the positions and camera angles with which the check will be performed. A large number of preset positions will make the result more accurate, but will slow down the optimization process. We used several dozen positions.
- We assign a shader to all objects in the scene, which displays the color of the vertices of the object meshes. By default, the vertices are painted black, so the scene in this form will look like a famous painting by Malevich.
- We go through all the mesh triangles of one of the optimized objects.
4.1. At each step, we cut out the current triangle from the mesh, save it in a separate temporary mesh and, accordingly, we get a separate object on the stage. At the same time, we paint its peaks in red. As a result, we get a black scene with a small red triangle.
4.2. We go through all the initially recorded positions and camera angles.
4.2.1. At the current camera position, take a picture of the scene. A good image resolution will make the result more accurate, but it will slow down the optimization process. We used 4K resolution.
4.2.2. In the resulting image we are looking for red color. We calculate the region of the image in which the tested triangle is located so as not to pass through all the pixels of the image. To do this, we transfer the coordinates of the vertices of the triangle from the scene space to the screen coordinates, taking into account the current position and camera angle. If we find a red pixel in the region being tested, then we can immediately proceed to the next step.
4.2.3. If we find a red pixel, then further verification for other camera angles and positions can be omitted. Check the next triangle, returning to step 4.1.
4.2.4. Go to the next camera position and to step 4.2.1.
4.3. If we went through all the steps and ended up here, then we did not find red in any of the shots. You can delete the triangle and go to step 4.1.
5. Profit! We have optimized one of the objects. You can go to step 4 for other objects.
6. The scene is optimized.
public class MeshData
{
    public Camera Camera;
    public List Polygons;
    public MeshFilter Filter;
    public MeshFilter PolygonFilter;
    public float ScreenWidth;
    public float ScreenHeight;
    public RenderTexture RenderTexture;
    public Texture2D ScreenShot;
}
public class RenderTextureMeshCutter
{
    // .....................
    // Точка входа
    // Убираем из списка видимые полигоны, таким образом они не будут удалены впоследствии
    public static void SaveVisiblePolygons(MeshData data)
    {
        var polygonsCount = data.Polygons.Count;
        for (int i = polygonsCount - 1; i >= 0; i--)
        {
            var polygonId = data.Polygons[i];
            var worldVertices = GetPolygonWorldPositions(polygonId, data.PolygonFilter);
            var screenVertices = GetScreenVertices(worldVertices, data.Camera);
            screenVertices = ClampScreenCordinatesInViewPort(screenVertices, data.ScreenWidth, data.ScreenHeight);
            var gui0 = ConvertScreenToGui(screenVertices[0], data.ScreenHeight);
            var gui1 = ConvertScreenToGui(screenVertices[1], data.ScreenHeight);
            var gui2 = ConvertScreenToGui(screenVertices[2], data.ScreenHeight);
            var guiVertices = new[] { gui0, gui1, gui2 };
            var renderTextureRect = GetPolygonRect(guiVertices);
            if (renderTextureRect.width == 0 || renderTextureRect.height == 0) continue;
            var oldTriangles = data.Filter.sharedMesh.triangles;
            RemoveTrianglesOfPolygon(polygonId, data.Filter);
            var tex = GetTexture2DFromRenderTexture(renderTextureRect, data);
            // Если полигон виден (найден красный пиксель), то удаляем его из списка полигонов, которые необходимо удалить
            if (ThereIsPixelOfAColor(tex, renderTextureRect))
            {
                data.Polygons.RemoveAt(i);
            }
            // Возвращаем проверяемый меш к исходному состоянию
            data.Filter.sharedMesh.triangles = oldTriangles;
        }
    }
    // Обрезаем координаты, чтобы не залезть за пределы рендер текстуры
    private static Vector3[] ClampScreenCordinatesInViewPort(Vector3[] screenPositions, float screenWidth, float screenHeight)
    {
        var len = screenPositions.Length;
        for (int i = 0; i < len; i++)
        {
            if (screenPositions[i].x < 0)
            {
                screenPositions[i].x = 0;
            }
            else if (screenPositions[i].x >= screenWidth)
            {
                screenPositions[i].x = screenWidth - 1;
            }
            if (screenPositions[i].y < 0)
            {
                screenPositions[i].y = 0;
            }
            else if (screenPositions[i].y >= screenHeight)
            {
                screenPositions[i].y = screenHeight - 1;
            }
        }
        return screenPositions;
    }
    // Возвращаем мировые координаты
    private static Vector3[] GetPolygonWorldPositions(MeshFilter filter, int polygonId, MeshFilter polygonFilter)
    {
        var sharedMesh = filter.sharedMesh;
        var meshTransform = filter.transform;
        polygonFilter.transform.position = meshTransform.position;
        var triangles = sharedMesh.triangles;
        var vertices = sharedMesh.vertices;
        var index = polygonId * 3;
        var localV0Pos = vertices[triangles[index]];
        var localV1Pos = vertices[triangles[index + 1]];
        var localV2Pos = vertices[triangles[index + 2]];
        var vertex0 = meshTransform.TransformPoint(localV0Pos);
        var vertex1 = meshTransform.TransformPoint(localV1Pos);
        var vertex2 = meshTransform.TransformPoint(localV2Pos);
        return new[] { vertex0, vertex1, vertex2 };
    }
    // Находим красный полигон
    private static bool ThereIsPixelOfAColor(Texture2D tex, Rect rect)
    {
        var width = (int)rect.width;
        var height = (int)rect.height;
        // Пиксели берутся из левого нижнего угла
        var pixels = tex.GetPixels(0, 0, width, height, 0);
        var len = pixels.Length;
        for (int i = 0; i < len; i += 1)
        {
            var pixel = pixels[i];
            if (pixel.r > 0f && pixel.g == 0 && pixel.b == 0 && pixel.a == 1) return true;
        }
        return false;
    }
    // Получаем фрагмент рендер текстуры по ректу
    private static Texture2D GetTexture2DFromRenderTexture(Rect renderTextureRect, MeshData data)
    {
        data.Camera.targetTexture = data.RenderTexture;
        data.Camera.Render();
        RenderTexture.active = data.Camera.targetTexture;
        data.ScreenShot.ReadPixels(renderTextureRect, 0, 0);
        RenderTexture.active = null;
        data.Camera.targetTexture = null;
        return data.ScreenShot;
    }
    // Удаляем треугольник с индексом polygonId из списка triangles
    private static void RemoveTrianglesOfPolygon(int polygonId, MeshFilter filter)
    {
        var newTriangles = new int[triangles.Length - 3];
        var len = triangles.Length;
        var k = 0;
        for (int i = 0; i < len; i++)
        {
            var curPolygonId = i / 3;
            if (curPolygonId == polygonId) continue;
            newTriangles[k] = triangles[i];
            k++;
        }
        filter.sharedMesh.triangles = newTriangles;
    }
    // Переводим мировые в экранные координаты
    private static Vector3[] GetScreenVertices(Vector3[] worldVertices, Camera cam)
    {
        var scr0 = cam.WorldToScreenPoint(worldVertices[0]);
        var scr1 = cam.WorldToScreenPoint(worldVertices[1]);
        var scr2 = cam.WorldToScreenPoint(worldVertices[2]);
        return new[] { scr0, scr1, scr2 };
    }
    // Переводим экранные в Gui координаты
    private static Vector2 ConvertScreenToGui(Vector3 pos, float screenHeight)
    {
        return new Vector2(pos.x, screenHeight - pos.y);
    }
    // Вычисляем прямоугольник в Gui координатах
    private static Rect GetPolygonRect(Vector2[] guiVertices)
    {
        var minX = guiVertices.Min(v => v.x);
        var maxX = guiVertices.Max(v => v.x);
        var minY = guiVertices.Min(v => v.y);
        var maxY = guiVertices.Max(v => v.y);
        var width = Mathf.CeilToInt(maxX - minX);
        var height = Mathf.CeilToInt(maxY - minY);
        return new Rect(minX, minY, width, height);
    }
}

We decided not to stop at trimming the geometry and tried to save free texture space. To do this, optimized unit models were returned to the modelers, and they recreated texture scans in the 3D package. Then we added models with new textures to the project. It remains only to re-calculate the lighting in the scene.

Using the created algorithm, we were able to:
- Reduce the number of vertices and triangles of the model without loss of quality → The load on the video adapter has decreased. Shaders will also be executed fewer times.
- Reduce the area of the object in the lighting map and save texture for some models due to the empty area formed → The application size has decreased and video memory consumption has decreased.
- Use a higher pixel density on the model (in some cases) → Improved detail.
As a result, in the models we managed to remove up to 50% of polygons and reduce textures by 10–20%. It took three to five minutes to optimize each scene consisting of several objects.
We hope that these findings will make your future work more convenient and enjoyable.
