Using the KOMPAS-3D API → Lesson 13 → Paragraphs
- Tutorial
Before proceeding to the discussion of documented ways to create compound lines, we need to get acquainted with an object such as a paragraph. It is an automatically formatted block of text consisting of several lines. In this lesson we will look at the construction of simple paragraphs.
The paragraph is described by the ksParagraphParam interface . To get it, you need to use the KompasObject interface's GetParamStruct method , for this it needs to pass the constant ko_ParagraphParam ( 0x0000001B ). Consider the properties of the interface ksParagraphParam .
ang - the angle of the text in degrees. Delayed from the horizontal line counterclockwise. Similar to the ang parameter of the ksText method .
height - the height of the paragraph in millimeters.
hFormat- formatting text horizontally. This property is used when the text does not fit in a paragraph in width. Valid values are listed in the table below.

style - text style (described in lesson 11 ).
vFormat - formatting text vertically. This property is used when the text does not fit in a paragraph in height. Valid values are listed in the table below.

When working with the vFormat property, you need to remember two things:

width - the width of the paragraph in millimeters.
The height , hFormat , vFormat, and width properties allow us to solve the problem of placing text in a given rectangle. This method is much safer and more efficient, unlike the ksGetTextLength method discussed in Lesson 11 .
The x and y coordinates of the anchor point. Regulation section relative to the datum is adjusted along the horizontal axis by ksSetTextAlign interface ksDocument2D(although this possibility is not documented). Vertically, the anchor point always coincides with the bottom of the first line of the paragraph. This behavior cannot be changed. There is only one
method for the ksParagraphParam interface : Init () . It initializes the values of the interface properties. It has no input parameters. Returns true if successful .
Creating a paragraph consists of three consecutive stages.
As always, for simplicity, the code responsible for the creation and execution of the document is omitted (this topic was covered in previous lessons).
In this example, KOMPAS itself determines the size of the paragraph based on its content. The figure below shows the generated paragraph.

Note: the text is displayed as one line. We did not specify the width of the paragraph, so KOMPAS automatically increases it as necessary. If the width has been set, the COMPASS behavior would be determined by the value of the properties hFormat interface ksParagraphParam .
For the formation of multi-line and composite text, you must use the features of the outline, partially discussed in the previous lesson.
For an explicit transfer to a new line, the NEW_LINE ( 0x1000 ) flag is used .
This example creates a paragraph of three lines. The first line is displayed as usual. For the second, the NEW_LINE flag is set . He talks about the beginning of a new line. The third one is displayed as usual, but the NEW_LINE flag is still valid for it , since we are working with the same instance of the ksTextItemParam interface . The figure below shows the paragraph formed by this program. Now the lines are displayed correctly.

Text alignment is set by the ksDocument2D interface's ksSetTextLineAlign method . It has only one integer parameter — settable alignment. Its valid values are listed in the table below.
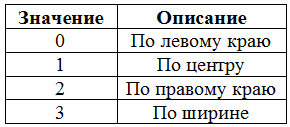
If successful, the ksSetTextLineAlign method returns the previous alignment attribute, and in case of error, the number -1 .
Note that the ksSetTextLineAlign method can be used only inside a block (in our case it is used inside a paragraph). This means that it cannot be used to set the alignment for the text displayed by the ksText method .. This limitation is due to the fact that in this case KOMPAS does not know as to which boundaries it is necessary to align the text.
Another important point is related to the scope of the ksSetTextLineAlign method - on which output lines it acts. Consider an example (here a strongly simplified syntax is used compared to their originals):
How will the lines be aligned? Contrary to our expectations, both lines will be aligned to the right. Why? The point is that the ksSetTextLineAlign method first changes the alignment of the last line that was output. Here is what happens in our example: the first line is centered. Since there is no previous output line, this call changes the default alignment (left).
Then we print the string “Center”. Initially, it uses the center alignment set earlier.
In the third line, we again change the alignment. First, the method changes the alignment of the previous line (“Center”). Therefore, it is aligned to the right, not the center, as we had planned. This alignment becomes alignable by default.
We display the string "Right". Since the ksSetTextLineAlign method is no longer called, it uses the previously set alignment (right).
Thus, both lines are aligned to the right. Now let's change the example a bit:
All that we have changed - added the output of the empty line without changing the alignment. Now the lines are displayed correctly. This happens because the output of the empty string "absorbs" the settable right alignment. The second call to the ksSetTextLineAlign method affects the empty line and does not affect the "Center" line in any way.
The example below shows correct alignment without a blank line.
The ksTextLine and ksSetTextLineAlign calls are swapped. Since the ksSetTextLineAlign method primarily affects the last output line, alignments are set correctly, and the lines are output the way we wanted.
In this example, in addition to the alignment of the text also demonstrates the use of the properties width and hFormat interface ksParagraphParam . They are used to limit its width. If we didn’t change them, COMPASS would increase the width of the paragraph, and we wouldn’t see left-justification and width alignment.
Blank lines are displayed to improve paragraph readability. They do not affect the alignment.
The figure below shows the paragraph formed by this program.

In the 11th cycle lesson, we looked at the flags that control the outline ( ITALIC_ON , ITALIC_OFF , BOLD_ON , UNDERLINE_ON and UNDERLINE_OFF ). Then we considered them in relation to the ksText method . An important difference in their use in a paragraph is that the action is not limited to calling the ksTextLine method , but extends to the entire paragraph. Consider a few examples.
The first line will be displayed in bold. There are no questions with this. But how will the second line be displayed? For her, the BOLD_ON flag is cleared. Therefore, we can assume that it will be displayed in normal font. But it is not. Upon encountering the BOLD_ON flag , KOMPAS understands the command as follows: all subsequent lines in this paragraph are displayed in bold. Therefore, all subsequent lines are displayed in bold until the paragraph is completed or COMPASS meets the BOLD_OFF flag paired to it . Consider an example:
The first line is displayed in bold. For the second line, we reset the BOLD_ON flag and coax the flag BOLD_OFF , which cancels it in bold. Due to this, the second and third lines are displayed without bold.
This behavior applies to the ITALIC_ON , ITALIC_OFF , UNDERLINE_ON and UNDERLINE_OFF flags , but does not apply to the NEW_LINE flag , since there is no paired cancel flag for it.
The most important part of this program is the correct setting of the flags for the output lines. Let us analyze it in more detail (the corresponding program lines are marked with a pair of “ // ” characters ).
The first line is displayed without any changes. Therefore, no flags are set for it.
The second line should be displayed without slope and with a new line. Therefore, the following flags are set for it: NEW_LINE (start from a new line) and ITALIC_OFF (disable italic).
The third line should be in italics and bold. To do this, we set the flags: NEW_LINE , ITALIC_ON (include italics) and BOLD_ON(include bold). All other flags reset.
The fourth line should be in italics, underlined and not in bold. To do this, we set the flags: NEW_LINE , BOLD_OFF (disable bold, remaining enabled from the previous line) and UNDERLINE_ON (enable underlined).
If there were more lines in a paragraph, they would be displayed in italic, underlined font. To turn off the underlined outline you need to reset the UNDERLINE_ON flag and set the UNDERLINE_OFF flag .
The figure below shows the result of this program.

If you follow the structure of your programs, you probably noticed a serious drawback of the previous example: the code responsible for generating the output information is mixed with the code responsible for implementing its output. With a good programming style, it is customary to separate information from its presentation.
If the output information consists of several ksTextItemParam lines , then they can be combined into one ksTextLineParam interface . The ksTextLine method can handle both of these interfaces. But this approach has an unpleasant limitation: if the ksTextLine method accepts the ksTextLineParam interface , then the flags NEW_LINE (and SPECIAL_SYMBOL_END) are ignored. That is, all information will be displayed in one line, even if for some instances of ksTextItemParam the NEW_LINE flag is coded . To bypass this restriction, you will have to manually call ksTextLine for each line.
In this example, the output lines are first entered into the dynamic array DynamicArray , and only then displayed in the paragraph. This allows you to separate information from its presentation. If in our example the NEW_LINE flag was not used , then we could do with a single call to the ksTextLine method .
The result of this program is similar to the result of the previous example.
Conclusion
In this lesson, we looked at how to construct a paragraph and how to use it to display a multi-line text. We also learned to separate information from its presentation. Unfortunately, the correct output of multi-line text requires manual traversal of the array of strings. This is not very convenient. In the next lesson, I will show you how to solve this problem.
To be continued, stay tuned to the blog.
 Sergey Norseev, Ph.D., author of the book “Development of applications for COMPAS in Delphi”.
Content of the cycle of lessons “Working with the API KOMPAS-3D”
- The basics
- Drawing design
- Correct connection to COMPAS
- Title block
- Graphic primitives
- Save the document in various formats
- Introduction to the settings
- More sophisticated writing methods
- Reading the caption cells
- Special characters including string
- Simple text lettering
- Compound strings
- Paragraphs
- Multiline text
Paragraph Parameters ( ksParagraphParam )
The paragraph is described by the ksParagraphParam interface . To get it, you need to use the KompasObject interface's GetParamStruct method , for this it needs to pass the constant ko_ParagraphParam ( 0x0000001B ). Consider the properties of the interface ksParagraphParam .
ang - the angle of the text in degrees. Delayed from the horizontal line counterclockwise. Similar to the ang parameter of the ksText method .
height - the height of the paragraph in millimeters.
hFormat- formatting text horizontally. This property is used when the text does not fit in a paragraph in width. Valid values are listed in the table below.
style - text style (described in lesson 11 ).
vFormat - formatting text vertically. This property is used when the text does not fit in a paragraph in height. Valid values are listed in the table below.
When working with the vFormat property, you need to remember two things:
- According to the KOMPAS documentation, the valid values for the vFormat property are 0 and -1 , but this is not the case. Valid values are 0 and 1 .
- COMPASS does not change the height of characters. It only changes the distance between the lines. If the height of the lines is less than the height of the paragraph, then they may overlap. An example of such an overlay is in the figure below.

width - the width of the paragraph in millimeters.
The height , hFormat , vFormat, and width properties allow us to solve the problem of placing text in a given rectangle. This method is much safer and more efficient, unlike the ksGetTextLength method discussed in Lesson 11 .
The x and y coordinates of the anchor point. Regulation section relative to the datum is adjusted along the horizontal axis by ksSetTextAlign interface ksDocument2D(although this possibility is not documented). Vertically, the anchor point always coincides with the bottom of the first line of the paragraph. This behavior cannot be changed. There is only one
method for the ksParagraphParam interface : Init () . It initializes the values of the interface properties. It has no input parameters. Returns true if successful .
Building a paragraph
Creating a paragraph consists of three consecutive stages.
- Announcement of the beginning of a paragraph. For this method is called ksParagraph interface ksDocument2D . As a single parameter, this method accepts the ksParagraphParam interface , which sets the parameters of the paragraph. If successful, the ksParagraph method returns a one, and in case of error, it returns zero .
- Filling a paragraph. For each line displayed in the paragraph, the ksTextLine method of the ksDocument2D interface is called . As a single parameter, it accepts the ksTextItemParam interface or the ksTextLineParam interface (discussed in previous loop lessons), describing the line. Note that the output lines must not contain the characters @ , $ , & , ~ , ^ and # , as they are control characters. Working with them will be discussed in the following lessons of the cycle.
- Completion of the paragraph. For this, the ksEndObj () method of the ksDocument2D interface is called . It has no input parameters and, if successful, returns an integer pointer to the created object (paragraph). In the event of an error, it returns zero .
Example. Simplest paragraph
Below is the source code of the program, demonstrating the construction of the simplest paragraph.
//Получаем интерфейс ksTextItemParam
TextItemParamPtr textItemParam;
textItemParam = static_cast<TextItemParamPtr>(kompas->GetParamStruct(ko_TextItemParam));
//Подготавливаем интерфейс параметров параграфа
ParagraphParamPtr paragraphParam;
paragraphParam = static_cast<ParagraphParamPtr>(kompas->GetParamStruct(ko_ParagraphParam));
paragraphParam->Init();
paragraphParam->set_x(100.0);
paragraphParam->set_y(100.0);
//Начинаем параграф
Document2D->ksParagraph(paragraphParam);
//Наполняем параграф
BSTR str = SysAllocString(L"Первая строка");
textItemParam->set_s(str);
Document2D->ksTextLine(textItemParam);
SysFreeString(str);
str = SysAllocString(L"Вторая строка");
textItemParam->set_s(str);
Document2D->ksTextLine(textItemParam);
SysFreeString(str);
//Завершаем параграф
Document2D->ksEndObj();
paragraphParam.Unbind();
textItemParam.Unbind();
As always, for simplicity, the code responsible for the creation and execution of the document is omitted (this topic was covered in previous lessons).
In this example, KOMPAS itself determines the size of the paragraph based on its content. The figure below shows the generated paragraph.
Note: the text is displayed as one line. We did not specify the width of the paragraph, so KOMPAS automatically increases it as necessary. If the width has been set, the COMPASS behavior would be determined by the value of the properties hFormat interface ksParagraphParam .
For the formation of multi-line and composite text, you must use the features of the outline, partially discussed in the previous lesson.
Example. Multiline text
For an explicit transfer to a new line, the NEW_LINE ( 0x1000 ) flag is used .
Below is an example of a program that demonstrates the construction of a multi-line paragraph using this flag.
//Получаем интерфейс ksTextItemParam
TextItemParamPtr textItemParam;
textItemParam = static_cast<TextItemParamPtr>(kompas->GetParamStruct(ko_TextItemParam));
//Подготавливаем интерфейс параметров параграфа
ParagraphParamPtr paragraphParam;
paragraphParam = static_cast<ParagraphParamPtr>(kompas->GetParamStruct(ko_ParagraphParam));
paragraphParam->Init();
paragraphParam->set_x(100.0);
paragraphParam->set_y(100.0);
//Начинаем параграф
Document2D->ksParagraph(paragraphParam);
//Наполняем параграф
BSTR str = SysAllocString(L"Первая строка");
textItemParam->set_s(str);
Document2D->ksTextLine(textItemParam);
SysFreeString(str);
TextItemFontPtr textItemFont;
textItemFont = static_cast<TextItemFontPtr>(textItemParam->GetItemFont());
textItemFont->SetBitVectorValue(NEW_LINE, true);
str = SysAllocString(L"Вторая строка");
textItemParam->set_s(str);
Document2D->ksTextLine(textItemParam);
SysFreeString(str);
textItemFont.Unbind();
str = SysAllocString(L"Третья строка");
textItemParam->set_s(str);
Document2D->ksTextLine(textItemParam);
SysFreeString(str);
//Завершаем параграф
Document2D->ksEndObj();
paragraphParam.Unbind();
textItemParam.Unbind();
This example creates a paragraph of three lines. The first line is displayed as usual. For the second, the NEW_LINE flag is set . He talks about the beginning of a new line. The third one is displayed as usual, but the NEW_LINE flag is still valid for it , since we are working with the same instance of the ksTextItemParam interface . The figure below shows the paragraph formed by this program. Now the lines are displayed correctly.

Difficult moments of working with paragraphs
Text alignment
Text alignment is set by the ksDocument2D interface's ksSetTextLineAlign method . It has only one integer parameter — settable alignment. Its valid values are listed in the table below.
If successful, the ksSetTextLineAlign method returns the previous alignment attribute, and in case of error, the number -1 .
Note that the ksSetTextLineAlign method can be used only inside a block (in our case it is used inside a paragraph). This means that it cannot be used to set the alignment for the text displayed by the ksText method .. This limitation is due to the fact that in this case KOMPAS does not know as to which boundaries it is necessary to align the text.
Another important point is related to the scope of the ksSetTextLineAlign method - on which output lines it acts. Consider an example (here a strongly simplified syntax is used compared to their originals):
ksSetTextLineAlign(1);
ksTextLine(“По центру”);
ksSetTextLineAlign(2);
ksTextLine(“По правому краю”);
How will the lines be aligned? Contrary to our expectations, both lines will be aligned to the right. Why? The point is that the ksSetTextLineAlign method first changes the alignment of the last line that was output. Here is what happens in our example: the first line is centered. Since there is no previous output line, this call changes the default alignment (left).
Then we print the string “Center”. Initially, it uses the center alignment set earlier.
In the third line, we again change the alignment. First, the method changes the alignment of the previous line (“Center”). Therefore, it is aligned to the right, not the center, as we had planned. This alignment becomes alignable by default.
We display the string "Right". Since the ksSetTextLineAlign method is no longer called, it uses the previously set alignment (right).
Thus, both lines are aligned to the right. Now let's change the example a bit:
ksSetTextLineAlign(1);
ksTextLine(“По центру”);
ksTextLine(“”);
ksSetTextLineAlign(2);
ksTextLine(“По правому краю”);
All that we have changed - added the output of the empty line without changing the alignment. Now the lines are displayed correctly. This happens because the output of the empty string "absorbs" the settable right alignment. The second call to the ksSetTextLineAlign method affects the empty line and does not affect the "Center" line in any way.
The example below shows correct alignment without a blank line.
ksTextLine(“По центру”);
ksSetTextLineAlign(1);
ksTextLine(“По правому краю”);
ksSetTextLineAlign(2);
The ksTextLine and ksSetTextLineAlign calls are swapped. Since the ksSetTextLineAlign method primarily affects the last output line, alignments are set correctly, and the lines are output the way we wanted.
Example
The following is the source code of a program that demonstrates the alignment of text in a paragraph.
//Получаем интерфейс ksTextItemParam
TextItemParamPtr textItemParam;
textItemParam = static_cast<TextItemParamPtr>(kompas->GetParamStruct(ko_TextItemParam));
//Подготавливаем интерфейс параметров параграфа
ParagraphParamPtr paragraphParam;
paragraphParam = static_cast<ParagraphParamPtr>(kompas->GetParamStruct(ko_ParagraphParam));
paragraphParam->Init();
paragraphParam->set_x(100.0);
paragraphParam->set_y(100.0);
paragraphParam->set_width(60.0);
paragraphParam->set_hFormat(2);
//Начинаем параграф
Document2D->ksParagraph(paragraphParam);
//Наполняем параграф
BSTR str = SysAllocString(L"Текст выровненный по левому краю");
textItemParam->set_s(str);
Document2D->ksTextLine(textItemParam);
SysFreeString(str);
TextItemFontPtr textItemFont;
textItemFont = static_cast<TextItemFontPtr>(textItemParam->GetItemFont());
textItemFont->SetBitVectorValue(NEW_LINE, true);
str = SysAllocString(L"");
textItemParam->set_s(str);
Document2D->ksTextLine(textItemParam);
SysFreeString(str);
textItemFont.Unbind();
str = SysAllocString(L"По центру");
textItemParam->set_s(str);
Document2D->ksTextLine(textItemParam);
SysFreeString(str);
Document2D->ksSetTextLineAlign(1);
str = SysAllocString(L"");
textItemParam->set_s(str);
Document2D->ksTextLine(textItemParam);
SysFreeString(str);
str = SysAllocString(L"Длинный текст выравниваемый по ширине");
textItemParam->set_s(str);
Document2D->ksTextLine(textItemParam);
SysFreeString(str);
Document2D->ksSetTextLineAlign(3);
//Завершаем параграф
Document2D->ksEndObj();
paragraphParam.Unbind();
textItemParam.Unbind();
In this example, in addition to the alignment of the text also demonstrates the use of the properties width and hFormat interface ksParagraphParam . They are used to limit its width. If we didn’t change them, COMPASS would increase the width of the paragraph, and we wouldn’t see left-justification and width alignment.
Blank lines are displayed to improve paragraph readability. They do not affect the alignment.
The figure below shows the paragraph formed by this program.

Turn on and off tracing
In the 11th cycle lesson, we looked at the flags that control the outline ( ITALIC_ON , ITALIC_OFF , BOLD_ON , UNDERLINE_ON and UNDERLINE_OFF ). Then we considered them in relation to the ksText method . An important difference in their use in a paragraph is that the action is not limited to calling the ksTextLine method , but extends to the entire paragraph. Consider a few examples.
TextItemFont->SetBitVectorValue(BOLD_ON, true);
TextItemParam->s = SysAllocString(L”Первая строка”);
Document2D->ksTextLine(TextItemParam);
TextItemFont->Init();
TextItemParam->s = SysAllocString(L”Вторая строка”);
Document2D->ksTextLine(TextItemParam);
The first line will be displayed in bold. There are no questions with this. But how will the second line be displayed? For her, the BOLD_ON flag is cleared. Therefore, we can assume that it will be displayed in normal font. But it is not. Upon encountering the BOLD_ON flag , KOMPAS understands the command as follows: all subsequent lines in this paragraph are displayed in bold. Therefore, all subsequent lines are displayed in bold until the paragraph is completed or COMPASS meets the BOLD_OFF flag paired to it . Consider an example:
TextItemFont.SetBitVectorValue(BOLD_ON, true);
TextItemParam.s = SysAllocString(L”Первая строка”);
Document2D.ksTextLine(TextItemParam);
TextItemFont.Init();
TextItemFont.SetBitVectorValue(BOLD_OFF, true);
TextItemParam.s = SysAllocString(L“Вторая строка”);
Document2D.ksTextLine(TextItemParam);
TextItemFont.Init();
TextItemParam.s = SysAllocString(L”Третья строка”);
Document2D.ksTextLine(TextItemParam);
The first line is displayed in bold. For the second line, we reset the BOLD_ON flag and coax the flag BOLD_OFF , which cancels it in bold. Due to this, the second and third lines are displayed without bold.
This behavior applies to the ITALIC_ON , ITALIC_OFF , UNDERLINE_ON and UNDERLINE_OFF flags , but does not apply to the NEW_LINE flag , since there is no paired cancel flag for it.
Example
Below is the source text of the program, demonstrating the output of text with different styles with the help of paragraphs.
//Получаем интерфейс ksTextItemParam
TextItemParamPtr textItemParam;
textItemParam = static_cast<TextItemParamPtr>(kompas->GetParamStruct(ko_TextItemParam));
//Подготавливаем интерфейс параметров параграфа
ParagraphParamPtr paragraphParam;
paragraphParam = static_cast<ParagraphParamPtr>(kompas->GetParamStruct(ko_ParagraphParam));
paragraphParam->Init();
paragraphParam->set_x(100.0);
paragraphParam->set_y(100.0);
//Начинаем параграф
Document2D->ksParagraph(paragraphParam);
//Наполняем параграф
BSTR str = SysAllocString(L"Обычный текст");
textItemParam->set_s(str);
Document2D->ksTextLine(textItemParam);
SysFreeString(str);
TextItemFontPtr textItemFont;
textItemFont = static_cast<TextItemFontPtr>(textItemParam->GetItemFont());
textItemFont->set_bitVector(NEW_LINE | ITALIC_OFF);               //
str = SysAllocString(L"Текст без наклона");
textItemParam->set_s(str);
Document2D->ksTextLine(textItemParam);
SysFreeString(str);
textItemFont->set_bitVector(NEW_LINE | ITALIC_ON | BOLD_ON);      //
str = SysAllocString(L"Полужирный текст");
textItemParam->set_s(str);
Document2D->ksTextLine(textItemParam);
SysFreeString(str);
textItemFont->set_bitVector(NEW_LINE | BOLD_OFF | UNDERLINE_ON);  //
str = SysAllocString(L"Подчеркнутый текст");
textItemParam->set_s(str);
Document2D->ksTextLine(textItemParam);
SysFreeString(str);
//Завершаем параграф
Document2D->ksEndObj();
paragraphParam.Unbind();
textItemFont.Unbind();
textItemParam.Unbind();
The most important part of this program is the correct setting of the flags for the output lines. Let us analyze it in more detail (the corresponding program lines are marked with a pair of “ // ” characters ).
The first line is displayed without any changes. Therefore, no flags are set for it.
The second line should be displayed without slope and with a new line. Therefore, the following flags are set for it: NEW_LINE (start from a new line) and ITALIC_OFF (disable italic).
The third line should be in italics and bold. To do this, we set the flags: NEW_LINE , ITALIC_ON (include italics) and BOLD_ON(include bold). All other flags reset.
The fourth line should be in italics, underlined and not in bold. To do this, we set the flags: NEW_LINE , BOLD_OFF (disable bold, remaining enabled from the previous line) and UNDERLINE_ON (enable underlined).
If there were more lines in a paragraph, they would be displayed in italic, underlined font. To turn off the underlined outline you need to reset the UNDERLINE_ON flag and set the UNDERLINE_OFF flag .
The figure below shows the result of this program.

Separation of information from submission
If you follow the structure of your programs, you probably noticed a serious drawback of the previous example: the code responsible for generating the output information is mixed with the code responsible for implementing its output. With a good programming style, it is customary to separate information from its presentation.
If the output information consists of several ksTextItemParam lines , then they can be combined into one ksTextLineParam interface . The ksTextLine method can handle both of these interfaces. But this approach has an unpleasant limitation: if the ksTextLine method accepts the ksTextLineParam interface , then the flags NEW_LINE (and SPECIAL_SYMBOL_END) are ignored. That is, all information will be displayed in one line, even if for some instances of ksTextItemParam the NEW_LINE flag is coded . To bypass this restriction, you will have to manually call ksTextLine for each line.
Below is the source code of an example demonstrating this technique.
//Получаем интерфейс массива строк
DynamicArrayPtr dynamicArray;
dynamicArray = static_cast<DynamicArrayPtr>(kompas->GetDynamicArray(TEXT_ITEM_ARR));
dynamicArray->ksClearArray();
//Получаем интерфейс ksTextItemParam
TextItemParamPtr textItemParam;
textItemParam = static_cast<TextItemParamPtr>(kompas->GetParamStruct(ko_TextItemParam));
//Наполняем массив строк
BSTR str = SysAllocString(L"Обычный текст");
textItemParam->set_s(str);
dynamicArray->ksAddArrayItem(-1, textItemParam);
SysFreeString(str);
TextItemFontPtr textItemFont;
textItemFont = static_cast<TextItemFontPtr>(textItemParam->GetItemFont());
textItemFont->set_bitVector(NEW_LINE | ITALIC_OFF);
str = SysAllocString(L"Текст без наклона");
textItemParam->set_s(str);
dynamicArray->ksAddArrayItem(-1, textItemParam);
SysFreeString(str);
textItemFont->set_bitVector(NEW_LINE | ITALIC_ON | BOLD_ON);
str = SysAllocString(L"Полужирный текст");
textItemParam->set_s(str);
dynamicArray->ksAddArrayItem(-1, textItemParam);
SysFreeString(str);
textItemFont->set_bitVector(NEW_LINE | BOLD_OFF | UNDERLINE_ON);
str = SysAllocString(L"Подчеркнутый текст");
textItemParam->set_s(str);
dynamicArray->ksAddArrayItem(-1, textItemParam);
SysFreeString(str);
//Подготавливаем интерфейс параметров параграфа
ParagraphParamPtr paragraphParam;
paragraphParam = static_cast<ParagraphParamPtr>(kompas->GetParamStruct(ko_ParagraphParam));
paragraphParam->Init();
paragraphParam->set_x(100.0);
paragraphParam->set_y(100.0);
//Начинаем параграф
Document2D->ksParagraph(paragraphParam);
//Выводим в параграф содержимое массива
for(unsigned int i = 0; i < dynamicArray->ksGetArrayCount(); ++i)
{
  dynamicArray->ksGetArrayItem(i, textItemParam);
  Document2D->ksTextLine(textItemParam);
}
//Завершаем параграф
Document2D->ksEndObj();
//Освобождаем интерфейсы
textItemFont.Unbind();
textItemParam.Unbind();
paragraphParam.Unbind();
dynamicArray->ksDeleteArray();
dynamicArray.Unbind();
In this example, the output lines are first entered into the dynamic array DynamicArray , and only then displayed in the paragraph. This allows you to separate information from its presentation. If in our example the NEW_LINE flag was not used , then we could do with a single call to the ksTextLine method .
The result of this program is similar to the result of the previous example.
Conclusion
In this lesson, we looked at how to construct a paragraph and how to use it to display a multi-line text. We also learned to separate information from its presentation. Unfortunately, the correct output of multi-line text requires manual traversal of the array of strings. This is not very convenient. In the next lesson, I will show you how to solve this problem.
To be continued, stay tuned to the blog.
 Sergey Norseev, Ph.D., author of the book “Development of applications for COMPAS in Delphi”.