November 27, 2017 at 16:10
ScadaPy JSON Server
In continuation of the previous articles on the use of python to build your own scada system, I would like to describe a way to organize the exchange between devices and output data using json - a text format for data exchange.
In this case, we will use the client parts of the modbusTCP and OPCUA libraries.
As a result, we get an http server that works as a master for slaves, which in turn work in slave mode .

To configure the modbus TCP wizard , we import the necessary libraries:
It is necessary to initialize the wizard with the ip address and port, as well as the timeout for waiting for a response:
We describe the cyclic function of polling slave devices, indicating the names of registers and cell addresses:
Now you need to start the polling cycle in a separate thread thread :
This starts a cyclic polling the slave protocol modbusTCP with the IP address 127.0.0.1 and port 502. Read register will READ_INPUT_REGISTERS and variable data is written to the value located at the address 0x00 .
To receive data from the OPCUA server, you need to connect the freeopcua library
In OPC servers, there is a strict hierarchy of inheritance, there is an exact definition of parent and child , so you can build quite complex systems with a large number of nested objects. But we, in this case, did not need such a number of functions today, so we limited ourselves to creating a node in the root folder of Objects and assigning it a value. It turned out like this Objects -> MyNode -> MyNodeValue , but I must admit that this method is not acceptable for building more complex systems.
You can see the value of the variable directly in valData , StatusCode is written to st , ts and tsc are recorded timestamps of ServerTimestamp and SourceTimestamp, respectively.
For polling slaves, a round-robin polling is also run running in a separate thread, although it would be more correct to subscribe to the event.
To create a web server, you need the libraries:
The most interesting thing began later, when for testing it became necessary to connect from the Chrome or Firefox browser to the created server.
Constantly popping refuse_connect .
Having searched a bit on the net, we found a solution - you need to add to the do_GET function:
Now I managed to get access to a working web server, but with open access, but I would like to establish some kind of authorization, access by login and password.
As it turned out, this is not particularly difficult to do using headers.
If now we try to connect using a browser, then authorization is performed and data is transferred, but receiving data from a browser without a parser is not a good idea, we assumed to receive data using the GET method with JavaScrypt and the XMLHttpRequest () function using the script in the html page. But with such an implementation, the browser first sends the request not by the GET method, but by the OPTIONS method and should receive response = 200, only after that the request will be executed by the GET method.
Added another function:
When this function is enabled, the check will be performed using the 'Access-Control-Allow-Origin' and, if it is not set to 'null' , there will be no exchange.
Now we have access by login and password, the browser will exchange data according to the scenario, but it is advisable to organize SSL data encryption. To do this, create an SSL certificate file and add the line before starting the server:
Of course, this is a self-signed certificate, but in any case it is better than an open protocol.
To process data in a script on an html page, you can use the above XMLHttpRequest () function:
The following is an example description of configurator settings for running scripts.
The appearance of the window and the purpose of the control buttons:
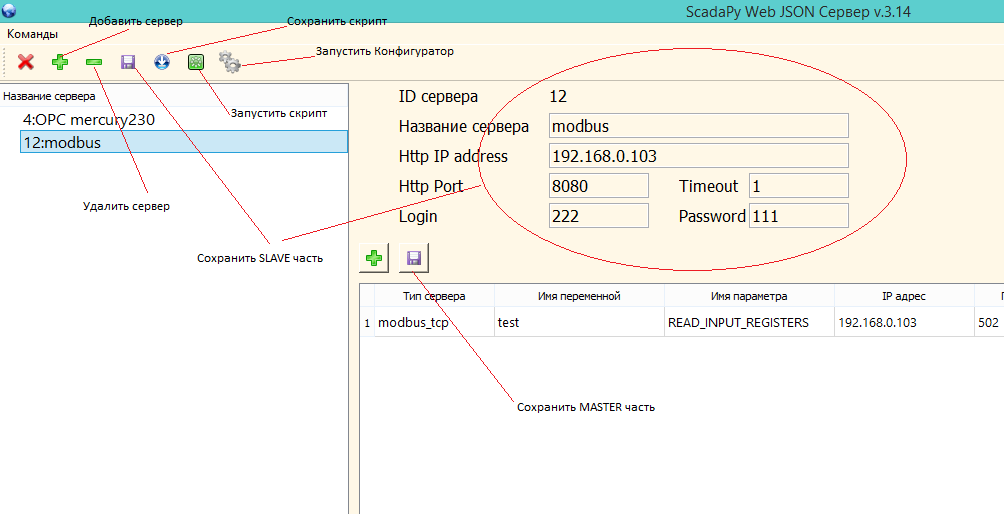
Suppose you have a task to receive data from a temperature sensor with parameters:
Protocol: modbusTCP
IP address: 192.168.0.103
Port: 502
RTU: 1
Register: READ_INPUT_REGISTERS (0x04)
Address: 0
Variable name: tempSensor_1
Print these data on json server:
Format: json
IP address: 192.168.0.103
Port: 8080
Login: 111
Password: 222
Run json.py, add a new server button (+) at the top left, indicate the name and save.
Now, you need to create the created instance and enter the parameters of the web server.

We write down the polling parameters of the slave device, in this case the temperature sensor:

After this, when you click the button to save the script, a file with the name web_ (the number of our server in the database) .bat for Windows or web_ (the number of our server in the database) will appear in the scr folder . sh for Linux. The script execution paths will be written in this file. In this case, an example for Windows, the file web_15.bat :
You can run the script immediately for execution by clicking the button located next to the save button (all buttons are equipped with tooltips).
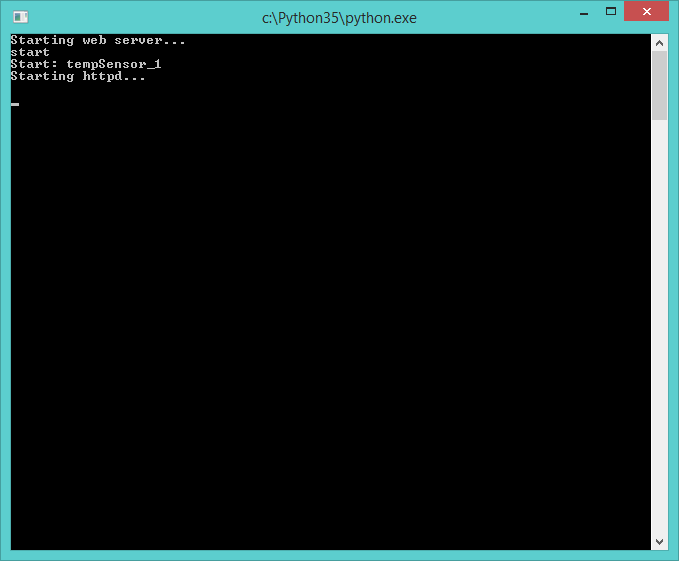
After launch, a console window appears with information about the launch and connections.
Now, having launched the browser, we write the connection string _https: //192.168.0.103: 8080 / all , and after entering the password we see the following in Chrome:

Or in Firefox:

And in the console of the running server information about connection sessions will be displayed:

In this case, we get data on all variables configured on the server, since the parameter all was entered in the GET request. This is not entirely correct, because when you increase the number of variables, you will have to receive and process data that is not currently in use, so it’s better to enter the direct name of the variable whose value you need to process: tempSensor_1 .
In this case:
Request - tempSensor_1
Response - {"tempSensor_1": [2384]}
I would like to describe a little how to integrate the formation of the request and the processing of the response in the html page.
You can use the XMLHttpRequest () function to execute the request , although there are other connection methods available at present. Upon successful connection and obtaining the status equal to 200, it is enough to execute the JSON.parse () function .
To establish the cyclicality of query execution, you must run a timer.
An example of displaying the received data in various widgets.

When receiving data from the OPCUA server, the structure of the JSON response will change slightly, but slightly. In any case, understanding there is not difficult.
Download link on github
In this case, we will use the client parts of the modbusTCP and OPCUA libraries.
As a result, we get an http server that works as a master for slaves, which in turn work in slave mode .
Modbus master
To configure the modbus TCP wizard , we import the necessary libraries:
import modbus_tk
import modbus_tk.defines as cst
import modbus_tk.modbus_tcp as modbus_tcp
It is necessary to initialize the wizard with the ip address and port, as well as the timeout for waiting for a response:
master = modbus_tcp.TcpMaster(host=’127.0.0.1’, port=502)
master.set_timeout(2)
We describe the cyclic function of polling slave devices, indicating the names of registers and cell addresses:
def getModbus():
  while True:
      try:
        data= master.execute(rtu, cst.READ_INPUT_REGISTERS,0,1 )
      except Exception as e:
         print (e)
      time.sleep(1)
#rtu – адрес RTU modbus
# cst.READ_INPUT_REGISTERS – название регистра, в режиме чтения их может быть четыре:
#cst.READ_INPUT_REGISTERS
#cst.READ_DISCRETE_INPUTS
#cst.READ_COILS
#cst.READ_HOLDING_REGISTERS
Now you need to start the polling cycle in a separate thread thread :
modb = threading.Thread(target=getModbus)
modb.daemon = True
modb.start()
This starts a cyclic polling the slave protocol modbusTCP with the IP address 127.0.0.1 and port 502. Read register will READ_INPUT_REGISTERS and variable data is written to the value located at the address 0x00 .
OPCUA client
To receive data from the OPCUA server, you need to connect the freeopcua library
from opcua import ua, Clienturl="opc.tcp://127.0.0.1:4840/server/"
try:
client = Client(url)
client.connect()
root = client.get_root_node()
except Exception as e:
print(e)In OPC servers, there is a strict hierarchy of inheritance, there is an exact definition of parent and child , so you can build quite complex systems with a large number of nested objects. But we, in this case, did not need such a number of functions today, so we limited ourselves to creating a node in the root folder of Objects and assigning it a value. It turned out like this Objects -> MyNode -> MyNodeValue , but I must admit that this method is not acceptable for building more complex systems.
obj = root.get_child(["0:Objects"])
objChild= obj.get_children()
for i in range(0,len(objChild)):
          unitsChild.append(i)
          unitsChild[i]=objChild[i].get_children()
          parName=val_to_string(objChild[i].get_browse_name())[2:]
          for a in range(0, len( unitsChild[i] ) ):
                 valName=val_to_string(unitsChild[i][a].get_browse_name())[2:]
                  try:
                         valData=unitsChild[i][a].get_value()
                         data =unitsChild[i][a].get_data_value()
                         st=val_to_string(data.StatusCode)
                         ts= data.ServerTimestamp.isoformat()
                         tsc= data.SourceTimestamp.isoformat()
                   except Exception as e:
                         print(e)
You can see the value of the variable directly in valData , StatusCode is written to st , ts and tsc are recorded timestamps of ServerTimestamp and SourceTimestamp, respectively.
For polling slaves, a round-robin polling is also run running in a separate thread, although it would be more correct to subscribe to the event.
Json Web Server
To create a web server, you need the libraries:
from http.server import BaseHTTPRequestHandler, HTTPServer
import json
import base64server_address = (“127.0.0.1”, 8080)
httpd = server_class(server_address, handler_class)
try:
httpd.serve_forever()
except Exception as e:
print(e)
httpd.server_close()The most interesting thing began later, when for testing it became necessary to connect from the Chrome or Firefox browser to the created server.
Constantly popping refuse_connect .
Having searched a bit on the net, we found a solution - you need to add to the do_GET function:
self.send_header('Access-Control-Allow-Origin', '*')
self.send_header('Access-Control-Allow-Credentials', 'true')
Now I managed to get access to a working web server, but with open access, but I would like to establish some kind of authorization, access by login and password.
As it turned out, this is not particularly difficult to do using headers.
Example
def do_GET(self):
         global key
         if self.headers.get('Authorization') == None:
             self.do_AUTHHEAD()
             response = { 'success': False, 'error': 'No auth header received'}
             self.wfile.write(bytes(json.dumps(response), 'utf-8'))
         elif self.headers.get('Authorization') == 'Basic ' + str(key):
             resp=[]
             self.send_response(200)
             self.send_header('Allow', 'GET, OPTIONS')
             self.send_header("Cache-Control", "no-cache")
             self.send_header('Content-type','application/json')
             self.send_header('Access-Control-Allow-Origin', 'null')
             self.send_header('Access-Control-Allow-Credentials', 'true')
             self.send_header('Access-Control-Allow-Methods', 'GET, OPTIONS')
             self.send_header('Access-Control-Allow-Headers', 'X-Request, X-Requested-With')
             self.send_header("Access-Control-Allow-Headers", "Authorization")
             self.end_headers()
             req=str(self.path)[1:]
             if(req == "all" ):
                 try:
                     for i in range(0,units):
                         resp.append({varName[i]:[reg[i],varNameData[i]]})
                         i+=1
                     self.wfile.write(json.dumps( resp ).encode())
                 except Exception as e:
                     print('all',e)
             else:
                 for i in range(0,units):
                     if(req == varName[i] ):
                         try:
                             resp =json.dumps({ varName[i]:varNameData[i] }  )
                             self.wfile.write(resp.encode())
                         except Exception as e:
                             print(e)
                     i+=1
         else:
             self.do_AUTHHEAD()
             response = { 'success': False, 'error': 'Invalid credentials'}
             self.wfile.write(bytes(json.dumps(response), 'utf-8'))
If now we try to connect using a browser, then authorization is performed and data is transferred, but receiving data from a browser without a parser is not a good idea, we assumed to receive data using the GET method with JavaScrypt and the XMLHttpRequest () function using the script in the html page. But with such an implementation, the browser first sends the request not by the GET method, but by the OPTIONS method and should receive response = 200, only after that the request will be executed by the GET method.
Added another function:
def do_OPTIONS(self):
         self.send_response(200)
         self.send_header('Access-Control-Allow-Credentials', 'true')
         self.send_header('Access-Control-Allow-Origin', 'null')
         self.send_header('Access-Control-Allow-Methods', 'GET,OPTIONS')
         self.send_header('Access-Control-Allow-Headers', 'X-Request, X-Requested-With')
         self.send_header("Access-Control-Allow-Headers", "origin, Authorization, accept")
         self.send_header('Content-type','application/json')
         self.end_headers()
When this function is enabled, the check will be performed using the 'Access-Control-Allow-Origin' and, if it is not set to 'null' , there will be no exchange.
Now we have access by login and password, the browser will exchange data according to the scenario, but it is advisable to organize SSL data encryption. To do this, create an SSL certificate file and add the line before starting the server:
httpd.socket = ssl.wrap_socket (httpd.socket, certfile=pathFolder+'json_server.pem',ssl_version=ssl.PROTOCOL_TLSv1, server_side=True) Of course, this is a self-signed certificate, but in any case it is better than an open protocol.
To process data in a script on an html page, you can use the above XMLHttpRequest () function:
Example
xmlhttp=new XMLHttpRequest();
xmlhttp.open("GET","http://192.168.0.103:8080/all",true);
xmlhttp.setRequestHeader("Authorization", "Basic " + btoa(login+":"+password));
xmlhttp.withCredentials = true;
xmlhttp.setRequestHeader("Content-type", "application/x-www-form-urlencoded");
xmlhttp.send(null);
          xmlhttp.onreadystatechange=function()
                 {
                       if (xmlhttp.readyState==4 && xmlhttp.status==200)
                      {
                        resp= xmlhttp.responseText;
                        parseResp=JSON.parse(resp);
                       }
                  }
JSON Configurator Description
The following is an example description of configurator settings for running scripts.
The appearance of the window and the purpose of the control buttons:
Suppose you have a task to receive data from a temperature sensor with parameters:
Protocol: modbusTCP
IP address: 192.168.0.103
Port: 502
RTU: 1
Register: READ_INPUT_REGISTERS (0x04)
Address: 0
Variable name: tempSensor_1
Print these data on json server:
Format: json
IP address: 192.168.0.103
Port: 8080
Login: 111
Password: 222
Run json.py, add a new server button (+) at the top left, indicate the name and save.
Now, you need to create the created instance and enter the parameters of the web server.
We write down the polling parameters of the slave device, in this case the temperature sensor:
After this, when you click the button to save the script, a file with the name web_ (the number of our server in the database) .bat for Windows or web_ (the number of our server in the database) will appear in the scr folder . sh for Linux. The script execution paths will be written in this file. In this case, an example for Windows, the file web_15.bat :
rem Скрипт создан в программе 'ScadaPy Web JSON Сервер v.3.14'

rem Сервер Web 'Сервер датчика температуры'

rem Http адрес '192.168.0.103'

rem Http порт '8080'

start c:\Python35\python.exe F:\scadapy\main\source\websrv.py 15 F:\scadapy\main\db\webDb.db
You can run the script immediately for execution by clicking the button located next to the save button (all buttons are equipped with tooltips).
After launch, a console window appears with information about the launch and connections.
Now, having launched the browser, we write the connection string _https: //192.168.0.103: 8080 / all , and after entering the password we see the following in Chrome:
Or in Firefox:
And in the console of the running server information about connection sessions will be displayed:
In this case, we get data on all variables configured on the server, since the parameter all was entered in the GET request. This is not entirely correct, because when you increase the number of variables, you will have to receive and process data that is not currently in use, so it’s better to enter the direct name of the variable whose value you need to process: tempSensor_1 .
In this case:
Request - tempSensor_1
Response - {"tempSensor_1": [2384]}
JavaScript processing
I would like to describe a little how to integrate the formation of the request and the processing of the response in the html page.
You can use the XMLHttpRequest () function to execute the request , although there are other connection methods available at present. Upon successful connection and obtaining the status equal to 200, it is enough to execute the JSON.parse () function .
To establish the cyclicality of query execution, you must run a timer.
Example.
  function getTemp()
{
         var dataReq='tempSensor_1';
         var login='111', passw='222';
         var ip='192.168.0.103';
         var port='8080';
         if (window.XMLHttpRequest) {  xmlhttp=new XMLHttpRequest();                        }
         else                       {  xmlhttp=new ActiveXObject("Microsoft.XMLHTTP");      }
                  xmlhttp.open("GET","https://"+ip+":"+port+"/"+dataReq,true);
                  xmlhttp.setRequestHeader("Authorization", "Basic " + btoa(login+":"+passw));
                  xmlhttp.withCredentials = true;
                  xmlhttp.setRequestHeader("Content-type", "application/x-www-form-urlencoded");
        xmlhttp.send(null);
         xmlhttp.onreadystatechange=function()
        {
               if (xmlhttp.readyState==4 && xmlhttp.status==200)
             {
              resp= xmlhttp.responseText;
              parseResp=JSON.parse(resp);
              data=parseResp.tempSensor_1[0];
              log("Val :" + data +"\n");
              resp=data*0.1;
              }
        }
 }
An example of displaying the received data in various widgets.
When receiving data from the OPCUA server, the structure of the JSON response will change slightly, but slightly. In any case, understanding there is not difficult.
Download link on github